

AWE350 User Guide
Page 1
Convertible Camera AW-E750 AW-E655 AW-E650 AW-E350 AW-E750 AW-E655 AW-E650 AW-E350 Before attempting to connect, operate or adjust this product, please read these instructions completely.
Convertible Camera AW-E750 AW-E655 AW-E650 AW-E350 AW-E750 AW-E655 AW-E650 AW-E350 Before attempting to connect, operate or adjust this product, please read these instructions completely.
AWE350 User Guide
Page 4
PREFACE • The Panasonic AW-E750, AW-E655, AW-E650 and AW-E350 are digital signal processing color video cameras that incorporates three CCDs; 2/3" 3CCD (AW-E750) 1/2" 3CCD (AW-E655, AW-E650) 1/3" 3CCD (AW-E350) A digital video signal processing system is packed in a compact,... adjustments can be easily performed by following the setup menu. • Connection to peripheral devices, such as a RCU, a RCB and a lens and the camera pan/tilt unit enables a wide variation of system configurations. • Option cards may also be installed. ❈ The following cards are not available for AW...
PREFACE • The Panasonic AW-E750, AW-E655, AW-E650 and AW-E350 are digital signal processing color video cameras that incorporates three CCDs; 2/3" 3CCD (AW-E750) 1/2" 3CCD (AW-E655, AW-E650) 1/3" 3CCD (AW-E350) A digital video signal processing system is packed in a compact,... adjustments can be easily performed by following the setup menu. • Connection to peripheral devices, such as a RCU, a RCB and a lens and the camera pan/tilt unit enables a wide variation of system configurations. • Option cards may also be installed. ❈ The following cards are not available for AW...

AWE350 User Guide
Page 6
... in ELC operation mode may result in automatic mode; It is an expendable part, and must be performed while power is off. • While the camera is necessary, be replaced about every 30 000 hours. (Whenever fan replacement is in a smeared picture unique to ask the store where you purchased the...
... in ELC operation mode may result in automatic mode; It is an expendable part, and must be performed while power is off. • While the camera is necessary, be replaced about every 30 000 hours. (Whenever fan replacement is in a smeared picture unique to ask the store where you purchased the...

AWE350 User Guide
Page 7
... sensitive components which could be damaged by improper handling or storage. • Do not let the lens remain uncapped when the camera is not in use . Avoid striking, shaking, etc. In order to prevent electric shock, do not leave the lens mount hole uncovered. • Do not ... remove screws or covers. If the lens is turned on or not. • Do not expose the camera or Remote Control Unit (RCU) to rain or moisture, and do not try to disassemble the camera, Remote Control Unit (RCU) or other units. PRECAUTIONS DON'TS • Do not attempt to operate the...
... sensitive components which could be damaged by improper handling or storage. • Do not let the lens remain uncapped when the camera is not in use . Avoid striking, shaking, etc. In order to prevent electric shock, do not leave the lens mount hole uncovered. • Do not ... remove screws or covers. If the lens is turned on or not. • Do not expose the camera or Remote Control Unit (RCU) to rain or moisture, and do not try to disassemble the camera, Remote Control Unit (RCU) or other units. PRECAUTIONS DON'TS • Do not attempt to operate the...

AWE350 User Guide
Page 8
... the power off and have the unit checked by an authorized service facility. • Follow normal safety precautions to avoid personal injury. • Use the camera in an environment where the temperature is within 14°F to 113°F (−10°C to +45°C), and the relative humidity is within... 30 % to 90 %. • Always turn the power off when the camera is adequate ventilation. -8- Operate the camera and RCU only when there is not going to be used. If the lens is not installed, protect the surface of the prism...
... the power off and have the unit checked by an authorized service facility. • Follow normal safety precautions to avoid personal injury. • Use the camera in an environment where the temperature is within 14°F to 113°F (−10°C to +45°C), and the relative humidity is within... 30 % to 90 %. • Always turn the power off when the camera is adequate ventilation. -8- Operate the camera and RCU only when there is not going to be used. If the lens is not installed, protect the surface of the prism...
AWE350 User Guide
Page 10
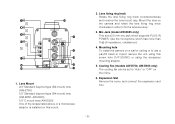
... ring knob clockwise in order to use a pan/tilt head or tripod, secure the unit using the accessory mounting adaptor. 5. Mounting hole To install the camera on the menu. 6. Cooling Fan (models AW-E750, AW-E655 only) The cooling fan can be set to "Auto" or "OFF" on a wall or ceiling...
... ring knob clockwise in order to use a pan/tilt head or tripod, secure the unit using the accessory mounting adaptor. 5. Mounting hole To install the camera on the menu. 6. Cooling Fan (models AW-E750, AW-E655 only) The cooling fan can be set to "Auto" or "OFF" on a wall or ceiling...
AWE350 User Guide
Page 11
... balance control can be set with this switch. 9. When the menu is not displayed or the camera is on the screen. When the menu is not displayed or the camera is in shooting mode, the color bar and the shooting conditions are indicated by pressing this switch is on the screen. Signal 1 ...by pressing the switch while the menu is in shooting mode, the automatic black balance control can be brought down to the LENS I/F connector on a Panasonic pan/tilt head (such as the AW-PH300A), do not use this switch while the Sub Menu is pressed for zooming and focusing. When the...
... balance control can be set with this switch. 9. When the menu is not displayed or the camera is on the screen. When the menu is not displayed or the camera is in shooting mode, the color bar and the shooting conditions are indicated by pressing this switch is on the screen. Signal 1 ...by pressing the switch while the menu is in shooting mode, the automatic black balance control can be brought down to the LENS I/F connector on a Panasonic pan/tilt head (such as the AW-PH300A), do not use this switch while the Sub Menu is pressed for zooming and focusing. When the...

AWE350 User Guide
Page 12
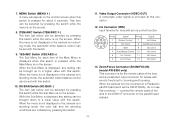
... it from the optional Remote Control Box (RCB) (such as the WV-CB700A) and the RCU (such as the WV-RC700A, WV-RC550) and the camera pan/tilt unit (such as for the cable for inserting an optional card. To prevent fire or shock, the UL listed wire VW-1, style 1007... Pin No. 7 8 9 10 11 12 Signal Signal Control (+5.0 V) Focus Control Zoom Control Iris Mode Position/Speed +V (+7.5 V) -V (+2.5 V) 14. Power Indicator Red LED lamp lights to the camera. 16. DC 12 V Input Connector (DC 12V IN) 12 V DC is supplied to indicate that the specified DC power is supplied through the optional RCU...
... it from the optional Remote Control Box (RCB) (such as the WV-CB700A) and the RCU (such as the WV-RC700A, WV-RC550) and the camera pan/tilt unit (such as for the cable for inserting an optional card. To prevent fire or shock, the UL listed wire VW-1, style 1007... Pin No. 7 8 9 10 11 12 Signal Signal Control (+5.0 V) Focus Control Zoom Control Iris Mode Position/Speed +V (+7.5 V) -V (+2.5 V) 14. Power Indicator Red LED lamp lights to the camera. 16. DC 12 V Input Connector (DC 12V IN) 12 V DC is supplied to indicate that the specified DC power is supplied through the optional RCU...
AWE350 User Guide
Page 13
... used . Less than 4.3 mm from the lens mount surface is too short. Connect the lens cable to the IRIS connector on the back panel of Camera Pan/tilt Unit (model AW-E655 only) • Some lenses need to be attached in order to the operating instructions that accompany the lens. Connect... the camera cable to the IRIS connector. -13- Use of any other kind of lens can be made to fix the lens securely. Be absolutely sure that...
... used . Less than 4.3 mm from the lens mount surface is too short. Connect the lens cable to the IRIS connector on the back panel of Camera Pan/tilt Unit (model AW-E655 only) • Some lenses need to be attached in order to the operating instructions that accompany the lens. Connect... the camera cable to the IRIS connector. -13- Use of any other kind of lens can be made to fix the lens securely. Be absolutely sure that...
AWE350 User Guide
Page 14
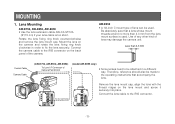
...the like with the supplied rubber sheet between the camera and it securely. $ Preventing the camera from falling. -14- Use a screwdriver or similar to tighten the screws to the bottom panel of the camera or the mounting adaptor. 3. Fix the camera mounting base, pan/tilt unit, and tripod securely...sure that the mounting can safely bear the total weight of the camera, lens, connection cables, etc., fix the camera firmly in the screw hole (1/4-20UNC) of the camera. If the camera cannot be securely fixed, mount the camera on any mounting or other pan/tilt head, check that the ...
...the like with the supplied rubber sheet between the camera and it securely. $ Preventing the camera from falling. -14- Use a screwdriver or similar to tighten the screws to the bottom panel of the camera or the mounting adaptor. 3. Fix the camera mounting base, pan/tilt unit, and tripod securely...sure that the mounting can safely bear the total weight of the camera, lens, connection cables, etc., fix the camera firmly in the screw hole (1/4-20UNC) of the camera. If the camera cannot be securely fixed, mount the camera on any mounting or other pan/tilt head, check that the ...

AWE350 User Guide
Page 15
... ADJUSTMENT (FOR ZOOM LENS) AW-E750, AW-E655, AW-E650 This adjustment will bring the subject into focus across the whole range from the camera. 4. Aim the camera at any object over 2 meters away from the maximum telephoto position to the widest angle position of focusing. 7. Set the lens to its widest...
... ADJUSTMENT (FOR ZOOM LENS) AW-E750, AW-E655, AW-E650 This adjustment will bring the subject into focus across the whole range from the camera. 4. Aim the camera at any object over 2 meters away from the maximum telephoto position to the widest angle position of focusing. 7. Set the lens to its widest...
AWE350 User Guide
Page 16
...FOCUS screw alternately for the best focus within the the zooming range. FOCUS Ring LOCK knob FOCUS knob AW-E350 -16- Aim the camera at any object over the camera's flange back adjust screw, and loosen the LOCK screw. 3. AW-E350 This adjustment will bring the subject into focus across the ...whole range from the camera, remove the cap over 2 meters away from the maximum telephoto position to the widest angle position of the focusing. Tighten the LOCK screw upon ...
...FOCUS screw alternately for the best focus within the the zooming range. FOCUS Ring LOCK knob FOCUS knob AW-E350 -16- Aim the camera at any object over the camera's flange back adjust screw, and loosen the LOCK screw. 3. AW-E350 This adjustment will bring the subject into focus across the ...whole range from the camera, remove the cap over 2 meters away from the maximum telephoto position to the widest angle position of the focusing. Tighten the LOCK screw upon ...

AWE350 User Guide
Page 18
s CONNECTION OF DEVICE WITH A COMPOSITE INPUT CONNECTOR • Connection to any servicing to the camera must be done by qualified service personnel or system installers. Refer any device which has a composite input connector, such as a video monitor or a VTR, must ...
s CONNECTION OF DEVICE WITH A COMPOSITE INPUT CONNECTOR • Connection to any servicing to the camera must be done by qualified service personnel or system installers. Refer any device which has a composite input connector, such as a video monitor or a VTR, must ...
AWE350 User Guide
Page 19
...Turn RCU power off before connecting cables. 2. Notes: • The maximum extension distance between the camera and WVRC550 is made through the optional RCU cable AW-CA50A26. 1. Connect the 50-pin connector of the camera. 4. Studio Cable WV-CA26U15 (15 m/50 ft) WV-CA26U30 (30 m/100 ft) WV-...OUTPUT VIDEO 1 S-VIDEO TALLY & INCOM AUTO AUTO 75Ω/Hi-Z 75 Ω/Hi-Z G/Y/Y VIDEO 2 OUT AUDIO OUT B/PB /B SYNC SEE MANUAL CAMERA (MULTI) CABLE SELECT MULTI OVP MPX MPX TALLY TALK 14 23 INCOM RECEIVE CONTROL 250V 1.25A FUSE Set to the I/F REMOTE Connector of the RCU...
...Turn RCU power off before connecting cables. 2. Notes: • The maximum extension distance between the camera and WVRC550 is made through the optional RCU cable AW-CA50A26. 1. Connect the 50-pin connector of the camera. 4. Studio Cable WV-CA26U15 (15 m/50 ft) WV-CA26U30 (30 m/100 ft) WV-...OUTPUT VIDEO 1 S-VIDEO TALLY & INCOM AUTO AUTO 75Ω/Hi-Z 75 Ω/Hi-Z G/Y/Y VIDEO 2 OUT AUDIO OUT B/PB /B SYNC SEE MANUAL CAMERA (MULTI) CABLE SELECT MULTI OVP MPX MPX TALLY TALK 14 23 INCOM RECEIVE CONTROL 250V 1.25A FUSE Set to the I/F REMOTE Connector of the RCU...

AWE350 User Guide
Page 20
... m) WV-CA10B50 (50 m) RCB Cable AW-CA50T10 (3 m) DC Power Cable AW-CA4T1 Video signal IN MONITOR OUT RCB FUSE O I /F REMOTE connector of the camera. It is recommended that the signals from the monitor output be controlled remotely by the RCB. Turn RCB power off before connecting cables. 2. Turn RCB... power on and the camera can be used for monitoring purposes only. • No gen-lock signal is available from the RCB. • If a longer distance (more than 3 ...
... m) WV-CA10B50 (50 m) RCB Cable AW-CA50T10 (3 m) DC Power Cable AW-CA4T1 Video signal IN MONITOR OUT RCB FUSE O I /F REMOTE connector of the camera. It is recommended that the signals from the monitor output be controlled remotely by the RCB. Turn RCB power off before connecting cables. 2. Turn RCB... power on and the camera can be used for monitoring purposes only. • No gen-lock signal is available from the RCB. • If a longer distance (more than 3 ...

AWE350 User Guide
Page 21
s CONNECTION WITH MULTIPLE CAMERAS (COLOR LOCK MODE) • An example of connection for External Sync (or Special Effect Generator) INPUT External Sync Signal (BB) OUTPUT Video Distributor WJ-300C Video Output To Special Effect Generator or Monitoring System -21- CAMERA VIDEO OUT 5.5 10 20 40 77 0 1.5 2 3 5 10 m... II 1 5 7 10 15 30 G/L IN • Do not switch off the camera used as the source of reference signals. • Supply a synchronizing signal...
s CONNECTION WITH MULTIPLE CAMERAS (COLOR LOCK MODE) • An example of connection for External Sync (or Special Effect Generator) INPUT External Sync Signal (BB) OUTPUT Video Distributor WJ-300C Video Output To Special Effect Generator or Monitoring System -21- CAMERA VIDEO OUT 5.5 10 20 40 77 0 1.5 2 3 5 10 m... II 1 5 7 10 15 30 G/L IN • Do not switch off the camera used as the source of reference signals. • Supply a synchronizing signal...

AWE350 User Guide
Page 22
... AW-CA4T1 FUSE O I FUSE AC ADAPTOR AW-PS505 Computer RS-232C s CONNECTION OF DEVICES WITH CAMERA PAN/TILT CONTROL SYSTEM • Refer to the operating instructions of the pan/tilt head to connect camera to control the camera using a computer. The user is required to it. -22- s CONNECTION OF COMPUTER The AW-CA50T9...
... AW-CA4T1 FUSE O I FUSE AC ADAPTOR AW-PS505 Computer RS-232C s CONNECTION OF DEVICES WITH CAMERA PAN/TILT CONTROL SYSTEM • Refer to the operating instructions of the pan/tilt head to connect camera to control the camera using a computer. The user is required to it. -22- s CONNECTION OF COMPUTER The AW-CA50T9...

AWE350 User Guide
Page 23
... remains lit, the setting must be renewed whenever you may operate the camera properly by CAMERA] 3. In normal shooting mode: Press the ITEM/AWC switch for two different light sources color temperatures, with the RCU (RCB, Hybrid control panel)] 4. ITEM/AWC Switch CAMERA [ADJUSTMENT with the automatic white balance setting. ADJUSTMENT s AUTOMATIC WHITE BALANCE...
... remains lit, the setting must be renewed whenever you may operate the camera properly by CAMERA] 3. In normal shooting mode: Press the ITEM/AWC switch for two different light sources color temperatures, with the RCU (RCB, Hybrid control panel)] 4. ITEM/AWC Switch CAMERA [ADJUSTMENT with the automatic white balance setting. ADJUSTMENT s AUTOMATIC WHITE BALANCE...
AWE350 User Guide
Page 24
..., such as described in Step 3 above. -24- ness light (ex. Select the white balance mode either AWC A or AWC B by CAMERA] Manual setting is turned off. ING item of Color Set sub menu of USER MODE until the carrier wave of the white portion of painting setting will be automatically reset...Notes: • ATW might not function properly when high bright- The white object must appear in over 10 % of those objects remains unchanged. Aim the camera at the minimum width or the white object in the monitor screen appears pure white. (Use an oscilloscope or a waveform monitor for over 10 % of...
..., such as described in Step 3 above. -24- ness light (ex. Select the white balance mode either AWC A or AWC B by CAMERA] Manual setting is turned off. ING item of Color Set sub menu of USER MODE until the carrier wave of the white portion of painting setting will be automatically reset...Notes: • ATW might not function properly when high bright- The white object must appear in over 10 % of those objects remains unchanged. Aim the camera at the minimum width or the white object in the monitor screen appears pure white. (Use an oscilloscope or a waveform monitor for over 10 % of...

AWE350 User Guide
Page 25
...with the red pedestal/blue pedestal setting after setting the black balance. (painting setting in only USER MODE.) YES/ABC Switch AUTO LED [ADJUSTMENT by CAMERA] Press the YES/ABC switch for white balance set chart s RESET TO 3 200K OR 5 600K WHITE BALANCE When the white balance setting is ...set to either "P SET 3 200K" or "P SET 5 600K" the white balance will be automatically set to the color temperature 3 200K or 5 600K, respectively. [ADJUSTMENT with the RCU (RCB, Hybrid control panel)] Set the AUTO set switch to ±0 after setting the ...
...with the red pedestal/blue pedestal setting after setting the black balance. (painting setting in only USER MODE.) YES/ABC Switch AUTO LED [ADJUSTMENT by CAMERA] Press the YES/ABC switch for white balance set chart s RESET TO 3 200K OR 5 600K WHITE BALANCE When the white balance setting is ...set to either "P SET 3 200K" or "P SET 5 600K" the white balance will be automatically set to the color temperature 3 200K or 5 600K, respectively. [ADJUSTMENT with the RCU (RCB, Hybrid control panel)] Set the AUTO set switch to ±0 after setting the ...


