

AGDVC15 User Guide
Page 1
NTSC Digital Video Camera Recorder AG- P Before attempting to connect, operate or adjust this product, please read these instructions completely.
NTSC Digital Video Camera Recorder AG- P Before attempting to connect, operate or adjust this product, please read these instructions completely.

AGDVC15 User Guide
Page 2
...to the presence of uninsulated "dangerous voltage" within the product's enclosure that have been tested and inspected for a Class A digital device, pursuant to provide excellent video pictures. The lightning flash with the HQ System to Part 15 of the FCC Rules. Note: The rating plate (serial number... and play back in accordance with the Ò mark be required to comply with Part 15 of the unit. Your Ò Camera Recorder is designed to radio communications. This equipment has been tested and found to correct the interference at his own expense. This equipment...
...to the presence of uninsulated "dangerous voltage" within the product's enclosure that have been tested and inspected for a Class A digital device, pursuant to provide excellent video pictures. The lightning flash with the HQ System to Part 15 of the FCC Rules. Note: The rating plate (serial number... and play back in accordance with the Ò mark be required to comply with Part 15 of the unit. Your Ò Camera Recorder is designed to radio communications. This equipment has been tested and found to correct the interference at his own expense. This equipment...

AGDVC15 User Guide
Page 5
... Playback/Still Advance Playback) ...30 Playing Back on a TV 31 After Use 32 Advanced Operations Viewing Recorded Scenes During Recording Pause (Camera Search 33 Searching for the End of the Recorded Part on a Cassette (Blank Search 34 Searching for the Beginning of Recorded Scenes Marked...sized Eyepiece (supplied 75 » LCD Monitor/Finder/Lens Hood 75 » Cleaning the Finder 75 » Repeat Playback 75 Glossary 76 » Digital Video System 76 » Focus 77 » White Balance Adjustment 79 » Color Temperature 80 » Time Code 81 » Memory Stop Function ...
... Playback/Still Advance Playback) ...30 Playing Back on a TV 31 After Use 32 Advanced Operations Viewing Recorded Scenes During Recording Pause (Camera Search 33 Searching for the End of the Recorded Part on a Cassette (Blank Search 34 Searching for the Beginning of Recorded Scenes Marked...sized Eyepiece (supplied 75 » LCD Monitor/Finder/Lens Hood 75 » Cleaning the Finder 75 » Repeat Playback 75 Glossary 76 » Digital Video System 76 » Focus 77 » White Balance Adjustment 79 » Color Temperature 80 » Time Code 81 » Memory Stop Function ...
AGDVC15 User Guide
Page 24
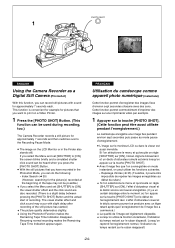
... SHOT] Button. ¡ With the still pictures that you want to print on a Video Printer. 1 Press the [PHOTO SHOT] Button. (This function can be used during recording, too.) The Camera Recorder records a still picture for approximately 7 seconds and then switches over to [ON], the...utilise la fonction instantané, l'indication du temps restant sur le ruban disparaît. PHOTO SHOT 1 PHOTO PHOTO ENGLISH Using the Camera Recorder as a Digital Still Camera (Photoshot) With this function, you can record still pictures with slight delay after recording of the still picture has started.) &#...
... SHOT] Button. ¡ With the still pictures that you want to print on a Video Printer. 1 Press the [PHOTO SHOT] Button. (This function can be used during recording, too.) The Camera Recorder records a still picture for approximately 7 seconds and then switches over to [ON], the...utilise la fonction instantané, l'indication du temps restant sur le ruban disparaît. PHOTO SHOT 1 PHOTO PHOTO ENGLISH Using the Camera Recorder as a Digital Still Camera (Photoshot) With this function, you can record still pictures with slight delay after recording of the still picture has started.) &#...

AGDVC15 User Guide
Page 31
...scenes recorded with copyright protection signal is equipped with an S-Video Socket, also connect the S-Video Cable 2. ♦ Before connecting, turn off both the Camera Recorder and the TV. ♦ If a cassette recorded with this Camera Recorder do not contain a copyright protection signal. The On-...the screen becomes black. Reproduction du son au casque En utilisant la prise [PHONES] 4, on the TV. ʔVOLUME 1 S-VIDEO OUT VIDEO OUT CH1-AUDIO OUT-CH2 4 2 1 3 CAMERA DISPLAY COUNTER/ TC RESET DATE/ TIME PHOTO SHOT A.DUB REC REC/ PAUSE Tʴ W MENU REW/ Q PLAY FF/ P...
...scenes recorded with copyright protection signal is equipped with an S-Video Socket, also connect the S-Video Cable 2. ♦ Before connecting, turn off both the Camera Recorder and the TV. ♦ If a cassette recorded with this Camera Recorder do not contain a copyright protection signal. The On-...the screen becomes black. Reproduction du son au casque En utilisant la prise [PHONES] 4, on the TV. ʔVOLUME 1 S-VIDEO OUT VIDEO OUT CH1-AUDIO OUT-CH2 4 2 1 3 CAMERA DISPLAY COUNTER/ TC RESET DATE/ TIME PHOTO SHOT A.DUB REC REC/ PAUSE Tʴ W MENU REW/ Q PLAY FF/ P...

AGDVC15 User Guide
Page 34
The new scene is no blank part on a cassette, the Camera Recorder stops at the end of the tape. ¡ When the Blank Search has finished, you can press the [VCR/CAM] Button so that the [...;dente et la nouvelle séquence. -34- SEARCH]. 4 Press the [PUSH] Dial to select [B. Approximately 1 second before the end of the last recorded scene, the Camera Recorder switches over to the Still Playback Mode. ¡ If there is recorded with a smooth transition from the last to the new scene. SEARCH]. 4 Appuyer...
The new scene is no blank part on a cassette, the Camera Recorder stops at the end of the tape. ¡ When the Blank Search has finished, you can press the [VCR/CAM] Button so that the [...;dente et la nouvelle séquence. -34- SEARCH]. 4 Press the [PUSH] Dial to select [B. Approximately 1 second before the end of the last recorded scene, the Camera Recorder switches over to the Still Playback Mode. ¡ If there is recorded with a smooth transition from the last to the new scene. SEARCH]. 4 Appuyer...

AGDVC15 User Guide
Page 52
... adjust the audio level so that the level meter appears up to i8 dB at the maximum volume. ¡ Set the [MIC LEVEL] on the Camera Mode Menu (m 64) to REAR. 3. Régler le commutateur [AUDIO IN CH1/CH2] sur [FRONT]. ¡ Les microphones internes commutent automatiquement sur les microphones externes...
... adjust the audio level so that the level meter appears up to i8 dB at the maximum volume. ¡ Set the [MIC LEVEL] on the Camera Mode Menu (m 64) to REAR. 3. Régler le commutateur [AUDIO IN CH1/CH2] sur [FRONT]. ¡ Les microphones internes commutent automatiquement sur les microphones externes...

AGDVC15 User Guide
Page 57
... manuellement, tourner la molette [PUSH] du caméscope. (m 47, 48) -57- and to adjust them manually, use the [PUSH] Dial on the Camera Recorder. (m 47, 48) FRANÇAIS 9 Touche de lecture au ralenti/image par image [E, O] (m 29, 30) Pour effectuer la lecture au ralenti ...;lément sélectionné. ♦ Le diaphragme et la vitesse d'obturateur ne peuvent pas être réglés avec la télécommande. CAMERA DISPLAY COUNTER/ TC RESET DATE/ TIME PHOTO SHOT A.DUB REC REC/ PAUSE Tʴ W MENU REW/ Q PLAY FF/ P ʔVOLUME 9 SLOW/ F.ADV PAUSE...
... manuellement, tourner la molette [PUSH] du caméscope. (m 47, 48) -57- and to adjust them manually, use the [PUSH] Dial on the Camera Recorder. (m 47, 48) FRANÇAIS 9 Touche de lecture au ralenti/image par image [E, O] (m 29, 30) Pour effectuer la lecture au ralenti ...;lément sélectionné. ♦ Le diaphragme et la vitesse d'obturateur ne peuvent pas être réglés avec la télécommande. CAMERA DISPLAY COUNTER/ TC RESET DATE/ TIME PHOTO SHOT A.DUB REC REC/ PAUSE Tʴ W MENU REW/ Q PLAY FF/ P ʔVOLUME 9 SLOW/ F.ADV PAUSE...

AGDVC15 User Guide
Page 59
...PAUSE/ SEL SLOW/ F. Ceci sélectionne automatiquement le mode [VCR1]. Selecting the Remote Controller Mode When using the Remote Controller indoors. ON 2 CAM VCR 3 CAMERA DISPLAY DATE/ TIME PHOTO SHOT COUNTER/ A.DUB TC RESET REC REC/ PAUSE T ʴ W ʔSKIP VOL MENU REW/ Q PLAY FF/ P SLOW...time, selecting different Remote Controller Modes makes it possible to operate them separately. ♦ If the Remote Controller Mode set on the Camera Recorder and on its Remote Controller are not matched, the [REMOTE] Indication appears. ♦ Replacing the button-type battery in ...
...PAUSE/ SEL SLOW/ F. Ceci sélectionne automatiquement le mode [VCR1]. Selecting the Remote Controller Mode When using the Remote Controller indoors. ON 2 CAM VCR 3 CAMERA DISPLAY DATE/ TIME PHOTO SHOT COUNTER/ A.DUB TC RESET REC REC/ PAUSE T ʴ W ʔSKIP VOL MENU REW/ Q PLAY FF/ P SLOW...time, selecting different Remote Controller Modes makes it possible to operate them separately. ♦ If the Remote Controller Mode set on the Camera Recorder and on its Remote Controller are not matched, the [REMOTE] Indication appears. ♦ Replacing the button-type battery in ...

AGDVC15 User Guide
Page 67
...] puis régler l'élément [CLOCK-SET] sur [ON]. The menu shown above is in the Camera Mode, press the [MENU] Button, select [OTHERS], and then set [CLOCKSET] to [ON]. If the Camera Recorder is now appeared. (m 63-65) For example: To set the clock to 15th October 2000, 2:30 PM... WHITE BAL 10 YEAR :2001 MONTH :OCT DAY :15 HOUR :2PM MINUTE :30 END: PUSH MENU KEY ENGLISH Setting the Date and Time If the Camera Recorder is in the VCR Mode, press the [MENU] Button, and then set [CLOCK-SET] to [ON]. The operation of the clock starts from [00...
...] puis régler l'élément [CLOCK-SET] sur [ON]. The menu shown above is in the Camera Mode, press the [MENU] Button, select [OTHERS], and then set [CLOCKSET] to [ON]. If the Camera Recorder is now appeared. (m 63-65) For example: To set the clock to 15th October 2000, 2:30 PM... WHITE BAL 10 YEAR :2001 MONTH :OCT DAY :15 HOUR :2PM MINUTE :30 END: PUSH MENU KEY ENGLISH Setting the Date and Time If the Camera Recorder is in the VCR Mode, press the [MENU] Button, and then set [CLOCK-SET] to [ON]. The operation of the clock starts from [00...

AGDVC15 User Guide
Page 68
...after charging is finished, set the date and time. 1 Connect the AC Adapter to the Camera Recorder and to an AC Outlet. (m 12) 2 Leave the Camera Recorder turned off. 3 Leave the Camera Recorder in this condition for approximately 3 months. Charge the discharged battery in the following order:...hours. Charge de la pile au lithium incorporée La pile incorporée assure le fonctionnement de l'horloge. WHEN NECESSARY, CONTACT YOUR LOCAL PANASONIC SUPPLIER. -68- FRANÇAIS ¡ De légères imprécisions de l'indication de l'heure pouvant se produire, nous ...
...after charging is finished, set the date and time. 1 Connect the AC Adapter to the Camera Recorder and to an AC Outlet. (m 12) 2 Leave the Camera Recorder turned off. 3 Leave the Camera Recorder in this condition for approximately 3 months. Charge the discharged battery in the following order:...hours. Charge de la pile au lithium incorporée La pile incorporée assure le fonctionnement de l'horloge. WHEN NECESSARY, CONTACT YOUR LOCAL PANASONIC SUPPLIER. -68- FRANÇAIS ¡ De légères imprécisions de l'indication de l'heure pouvant se produire, nous ...

AGDVC15 User Guide
Page 69
... SETTING LCD BRIGHT LOW HIGH LCD COLOR PALE VIVID EVF BRIGHT LOW HIGH END: PUSH MENU KEY PUSH ENGLISH Adjusting the LCD Monitor If the Camera Recorder is in the VCR Mode, press the [MENU] Button, and then set [LCD/EVF SET] to [ON]. The Bar Indication is the screen.... Boosting the Brightness of the Bar Indication. L'indication à barres comprend huit éléments. If the Camera Recorder is divided into 8 steps. LCD Color Level [LCD COLOR] To adjust the color saturation of the Finder. The more vertical bars are shown, the...
... SETTING LCD BRIGHT LOW HIGH LCD COLOR PALE VIVID EVF BRIGHT LOW HIGH END: PUSH MENU KEY PUSH ENGLISH Adjusting the LCD Monitor If the Camera Recorder is in the VCR Mode, press the [MENU] Button, and then set [LCD/EVF SET] to [ON]. The Bar Indication is the screen.... Boosting the Brightness of the Bar Indication. L'indication à barres comprend huit éléments. If the Camera Recorder is divided into 8 steps. LCD Color Level [LCD COLOR] To adjust the color saturation of the Finder. The more vertical bars are shown, the...


