
AG1340P User Guide
Page 2
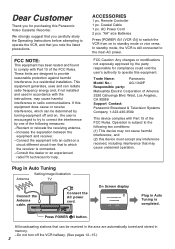
... user is connected. - Do not turn off and on to standby mode or vice versa. ACCESSORIES 1 pc. Press POWER Í/I (VCR Í)] to switch the VCR from that may cause harmful interference to radio communications. If this Panasonic Video Cassette Recorder. Plug in Auto Tuning Setting image illustration Antenna TV Connect the Antenna cable. "AA" size Batteries Press [POWER Í/I button. Dear Customer Thank you carefully study the Operating Instructions before attempting to operate...
... user is connected. - Do not turn off and on to standby mode or vice versa. ACCESSORIES 1 pc. Press POWER Í/I (VCR Í)] to switch the VCR from that may cause harmful interference to radio communications. If this Panasonic Video Cassette Recorder. Plug in Auto Tuning Setting image illustration Antenna TV Connect the Antenna cable. "AA" size Batteries Press [POWER Í/I button. Dear Customer Thank you carefully study the Operating Instructions before attempting to operate...
AG1340P User Guide
Page 3
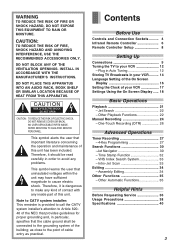
... of your VCR 17 Settings Using the On Screen Display ...... 18 Basic Operations Playback 21 - as practical. Intro-Jet Scan 33 Editing 34 - INSTALL IN ACCORDANCE WITH THE MANUFACTURER'S INSTRUCTIONS. Plug in Auto Tuning 12 Storing TV Broadcasts in order to avoid any inside part of this unit has been included. Contents Before Use Controls and Connection Sockets .......... 04 Infrared Remote Controller 06 Remote Controller Setup 08 Setting Up Connections 09 Tuning...
... of your VCR 17 Settings Using the On Screen Display ...... 18 Basic Operations Playback 21 - as practical. Intro-Jet Scan 33 Editing 34 - INSTALL IN ACCORDANCE WITH THE MANUFACTURER'S INSTRUCTIONS. Plug in Auto Tuning 12 Storing TV Broadcasts in order to avoid any inside part of this unit has been included. Contents Before Use Controls and Connection Sockets .......... 04 Infrared Remote Controller 06 Remote Controller Setup 08 Setting Up Connections 09 Tuning...

AG1340P User Guide
Page 6
... 02 INPUT SELECT (' 34) 03 OSD/DISPLAY (' 18, 25) 14 RESET (' 18) 05 On Screen Display Menu Operation Buttons (' 14) MENU OK 3421 06 ;/D (PAUSE/SLOW) (' 21) 07 Timer Recording Operation Buttons (' 27-29) I J, DATE, ON, OFF PROG./CHECK CANCEL SPEED TIMER Á 08 VCR/TV (' 12) 09 AUDIO This button is not used to operate this VCR is a universal remote controller. As such, some of its buttons are not used to operate this VCR. Infrared Remote Controller The remote control unit for this VCR...
... 02 INPUT SELECT (' 34) 03 OSD/DISPLAY (' 18, 25) 14 RESET (' 18) 05 On Screen Display Menu Operation Buttons (' 14) MENU OK 3421 06 ;/D (PAUSE/SLOW) (' 21) 07 Timer Recording Operation Buttons (' 27-29) I J, DATE, ON, OFF PROG./CHECK CANCEL SPEED TIMER Á 08 VCR/TV (' 12) 09 AUDIO This button is not used to operate this VCR is a universal remote controller. As such, some of its buttons are not used to operate this VCR. Infrared Remote Controller The remote control unit for this VCR...

AG1340P User Guide
Page 7
... VOLUME sNr Adjusts the volume of the TV. - However, some TV models, it may only be performed. No additional settings need to be possible to switch the TV to the standby mode using this remote control. 13 14 TV VOLUME Í r AV s VCR INPUT SELECT VCR/TV Í OSD/DISPLAY RESET AUDIO W X W X PICTURE MODE INDEX REC : 9 ¥ MENU 3 NAVI 1 26 OK 51 ;/D SEARCH ∫ PROG/CHECK CANCEL 4 SPEED 1 2 3 Wr r DATE ON Xs s TIMER...
... VOLUME sNr Adjusts the volume of the TV. - However, some TV models, it may only be performed. No additional settings need to be possible to switch the TV to the standby mode using this remote control. 13 14 TV VOLUME Í r AV s VCR INPUT SELECT VCR/TV Í OSD/DISPLAY RESET AUDIO W X W X PICTURE MODE INDEX REC : 9 ¥ MENU 3 NAVI 1 26 OK 51 ;/D SEARCH ∫ PROG/CHECK CANCEL 4 SPEED 1 2 3 Wr r DATE ON Xs s TIMER...

AG1340P User Guide
Page 9
When the VCR is turned on after connecting the antenna cable and the AC power cord, Plug in Auto Tuning starts automatically. Basic Connections The following connections are required to an antenna, TV, etc. Antenna (Not supplied) TV Set (Not supplied) 1 2 Antenna Input Connector AC IN SECTEUR 3 To mains supply IN IN (AV1) OUT RF VIDEO OUT AUDIO 9 Setting Up Connections This section shows you how to connect the VCR to record and play back the video cassette through the TV.
When the VCR is turned on after connecting the antenna cable and the AC power cord, Plug in Auto Tuning starts automatically. Basic Connections The following connections are required to an antenna, TV, etc. Antenna (Not supplied) TV Set (Not supplied) 1 2 Antenna Input Connector AC IN SECTEUR 3 To mains supply IN IN (AV1) OUT RF VIDEO OUT AUDIO 9 Setting Up Connections This section shows you how to connect the VCR to record and play back the video cassette through the TV.

AG1340P User Guide
Page 11
... connection in this connection will have a descrambler box for viewing one 2-Way Splitter. Since the VCR has an extended range of tuning, tuning-programing of non-scrambled Mid-Band and Super-Band TV programs is therefore limited to be used methods of the 56 UHF channels (14-69). Typical Cable System Hook Ups with the cable converter. Setting Up Cable Connection Cable-VCR-TV (For CATV/PAY Channels Recording/Playback) The VCR...
... connection in this connection will have a descrambler box for viewing one 2-Way Splitter. Since the VCR has an extended range of tuning, tuning-programing of non-scrambled Mid-Band and Super-Band TV programs is therefore limited to be used methods of the 56 UHF channels (14-69). Typical Cable System Hook Ups with the cable converter. Setting Up Cable Connection Cable-VCR-TV (For CATV/PAY Channels Recording/Playback) The VCR...
AG1340P User Guide
Page 15
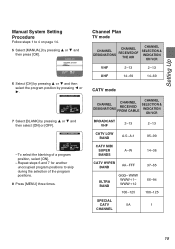
...]. - CHANNEL SET ANTENNA SYSTEM AUTO ≥MANUAL SELECT : , OK END :MENU 6 Select [CH] by pressing 3 or 4 and then select the program position by pressing 2 or 1. To select the blanking of the program positions. 8 Press [MENU] three times. A-1 95 -99 CATV MID/ SUPER BANDS A-W 14 -36 CATV HYPER BAND AA - Channel Plan TV mode CHANNEL DESIGNATIONS CHANNEL RECEIVED OF THE AIR CHANNEL SELECTION & INDICATION ON VCR VHF...
...]. - CHANNEL SET ANTENNA SYSTEM AUTO ≥MANUAL SELECT : , OK END :MENU 6 Select [CH] by pressing 3 or 4 and then select the program position by pressing 2 or 1. To select the blanking of the program positions. 8 Press [MENU] three times. A-1 95 -99 CATV MID/ SUPER BANDS A-W 14 -36 CATV HYPER BAND AA - Channel Plan TV mode CHANNEL DESIGNATIONS CHANNEL RECEIVED OF THE AIR CHANNEL SELECTION & INDICATION ON VCR VHF...
AG1340P User Guide
Page 17
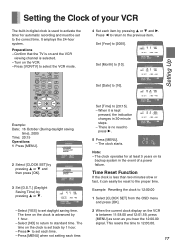
... time. When it can easily be set back by 1 hour. - There is no need to select the VCR mode. Í r AV s VCR INPUT SELECT VCR/TV Í OSD/DISPLAY RESET AUDIO W X W X PICTURE MODE INDEX REC : 9 ¥ MENU 3 NAVI 1 26 OK 51 ;/D SEARCH ∫ PROG/CHECK CANCEL 4 SPEED 1 2 3 TIMER Á 4 Example: Date; 16 October (During daylight saving time), 2005 Time; 20:15 Operations 1 Press [MENU]. S. The clock starts. Note: - Confirm that the TV is advanced...
... time. When it can easily be set back by 1 hour. - There is no need to select the VCR mode. Í r AV s VCR INPUT SELECT VCR/TV Í OSD/DISPLAY RESET AUDIO W X W X PICTURE MODE INDEX REC : 9 ¥ MENU 3 NAVI 1 26 OK 51 ;/D SEARCH ∫ PROG/CHECK CANCEL 4 SPEED 1 2 3 TIMER Á 4 Example: Date; 16 October (During daylight saving time), 2005 Time; 20:15 Operations 1 Press [MENU]. S. The clock starts. Note: - Confirm that the TV is advanced...

AG1340P User Guide
Page 18
... s VCR INPUT SELECT VCR/TV W X Í OSD/DISPLAY RESET AUDIO W X PICTURE MODE INDEX REC : 9 ¥ MENU 3 NAVI 1 26 OK 51 ;/D SEARCH ∫ PROG/CHECK CANCEL 4 SPEED 1 2 3 TIMER Á 4 To Use the On Screen Display Press [OSD/DISPLAY]. 1 23 CH 1 0:00.22 SP 4 5 1 Program position STANDARD 6 2 Tape running display Stop, Eject Rewind, Review, Index Search, JET SEARCH (backward) Fast forward, Cue, Index Search, JET SEARCH (forward) Playback Recording Recording pause Repeat playback 6 5 1 ¥ M R 1 3 Present time/Tape counter/Remaining tape time...
... s VCR INPUT SELECT VCR/TV W X Í OSD/DISPLAY RESET AUDIO W X PICTURE MODE INDEX REC : 9 ¥ MENU 3 NAVI 1 26 OK 51 ;/D SEARCH ∫ PROG/CHECK CANCEL 4 SPEED 1 2 3 TIMER Á 4 To Use the On Screen Display Press [OSD/DISPLAY]. 1 23 CH 1 0:00.22 SP 4 5 1 Program position STANDARD 6 2 Tape running display Stop, Eject Rewind, Review, Index Search, JET SEARCH (backward) Fast forward, Cue, Index Search, JET SEARCH (forward) Playback Recording Recording pause Repeat playback 6 5 1 ¥ M R 1 3 Present time/Tape counter/Remaining tape time...
AG1340P User Guide
Page 19
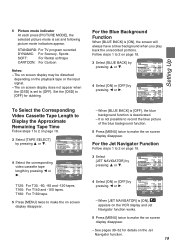
.... 3 Select [TAPE SELECT] by pressing 2 or 1. For the Blue Background Function When [BLUE BACK] is deactivated. - For the Jet Navigator Function Follow steps 1 to 2 on screen display does not appear when the [OSD] is set and following picture mode indicators appear. When [JET NAVIGATOR] is [ON], appears on the VCR display and Jet Navigator function works. 5 Press [MENU] twice to make the on...
.... 3 Select [TAPE SELECT] by pressing 2 or 1. For the Blue Background Function When [BLUE BACK] is deactivated. - For the Jet Navigator Function Follow steps 1 to 2 on screen display does not appear when the [OSD] is set and following picture mode indicators appear. When [JET NAVIGATOR] is [ON], appears on the VCR display and Jet Navigator function works. 5 Press [MENU] twice to make the on...
AG1340P User Guide
Page 22
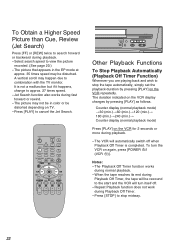
... VOLUME Í r AV s VCR INPUT SELECT VCR/TV W X Í OSD/DISPLAY RESET AUDIO W X PICTURE MODE INDEX REC : 9 ¥ MENU 3 NAVI 1 26 OK 51 ;/D SEARCH ∫ PROG/CHECK CANCEL 4 SPEED 1 2 3 Wr r DATE ON Xs s TIMER Á 4 r OFF s TIMER REC REC/OTR EJECT STOP PLAY SEARCH 6 / REW FF / 5 Other Playback Functions To Stop Playback Automatically (Playback Off Timer Function) Whenever you are playing back and wish to combination with the TV monitor. To turn itself...
... VOLUME Í r AV s VCR INPUT SELECT VCR/TV W X Í OSD/DISPLAY RESET AUDIO W X PICTURE MODE INDEX REC : 9 ¥ MENU 3 NAVI 1 26 OK 51 ;/D SEARCH ∫ PROG/CHECK CANCEL 4 SPEED 1 2 3 Wr r DATE ON Xs s TIMER Á 4 r OFF s TIMER REC REC/OTR EJECT STOP PLAY SEARCH 6 / REW FF / 5 Other Playback Functions To Stop Playback Automatically (Playback Off Timer Function) Whenever you are playing back and wish to combination with the TV monitor. To turn itself...

AG1340P User Guide
Page 23
.... TV VOLUME Í r AV s VCR INPUT SELECT VCR/TV Í OSD/DISPLAY RESET AUDIO W X W X PICTURE MODE INDEX REC : 9 ¥ MENU 3 NAVI 1 26 OK 51 ;/D SEARCH ∫ PROG/CHECK CANCEL 4 SPEED 1 2 3 Wr r DATE ON Xs s TIMER Á 4 r OFF s 23 Press [STOP] to format constraints. after 5 minutes. - Pressing [PICTURE MODE] once makes the On Screen Display appear; In the EP mode only: When playing back a tape which was recorded on another VCR, it repeatedly changes the indication...
.... TV VOLUME Í r AV s VCR INPUT SELECT VCR/TV Í OSD/DISPLAY RESET AUDIO W X W X PICTURE MODE INDEX REC : 9 ¥ MENU 3 NAVI 1 26 OK 51 ;/D SEARCH ∫ PROG/CHECK CANCEL 4 SPEED 1 2 3 Wr r DATE ON Xs s TIMER Á 4 r OFF s 23 Press [STOP] to format constraints. after 5 minutes. - Pressing [PICTURE MODE] once makes the On Screen Display appear; In the EP mode only: When playing back a tape which was recorded on another VCR, it repeatedly changes the indication...

AG1340P User Guide
Page 24
Manual Recording PICTURE MODE 1 TV VOLUME Í r AV s VCR INPUT SELECT VCR/TV W X Í OSD/DISPLAY RESET AUDIO W X PICTURE MODE INDEX REC : 9 ¥ MENU 3 NAVI 1 26 OK 51 ;/D SEARCH ∫ PROG/CHECK CANCEL 4 SPEED 1 2 3 Wr r DATE ON Xs s TIMER Á 4 r OFF s 2 3 4 5 TIMER REC REC/OTR EJECT STOP PLAY SEARCH 6 / REW FF / 5 4 35 Operations 1 Insert a video cassette tape with an intact erasure prevention tab. - REC 5 Press [STOP] to start recording. VCR 3 Press the I (VCR Í)] to turn the VCR on. 2 Press...
Manual Recording PICTURE MODE 1 TV VOLUME Í r AV s VCR INPUT SELECT VCR/TV W X Í OSD/DISPLAY RESET AUDIO W X PICTURE MODE INDEX REC : 9 ¥ MENU 3 NAVI 1 26 OK 51 ;/D SEARCH ∫ PROG/CHECK CANCEL 4 SPEED 1 2 3 Wr r DATE ON Xs s TIMER Á 4 r OFF s 2 3 4 5 TIMER REC REC/OTR EJECT STOP PLAY SEARCH 6 / REW FF / 5 4 35 Operations 1 Insert a video cassette tape with an intact erasure prevention tab. - REC 5 Press [STOP] to start recording. VCR 3 Press the I (VCR Í)] to turn the VCR on. 2 Press...

AG1340P User Guide
Page 25
... on screen display and select the corresponding video cassette tape length. The recording pause mode will return to continue REC recording. TV VOLUME Í r AV s VCR INPUT SELECT VCR/TV Í OSD/DISPLAY RESET AUDIO W X W X PICTURE MODE INDEX REC : 9 ¥ MENU 3 NAVI 1 26 OK 51 ;/D SEARCH ∫ PROG/CHECK CANCEL 4 SPEED 1 2 3 Wr r DATE ON Xs s TIMER Á 4 r OFF s Notes: - To View One TV Program while Recording Another One 1 Refer to steps 1-4 of the manual recording operation. 2 Press [VCR...
... on screen display and select the corresponding video cassette tape length. The recording pause mode will return to continue REC recording. TV VOLUME Í r AV s VCR INPUT SELECT VCR/TV Í OSD/DISPLAY RESET AUDIO W X W X PICTURE MODE INDEX REC : 9 ¥ MENU 3 NAVI 1 26 OK 51 ;/D SEARCH ∫ PROG/CHECK CANCEL 4 SPEED 1 2 3 Wr r DATE ON Xs s TIMER Á 4 r OFF s Notes: - To View One TV Program while Recording Another One 1 Refer to steps 1-4 of the manual recording operation. 2 Press [VCR...

AG1340P User Guide
Page 27
... : MENU Advanced Operations 27 Example: Program position (channel); 2 Date; 27 October Starting time; 20:02 Ending time; 21:30 (Present date; 16 October) Operations 1 Press [PROG./ CHECK]. CH DATE ON OFF 2 27TH SP CH DATE ON OFF 2 27TH SP CATEGORY : 1 4 Set Starting time to select the VCR mode. Press [VCR/TV] to 20:02. Insert a video cassette tape with an intact erasure prevention tab. - Turn on and the VCR viewing channel is on the VCR...
... : MENU Advanced Operations 27 Example: Program position (channel); 2 Date; 27 October Starting time; 20:02 Ending time; 21:30 (Present date; 16 October) Operations 1 Press [PROG./ CHECK]. CH DATE ON OFF 2 27TH SP CH DATE ON OFF 2 27TH SP CATEGORY : 1 4 Set Starting time to select the VCR mode. Press [VCR/TV] to 20:02. Insert a video cassette tape with an intact erasure prevention tab. - Turn on and the VCR viewing channel is on the VCR...

AG1340P User Guide
Page 29
... turned on and the VCR viewing channel is on , or the timer recording indicator "Á" lit. - Every time you press [PROG./CHECK], the program shifts below. EP 2 1 :3 0 SP 1 9 :5 5 EP SELECT: 1 END:MENU Note: - two days later. However, if the timer recording function is set correctly. (See page 19.) - If timer recording is on , or in the following order: SP>EP>A>SP Checking a Timer Program - Recording by SP mode Video Tape...
... turned on and the VCR viewing channel is on , or the timer recording indicator "Á" lit. - Every time you press [PROG./CHECK], the program shifts below. EP 2 1 :3 0 SP 1 9 :5 5 EP SELECT: 1 END:MENU Note: - two days later. However, if the timer recording function is set correctly. (See page 19.) - If timer recording is on , or in the following order: SP>EP>A>SP Checking a Timer Program - Recording by SP mode Video Tape...

AG1340P User Guide
Page 31
... each cassette. - Advanced Operations 31 CATEGORY SETTING ≥MOVIE ≥MUSIC ≥DRAMA ≥EDUCA ≥DOCUM ≥SPORT ≥CHILD ≥NEWS ≥OTHER SELECT: 3421 END : MENU Category Indication MOVIE MOVIE MUSIC MUSIC DRAMA DRAMA EDUCATION EDUCA DOCUMENTARY DOCUM SPORTS SPORT CHILDREN CHILD NEWS NEWS OTHERS OTHER Icon To Delete the Jet Navigator Data of a Single Video Cassette Tape: Keep...
... each cassette. - Advanced Operations 31 CATEGORY SETTING ≥MOVIE ≥MUSIC ≥DRAMA ≥EDUCA ≥DOCUM ≥SPORT ≥CHILD ≥NEWS ≥OTHER SELECT: 3421 END : MENU Category Indication MOVIE MOVIE MUSIC MUSIC DRAMA DRAMA EDUCATION EDUCA DOCUMENTARY DOCUM SPORTS SPORT CHILDREN CHILD NEWS NEWS OTHERS OTHER Icon To Delete the Jet Navigator Data of a Single Video Cassette Tape: Keep...

AG1340P User Guide
Page 33
... Signals Index signals are found, the tape is located. TV VOLUME Í r AV s VCR INPUT SELECT VCR/TV W X Í OSD/DISPLAY RESET AUDIO W X PICTURE MODE INDEX REC : 9 ¥ MENU 3 NAVI 1 26 OK 51 ;/D SEARCH ∫ PROG/CHECK CANCEL 4 SPEED 1 2 3 Wr r DATE ON TIMER Á 4 r OFF Searching while checking the video cassette contents (Intro-Jet Scan) The approximate beginnings of Each Recording (VHS Index Search System) Example: Searching for...
... Signals Index signals are found, the tape is located. TV VOLUME Í r AV s VCR INPUT SELECT VCR/TV W X Í OSD/DISPLAY RESET AUDIO W X PICTURE MODE INDEX REC : 9 ¥ MENU 3 NAVI 1 26 OK 51 ;/D SEARCH ∫ PROG/CHECK CANCEL 4 SPEED 1 2 3 Wr r DATE ON TIMER Á 4 r OFF Searching while checking the video cassette contents (Intro-Jet Scan) The approximate beginnings of Each Recording (VHS Index Search System) Example: Searching for...

AG1340P User Guide
Page 35
... pressing [EJECT]. Other Automatic Functions Automatic Playback When a video cassette without an erasure prevention tab is capable of tape used to adjust the tracking when, for timer recording) or playback, it will automatically be played back by pressing [PLAY]. During OTR, this VCR. S-VHS Quasi Playback (SQPB) It is also possible to record in the S-VHS system. - TV VOLUME Í r AV s VCR INPUT SELECT VCR/TV Í OSD/DISPLAY RESET AUDIO W X W X PICTURE MODE INDEX REC : 9 ¥ MENU 3 NAVI...
... pressing [EJECT]. Other Automatic Functions Automatic Playback When a video cassette without an erasure prevention tab is capable of tape used to adjust the tracking when, for timer recording) or playback, it will automatically be played back by pressing [PLAY]. During OTR, this VCR. S-VHS Quasi Playback (SQPB) It is also possible to record in the S-VHS system. - TV VOLUME Í r AV s VCR INPUT SELECT VCR/TV Í OSD/DISPLAY RESET AUDIO W X W X PICTURE MODE INDEX REC : 9 ¥ MENU 3 NAVI...

AG1340P User Guide
Page 37
... video and audio sources are clogged or worn. Horizontal bars or lines run down the screen.] - See pages 12-15. - The remote controller transmitter beam is defective. The TV has not been tuned to the present time. (Note that the connections for timer recording. [AV external recordings cannot be performed.] - AV input has been selected. Set them to the VCR. The distance is a 24-hour clock...
... video and audio sources are clogged or worn. Horizontal bars or lines run down the screen.] - See pages 12-15. - The remote controller transmitter beam is defective. The TV has not been tuned to the present time. (Note that the connections for timer recording. [AV external recordings cannot be performed.] - AV input has been selected. Set them to the VCR. The distance is a 24-hour clock...


