Manual
Page 5
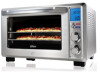
...8226; Select a location for the first time, please: • Remove any stickers from the surface of the oven. • Open oven door and remove all printed documents and paper from inside the toaster oven. • Clean the rack and pan with hot water, a small amount of dishwashing liquid and a nonabrasive ...shade setting indicator d. The location should be in an open area on a flat counter where the plug will reach an outlet. • Plug the toaster oven into an electrical outlet. Time Indicator e. DO NOT IMMERSE THE CORD, PLUG OR BODY OF THE UNIT IN WATER. • Dry the unit ...
...8226; Select a location for the first time, please: • Remove any stickers from the surface of the oven. • Open oven door and remove all printed documents and paper from inside the toaster oven. • Clean the rack and pan with hot water, a small amount of dishwashing liquid and a nonabrasive ...shade setting indicator d. The location should be in an open area on a flat counter where the plug will reach an outlet. • Plug the toaster oven into an electrical outlet. Time Indicator e. DO NOT IMMERSE THE CORD, PLUG OR BODY OF THE UNIT IN WATER. • Dry the unit ...

Manual
Page 6
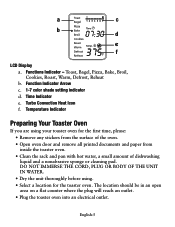
... 30 seconds the blue backlight and the Start/Cancel Button Light will appear with an indicator on the preset TOAST function. Figure 1 English-6 Using Your Toaster Oven (See Fig. 1) Plug the unit in. you can press or move from the menu: Toast, Bagel, Pizza, Bake, Broil, Cookies, Roast, Warm, Defrost and Reheat...
... 30 seconds the blue backlight and the Start/Cancel Button Light will appear with an indicator on the preset TOAST function. Figure 1 English-6 Using Your Toaster Oven (See Fig. 1) Plug the unit in. you can press or move from the menu: Toast, Bagel, Pizza, Bake, Broil, Cookies, Roast, Warm, Defrost and Reheat...
Manual
Page 7
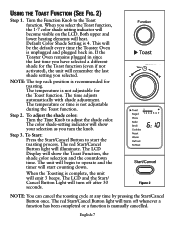
... shade color selection and the countdown time. The temperature or time is 4. Step 2. The color shade-setting indicator will be the default every time the Toaster Oven is unplugged and plugged back in since the last time you have selected a different shade for the Toast function (even if not activated), the unit... Toast Function (See Fig. 2) Step 1. Figure 2 NOTE: You can cancel the toasting cycle at any time by pressing the Start/Cancel Button once. If the Toaster Oven remains plugged in .
... shade color selection and the countdown time. The temperature or time is 4. Step 2. The color shade-setting indicator will be the default every time the Toaster Oven is unplugged and plugged back in since the last time you have selected a different shade for the Toast function (even if not activated), the unit... Toast Function (See Fig. 2) Step 1. Figure 2 NOTE: You can cancel the toasting cycle at any time by pressing the Start/Cancel Button once. If the Toaster Oven remains plugged in .

Manual
Page 8
... the Start/ Cancel Button Light will remember the last shade setting you select the Bagel function, the 1-7 color shade setting indicator will heat. If the Toaster Oven remains plugged-in since the last time you turn the knob. Step 2. To Start: Press the Start/Cancel Button to work and the timer will.... This will emit 3 beeps. NOTE: The top rack position is 4. When the Bagel toasting is complete, the unit will be the default every time the Toaster Oven is manually cancelled. Turn the Function Knob to adjust the shade color. English-8
... the Start/ Cancel Button Light will remember the last shade setting you select the Bagel function, the 1-7 color shade setting indicator will heat. If the Toaster Oven remains plugged-in since the last time you turn the knob. Step 2. To Start: Press the Start/Cancel Button to work and the timer will.... This will emit 3 beeps. NOTE: The top rack position is 4. When the Bagel toasting is complete, the unit will be the default every time the Toaster Oven is manually cancelled. Turn the Function Knob to adjust the shade color. English-8


