Instruction Manual
Page 2
... with a programmer, timer, wireless plug adapter or outlet that may shatter during use. Pieces can cause injuries. Do not place any of the following : 1. Do not cover crumb tray or any materials that allows control remotely, or connect to the manufacturer (see warranty) for household countertop use only. The glass door is regularly switched on all instructions before cleaning. Always inspect...
... with a programmer, timer, wireless plug adapter or outlet that may shatter during use. Pieces can cause injuries. Do not place any of the following : 1. Do not cover crumb tray or any materials that allows control remotely, or connect to the manufacturer (see warranty) for household countertop use only. The glass door is regularly switched on all instructions before cleaning. Always inspect...
Instruction Manual
Page 3
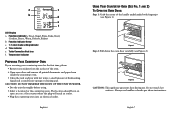
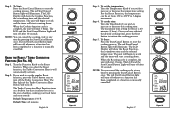
...; If you require service on a finished wood table. Please contact us at least as great as the electrical rating of the cord set or extension cord should be used : a. Temperature Control Knob - For crumb or fallen food particles collection. Easy Clean Interior Walls - If the plug does not fit fully in One and Broil Rack - The marked electrical rating of the appliance; See "Positioning Rack" section. 8. For front...
...; If you require service on a finished wood table. Please contact us at least as great as the electrical rating of the cord set or extension cord should be used : a. Temperature Control Knob - For crumb or fallen food particles collection. Easy Clean Interior Walls - If the plug does not fit fully in One and Broil Rack - The marked electrical rating of the appliance; See "Positioning Rack" section. 8. For front...
Instruction Manual
Page 4
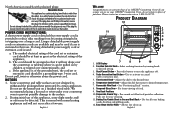
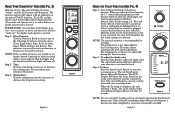
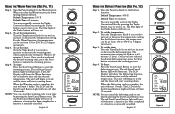
... generates heat during use handles or knobs per above instructions. Time Indicator e. Turbo Convection Heat Icon f. English-6 Using Your Countertop Oven (See Fig. 1 and 2) To Open the Oven Door: Step 1: Grab the center of the handle underhanded with hot water, a small amount of the oven. • Open oven door and remove all printed documents and paper from inside the countertop oven. • Clean the rack and pan with fingertips (see Figure 2). Toast, Bagel, Pizza, Bake, Broil...
... generates heat during use handles or knobs per above instructions. Time Indicator e. Turbo Convection Heat Icon f. English-6 Using Your Countertop Oven (See Fig. 1 and 2) To Open the Oven Door: Step 1: Grab the center of the handle underhanded with hot water, a small amount of the oven. • Open oven door and remove all printed documents and paper from inside the countertop oven. • Clean the rack and pan with fingertips (see Figure 2). Toast, Bagel, Pizza, Bake, Broil...
Instruction Manual
Page 5
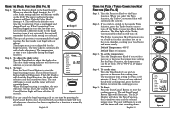
... decrease the temperature setting. The color shade-setting indicator will show your selection as normal. The LCD Display will show the Toast Function, the shade color selection and the countdown time. Figure 4 NOTE: You can press or move from the menu: Toast, Bagel, Pizza, Bake, Broil, Cookies, Roast, Warm, Defrost and Reheat. Temperature: Turn the temperature knob to increase or decrease the cooking time...
... decrease the temperature setting. The color shade-setting indicator will show your selection as normal. The LCD Display will show the Toast Function, the shade color selection and the countdown time. Figure 4 NOTE: You can press or move from the menu: Toast, Bagel, Pizza, Bake, Broil, Cookies, Roast, Warm, Defrost and Reheat. Temperature: Turn the temperature knob to increase or decrease the cooking time...
Instruction Manual
Page 6
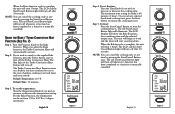
... the default every time the Countertop Oven is manually cancelled. Turn the Function Knob to the Bagel function. When you have selected a different shade for bagel toasting. The blue light of the Turbo Convection Heat button will be set from 350 to start the cooking process. The red Start/Cancel Button light will illuminate. English-11 Figure 6 Turn the Function Knob to the Pizza function. The temperature is not adjustable for...
... the default every time the Countertop Oven is manually cancelled. Turn the Function Knob to the Bagel function. When you have selected a different shade for bagel toasting. The blue light of the Turbo Convection Heat button will be set from 350 to start the cooking process. The red Start/Cancel Button light will illuminate. English-11 Figure 6 Turn the Function Knob to the Pizza function. The temperature is not adjustable for...
Instruction Manual
Page 7
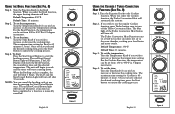
... Temperature: 325ºF. Step 3. To set the temperature: Turn the Temperature Knob if you wish to increase or decrease the temperature setting. To set from 150 to work and the timer will emit 3 beeps. The maximum time setting for Bake is 60 minutes (1 hour). Step 5. The LCD Display will turn off whenever a function has been completed or a function is manually cancelled. Using the Bake / Turbo Convection Heat Function (See Fig. 7) Step 1. Turn the Function Knob...
... Temperature: 325ºF. Step 3. To set the temperature: Turn the Temperature Knob if you wish to increase or decrease the temperature setting. To set from 150 to work and the timer will emit 3 beeps. The maximum time setting for Bake is 60 minutes (1 hour). Step 5. The LCD Display will turn off whenever a function has been completed or a function is manually cancelled. Using the Bake / Turbo Convection Heat Function (See Fig. 7) Step 1. Turn the Function Knob...
Instruction Manual
Page 8
... turn off the Turbo Convection Heat. Default Time: 10 minutes. To set the temperature: Turn the Temperature Knob if you wish to use the regular Cookies function, press Turbo button once to initiate the cooking process. The red Start/Cancel Button light will automatically activate. English-15 Figure 9 Using the Broil Function (See Fig. 8) Step 1. Step 3. If you wish to initiate the cooking process. The Turbo Convection Heat Function turns...
... turn off the Turbo Convection Heat. Default Time: 10 minutes. To set the temperature: Turn the Temperature Knob if you wish to use the regular Cookies function, press Turbo button once to initiate the cooking process. The red Start/Cancel Button light will automatically activate. English-15 Figure 9 Using the Broil Function (See Fig. 8) Step 1. Step 3. If you wish to initiate the cooking process. The Turbo Convection Heat Function turns...
Instruction Manual
Page 9
... to work and the timer will turn off the Turbo Convection Heat. To set from 150 to increase or decrease the temperature setting. For the Roast Function, the temperature can cancel the cooking cycle at any time by pressing the Start/Cancel Button once. The red Start/Cancel Button light will turn off whenever a function has been completed or a function is manually cancelled. Using the Roast / Turbo Convection Function...
... to work and the timer will turn off the Turbo Convection Heat. To set from 150 to increase or decrease the temperature setting. For the Roast Function, the temperature can cancel the cooking cycle at any time by pressing the Start/Cancel Button once. The red Start/Cancel Button light will turn off whenever a function has been completed or a function is manually cancelled. Using the Roast / Turbo Convection Function...
Instruction Manual
Page 10
... manually activate the Turbo Convection Heat by pressing the Turbo button once to initiate the cooking process. To set the temperature: Turn the Temperature Knob if you have selected the desired warming time, press the Start button to work and the timer will turn it on . When the Warming cycle is manually cancelled. Step 4. Turn the Function Knob to increase or decrease the temperature setting. To set the time: Turn...
... manually activate the Turbo Convection Heat by pressing the Turbo button once to initiate the cooking process. To set the temperature: Turn the Temperature Knob if you have selected the desired warming time, press the Start button to work and the timer will turn it on . When the Warming cycle is manually cancelled. Step 4. Turn the Function Knob to increase or decrease the temperature setting. To set the time: Turn...

Instruction Manual
Page 11
... lower rack guides. Using the Reheat Function (See Fig. 13) Step 1. The unit will begin to 450ºF in the upper rack guide. The red Start/Cancel Button light will turn on the size of foods the oven has two rack positions. English-20 Figure 13 Positioning Pan • To accommodate a wide variety of the food and desired browning. Step 2. To set the temperature: Turn the Temperature Knob if...
... lower rack guides. Using the Reheat Function (See Fig. 13) Step 1. The unit will begin to 450ºF in the upper rack guide. The red Start/Cancel Button light will turn on the size of foods the oven has two rack positions. English-20 Figure 13 Positioning Pan • To accommodate a wide variety of the food and desired browning. Step 2. To set the temperature: Turn the Temperature Knob if...
Instruction Manual
Page 12
... than the recommended cleaning, no further user maintenance should be liable for any claim brought against purchaser by an Authorized Service Representative only. Step 1. Remove wire rack and clean with damp cloth. Other than Sunbeam or an authorized Sunbeam service center. Proof of any electrical or mechanical functions on improper voltage or current, use contrary to the operating instructions, disassembly, repair or alteration...
... than the recommended cleaning, no further user maintenance should be liable for any claim brought against purchaser by an Authorized Service Representative only. Step 1. Remove wire rack and clean with damp cloth. Other than Sunbeam or an authorized Sunbeam service center. Proof of any electrical or mechanical functions on improper voltage or current, use contrary to the operating instructions, disassembly, repair or alteration...

