
English
Page 2
Remove the filler cap from outlet when not in use or before cleaning. • To protect against risk of electrical shock, do not immerse the cord, plug or motor base in water or any other . Other attachments may cause injury. POWER CORD INSTRUCTIONS Please follow these guidelines: - The marked electrical rating of the extension cord must be arranged so that it will not drape over...
Remove the filler cap from outlet when not in use or before cleaning. • To protect against risk of electrical shock, do not immerse the cord, plug or motor base in water or any other . Other attachments may cause injury. POWER CORD INSTRUCTIONS Please follow these guidelines: - The marked electrical rating of the extension cord must be arranged so that it will not drape over...
English
Page 3
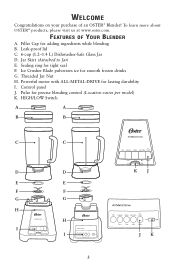
Leak-proof lid C. 6-cup (1.2-1.4 L) Dishwasher-Safe Glass Jar D. HIGH/LOW Switch A A B B C C D D E E F F G G H H I I . To learn more about OSTER® products, please visit us at www.oster.com. Powerful motor with ALL-METAL-DRIVE for lasting durability I KJ JK 3 WELCOME Congratulations on your purchase of an OSTER® Blender! Control panel J. Sealing ring for adding ingredients while blending B. Threaded Jar Nut H. Filler Cap for tight seal F. Jar Skirt (Attached to Jar) E. Ice Crusher Blade pulverizes ice for precise...
Leak-proof lid C. 6-cup (1.2-1.4 L) Dishwasher-Safe Glass Jar D. HIGH/LOW Switch A A B B C C D D E E F F G G H H I I . To learn more about OSTER® products, please visit us at www.oster.com. Powerful motor with ALL-METAL-DRIVE for lasting durability I KJ JK 3 WELCOME Congratulations on your purchase of an OSTER® Blender! Control panel J. Sealing ring for adding ingredients while blending B. Threaded Jar Nut H. Filler Cap for tight seal F. Jar Skirt (Attached to Jar) E. Ice Crusher Blade pulverizes ice for precise...
English
Page 4
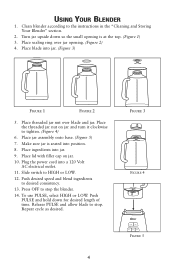
... blade and jar. Release PULSE and allow blade to stop . Repeat cycle as desired. USING YOUR BLENDER 1. Plug the power cord into jar. (Figure 3) FIGURE 1 FIGURE 2 5. Press OFF to stop the blender. 14. Place jar assembly onto base. (Figure 5) 7. Push desired speed and blend ingredients to tighten. (Figure 4) 6. Place threaded jar nut over jar opening is seated into jar. 9. Place ingredients into position. 8. Place the threaded jar nut on jar. 10. Place lid with filler cap on jar and turn...
... blade and jar. Release PULSE and allow blade to stop . Repeat cycle as desired. USING YOUR BLENDER 1. Plug the power cord into jar. (Figure 3) FIGURE 1 FIGURE 2 5. Press OFF to stop the blender. 14. Place jar assembly onto base. (Figure 5) 7. Push desired speed and blend ingredients to tighten. (Figure 4) 6. Place threaded jar nut over jar opening is seated into jar. 9. Place ingredients into position. 8. Place the threaded jar nut on jar. 10. Place lid with filler cap on jar and turn...
English
Page 5
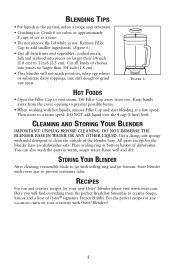
... 4 cup (1 liter) level. STORING YOUR BLENDER After cleaning, reassemble blade to prevent possible burns. • When working with Oster® Blenders! 5 All parts except for your creativity with hot liquids, remove Filler Cap and start blending at a time. • Do not remove the lid while in use. BLENDING TIPS • Put liquids in the jar first, unless a recipe says otherwise. • Crushing ice: Crush 6 ice cubes or approximately 2 cups of ice at a low speed. Cut all...
... 4 cup (1 liter) level. STORING YOUR BLENDER After cleaning, reassemble blade to prevent possible burns. • When working with Oster® Blenders! 5 All parts except for your creativity with hot liquids, remove Filler Cap and start blending at a time. • Do not remove the lid while in use. BLENDING TIPS • Put liquids in the jar first, unless a recipe says otherwise. • Crushing ice: Crush 6 ice cubes or approximately 2 cups of ice at a low speed. Cut all...
English
Page 6
... other warranties, conditions or representations, express, implied, statutory or otherwise. Replacement will repair or replace this warranty is required to the operating instructions, disassembly, repair or alteration by Sunbeam Corporation (Canada) Limited doing business as fire, flood, hurricanes and tornadoes. JCS shall not be made with a new or remanufactured product or component. In Canada In the U.S.A., this product, please write our Consumer Service Department...
... other warranties, conditions or representations, express, implied, statutory or otherwise. Replacement will repair or replace this warranty is required to the operating instructions, disassembly, repair or alteration by Sunbeam Corporation (Canada) Limited doing business as fire, flood, hurricanes and tornadoes. JCS shall not be made with a new or remanufactured product or component. In Canada In the U.S.A., this product, please write our Consumer Service Department...


