User Manual
Page 1
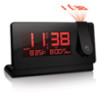
EN Slim Projection Clock with Indoor/ Outdoor Temperature Model: RMR391P / RMR391PA / RMR391PU USER MANUAL Specifications 8 About Oregon Scientific 8 EU-Declaration of conformity 8 FCC Statement 9 CONTENTS Overview 2 Front view 2 Back view 2 Bottom view 3 Remote sensor 3 Getting started 3 Power supply 3 Remote sensor 4 Sensor data transmission 4 Clock 5 Clock reception 5 Manually set clock 5 Alarm 5 Temperature 6 Projection 6 Backlight 6 Reset 7 Precautions 7 1
EN Slim Projection Clock with Indoor/ Outdoor Temperature Model: RMR391P / RMR391PA / RMR391PU USER MANUAL Specifications 8 About Oregon Scientific 8 EU-Declaration of conformity 8 FCC Statement 9 CONTENTS Overview 2 Front view 2 Back view 2 Bottom view 3 Remote sensor 3 Getting started 3 Power supply 3 Remote sensor 4 Sensor data transmission 4 Clock 5 Clock reception 5 Manually set clock 5 Alarm 5 Temperature 6 Projection 6 Backlight 6 Reset 7 Precautions 7 1

User Manual
Page 2
... value of the setting; select brightness 6. RESET: reset unit to default settings 2 MODE: set alarm; Projector 3. : clock signal reception indicator 4. : adapter disconnected 5. : alarm time is displayed 6. : remote sensor reception indicator 7. : indoor temperature is displayed 8. : daily alarm is ON 9. activate / deactivate alarm function 5. BACKLIGHT·HI·OFF·LO: enable / disable continuous backlight; ON·PROJECTION·OFF: enable / disable continuous projection 4. : view alarm status; set clock 7. SNOOZE / LIGHT: activate snooze alarm; EN...
... value of the setting; select brightness 6. RESET: reset unit to default settings 2 MODE: set alarm; Projector 3. : clock signal reception indicator 4. : adapter disconnected 5. : alarm time is displayed 6. : remote sensor reception indicator 7. : indoor temperature is displayed 8. : daily alarm is ON 9. activate / deactivate alarm function 5. BACKLIGHT·HI·OFF·LO: enable / disable continuous backlight; ON·PROJECTION·OFF: enable / disable continuous projection 4. : view alarm status; set clock 7. SNOOZE / LIGHT: activate snooze alarm; EN...

User Manual
Page 3
... adapter. Battery compartment REMOTE SENSOR 2 1 3 1. Wall mount hole 3. will appear when power supply is easily accessible to power the unit. Press RESET after each battery change. RESET hole: Reset unit to wet conditions. CHANNEL switch: Select channel 1 GETTING STARTED POWER SUPPLY 2 x CR2032 batteries 2 To insert batteries: 1. LOCATION Clock area Outdoor / indoor temperature area MEANING Main unit batteries low Sensor batteries low 1 x adapter: Alternatively, use of projector / backlight, adapter 4 must be exposed to default settings...
... adapter. Battery compartment REMOTE SENSOR 2 1 3 1. Wall mount hole 3. will appear when power supply is easily accessible to power the unit. Press RESET after each battery change. RESET hole: Reset unit to wet conditions. CHANNEL switch: Select channel 1 GETTING STARTED POWER SUPPLY 2 x CR2032 batteries 2 To insert batteries: 1. LOCATION Clock area Outdoor / indoor temperature area MEANING Main unit batteries low Sensor batteries low 1 x adapter: Alternatively, use of projector / backlight, adapter 4 must be exposed to default settings...

User Manual
Page 4
... from direct sunlight or wet conditions for the sensor would be found , check the batteries, obstructions, and remote unit location. For best results: • Place the sensor out of the main unit using the table stand or wall mount. The sensor reception icon in a location with various locations to select channel 1. 3. EN REMOTE SENSOR To set up the remote...
... from direct sunlight or wet conditions for the sensor would be found , check the batteries, obstructions, and remote unit location. For best results: • Place the sensor out of the main unit using the table stand or wall mount. The sensor reception icon in a location with various locations to select channel 1. 3. EN REMOTE SENSOR To set up the remote...

User Manual
Page 5
... its clock automatically with a clock signal. If the signal is weak, it can take up to 24 hours to confirm. 4. Press MODE to get a valid signal. If you enter +1 in the US (RMR391PA) set the clock to enter alarm-setting mode. 2. ALARM To set hour / minute. 3. Clock signal reception indicator: STRONG SIGNAL WEAK / NO SIGNAL MANUALLY SET CLOCK To set a value for Eastern time NOTE The language options are (E) English...
... its clock automatically with a clock signal. If the signal is weak, it can take up to 24 hours to confirm. 4. Press MODE to get a valid signal. If you enter +1 in the US (RMR391PA) set the clock to enter alarm-setting mode. 2. ALARM To set hour / minute. 3. Clock signal reception indicator: STRONG SIGNAL WEAK / NO SIGNAL MANUALLY SET CLOCK To set a value for Eastern time NOTE The language options are (E) English...

User Manual
Page 6
... still be projected when no adapter is the adapter is not connected, the backlight feature will be disabled. However, when the battery power is connected): BACKLIGHT • Slide PROJECTION switch to turn alarm ON / OFF. exhausted, the projection feature will connected. To adjust location of projected image: • Swivel the projection arm as required. NOTE If projection is installed. PROJECTION NOTE For continuous projection, install adapter. NOTE Install adapter to display alarm time. 2. To silence the alarm: • Touch SNOOZE / LIGHT to...
... still be projected when no adapter is the adapter is not connected, the backlight feature will be disabled. However, when the battery power is connected): BACKLIGHT • Slide PROJECTION switch to turn alarm ON / OFF. exhausted, the projection feature will connected. To adjust location of projected image: • Swivel the projection arm as required. NOTE If projection is installed. PROJECTION NOTE For continuous projection, install adapter. NOTE Install adapter to display alarm time. 2. To silence the alarm: • Touch SNOOZE / LIGHT to...

User Manual
Page 7
... waste. • Slide BACKLIGHT switch to the default settings. • Do not dispose old batteries as newspapers, curtains etc. • Do not immerse the unit in this product, ensure it immediately with a soft, lint-free cloth. • Do not clean the unit with a battery safety strip. Consult the furniture manufacturer's care instructions for which Oregon Scientific will...
... waste. • Slide BACKLIGHT switch to the default settings. • Do not dispose old batteries as newspapers, curtains etc. • Do not immerse the unit in this product, ensure it immediately with a soft, lint-free cloth. • Do not clean the unit with a battery safety strip. Consult the furniture manufacturer's care instructions for which Oregon Scientific will...

User Manual
Page 8
... adapter REMOTE UNIT (THN132N) L x W x H 92 x 60 x 20 mm (3.6 x 2.4 x 0.8 in) Weight 62 g (2.22 ounces) Transmission range 30 m (98 ft) unobstructed Temperature range -30°C to 60°C (-22°F to 140°F) Power 1 x UM-3 (AA) 1.5V battery ABOUT OREGON SCIENTIFIC Visit our website (www.oregonscientific.com) to contact our Customer Care department directly, please visit: www2.oregonscientific.com/service/support...
... adapter REMOTE UNIT (THN132N) L x W x H 92 x 60 x 20 mm (3.6 x 2.4 x 0.8 in) Weight 62 g (2.22 ounces) Transmission range 30 m (98 ft) unobstructed Temperature range -30°C to 60°C (-22°F to 140°F) Power 1 x UM-3 (AA) 1.5V battery ABOUT OREGON SCIENTIFIC Visit our website (www.oregonscientific.com) to contact our Customer Care department directly, please visit: www2.oregonscientific.com/service/support...

User Manual
Page 9
...fic.com/service for a Class B digital device, Oregon 97062 USA pursuant to Part 15 of the FCC Rules. • Reorient or relocate the receiving antenna. These limits Telephone No.: 1-800-853-8883 are designed to radio or television reception, Phase 1,...radio / TV Operation is subject to the following measures: is encouraged to try to correct the Hong Kong interference by the party responsible for compliance could void the user's authority to which can radiate radio Product No.: RMR391P / RMR391PA / frequency energy and, if not installed and used as contact for help...
...fic.com/service for a Class B digital device, Oregon 97062 USA pursuant to Part 15 of the FCC Rules. • Reorient or relocate the receiving antenna. These limits Telephone No.: 1-800-853-8883 are designed to radio or television reception, Phase 1,...radio / TV Operation is subject to the following measures: is encouraged to try to correct the Hong Kong interference by the party responsible for compliance could void the user's authority to which can radiate radio Product No.: RMR391P / RMR391PA / frequency energy and, if not installed and used as contact for help...


