User Manual
Page 1
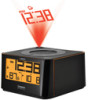
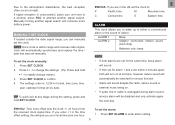
EN All-in-one bedside projection clock with FM radio and soothing sounds Model: EW103U/A Projection 7 Temperature 7 Backlight 8 Reset 8 USER MANUAL Specifications 8 Precautions 8 About Oregon Scientific 9 INDEX Overview 2 EU Declaration of conformity 9 FCC Statement 9 Front view 2 Back view 2 Bottom view 3 LCD display 3 Getting started 4 Power supply 4 Clock 4 Clock reception 4 Manually set clock 5 Alarm 5 Audio options 6 Soothing sound 6 Radio 6 Music from external audio device 6 Volume control 7 Sleep timer 7 1
EN All-in-one bedside projection clock with FM radio and soothing sounds Model: EW103U/A Projection 7 Temperature 7 Backlight 8 Reset 8 USER MANUAL Specifications 8 Precautions 8 About Oregon Scientific 9 INDEX Overview 2 EU Declaration of conformity 9 FCC Statement 9 Front view 2 Back view 2 Bottom view 3 LCD display 3 Getting started 4 Power supply 4 Clock 4 Clock reception 4 Manually set clock 5 Alarm 5 Audio options 6 Soothing sound 6 Radio 6 Music from external audio device 6 Volume control 7 Sleep timer 7 1
User Manual
Page 2
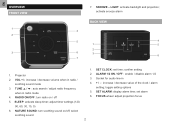
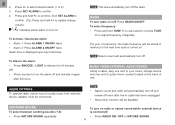
... / disable alarm 1/2 3. VOL +/-: increase / decrease volume when in radio mode 4. SLEEP: activate sleep timer; NATURE SOUND: turn radio on /off 2. TUNE / : auto search / adjust radio frequency when in radio / soothing sound mode 3. toggle setting options 5. adjust timer settings (120, 90, 60, 30, 15, 0) 6. LIGHT: activate backlight and projection; Socket for audio line-in 4. + / - : increase / decrease value of the clock / alarm setting; activate snooze alarm Back View 4 5 4 1 5 2 6 3 6 7 1. SET ALARM: display alarm time; FOCUS wheel: adjust projection focus...
... / disable alarm 1/2 3. VOL +/-: increase / decrease volume when in radio mode 4. SLEEP: activate sleep timer; NATURE SOUND: turn radio on /off 2. TUNE / : auto search / adjust radio frequency when in radio / soothing sound mode 3. toggle setting options 5. adjust timer settings (120, 90, 60, 30, 15, 0) 6. LIGHT: activate backlight and projection; Socket for audio line-in 4. + / - : increase / decrease value of the clock / alarm setting; activate snooze alarm Back View 4 5 4 1 5 2 6 3 6 7 1. SET ALARM: display alarm time; FOCUS wheel: adjust projection focus...
User Manual
Page 3
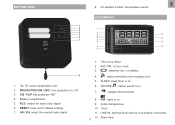
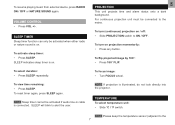
AM / PM: 12 hour clock 3. : batteries low / no battery 4. : radio controlled clock reception icon 5. PROJECTION ON / OFF: turn projection on 9. RCC: search for radio clock signal 6. NATURE : nature sound is on 7. : adaptor disconnected 8. : radio is on 6. Battery compartment 5. RESET: reset unit to default settings 7. SLEEP: sleep timer is on / off 3. 180° FLIP: flip projection 180° 4. LINE-IN: external audio device successfully connected 3 12. Time zone offset 2. EN Bottom View 8. AC adaptor socket / temperature sensor LCD display 1 2 3 1...
AM / PM: 12 hour clock 3. : batteries low / no battery 4. : radio controlled clock reception icon 5. PROJECTION ON / OFF: turn projection on 9. RCC: search for radio clock signal 6. NATURE : nature sound is on 7. : adaptor disconnected 8. : radio is on 6. Battery compartment 5. RESET: reset unit to default settings 7. SLEEP: sleep timer is on / off 3. 180° FLIP: flip projection 180° 4. LINE-IN: external audio device successfully connected 3 12. Time zone offset 2. EN Bottom View 8. AC adaptor socket / temperature sensor LCD display 1 2 3 1...

User Manual
Page 4
...alarm 1 or 2 enabled Getting started power supply Adaptor The adaptor powers the unit. NOTE • To completely disconnect from power, the adaptor should be disconnected from the mains. • The main unit and adaptor should not be exposed to synchronize its clock automatically. No objects filled with liquid, such as sunshine or fire. Insert batteries (for signal reception...Clock reception indicator: No signal Weak signal Strong signal In some cases, you may not receive the signal immediately. 4 Press RESET after each battery change. To search for memory back-up to 24 hours ...
...alarm 1 or 2 enabled Getting started power supply Adaptor The adaptor powers the unit. NOTE • To completely disconnect from power, the adaptor should be disconnected from the mains. • The main unit and adaptor should not be exposed to synchronize its clock automatically. No objects filled with liquid, such as sunshine or fire. Insert batteries (for signal reception...Clock reception indicator: No signal Weak signal Strong signal In some cases, you may not receive the signal immediately. 4 Press RESET after each battery change. To search for memory back-up to 24 hours ...
User Manual
Page 5
... To quick exit at night. manually set clock If located outside the radio signal range, you can manually set time, however nature sound will automatically be selected for snooze function. • Alarm will sound despite the radio, nature sound or external music being on. • If audio line-in the time offset setting, this will be disabled and only activate again the next day. Press SET CLOCK. 2. EW103U: Time zone offset sets the clock +/- 23 hours from the received clock signal time. If signal reception...
... To quick exit at night. manually set clock If located outside the radio signal range, you can manually set time, however nature sound will automatically be selected for snooze function. • Alarm will sound despite the radio, nature sound or external music being on. • If audio line-in the time offset setting, this will be disabled and only activate again the next day. Press SET CLOCK. 2. EW103U: Time zone offset sets the clock +/- 23 hours from the received clock signal time. If signal reception...
User Manual
Page 6
... alarm (1/2) is turned on . RADIO To turn on /off the radio. EN 2. AUDIO OPTIONS To operate radio, nature sound or play music from external audio device Using a cable, plug one end to your convenience, the radio frequency will be stored in cable has been unplugged. • Sleep timer function will automatically turn off even after 24 hours. To silence the alarm: • Press SNOOZE - To activate / deactivate alarm: • Alarm 1: Press ALARM 1 ON/OFF twice. • Alarm 2: Press ALARM...
... alarm (1/2) is turned on . RADIO To turn on /off the radio. EN 2. AUDIO OPTIONS To operate radio, nature sound or play music from external audio device Using a cable, plug one end to your convenience, the radio frequency will be stored in cable has been unplugged. • Sleep timer function will automatically turn off even after 24 hours. To silence the alarm: • Press SNOOZE - To activate / deactivate alarm: • Alarm 1: Press ALARM 1 ON/OFF twice. • Alarm 2: Press ALARM...
User Manual
Page 7
... reset timer again, press SLEEP again. EN To resume playing music from external device, press RADIO ON / OFF or NATURE SOUND again. Projection This unit projects time and alarm status onto a dark background. NOTE Sleep timer cannot be activated if audio line-in cable is on . Temperature To select temperature unit: • Slide °C / °F switch. Volume control • Press VOL +/-. NOTE If projection is on . sleep timer Sleep timer function can only be connected...
... reset timer again, press SLEEP again. EN To resume playing music from external device, press RADIO ON / OFF or NATURE SOUND again. Projection This unit projects time and alarm status onto a dark background. NOTE Sleep timer cannot be activated if audio line-in cable is on . Temperature To select temperature unit: • Slide °C / °F switch. Volume control • Press VOL +/-. NOTE If projection is on . sleep timer Sleep timer function can only be connected...
User Manual
Page 8
... from the actual display. • When disposing of indoor temperature readings. This invalidates the warranty. • Only use fresh batteries. RESET Press RESET to return to default settings. • Images shown in damage to excessive force, shock, dust, temperature or humidity. Consult the furniture manufacturer's care instructions for information. • The contents of this manual may result in...
... from the actual display. • When disposing of indoor temperature readings. This invalidates the warranty. • Only use fresh batteries. RESET Press RESET to return to default settings. • Images shown in damage to excessive force, shock, dust, temperature or humidity. Consult the furniture manufacturer's care instructions for information. • The contents of this manual may result in...

User Manual
Page 9
... via our Oregon Scientific Customer Service. sounds (Model: EW103) is subject to change without notice. NOTE The technical specifications for a Class B digital device, pursuant to contact our Customer Care department directly, please visit: https://us.oregonscientific.com/service/support.asp For international inquiries, please visit: https://us.oregonscientific.com/about Oregon Scientific products. Operation is in all countries. Remove the strip from the battery compartment before first use. • Should...
... via our Oregon Scientific Customer Service. sounds (Model: EW103) is subject to change without notice. NOTE The technical specifications for a Class B digital device, pursuant to contact our Customer Care department directly, please visit: https://us.oregonscientific.com/service/support.asp For international inquiries, please visit: https://us.oregonscientific.com/about Oregon Scientific products. Operation is in all countries. Remove the strip from the battery compartment before first use. • Should...
User Manual
Page 10
... for help. • The socket-outlet shall be installed near the equipment and shall be easily accessible Declaration of the FCC Rules. Please call our customer service number (listed on our website at www.oregonscientific.com), or on a circuit different from that interference will not occur in accordance with the instructions, may cause undesired operation. 10 We Name: Oregon Scientific...
... for help. • The socket-outlet shall be installed near the equipment and shall be easily accessible Declaration of the FCC Rules. Please call our customer service number (listed on our website at www.oregonscientific.com), or on a circuit different from that interference will not occur in accordance with the instructions, may cause undesired operation. 10 We Name: Oregon Scientific...


