

User Manual
Page 1
... remote unit. No wire installation is a multifunctional radio frequency (RF) controlled projection calendar clock that automatically synchronizes current time and date with the RF signal broadcast by the US Atomic Clock, one of BAR338PA include: weather forecast display, indoor and remote temperature display and daily alarm function. MAIN UNIT CONTROLS 1 The BAR338PA is very easy to use. GB RF Projection Barometer With Remote Thermo Sensor Model No.: BAR338PA User's Manual INTRODUCTION Congratulations on your purchasing the BAR338PA RF Projection...
... remote unit. No wire installation is a multifunctional radio frequency (RF) controlled projection calendar clock that automatically synchronizes current time and date with the RF signal broadcast by the US Atomic Clock, one of BAR338PA include: weather forecast display, indoor and remote temperature display and daily alarm function. MAIN UNIT CONTROLS 1 The BAR338PA is very easy to use. GB RF Projection Barometer With Remote Thermo Sensor Model No.: BAR338PA User's Manual INTRODUCTION Congratulations on your purchasing the BAR338PA RF Projection...
User Manual
Page 2
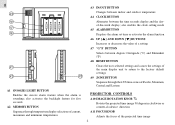
... through the 4 US time-zones of Pacific, Mountain, Central and Eastern PROJECTOR CONTROLS A10 IMAGE ROTATION KNOB Rotates the projected time image 90 degree in clockwise or counter-clockwise direction A11 FOCUS KNOB Adjusts the focus of a setting A7 °C/°F BUTTON Selects between the time seconds display and the dayof-the-week display; GB A1 SNOOZE / LIGHT BUTTON Enables the snooze alarm feature when the alarm is sounding;
... through the 4 US time-zones of Pacific, Mountain, Central and Eastern PROJECTOR CONTROLS A10 IMAGE ROTATION KNOB Rotates the projected time image 90 degree in clockwise or counter-clockwise direction A11 FOCUS KNOB Adjusts the focus of a setting A7 °C/°F BUTTON Selects between the time seconds display and the dayof-the-week display; GB A1 SNOOZE / LIGHT BUTTON Enables the snooze alarm feature when the alarm is sounding;

User Manual
Page 3
... ALARM TIME INDICATOR Appears when the alarm time is displayed A18 RADIO RECEPTION SIGNAL Identifies the strength of signal received from the US Atomic Clock A19 BATTERY-LOW INDICATOR When displayed indicates that batteries are low and need to be replaced A20 M / D INDICATOR Indicates month-day (MD) calendar display REMOTE UNIT CONTROLS B1 LED INDICATOR Flashes when the remote unit transmits a reading B2 RESET BUTTON Clears the user selected settings and causes the settings of the remote...
... ALARM TIME INDICATOR Appears when the alarm time is displayed A18 RADIO RECEPTION SIGNAL Identifies the strength of signal received from the US Atomic Clock A19 BATTERY-LOW INDICATOR When displayed indicates that batteries are low and need to be replaced A20 M / D INDICATOR Indicates month-day (MD) calendar display REMOTE UNIT CONTROLS B1 LED INDICATOR Flashes when the remote unit transmits a reading B2 RESET BUTTON Clears the user selected settings and causes the settings of the remote...
User Manual
Page 4
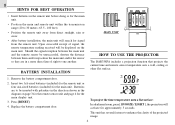
..., press [ SNOOZE / LIGHT ], the projection will be inserted with polarities in the direction shown in a more direct line of sight to one another. Press [RESET]. 4. This unit has several features to be displayed on page 3 for the remote sensor unit and page 4 for approximately 5 seconds. Upon successful receipt of the projected image. 4 Replace the battery compartment door. Should the signal reception between the...
..., press [ SNOOZE / LIGHT ], the projection will be inserted with polarities in the direction shown in a more direct line of sight to one another. Press [RESET]. 4. This unit has several features to be displayed on page 3 for the remote sensor unit and page 4 for approximately 5 seconds. Upon successful receipt of the projected image. 4 Replace the battery compartment door. Should the signal reception between the...
User Manual
Page 5
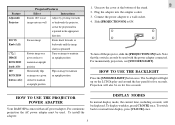
... install the adapter: DISPLAY MODES In normal display mode, the current time, including seconds, will also be used with an AC power adapter. Slide [PROJECTION ON] to a wall socket. 4. To turn off the projector, slide the [PROJECTION ON] back. HOW TO USE THE PROJECTOR POWER ADAPTER Your BAR338PA comes with the power adapter connected. To switch back to normal time display, press [CLOCK] once. 5 HOW TO USE THE BACKLIGHT Press the [SNOOZE/LIGHT] button once. GB Feature Adjustable Projector...
... install the adapter: DISPLAY MODES In normal display mode, the current time, including seconds, will also be used with an AC power adapter. Slide [PROJECTION ON] to a wall socket. 4. To turn off the projector, slide the [PROJECTION ON] back. HOW TO USE THE PROJECTOR POWER ADAPTER Your BAR338PA comes with the power adapter connected. To switch back to normal time display, press [CLOCK] once. 5 HOW TO USE THE BACKLIGHT Press the [SNOOZE/LIGHT] button once. GB Feature Adjustable Projector...
User Manual
Page 6
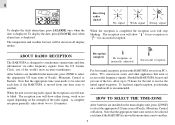
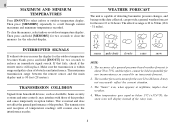
... stop blinking. ABOUT RADIO RECEPTION The BAR338PA is moved from the US Atomic Clock, one time zone to select the appropriate US time zone of the radio signal. Reception complete No reception, or manually adjusted Successful reception For best signal reception, position the BAR338PA away from one time zone to receive the initial signal reception. GB Receiving radio signal No signal Weak signal Strong signal To display the daily alarm time, press [ALARM] once when the date is displayed...
... stop blinking. ABOUT RADIO RECEPTION The BAR338PA is moved from the US Atomic Clock, one time zone to select the appropriate US time zone of the radio signal. Reception complete No reception, or manually adjusted Successful reception For best signal reception, position the BAR338PA away from one time zone to receive the initial signal reception. GB Receiving radio signal No signal Weak signal Strong signal To display the daily alarm time, press [ALARM] once when the date is displayed...

User Manual
Page 7
HOW TO MANUALLY SET THE CALENDAR CLOCK When travelling outside of the US Atomic Clock signal reception range, the BAR338PA can choose English, French or Spanish. Note that setting the clock manually will sound for a minute. Enter the minute using the [ ] or [ ] buttons. 3. Enter the hour using the [ ] or [ ] buttons. 5. ALARM AND SNOOZE FUNCTION When the alarm is activated, it , press [ALARM] to turn off gently and with its intensity in Centigrade °C or...
HOW TO MANUALLY SET THE CALENDAR CLOCK When travelling outside of the US Atomic Clock signal reception range, the BAR338PA can choose English, French or Spanish. Note that setting the clock manually will sound for a minute. Enter the minute using the [ ] or [ ] buttons. 3. Enter the hour using the [ ] or [ ] buttons. 5. ALARM AND SNOOZE FUNCTION When the alarm is activated, it , press [ALARM] to turn off gently and with its intensity in Centigrade °C or...
User Manual
Page 8
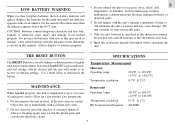
... next 12 to 24 hours. sunny partlycloudy cloudy rainy snow NOTE: 1. The weather forecast is capable of the product. The effective range is still in place. The "Sunny" icon, when appears at nighttime, implies clear weather. 4. Then press [MEMORY] repeatedly to select indoor or outdoor temperature display. If that fails, check if the remote unit is 30...
... next 12 to 24 hours. sunny partlycloudy cloudy rainy snow NOTE: 1. The weather forecast is capable of the product. The effective range is still in place. The "Sunny" icon, when appears at nighttime, implies clear weather. 4. Then press [MEMORY] repeatedly to select indoor or outdoor temperature display. If that fails, check if the remote unit is 30...
User Manual
Page 9
Always dispose of satisfactory service. Only use new batteries as specified in this instruction manual thoroughly before operating the unit. Note that when RESET is time to replace batteries, the low-battery indicator will appear. Here are a few product care instructions: 1. Operating range : -20.0°C to +60.0°C (-4.0°F to excessive: force, shock, dust, temperature, or humidity. Only insert batteries with the unit's internal components. Do...
Always dispose of satisfactory service. Only use new batteries as specified in this instruction manual thoroughly before operating the unit. Note that when RESET is time to replace batteries, the low-battery indicator will appear. Here are a few product care instructions: 1. Operating range : -20.0°C to +60.0°C (-4.0°F to excessive: force, shock, dust, temperature, or humidity. Only insert batteries with the unit's internal components. Do...
User Manual
Page 10
... of 90-days from date of retail purchase. warrants this not be possible, contact our customer service department to replace or repair product at [email protected]. Oregon Scientific, Inc. A RMA is required prior to returning product to tampering, abuse, misuse or accidental damage. 10 This product contains no user-serviceable parts or components. This warranty does not cover product subjected to Oregon Scientific, Inc. Please keep your...
... of 90-days from date of retail purchase. warrants this not be possible, contact our customer service department to replace or repair product at [email protected]. Oregon Scientific, Inc. A RMA is required prior to returning product to tampering, abuse, misuse or accidental damage. 10 This product contains no user-serviceable parts or components. This warranty does not cover product subjected to Oregon Scientific, Inc. Please keep your...
User Manual
Page 11
... the limits for help. Connect the equipment into an outlet on , the user is needed. ! Due to printing limitation, the displays shown in a particular installation. FCC : NOTE: This equipment has been tested and found to comply with the instructions, may differ from that interference will not occur in this manual may cause harmful interference to radio communications. If this...
... the limits for help. Connect the equipment into an outlet on , the user is needed. ! Due to printing limitation, the displays shown in a particular installation. FCC : NOTE: This equipment has been tested and found to comply with the instructions, may differ from that interference will not occur in this manual may cause harmful interference to radio communications. If this...


