
Owners Guide
Page 1
Ultimate Handheld Vacuum User's Guide 1600 Series Important! Read this manual carefully, and keep for future reference.
Ultimate Handheld Vacuum User's Guide 1600 Series Important! Read this manual carefully, and keep for future reference.

Owners Guide
Page 2
The installed HEPA filter helps keep dust and dirt from escaping as you vacuum. Welcome to our Call, Click customer service program. Call Click USA: 1•800•989•3535 Canada: 1•888•676•7325 On the web, point and click at: www.oreck.com and click locate a store on the top right. 2 To contact Oreck Call or Click using the information below. Enjoy Thank You for any cleaning need. The Ultimate Handheld Vacuum weighs about five pounds and comes with a variety of accessories for purchasing our Ultimate Handheld Vacuum.
The installed HEPA filter helps keep dust and dirt from escaping as you vacuum. Welcome to our Call, Click customer service program. Call Click USA: 1•800•989•3535 Canada: 1•888•676•7325 On the web, point and click at: www.oreck.com and click locate a store on the top right. 2 To contact Oreck Call or Click using the information below. Enjoy Thank You for any cleaning need. The Ultimate Handheld Vacuum weighs about five pounds and comes with a variety of accessories for purchasing our Ultimate Handheld Vacuum.

Owners Guide
Page 3
Contents Safety 4 General Warnings 4 Polarized Plug 5 Parts & Features 6 Assemble 8 Attach the Tool Caddy 8 Attach the Slinky Hose and Tools 9 Attach the Adjustable Shoulder Strap 10 Use 11 Using the Vacuum 11 After Using the Vacuum 11 Maintain 12 Replacing the Disposable Inner Bag 12 Replacing the Micro Filter 13 Replacing the HEPA Filter 14 Trouble shoot 15 Parts 16 Warranty 17 3
Contents Safety 4 General Warnings 4 Polarized Plug 5 Parts & Features 6 Assemble 8 Attach the Tool Caddy 8 Attach the Slinky Hose and Tools 9 Attach the Adjustable Shoulder Strap 10 Use 11 Using the Vacuum 11 After Using the Vacuum 11 Maintain 12 Replacing the Disposable Inner Bag 12 Replacing the Micro Filter 13 Replacing the HEPA Filter 14 Trouble shoot 15 Parts 16 Warranty 17 3
Owners Guide
Page 4
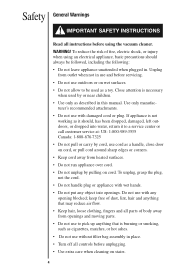
... outdoors, or dropped into openings. Do not use without filter bag assembly in this manual. keep free of dust, lint, hair and anything that may reduce air flow. • Keep hair, loose clothing, fingers and all parts of fire, electric shock, or injury when using the vacuum cleaner. To reduce the risk of body away from heated surfaces. • Do not run appliance over cord. • Do not...
... outdoors, or dropped into openings. Do not use without filter bag assembly in this manual. keep free of dust, lint, hair and anything that may reduce air flow. • Keep hair, loose clothing, fingers and all parts of fire, electric shock, or injury when using the vacuum cleaner. To reduce the risk of body away from heated surfaces. • Do not run appliance over cord. • Do not...
Owners Guide
Page 5
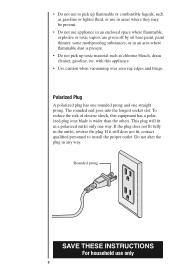
... install the proper outlet. Polarized Plug A polarized plug has one rounded prong and one way. To reduce the risk of electric shock, this appliance. • Use caution when vacuuming over area rug edges and fringe. This plug will fit in any way. The rounded end goes into the longest socket slot. Rounded prong SAVE THESE INSTRUCTIONS For household use...
... install the proper outlet. Polarized Plug A polarized plug has one rounded prong and one way. To reduce the risk of electric shock, this appliance. • Use caution when vacuuming over area rug edges and fringe. This plug will fit in any way. The rounded end goes into the longest socket slot. Rounded prong SAVE THESE INSTRUCTIONS For household use...
Owners Guide
Page 6
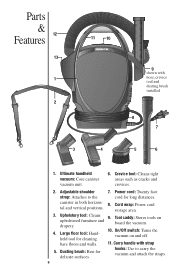
... handle with hose, crevice tool and dusting brush installed 8 7 5 6 1. Power cord: Twenty foot strap: Attaches to carry the vacuum and attach the straps. 6 storage area. 3. Upholstery tool: Cleans 9. Large floor tool: Handheld tool for long distances. drapery. 4. Dusting brush: Best for delicate surfaces. Parts & 12 Features 13 1 2 11 10 3 4 9 shown with strap 5. Crevice tool: Cleans tight areas such as cracks and crevices. 2. Ultimate handheld vacuum: Core canister vacuum unit. 6. canister in both horizon- 8. Adjustable shoulder 7. hooks: Use...
... handle with hose, crevice tool and dusting brush installed 8 7 5 6 1. Power cord: Twenty foot strap: Attaches to carry the vacuum and attach the straps. 6 storage area. 3. Upholstery tool: Cleans 9. Large floor tool: Handheld tool for long distances. drapery. 4. Dusting brush: Best for delicate surfaces. Parts & 12 Features 13 1 2 11 10 3 4 9 shown with strap 5. Crevice tool: Cleans tight areas such as cracks and crevices. 2. Ultimate handheld vacuum: Core canister vacuum unit. 6. canister in both horizon- 8. Adjustable shoulder 7. hooks: Use...

Owners Guide
Page 7
... Filter. 7 seal to use 17. HEPA Filter door: The HEPA the vacuum motor. Disposable inner bag: 14. filter is secured to the inner bag. Micro Filter Frame: Holds access to this door. 16. dust and dirt inside the 15. Bag Gasket: Creates a tight 10" extension 14 flexible hose. Hose inlet: Hose connec- HEPA Filter: Helps keep of a button. 17 18 19 21 15 16 Hose inlet side 20 HEPA filter side 12. Micro Filter: Keeps dirt vacuum as you clean...
... Filter. 7 seal to use 17. HEPA Filter door: The HEPA the vacuum motor. Disposable inner bag: 14. filter is secured to the inner bag. Micro Filter Frame: Holds access to this door. 16. dust and dirt inside the 15. Bag Gasket: Creates a tight 10" extension 14 flexible hose. Hose inlet: Hose connec- HEPA Filter: Helps keep of a button. 17 18 19 21 15 16 Hose inlet side 20 HEPA filter side 12. Micro Filter: Keeps dirt vacuum as you clean...

Owners Guide
Page 8
Load the tools onto the tool caddy in the designated outside slots. 1 8 Rotate and snap the tool caddy down into place. 3. Assemble Attach the Tool Caddy Before you attach the hose or any tools onto your vacuum, you will first want to attach the tool caddy. 1. Align the middle slot and two pronged tabs on the tool caddy with the middle tab and two slots on the side of the vacuum. 2.
Load the tools onto the tool caddy in the designated outside slots. 1 8 Rotate and snap the tool caddy down into place. 3. Assemble Attach the Tool Caddy Before you attach the hose or any tools onto your vacuum, you will first want to attach the tool caddy. 1. Align the middle slot and two pronged tabs on the tool caddy with the middle tab and two slots on the side of the vacuum. 2.

Owners Guide
Page 9
... lock tightly when attaching. The wand and all cleaning tools supplied with the vacuum lock together with the tab inside the hose inlet. 2 1 3 hose collar J-shaped slot 2. Twist and push to use for your cleaning job. 5. To unlock, turn the collar counterclockwise. 3. Attach the tool onto the end of the hose with friction. Turn the hose collar clockwise to remove. 4. Attach the Slinky Hose and Tools 1. Twist and pull...
... lock tightly when attaching. The wand and all cleaning tools supplied with the vacuum lock together with the tab inside the hose inlet. 2 1 3 hose collar J-shaped slot 2. Twist and push to use for your cleaning job. 5. To unlock, turn the collar counterclockwise. 3. Attach the tool onto the end of the hose with friction. Turn the hose collar clockwise to remove. 4. Attach the Slinky Hose and Tools 1. Twist and pull...

Owners Guide
Page 10
...into the two slots on the sides of the carry handle, on what is most comfortable for your use the vacuum in the horizontal position: clip one end of the shoulder strap into the slot on the bottom of the vacuum on the length you desire. To adjust the shoulder ...or down depending on the hose inlet side. To carry the vacuum in the horizontal or vertical position depending on the hose inlet side. Clip the opposite end of the strap into the slot of the carry handle. 3. Attach the Adjustable Shoulder Strap The shoulder strap can be attached to use . 1. horizontal position vertical...
...into the two slots on the sides of the carry handle, on what is most comfortable for your use the vacuum in the horizontal position: clip one end of the shoulder strap into the slot on the bottom of the vacuum on the length you desire. To adjust the shoulder ...or down depending on the hose inlet side. To carry the vacuum in the horizontal or vertical position depending on the hose inlet side. Clip the opposite end of the strap into the slot of the carry handle. 3. Attach the Adjustable Shoulder Strap The shoulder strap can be attached to use . 1. horizontal position vertical...
Owners Guide
Page 11
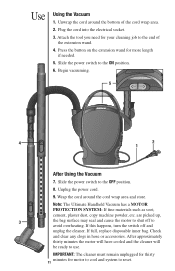
... extension wand. 4. IMPORTANT: The cleaner must remain unplugged for thirty 11 minutes for more length if needed. 5. Unplug the power cord. 9. Begin vacuuming. 5 4 2 1 After Using the Vacuum 7. If this happens, turn the switch off to reset. If full, replace disposable inner bag. Use Using the Vacuum 1. Unwrap the cord around the cord wrap area and store. Attach the tool you need for your cleaning job to use. After approximately thirty minutes the motor will...
... extension wand. 4. IMPORTANT: The cleaner must remain unplugged for thirty 11 minutes for more length if needed. 5. Unplug the power cord. 9. Begin vacuuming. 5 4 2 1 After Using the Vacuum 7. If this happens, turn the switch off to reset. If full, replace disposable inner bag. Use Using the Vacuum 1. Unwrap the cord around the cord wrap area and store. Attach the tool you need for your cleaning job to use. After approximately thirty minutes the motor will...
Owners Guide
Page 12
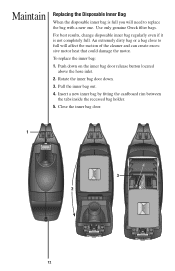
... a bag close to full will need to replace the bag with a new one. To replace the inner bag: 1. Maintain Replacing the Disposable Inner Bag When the disposable inner bag is not completely full. Use only genuine Oreck filter bags. Insert a new inner bag by fitting the cardboard rim between the tabs inside the recessed bag holder. 5. Rotate the inner bag door down on the inner bag door release button located above the hose...
... a bag close to full will need to replace the bag with a new one. To replace the inner bag: 1. Maintain Replacing the Disposable Inner Bag When the disposable inner bag is not completely full. Use only genuine Oreck filter bags. Insert a new inner bag by fitting the cardboard rim between the tabs inside the recessed bag holder. 5. Rotate the inner bag door down on the inner bag door release button located above the hose...
Owners Guide
Page 13
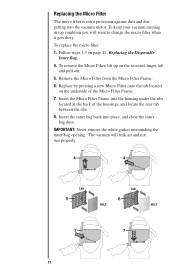
... vacuum motor. Replacing the Micro Filter The micro filter is extra protection against dust and dirt getting into the housing under the ribs located at the back of the Micro Filter Frame. 7. Remove the Micro Filter from the Micro Filter Frame. 6. IMPORTANT: Never remove the white gasket surrounding the inner bag opening. Insert the inner bag back into place, and close the inner bag door. To keep your vacuum running...
... vacuum motor. Replacing the Micro Filter The micro filter is extra protection against dust and dirt getting into the housing under the ribs located at the back of the Micro Filter Frame. 7. Remove the Micro Filter from the Micro Filter Frame. 6. IMPORTANT: Never remove the white gasket surrounding the inner bag opening. Insert the inner bag back into place, and close the inner bag door. To keep your vacuum running...
Owners Guide
Page 14
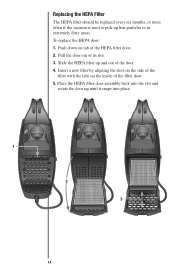
Insert a new filter by aligning the slots on the side of the filter with the tabs on tab of the filter door. 5. To replace the HEPA door: 1. Pull the door out of the door. 4. Place the HEPA filter door assembly back into place. 1 2 3 14 Push down on the inside of the HEPA filter door. 2. Slide the HEPA filter up and out of its slot. 3. Replacing the HEPA Filter The HEPA filter should be replaced every six months, or more often if the vacuum is used to pick up until it snaps into the slot and rotate the door up fine particles or in extremely dirty areas.
Insert a new filter by aligning the slots on the side of the filter with the tabs on tab of the filter door. 5. To replace the HEPA door: 1. Pull the door out of the door. 4. Place the HEPA filter door assembly back into place. 1 2 3 14 Push down on the inside of the HEPA filter door. 2. Slide the HEPA filter up and out of its slot. 3. Replacing the HEPA Filter The HEPA filter should be replaced every six months, or more often if the vacuum is used to pick up until it snaps into the slot and rotate the door up fine particles or in extremely dirty areas.
Owners Guide
Page 15
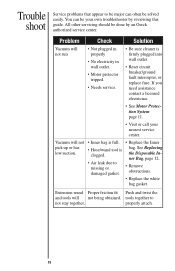
... electricity in wall outlet. • Motor protector tripped. • Needs service. • Be sure cleaner is clogged. See Replacing the Disposable Inner Bag, page 12. • Air leak due to not stay together. Problem Check Solution Vacuum will not • Inner bag is full. • Replace the Inner pick up or has low suction. • Hose/wand tool is firmly plugged into wall outlet. • Reset circuit breaker/ground fault interrupter, or replace fuse. bag. Extension wand...
... electricity in wall outlet. • Motor protector tripped. • Needs service. • Be sure cleaner is clogged. See Replacing the Disposable Inner Bag, page 12. • Air leak due to not stay together. Problem Check Solution Vacuum will not • Inner bag is full. • Replace the Inner pick up or has low suction. • Hose/wand tool is firmly plugged into wall outlet. • Reset circuit breaker/ground fault interrupter, or replace fuse. bag. Extension wand...

Owners Guide
Page 16
Please have your model number from the data label on the bottom of the unit. Parts All accessories and replacement parts are sold separately. Part Replacement Paper inner bags (Twelve pack with one Micro filter) Replacement Odor Fighting inner bags (Twelve pack with one Micro filter) Replacement HEPA filter Replacement Micro filter Replacement white bag gasket Number PKBB12DW PKBB12OF HF1000 72005-01 72017-02 16 To order, call our customer service group or visit our website.
Please have your model number from the data label on the bottom of the unit. Parts All accessories and replacement parts are sold separately. Part Replacement Paper inner bags (Twelve pack with one Micro filter) Replacement Odor Fighting inner bags (Twelve pack with one Micro filter) Replacement HEPA filter Replacement Micro filter Replacement white bag gasket Number PKBB12DW PKBB12OF HF1000 72005-01 72017-02 16 To order, call our customer service group or visit our website.
Owners Guide
Page 17
... warranty. Warranty Ultimate Handheld Vac- uum ORECK MANUFACTURING COMPANY: (ORECK gives you retain proof of incidental or consequential damages, so the above limitation may not apply to the original purchaser, any defects. ORECK's limited warranty is found to be liable for any direct, indirect, consequential or incidental damages arising out of the use or inability to use of this product will repair or replace, free...
... warranty. Warranty Ultimate Handheld Vac- uum ORECK MANUFACTURING COMPANY: (ORECK gives you retain proof of incidental or consequential damages, so the above limitation may not apply to the original purchaser, any defects. ORECK's limited warranty is found to be liable for any direct, indirect, consequential or incidental damages arising out of the use or inability to use of this product will repair or replace, free...

Owners Guide
Page 52
© 2011 Oreck Holdings, LLC. All rights reserved. All marks, text, logos, product configurations and registered trademarks are owned and used under the authority of Oreck Holdings, LLC. 73136-01 REV A 04/11 R-10315
© 2011 Oreck Holdings, LLC. All rights reserved. All marks, text, logos, product configurations and registered trademarks are owned and used under the authority of Oreck Holdings, LLC. 73136-01 REV A 04/11 R-10315


