User Guide
Page 1
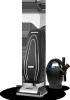
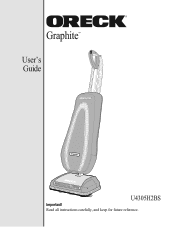
Read all instructions carefully, and keep for future reference. Graphite™ User's Guide U4305H2BS Important!
Read all instructions carefully, and keep for future reference. Graphite™ User's Guide U4305H2BS Important!
User Guide
Page 2
... not leave appliance unattended when plugged in areas where they may reduce air flow. • Keep hair, loose clothing, fingers and all controls before servicing. • Do not use with this manual. Keep the unit moving parts. • Do not use to pick up anything that stays in any one stationary position for purchasing the Oreck U4305H2BS Graphite series upright vacuum cleaner. Call Click 0845 603...
... not leave appliance unattended when plugged in areas where they may reduce air flow. • Keep hair, loose clothing, fingers and all controls before servicing. • Do not use with this manual. Keep the unit moving parts. • Do not use to pick up anything that stays in any one stationary position for purchasing the Oreck U4305H2BS Graphite series upright vacuum cleaner. Call Click 0845 603...
User Guide
Page 3
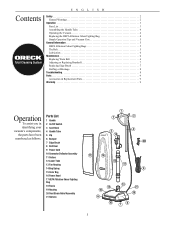
...Odour Fighting Bags 5 The Belt 5 Lubrication 6 Maintenance 6 Replacing Worn Belt 6 Adjusting or Replacing Brushroll 7 Replacing Edge Brush 7 Stuffing or Blockage 8 Troubleshooting 8 Parts 9 Accessories & Replacement Parts 9 Warranty 9 Operation To assist you in identifying your vacuum's components, the parts have been numbered as follows. Parts List 1 Handle 2 On/Off Switch 3 Cord Hook 4 Handle Tube 5 Zip 6 Bumper 7 Edge Brush 8 Belt Door 9 Power Cord 10 Connector Deflector Assembly 11 Collars 12 Lower Tube 13 Fan Housing 14 Bag Spring 15 Outer Bag 16 Power Head 17 HEPA Filtration...
...Odour Fighting Bags 5 The Belt 5 Lubrication 6 Maintenance 6 Replacing Worn Belt 6 Adjusting or Replacing Brushroll 7 Replacing Edge Brush 7 Stuffing or Blockage 8 Troubleshooting 8 Parts 9 Accessories & Replacement Parts 9 Warranty 9 Operation To assist you in identifying your vacuum's components, the parts have been numbered as follows. Parts List 1 Handle 2 On/Off Switch 3 Cord Hook 4 Handle Tube 5 Zip 6 Bumper 7 Edge Brush 8 Belt Door 9 Power Cord 10 Connector Deflector Assembly 11 Collars 12 Lower Tube 13 Fan Housing 14 Bag Spring 15 Outer Bag 16 Power Head 17 HEPA Filtration...
User Guide
Page 4
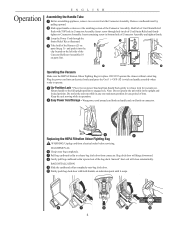
... firmly tighten to release bag dock door from electrical outlet before servicing. Plug the power cord into the clip located on parts list). Bag dock door will close automatically. Saniseal® dust seal will hinge downward. 8 Gently pull bag cardboard collar upward out of the Conector Deflector Assembly (10 on the left side of the bag dock. Connector 1 Assembly 2.1 3 Operating the Vacuum Make sure the HEPA Filtration Odour Fighting...
... firmly tighten to release bag dock door from electrical outlet before servicing. Plug the power cord into the clip located on parts list). Bag dock door will close automatically. Saniseal® dust seal will hinge downward. 8 Gently pull bag cardboard collar upward out of the Conector Deflector Assembly (10 on the left side of the bag dock. Connector 1 Assembly 2.1 3 Operating the Vacuum Make sure the HEPA Filtration Odour Fighting...
User Guide
Page 5
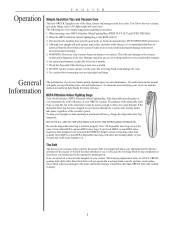
... instructions in the baseplate of your upright will pick up properly or makes an unusual noise, STOP OPERATION and service. 4. The revolving brush could cause damage to it cleans, gets under warranty. 6. Operation ENGLISH Simple Operation Tips and Vacuum Care This new ORECK Upright is one of the finest, fastest, and strongest units in this manual will cause damage to the vacuum cleaner and is dangerous to the user. To keep...
... instructions in the baseplate of your upright will pick up properly or makes an unusual noise, STOP OPERATION and service. 4. The revolving brush could cause damage to it cleans, gets under warranty. 6. Operation ENGLISH Simple Operation Tips and Vacuum Care This new ORECK Upright is one of the finest, fastest, and strongest units in this manual will cause damage to the vacuum cleaner and is dangerous to the user. To keep...

User Guide
Page 6
... preventative maintenance will keep your cleaner looking new and will ensure continued cleaning effectiveness. Maintenance Replacing Worn Belt WARNING: Unplug cord from electrical outlet before servicing. 11 Remove the replacement belt from the storage channel. 12 Remove the door by placing the bottom tab on side of the belt on the motor drive shaft. 13 Replace the door by removing the phillips head screw located on door into slots located inside power head and pressing...
... preventative maintenance will keep your cleaner looking new and will ensure continued cleaning effectiveness. Maintenance Replacing Worn Belt WARNING: Unplug cord from electrical outlet before servicing. 11 Remove the replacement belt from the storage channel. 12 Remove the door by placing the bottom tab on side of the belt on the motor drive shaft. 13 Replace the door by removing the phillips head screw located on door into slots located inside power head and pressing...
User Guide
Page 7
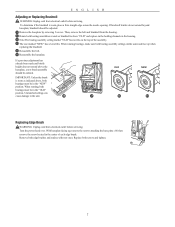
... OLD NEW 17 18 19 Replacing Edge Brush WARNING: Unplug cord from electrical outlet before servicing. With baseplate facing up when replacing the brushroll. 15 Reassemble the belt. 16 Reassemble the baseplate. ENGLISH Adjusting or Replacing Brushroll WARNING:Unplug cord from electrical outlet before servicing. To determine if the brushroll is worn as indicated above the baseplate, a new brush assembly should be ordered. Turn the power head over...
... OLD NEW 17 18 19 Replacing Edge Brush WARNING: Unplug cord from electrical outlet before servicing. With baseplate facing up when replacing the brushroll. 15 Reassemble the belt. 16 Reassemble the baseplate. ENGLISH Adjusting or Replacing Brushroll WARNING:Unplug cord from electrical outlet before servicing. To determine if the brushroll is worn as indicated above the baseplate, a new brush assembly should be ordered. Turn the power head over...
User Guide
Page 8
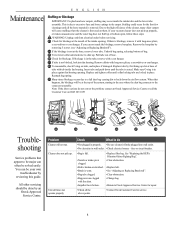
... cleaner is removed. Reattach bag spring. 28 Many times blockage occurs due to a full dust bag causing dirt to slide up . • Bag is first used on tube, and replace if damaged. Note: If the above points. • Contact Oreck Customer Care for blockage at the top of base. 26 Check for repair. See "Replacing the HEPA Filtration Odour Fighting Bag". • Nozzle or intake pivot clogged...
... cleaner is removed. Reattach bag spring. 28 Many times blockage occurs due to a full dust bag causing dirt to slide up . • Bag is first used on tube, and replace if damaged. Note: If the above points. • Contact Oreck Customer Care for blockage at the top of base. 26 Check for repair. See "Replacing the HEPA Filtration Odour Fighting Bag". • Nozzle or intake pivot clogged...
User Guide
Page 9
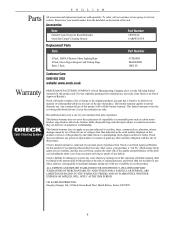
... warranty applies to use , not resale, from date of this product. This limited warranty does not cover the replacement of purchase from Oreck or an Oreck Approved Retailer for damages to the amount paid for one (1) year warranty from Oreck or an Oreck Approved Retailer). Accessories Item Part Number Natural Crystal Carpet & Room Refresher CRYSTAL Oreck Dry Carpet® Cleaning System CARPETCSYS Replacement Parts Item Part Number 8 Pack, HEPA Filtration Odour Fighting Bags...
... warranty applies to use , not resale, from date of this product. This limited warranty does not cover the replacement of purchase from Oreck or an Oreck Approved Retailer for damages to the amount paid for one (1) year warranty from Oreck or an Oreck Approved Retailer). Accessories Item Part Number Natural Crystal Carpet & Room Refresher CRYSTAL Oreck Dry Carpet® Cleaning System CARPETCSYS Replacement Parts Item Part Number 8 Pack, HEPA Filtration Odour Fighting Bags...

User Guide
Page 10
All rights reserved. ©2011 Oreck Holdings, LLC. All word marks, logos product configurations and registered trademarks are owned and used under the authority of Oreck Holdings, LLC. 76140-01 REV A 06/15 ECN # R-10492 UK Edition
All rights reserved. ©2011 Oreck Holdings, LLC. All word marks, logos product configurations and registered trademarks are owned and used under the authority of Oreck Holdings, LLC. 76140-01 REV A 06/15 ECN # R-10492 UK Edition


