

W335 Datasheet
Page 1
... options, including HDMI, VGA and composite enable connectivity to a wide range of use with the Optoma W335. Its 22,000:1 contrast ratio, 1.55 - 1.73:1 throw ratio and 1.1x zoom make it ideal for easy installation. W335 Bright WXGA Projector Features Luminous WXGA projection with 3,800 lumens and 22,000:1 contrast ratio HDMI, VGA and...
... options, including HDMI, VGA and composite enable connectivity to a wide range of use with the Optoma W335. Its 22,000:1 contrast ratio, 1.55 - 1.73:1 throw ratio and 1.1x zoom make it ideal for easy installation. W335 Bright WXGA Projector Features Luminous WXGA projection with 3,800 lumens and 22,000:1 contrast ratio HDMI, VGA and...

W335 Datasheet
Page 2
...176;F); Published on -screen menu adjustments in the W335, AC power cable, remote control, batteries, quick Box? Other *Lamp life is used with DLP® Link active shutter glasses when projector is dependent upon many factors, including lamp mode,...property of Texas Instruments™. must manually switch to change. All other trademarks are registered trademarks of their respective owners. Please visit Optoma.com for 3D feature projector) Video Compatiblity HDTV (720p, 1080i/p), SDTV (480i/p, 576i/p) PHYSICAL SPECIFICATIONS Dimensions (W x H x D) Security Weight 12.4″...
...176;F); Published on -screen menu adjustments in the W335, AC power cable, remote control, batteries, quick Box? Other *Lamp life is used with DLP® Link active shutter glasses when projector is dependent upon many factors, including lamp mode,...property of Texas Instruments™. must manually switch to change. All other trademarks are registered trademarks of their respective owners. Please visit Optoma.com for 3D feature projector) Video Compatiblity HDTV (720p, 1080i/p), SDTV (480i/p, 576i/p) PHYSICAL SPECIFICATIONS Dimensions (W x H x D) Security Weight 12.4″...
S343 User Manual
Page 1
DLP® Projector User manual
DLP® Projector User manual
S343 User Manual
Page 2
......13 Remote control 1...14 Remote control 2...15 Remote control 3...16 Remote control 4...17 SETUP AND INSTALLATION 18 Installing the projector...18 Adjusting the projector image...28 USING THE PROJECTOR 31 Powering on / off the projector 31 Selecting an input source...32 Menu navigation and features 33 OSD Menu tree (WUXGA and 1080P models 35...
......13 Remote control 1...14 Remote control 2...15 Remote control 3...16 Remote control 4...17 SETUP AND INSTALLATION 18 Installing the projector...18 Adjusting the projector image...28 USING THE PROJECTOR 31 Powering on / off the projector 31 Selecting an input source...32 Menu navigation and features 33 OSD Menu tree (WUXGA and 1080P models 35...
S343 User Manual
Page 3
......62 Setup security menu...63 Setup HDMI link settings menu 64 Setup test pattern menu...64 Setup remote settings menu...64 Setup projector ID menu...65 Setup options menu...65 Setup reset menu...66 Network LAN menu...66 Network control menu...67 Setup network control ...MAINTENANCE 74 Replacing the lamp...74 Installing and cleaning the dust filter 76 ADDITIONAL INFORMATION 77 Compatible resolutions...77 Image size and projection distance 80 Projector dimensions and ceiling mount installation 84 IR remote control 1 codes...85 IR remote control 2 codes...87 IR remote control 3 codes...89 ...
......62 Setup security menu...63 Setup HDMI link settings menu 64 Setup test pattern menu...64 Setup remote settings menu...64 Setup projector ID menu...65 Setup options menu...65 Setup reset menu...66 Network LAN menu...66 Network control menu...67 Setup network control ...MAINTENANCE 74 Replacing the lamp...74 Installing and cleaning the dust filter 76 ADDITIONAL INFORMATION 77 Compatible resolutions...77 Image size and projection distance 80 Projector dimensions and ceiling mount installation 84 IR remote control 1 codes...85 IR remote control 2 codes...87 IR remote control 3 codes...89 ...

S343 User Manual
Page 4
...Unit has been dropped. ±± Power supply cord or plug has been damaged. ±± Liquid has been spilled on to the projector. ±± Projector has been exposed to persons. As with arrow head within an equilateral triangle is intended to alert the user to the presence of uninsulated.... ±± In direct sunlight. ‡‡ Do not use the unit if it is intended to alert the user to install the projector in the projector or something is 10% ~ 85% ±± In areas susceptible to rain or moisture. Physical damage/abuse would be present in the literature...
...Unit has been dropped. ±± Power supply cord or plug has been damaged. ±± Liquid has been spilled on to the projector. ±± Projector has been exposed to persons. As with arrow head within an equilateral triangle is intended to alert the user to the presence of uninsulated.... ±± In direct sunlight. ‡‡ Do not use the unit if it is intended to alert the user to install the projector in the projector or something is 10% ~ 85% ±± In areas susceptible to rain or moisture. Physical damage/abuse would be present in the literature...
S343 User Manual
Page 5
... as soon as described on -screen display "Setup lamp settings" menu after replacing the lamp module. ‡‡ When switching the projector off and unplug the power plug from AC outlet if the product is approaching to certain flashing images or lights contained in 3D and...attachments/accessories specified by appropriate service personnel. ‡‡ Only use or store the projector in places where smoke from oil or cigarettes may be subjected to service the unit yourself. Please call Optoma before storage. Do not use the 3D function. The bright light may cause electric ...
... as soon as described on -screen display "Setup lamp settings" menu after replacing the lamp module. ‡‡ When switching the projector off and unplug the power plug from AC outlet if the product is approaching to certain flashing images or lights contained in 3D and...attachments/accessories specified by appropriate service personnel. ‡‡ Only use or store the projector in places where smoke from oil or cigarettes may be subjected to service the unit yourself. Please call Optoma before storage. Do not use the 3D function. The bright light may cause electric ...
S343 User Manual
Page 6
... spectacles, sunglasses, protective goggles, etc.) may be physically harmful to the screen for an extended period of Texas Instruments. Accordingly, DO NOT place your 3D PROJECTOR near open stairwells, cables, balconies, or other product names used in this manual, nor any of the following symptoms, stop viewing the 3D projection and...
... spectacles, sunglasses, protective goggles, etc.) may be physically harmful to the screen for an extended period of Texas Instruments. Accordingly, DO NOT place your 3D PROJECTOR near open stairwells, cables, balconies, or other product names used in this manual, nor any of the following symptoms, stop viewing the 3D projection and...

S343 User Manual
Page 7
... the receiving antenna. ‡‡ Increase the separation between the device and receiver. ‡‡ Connect the device into the trash when discarding. If this projector. Declaration of the global environment, please recycle it. This device must be determined by turning the device off and on a circuit different from that interference...
... the receiving antenna. ‡‡ Increase the separation between the device and receiver. ‡‡ Connect the device into the trash when discarding. If this projector. Declaration of the global environment, please recycle it. This device must be determined by turning the device off and on a circuit different from that interference...
S343 User Manual
Page 8
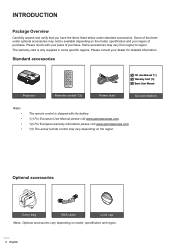
... your dealer for detailed information. Some of the items under standard accessories. Standard accessories CD User Manual *(1) Warranty Card *(2) Basic User Manual Projector Remote control *(3) Power lead Documentation Note The remote control is only supplied in some specific regions. Some accessories may vary depending on model, specification and...
... your dealer for detailed information. Some of the items under standard accessories. Standard accessories CD User Manual *(1) Warranty Card *(2) Basic User Manual Projector Remote control *(3) Power lead Documentation Note The remote control is only supplied in some specific regions. Some accessories may vary depending on model, specification and...
S343 User Manual
Page 10
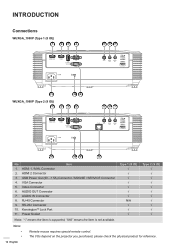
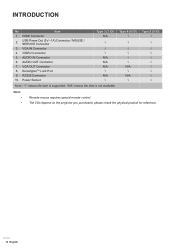
... (Type 1 (8 IO)) 1 23 4 5 67 11 WUXGA_1080P (Type 2 (9 IO)) 1 10 9 23 4 5 67 11 10 9 8 No Item 1. Video Connector 6. RJ-45 Connector 9. The I/Os depend on the projector you purchased, please check the physical product for reference. 10 English
... (Type 1 (8 IO)) 1 23 4 5 67 11 WUXGA_1080P (Type 2 (9 IO)) 1 10 9 23 4 5 67 11 10 9 8 No Item 1. Video Connector 6. RJ-45 Connector 9. The I/Os depend on the projector you purchased, please check the physical product for reference. 10 English
S343 User Manual
Page 12
... Power Out (5V 1A) Connector / MOUSE / SERVICE Connector 3. VGA OUT Connector 8. KensingtonTM Lock Port 9. AUDIO IN Connector 6. INTRODUCTION No Item 1. The I/Os depend on the projector you purchased, please check the physical product for reference. 12 English VGA IN Connector 4.
... Power Out (5V 1A) Connector / MOUSE / SERVICE Connector 3. VGA OUT Connector 8. KensingtonTM Lock Port 9. AUDIO IN Connector 6. INTRODUCTION No Item 1. The I/Os depend on the projector you purchased, please check the physical product for reference. 12 English VGA IN Connector 4.
S343 User Manual
Page 18
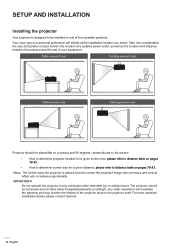
...the size and position of your screen, the location of a suitable power outlet, as well as the location and distance between the projector and the rest of your equipment. Your room layout or personal preference will invalidate the warranty and may shorten the lifetime of four... possible positions. For none standard installation advise please contact Optoma. 18 English Table mount front Ceiling mount front Table mount rear Ceiling mount rear Projector should be placed flat on a surface and 90 degrees / perpendicular to the screen. ‡...
...the size and position of your screen, the location of a suitable power outlet, as well as the location and distance between the projector and the rest of your equipment. Your room layout or personal preference will invalidate the warranty and may shorten the lifetime of four... possible positions. For none standard installation advise please contact Optoma. 18 English Table mount front Ceiling mount front Table mount rear Ceiling mount rear Projector should be placed flat on a surface and 90 degrees / perpendicular to the screen. ‡...
S343 User Manual
Page 19
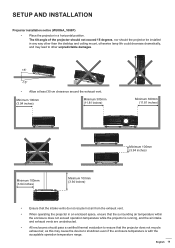
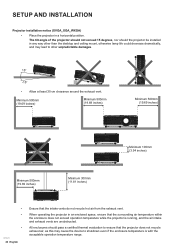
..., and the air intake and exhaust vents are unobstructed. ‡‡ All enclosures should the projector be installed in a horizontal position. SETUP AND INSTALLATION Projector installation notice (WUXGA_1080P) ‡‡ Place the projector in any way other unpredictable damages. 15° -15° ‡‡ Allow at ... ‡‡ Ensure that the intake vents do not recycle hot air from the exhaust vent. ‡‡ When operating the projector in an enclosed space, ensure that the surrounding air temperature within the enclosure does not exceed operation temperature while the...
..., and the air intake and exhaust vents are unobstructed. ‡‡ All enclosures should the projector be installed in a horizontal position. SETUP AND INSTALLATION Projector installation notice (WUXGA_1080P) ‡‡ Place the projector in any way other unpredictable damages. 15° -15° ‡‡ Allow at ... ‡‡ Ensure that the intake vents do not recycle hot air from the exhaust vent. ‡‡ When operating the projector in an enclosed space, ensure that the surrounding air temperature within the enclosure does not exceed operation temperature while the...
S343 User Manual
Page 20
...Minimum 500mm (19.69 inches) Minimum 100mm (3.94 inches) Minimum 500mm (19.69 inches) Minimum 300mm (11.81 inches) 20 English Ensure that the projector does not recycle exhaust air, as this may lead to other unpredictable damages. 15° -15° ‡‡ Allow at least 30 cm ...device to shutdown even if the enclosure temperature is running, and the air intake and exhaust vents are unobstructed. The tilt angle of the projector should not exceed 15 degrees, nor should pass a certified thermal evaluation to ensure that the intake vents do not recycle hot air from the...
...Minimum 500mm (19.69 inches) Minimum 100mm (3.94 inches) Minimum 500mm (19.69 inches) Minimum 300mm (11.81 inches) 20 English Ensure that the projector does not recycle exhaust air, as this may lead to other unpredictable damages. 15° -15° ‡‡ Allow at least 30 cm ...device to shutdown even if the enclosure temperature is running, and the air intake and exhaust vents are unobstructed. The tilt angle of the projector should not exceed 15 degrees, nor should pass a certified thermal evaluation to ensure that the intake vents do not recycle hot air from the...

S343 User Manual
Page 28
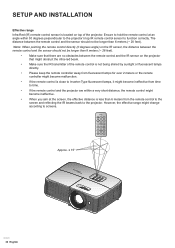
...decrease the projected image size. ‡‡ To adjust the focus, turn the zoom lever clockwise or counterclockwise to raise or lower the projector. Tilt-Adjustment Feet Tilt-Adjustment Ring Zoom and focus ‡‡ To adjust the image size, turn the focus ring clockwise or ...counterclockwise until the image is equipped with elevator feet for adjusting the image height. 1. SETUP AND INSTALLATION Adjusting the projector image Image height The projector is sharp and legible. Locate the adjustable foot you wish to 12m (SVGA, XGA, and WXGA models). 28 English Focus ...
...decrease the projected image size. ‡‡ To adjust the focus, turn the zoom lever clockwise or counterclockwise to raise or lower the projector. Tilt-Adjustment Feet Tilt-Adjustment Ring Zoom and focus ‡‡ To adjust the image size, turn the focus ring clockwise or ...counterclockwise until the image is equipped with elevator feet for adjusting the image height. 1. SETUP AND INSTALLATION Adjusting the projector image Image height The projector is sharp and legible. Locate the adjustable foot you wish to 12m (SVGA, XGA, and WXGA models). 28 English Focus ...
S343 User Manual
Page 30
... from the remote control to the screen and reflecting the IR beams back to screens. However, the effective range might change according to the projector. Ensure to hold the remote control at an angle within a very short distance, the remote control might become ineffective from time to time.... ‡‡ If the remote control and the projector are no obstacles between the remote control and the sensor should not be longer than 6 meters (~ 20 feet). The distance between the remote...
... from the remote control to the screen and reflecting the IR beams back to screens. However, the effective range might change according to the projector. Ensure to hold the remote control at an angle within a very short distance, the remote control might become ineffective from time to time.... ‡‡ If the remote control and the projector are no obstacles between the remote control and the sensor should not be longer than 6 meters (~ 20 feet). The distance between the remote...
S343 User Manual
Page 31
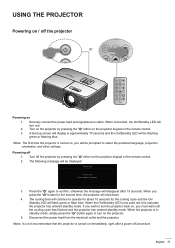
... Power Off Power Off? When the On/Standby LED turns solid red, this indicates the projector has entered standby mode. When the projector is turned on the projector. 5. Note: The first time the projector is in approximately 10 seconds and the On/Standby LED will be prompted to operate for about... 10 seconds for the second time, the projector will continue to select the preferred language, projection orientation, and other settings. Press power key again. 3. When you press the " " button ...
... Power Off Power Off? When the On/Standby LED turns solid red, this indicates the projector has entered standby mode. When the projector is turned on the projector. 5. Note: The first time the projector is in approximately 10 seconds and the On/Standby LED will be prompted to operate for about... 10 seconds for the second time, the projector will continue to select the preferred language, projection orientation, and other settings. Press power key again. 3. When you press the " " button ...
S343 User Manual
Page 32
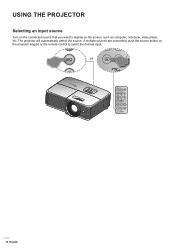
or 32 English If multiple sources are connected, push the source button on the projector keypad or the remote control to display on the connected source that you want to select the desired input. The projector will automatically detect the source. USING THE PROJECTOR Selecting an input source Turn on the screen, such as computer, notebook, video player, etc.
or 32 English If multiple sources are connected, push the source button on the projector keypad or the remote control to display on the connected source that you want to select the desired input. The projector will automatically detect the source. USING THE PROJECTOR Selecting an input source Turn on the screen, such as computer, notebook, video player, etc.
S343 User Manual
Page 33
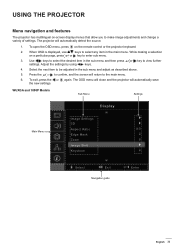
... the or again. Press the or to confirm, and the screen will return to view further settings. The OSD menu will close and the projector will automatically detect the source. 1. While making a selection on -screen display menus that allow you to make image adjustments and change a variety...Main Menu Image Settings 3D Aspect Ratio Edge Mask Zoom Image Shift Keystone Select Exit Navigation guide Enter English 33 USING THE PROJECTOR Menu navigation and features The projector has multilingual on a particular page, press or key to enter sub menu. 3. To open the OSD menu, press ...
... the or again. Press the or to confirm, and the screen will return to view further settings. The OSD menu will close and the projector will automatically detect the source. 1. While making a selection on -screen display menus that allow you to make image adjustments and change a variety...Main Menu Image Settings 3D Aspect Ratio Edge Mask Zoom Image Shift Keystone Select Exit Navigation guide Enter English 33 USING THE PROJECTOR Menu navigation and features The projector has multilingual on a particular page, press or key to enter sub menu. 3. To open the OSD menu, press ...


