
User manual
Page 1
DLP® Projector User manual
DLP® Projector User manual
User manual
Page 2
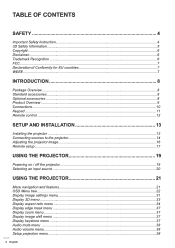
... Keypad...11 Remote control...12 SETUP AND INSTALLATION 13 Installing the projector...13 Connecting sources to the projector 14 Adjusting the projector image...16 Remote setup...17 USING THE PROJECTOR 19 Powering on / off the projector 19 Selecting an input source...20 USING The projector 21 Menu navigation and features 21 OSD Menu tree...22 Display...
... Keypad...11 Remote control...12 SETUP AND INSTALLATION 13 Installing the projector...13 Connecting sources to the projector 14 Adjusting the projector image...16 Remote setup...17 USING THE PROJECTOR 19 Powering on / off the projector 19 Selecting an input source...20 USING The projector 21 Menu navigation and features 21 OSD Menu tree...22 Display...

User manual
Page 3
... settings menu...39 Setup security menu...40 Setup HDMI link settings menu 40 Setup test pattern menu...41 Setup remote settings menu...41 Setup projector ID menu...41 Setup options menu...41 Setup reset all menu...42 Info menu...42 maintenance 43 Replacing the lamp...43 Installing and cleaning... the dust filter 45 additional information 46 Compatible resolutions...46 Image size and projection distance 49 Projector dimensions and ceiling mount installation 50 IR remote codes...51 Troubleshooting...53 Warning indicators...55 Specifications...57...
... settings menu...39 Setup security menu...40 Setup HDMI link settings menu 40 Setup test pattern menu...41 Setup remote settings menu...41 Setup projector ID menu...41 Setup options menu...41 Setup reset all menu...42 Info menu...42 maintenance 43 Replacing the lamp...43 Installing and cleaning... the dust filter 45 additional information 46 Compatible resolutions...46 Image size and projection distance 49 Projector dimensions and ceiling mount installation 50 IR remote codes...51 Troubleshooting...53 Warning indicators...55 Specifications...57...

User manual
Page 4
...maintenance as radiators, heaters, stoves or any ventilation openings. Physical damage/abuse would be repaired by appropriate service personnel. 4 English The projector may fall over heating, it has been physically damaged or abused. Important Safety Instruction ‡‡ Do not block any other hazards...result in a fire. ‡‡ Do not use the projector in a location that could result in this may cause electric shock. ‡‡ Do not attempt to service the unit yourself. Please call Optoma before you to dangerous voltages or other apparatus such as this user...
...maintenance as radiators, heaters, stoves or any ventilation openings. Physical damage/abuse would be repaired by appropriate service personnel. 4 English The projector may fall over heating, it has been physically damaged or abused. Important Safety Instruction ‡‡ Do not block any other hazards...result in a fire. ‡‡ Do not use the projector in a location that could result in this may cause electric shock. ‡‡ Do not attempt to service the unit yourself. Please call Optoma before you to dangerous voltages or other apparatus such as this user...

User manual
Page 5
...medical specialist: (1) altered vision; (2) light-headedness; (3) dizziness; (4) involuntary movements such as non standard installation may affect the projector performance. ‡‡ Use a power strip and or surge protector. Please contact your local reseller or service center to clean...135; Turn off , please ensure the cooling cycle has been completed before disconnecting power. To replace the lamp, follow the correct projector orientation installation as eye or muscle twitching; (5) confusion; (6) nausea; (7) loss of awareness; (8) convulsions; (9) cramps; Photosensitive ...
...medical specialist: (1) altered vision; (2) light-headedness; (3) dizziness; (4) involuntary movements such as non standard installation may affect the projector performance. ‡‡ Use a power strip and or surge protector. Please contact your local reseller or service center to clean...135; Turn off , please ensure the cooling cycle has been completed before disconnecting power. To replace the lamp, follow the correct projector orientation installation as eye or muscle twitching; (5) confusion; (6) nausea; (7) loss of awareness; (8) convulsions; (9) cramps; Photosensitive ...

User manual
Page 6
It is a trademark by Darbee Products, Inc. Accordingly, DO NOT place your 3D PROJECTOR near open stairwells, cables, balconies, or other purpose (as general spectacles, sunglasses, protective goggles, etc.) may be physically harmful to you and may cause disorientation ...
It is a trademark by Darbee Products, Inc. Accordingly, DO NOT place your 3D PROJECTOR near open stairwells, cables, balconies, or other purpose (as general spectacles, sunglasses, protective goggles, etc.) may be physically harmful to you and may cause disorientation ...
User manual
Page 7
...;‡ Low Voltage Directive 2006/95/EC ‡‡ R & TTE Directive 1999/5/EC (if product has RF function) WEEE Disposal instructions Do not throw this projector. Remarque l'intention des utilisateurs canadiens Cet appareil numerique de la classe B est conforme a la norme NMB-003 du Canada. Operation Conditions This device complies with...
...;‡ Low Voltage Directive 2006/95/EC ‡‡ R & TTE Directive 1999/5/EC (if product has RF function) WEEE Disposal instructions Do not throw this projector. Remarque l'intention des utilisateurs canadiens Cet appareil numerique de la classe B est conforme a la norme NMB-003 du Canada. Operation Conditions This device complies with...
User manual
Page 8
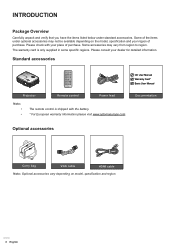
... vary depending on the model, specification and your dealer for detailed information. Standard accessories CD User Manual Warranty Card* Basic User Manual Projector Remote control Power lead Note: ‡‡ ‡‡ The remote control is only supplied in some specific regions. Some of purchase. INTRODUCTION Package Overview...
... vary depending on the model, specification and your dealer for detailed information. Standard accessories CD User Manual Warranty Card* Basic User Manual Projector Remote control Power lead Note: ‡‡ ‡‡ The remote control is only supplied in some specific regions. Some of purchase. INTRODUCTION Package Overview...
User manual
Page 9
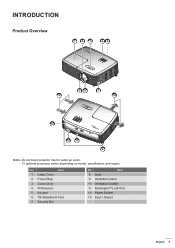
Keypad 6. Ventilation (outlet) 11. No Item 1. Zoom Lever 4. IR Receiver 5. Tilt-Adjustment Foot 7. Security Bar No Item 8. Input / Output English 9 Ventilation (inlet) 10. KensingtonTM Lock Port 12. Lamp Cover 2. Focus Ring 3. Power Socket 13. Lens 9. INTRODUCTION Product Overview 1 2 3 45 68 7 9 10 13 12 11 6 Note: Do not block projector inlet or outlet air vents. (*) optional accessory varies depending on model, specification, and region.
Keypad 6. Ventilation (outlet) 11. No Item 1. Zoom Lever 4. IR Receiver 5. Tilt-Adjustment Foot 7. Security Bar No Item 8. Input / Output English 9 Ventilation (inlet) 10. KensingtonTM Lock Port 12. Lamp Cover 2. Focus Ring 3. Power Socket 13. Lens 9. INTRODUCTION Product Overview 1 2 3 45 68 7 9 10 13 12 11 6 Note: Do not block projector inlet or outlet air vents. (*) optional accessory varies depending on model, specification, and region.

User manual
Page 13
... front Ceiling mount front Table mount rear Ceiling mount rear Projector should be horizontal and not tilted either forwards/backwards or left/right. For none standard installation advise please contact Optoma. Note: The further away the projector is designed to be placed flat on a surface and ...90 degrees / perpendicular to the screen. ‡‡ How to determine projector location for a given screen size, please refer to...
... front Ceiling mount front Table mount rear Ceiling mount rear Projector should be horizontal and not tilted either forwards/backwards or left/right. For none standard installation advise please contact Optoma. Note: The further away the projector is designed to be placed flat on a surface and ...90 degrees / perpendicular to the screen. ‡‡ How to determine projector location for a given screen size, please refer to...
User manual
Page 14
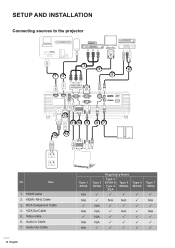
... 2 SVGA P P N/A N/A N/A N/A P Regulatory Name Type 3 SVGA & Type 4 XGA Type 5 WXGA PP N/A N/A PP P N/A PP PP PP Type 6 WXGA P P P P P P P Type 7 1080p P N/A P N/A P P P SETUP AND INSTALLATION Connecting sources to the projector 12 3 4 6 5 HDMI 1 HDMI 2 / MHL USB Power Out (5V 1.0A) MOUSE SERVICE VGA-IN / YPbPr VGA-OUT / YPbPr RS-232C VIDEO Audio In Audio Out MOLEX...
... 2 SVGA P P N/A N/A N/A N/A P Regulatory Name Type 3 SVGA & Type 4 XGA Type 5 WXGA PP N/A N/A PP P N/A PP PP PP Type 6 WXGA P P P P P P P Type 7 1080p P N/A P N/A P P P SETUP AND INSTALLATION Connecting sources to the projector 12 3 4 6 5 HDMI 1 HDMI 2 / MHL USB Power Out (5V 1.0A) MOUSE SERVICE VGA-IN / YPbPr VGA-OUT / YPbPr RS-232C VIDEO Audio In Audio Out MOLEX...
User manual
Page 16
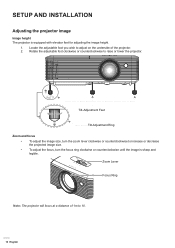
... increase or decrease the projected image size. ‡‡ To adjust the focus, turn the zoom lever clockwise or counterclockwise to raise or lower the projector. Tilt-Adjustment Feet Tilt-Adjustment Ring Zoom and focus ‡‡ To adjust the image size, turn the focus ring clockwise or counterclockwise until the... equipped with elevator feet for adjusting the image height. 1. Locate the adjustable foot you wish to 10. 16 English Zoom Lever Focus Ring Note: The projector will focus at a distance of 1m to adjust on the underside of the...
... increase or decrease the projected image size. ‡‡ To adjust the focus, turn the zoom lever clockwise or counterclockwise to raise or lower the projector. Tilt-Adjustment Feet Tilt-Adjustment Ring Zoom and focus ‡‡ To adjust the image size, turn the focus ring clockwise or counterclockwise until the... equipped with elevator feet for adjusting the image height. 1. Locate the adjustable foot you wish to 10. 16 English Zoom Lever Focus Ring Note: The projector will focus at a distance of 1m to adjust on the underside of the...

User manual
Page 18
...become ineffective. Ensure to hold the remote control at an angle within 20 degrees perpendicular to the projector's IR remote control sensor to time. ‡‡ If the remote control and the projector are no obstacles between the remote control and the sensor should not be longer than 7 meters ...controller away from time to function correctly. Approx. 10° 18 English The distance between the remote control and the IR sensor on the projector that there are within a very short distance, the remote control might obstruct the infra-red beam. ‡‡ Make sure the IR ...
...become ineffective. Ensure to hold the remote control at an angle within 20 degrees perpendicular to the projector's IR remote control sensor to time. ‡‡ If the remote control and the projector are no obstacles between the remote control and the sensor should not be longer than 7 meters ...controller away from time to function correctly. Approx. 10° 18 English The distance between the remote control and the IR sensor on the projector that there are within a very short distance, the remote control might obstruct the infra-red beam. ‡‡ Make sure the IR ...
User manual
Page 19
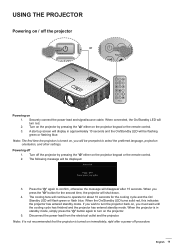
...the message will flash green or flash blue. Disconnect the power lead from the electrical outlet and the projector. Turn on the projector by pressing the " " either on the projector keypad or the remote control. 2. The cooling fans will continue to operate for about 10 seconds for ...be displayed: Power Off Power Off? Note: It is not recommended that the projector is turned on 1. Note: The first time the projector is turned on the projector. 5. USING THE PROJECTOR Powering on / off the projector or Powering on , you will be prompted to select the preferred language, projection ...
...the message will flash green or flash blue. Disconnect the power lead from the electrical outlet and the projector. Turn on the projector by pressing the " " either on the projector keypad or the remote control. 2. The cooling fans will continue to operate for about 10 seconds for ...be displayed: Power Off Power Off? Note: It is not recommended that the projector is turned on 1. Note: The first time the projector is turned on the projector. 5. USING THE PROJECTOR Powering on / off the projector or Powering on , you will be prompted to select the preferred language, projection ...
User manual
Page 20
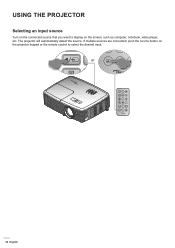
If multiple sources are connected, push the source button on the screen, such as computer, notebook, video player, etc. or 20 English USING THE PROJECTOR Selecting an input source Turn on the connected source that you want to display on the projector keypad or the remote control to select the desired input. The projector will automatically detect the source.
If multiple sources are connected, push the source button on the screen, such as computer, notebook, video player, etc. or 20 English USING THE PROJECTOR Selecting an input source Turn on the connected source that you want to display on the projector keypad or the remote control to select the desired input. The projector will automatically detect the source.
User manual
Page 21
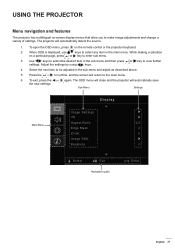
... press on -screen display menus that allow you to view further settings. Adjust the settings by using keys. 4. To exit, press the or again. The projector will automatically save the new settings. When OSD is displayed, use keys to select any item in the sub menu and then press or key...to be adjusted in the sub menu and adjust as described above. 5. Use keys to the main menu. 6. The OSD menu will close and the projector will automatically detect the source. 1. Select the next item to enter sub menu. 3. Press the or to confirm, and the screen will return to select...
... press on -screen display menus that allow you to view further settings. Adjust the settings by using keys. 4. To exit, press the or again. The projector will automatically save the new settings. When OSD is displayed, use keys to select any item in the sub menu and then press or key...to be adjusted in the sub menu and adjust as described above. 5. Use keys to the main menu. 6. The OSD menu will close and the projector will automatically detect the source. 1. Select the next item to enter sub menu. 3. Press the or to confirm, and the screen will return to select...
User manual
Page 23
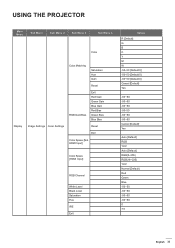
USING THE PROJECTOR Main Menu Sub Menu Sub Menu 2 Sub Menu 3 Sub Menu 4 Color Display Color Matching Saturation Hue Gain Reset RGB Gain/Bias Exit Red Gain Green ...
USING THE PROJECTOR Main Menu Sub Menu Sub Menu 2 Sub Menu 3 Sub Menu 4 Color Display Color Matching Saturation Hue Gain Reset RGB Gain/Bias Exit Red Gain Green ...

User manual
Page 24
... Off [Default] 4:3 16:9 16:10 [WXGA WUXGA models] LBX [except SVGA XGA models] Native Auto 0~10 [Default: 0] -5~25 [Default: 0] [Default:0] -40~40 [Default:0] USING THE PROJECTOR Main Menu Sub Menu Sub Menu 2 Sub Menu 3 Automatic Signal Image Settings Frequency Phase H. V: 0 H: 100; V: 100 H: -100; V: -100 H: 100; Position V. V: -100 H: -100...
... Off [Default] 4:3 16:9 16:10 [WXGA WUXGA models] LBX [except SVGA XGA models] Native Auto 0~10 [Default: 0] -5~25 [Default: 0] [Default:0] -40~40 [Default:0] USING THE PROJECTOR Main Menu Sub Menu Sub Menu 2 Sub Menu 3 Automatic Signal Image Settings Frequency Phase H. V: 0 H: 100; V: 100 H: -100; V: -100 H: 100; Position V. V: -100 H: -100...

User manual
Page 25
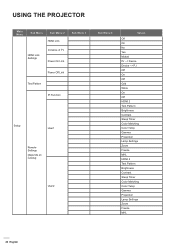
USING THE PROJECTOR Main Menu Sub Menu Audio Mute Volume Sub Menu 2 Sub Menu 3 Projection Screen Type [WXGA WUXGA models] Lamp Settings Lamp Reminder Lamp Reset Optional Filter ...
USING THE PROJECTOR Main Menu Sub Menu Audio Mute Volume Sub Menu 2 Sub Menu 3 Projection Screen Type [WXGA WUXGA models] Lamp Settings Lamp Reminder Lamp Reset Optional Filter ...
User manual
Page 26
USING THE PROJECTOR Main Menu Sub Menu Sub Menu 2 HDMI Link Sub Menu 3 HDMI Link Settings Inclusive of TV Power On Link Power Off Link Test Pattern IR Function Setup User1 Remote Settings [depends on remote] User2 Sub Menu 4 Values Off On No Yes Mutual PJ --> Device Device --> PJ Off On Off Grid White On Off HDMI 2 Test Pattern Brightness Contrast Sleep Timer Color Matching Color Temp Gamma Projection Lamp Settings Zoom Freeze MHL HDMI 2 Test Pattern Brightness Contrast Sleep Timer Color Matching Color Temp Gamma Projection Lamp Settings Zoom Freeze MHL 26 English
USING THE PROJECTOR Main Menu Sub Menu Sub Menu 2 HDMI Link Sub Menu 3 HDMI Link Settings Inclusive of TV Power On Link Power Off Link Test Pattern IR Function Setup User1 Remote Settings [depends on remote] User2 Sub Menu 4 Values Off On No Yes Mutual PJ --> Device Device --> PJ Off On Off Grid White On Off HDMI 2 Test Pattern Brightness Contrast Sleep Timer Color Matching Color Temp Gamma Projection Lamp Settings Zoom Freeze MHL HDMI 2 Test Pattern Brightness Contrast Sleep Timer Color Matching Color Temp Gamma Projection Lamp Settings Zoom Freeze MHL 26 English


