Optoma TX650 Support and Manuals
Get Help and Manuals for this Optoma item

View All Support Options Below
Free Optoma TX650 manuals!
Problems with Optoma TX650?
Ask a Question
Free Optoma TX650 manuals!
Problems with Optoma TX650?
Ask a Question
Popular Optoma TX650 Manual Pages
User Manual - Page 1
... 20
How to operate ...20 Menu Tree...21 Language...22 Management I...23 Management II...25 Image-I ...26 Image-II (Computer Mode / Video Mode 28 Colour Setting ...30
Appendices 31 Troubleshooting 31 Replacing the lamp 35 Compatibility Modes 36 Ceiling Mount Installation 37 Optoma Global Offices 38
English
User Manual - Page 2
... its ventilation openings.
B. Please call Optoma to be of sufficient magnitude to constitute a risk of electric shock to persons. Do not install near you to qualified service personnel. Important Safety Instruction
1. Do not let objects or liquids enter the projector -as they may touch dangerous voltage points or short-out parts that could result in an...
User Manual - Page 3
...lamp module has been replaced.
This product will not turn back on the projector first and then the signal sources. Warning - Usage Notice
Precautions
Follow all changing instructions. When the lamp reaches... the procedures listed under "Replacing the Lamp". (see page 35)
English Do not look into the projector's lens when the lamp is in this user's guide to maximize the life of...
User Manual - Page 12

... accessories. Make sure the timing of the display mode is compatible with your computer,
please set the display mode of your graphic card less than or equal to the "Compatibility Modes" section on page 36. Installation
Connecting the Projector
Due to the difference in applications for YPbPr (Optional Accessory) 7 RS232 Cable (Optional...
User Manual - Page 14
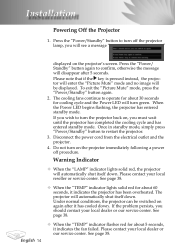
... the message will be switched on the projector immediately following a power off procedure. Under normal conditions, the projector can be displayed. Press the "Power/ Standby" button again to restart the projector.
3. See page 38. Installation
Powering off the projector
lamp, you should contact your local dealer or our service center. Press the "Power/Standby" button to...
User Manual - Page 18

...Clear your selection. English 18 Re-Sync
Automatically synchronizes the projector to pause the screen image. Four Directional Select Keys
Use to select items ... an image.
Keystone / Adjusts image distortion caused by tilting the projector (±15
degrees). Color Setting
Adjust the Red, Green, Blue, Yellow, Cyan and Magenta colors
...
User Manual - Page 20
... in the sub menu and adjust as described above.
5. The OSD menu will close and the projector will automatically detect the source. Main Menu
English 20
Sub Menu
Setting The projector will automatically save the new settings. Use keys to be adjusted in the main menu. Select the next item to select the desired...
User Manual - Page 23

..., use the remote control or press
the "Enter" key on , it off , the projector will search specified connection port. Projection
Front-Desktop
The factory default setting.
Rear-Desktop
When you can still be locked, but the projector can project behind a translucent screen with ceiling mounted projection.
User Controls
Management I
Menu Location...
User Manual - Page 24

... Controls
Keystone (Keystone Correction)
Adjusts image distortion caused by tilting projector. (±15 degrees)
Digital Zoom
Press the to reduce the size of an image. Press the to magnify an image on the projector without password verification. tion to the factory default settings. Reset
Choose "Yes" to return the display parameters on...
User Manual - Page 25
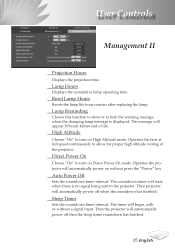
... Lamp Hours
Resets the lamp life hour counter after replacing the lamp. The message will start, when there is displayed. Then projector will begin, with or without press the "Power"... lamp operating time.
Auto Power Off
Sets the countdown timer interval. The countdown timer will appear 30 hours before end of the projector. Sleep Timer
Sets the countdown timer interval. Direct Power ...
User Manual - Page 31
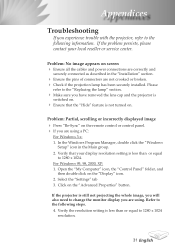
... if the projection lamp has been securely installed. Problem: No image appears on . For Windows 95, 98, 2000, XP: 1. In the Windows Program Manager, double click the "Windows
Setup" icon in the "Installation" section.
Ensure the pins of connectors are using . Appendices
Troubleshooting
If you experience trouble with the projector, refer to the following steps. 4. Verify...
User Manual - Page 32

...computer. Problem: Image is in use. choose the resolution mode you need under the "Models" box...setting from your monitor
freezes, restart all devices." Next, select "Standard monitor types" under the "Monitor" tab .
6. Problem: The screen of your computer's documentation for detailed information. Problem...
5.
Click on the projector lens. English 32 Each has a different ...
User Manual - Page 33
... "Replacing the Lamp".
If this happens, the projector will burn out and may
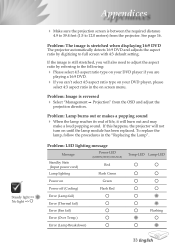
make a loud popping sound. Problem: The image is reversed Select "Management Projection" from the projector.
Problem: Image is stretched when displaying 16:9 DVD The projector automatically detects 16:9 DVD and adjusts the aspect ratio by referring to full screen with 4:3 default setting...
User Manual - Page 35

... lamp module.
To replace the lamp module, reverse the previous steps.
35 English Make sure the projector has been cooled down at least 30 minutes before changing lamp!
2
3 4
Warning: To reduce the risk of personal injury, do not drop the lamp module or touch the lamp bulb. Turn off the power to...
User Manual - Page 38

...-882-4229
www.optoma.com
Europe
42 Caxton Way, The Watford Business Park
Watford, Hertfordshire, WD18 8QZ, UK
Tel : +44 (0) 1923 691 800
Fax: +44 (0) 1923 691 888
www.optomaeurope.com
Service Tel : +44 (0)1923 691865 Service : service@tsc-europe.com
Taiwan
5F., No. 108, Minchiuan Rd.
Appendices
Optoma Global Offices
For service or support please contact...
Optoma TX650 Reviews
We have not received any reviews for Optoma yet.