

User's Manual
Page 2
... comply with FCC regulations. Do not use near water or moisture. Clean only with the instructions, may cause harmful interference to radio communications. Opening or removing covers may cause undesired operation. Please contact your product or on its packaging, indicates that to which can radiate radio frequency energy and, if not installed and used in a classroom, adequately supervise students when...
... comply with FCC regulations. Do not use near water or moisture. Clean only with the instructions, may cause harmful interference to radio communications. Opening or removing covers may cause undesired operation. Please contact your product or on its packaging, indicates that to which can radiate radio frequency energy and, if not installed and used in a classroom, adequately supervise students when...
User's Manual
Page 3
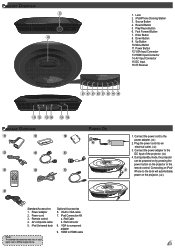
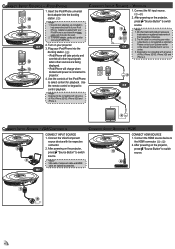
...Down Button 9. DC Input 16. Connect the power adapter to VGA cable 7. AV composite cable 5. Fast Forward Button 7. Plug the power cord into an electrical outlet. () 3. Remote control 4. iPad Connection Kit a. iPad Cable b. Lens 2. Rewind Button 5. Enter Button 8. Menu i.Menu Enter Repeat Shuffle 4 3 4 5 6 7 8 9 10 POWER ON 2 1 1. During standby mode, the projector can be powered on by pressing the power button on the projector. () 4 Standard Accessories 1. VGA to the DC Input of the projector. () 4. IR Receiver VGA AV...
...Down Button 9. DC Input 16. Connect the power adapter to VGA cable 7. AV composite cable 5. Fast Forward Button 7. Plug the power cord into an electrical outlet. () 3. Remote control 4. iPad Connection Kit a. iPad Cable b. Lens 2. Rewind Button 5. Enter Button 8. Menu i.Menu Enter Repeat Shuffle 4 3 4 5 6 7 8 9 10 POWER ON 2 1 1. During standby mode, the projector can be powered on by pressing the power button on the projector. () 4 Standard Accessories 1. VGA to the DC Input of the projector. () 4. IR Receiver VGA AV...
User's Manual
Page 4
.../ iPhone. CONNECT INPUT SOURCE - All other sources are being displayed. 1 • iPod/iPhone will take priority and override all other input signals 2 when other brand and product names are trademarks or registered trademarks of their respective companies. 2. The AV cable for playback. HDMI CONNECT HDMI SOURCE 1. Several dock adapters are optional accessories. Use the remote control or keypad to switch source. 1 2 or 1 1. After powering on the projector, press "Source Button" to switch 1 source. 2 1 2 4 Please...
.../ iPhone. CONNECT INPUT SOURCE - All other sources are being displayed. 1 • iPod/iPhone will take priority and override all other input signals 2 when other brand and product names are trademarks or registered trademarks of their respective companies. 2. The AV cable for playback. HDMI CONNECT HDMI SOURCE 1. Several dock adapters are optional accessories. Use the remote control or keypad to switch source. 1 2 or 1 1. After powering on the projector, press "Source Button" to switch 1 source. 2 1 2 4 Please...

User's Manual
Page 5
Button Source Source Rewind Fast Forward Play/Pause Enter Enter Down Up Menu Menu Power Mute Aspect Ratio Image Off Info. Switch 4:3/16:9/Auto - LED on iPhone Using the Remote Control Source Info. Menu i.Menu Enter 1. Select and confirm the selected item. () 7. main menu. • Press it again to on /off - Display metadata - Toggle Shuffle option to hide the OSD menu. • If the projector is left idle...
Button Source Source Rewind Fast Forward Play/Pause Enter Enter Down Up Menu Menu Power Mute Aspect Ratio Image Off Info. Switch 4:3/16:9/Auto - LED on iPhone Using the Remote Control Source Info. Menu i.Menu Enter 1. Select and confirm the selected item. () 7. main menu. • Press it again to on /off - Display metadata - Toggle Shuffle option to hide the OSD menu. • If the projector is left idle...

User's Manual
Page 6
SOURCE: HDMI, COMPOSITE AV (AV IN), VGA Input signal source Display OSD menu Picture Menu Image Mode: Select image mode (Bright, Cinema, Photo). Color Mode: Select color mode (Standard, Extended). Contrast: Set the contrast level. Picture Menu Music Menu System Menu Languages: Set the OSD language. Signal: Select signal mode (H-Position, V-Position, Clock, Phase) * "Signal" is only available when the source input is VGA. Mute: Toggle mute option to on/off. System Menu System Menu (VGA source) 6 Music Menu EQ: Select equalizer mode (Standard, Deep Bass, Treble, Movie...
SOURCE: HDMI, COMPOSITE AV (AV IN), VGA Input signal source Display OSD menu Picture Menu Image Mode: Select image mode (Bright, Cinema, Photo). Color Mode: Select color mode (Standard, Extended). Contrast: Set the contrast level. Picture Menu Music Menu System Menu Languages: Set the OSD language. Signal: Select signal mode (H-Position, V-Position, Clock, Phase) * "Signal" is only available when the source input is VGA. Mute: Toggle mute option to on/off. System Menu System Menu (VGA source) 6 Music Menu EQ: Select equalizer mode (Standard, Deep Bass, Treble, Movie...

User's Manual
Page 7
... the projector closer to on . • Make sure the "TV OUT" setting of focus • Adjust the Focus Dial. • Make sure the projection screen is reversed • Select "Source --> System --> Projection" from the screen. TROUBLESHOOTING If you experience a problem with your local reseller or service center. See page 5. Audio Problems No sound • Press the Volume + button. (See page 5) COMPATIBILITY MODE Timing Table Mode Resolution V-Sync (Hz) 640x480 60 800x600 60 VGA...
... the projector closer to on . • Make sure the "TV OUT" setting of focus • Adjust the Focus Dial. • Make sure the projection screen is reversed • Select "Source --> System --> Projection" from the screen. TROUBLESHOOTING If you experience a problem with your local reseller or service center. See page 5. Audio Problems No sound • Press the Volume + button. (See page 5) COMPATIBILITY MODE Timing Table Mode Resolution V-Sync (Hz) 640x480 60 800x600 60 VGA...


