
User Manual
Page 1
...Overview 8 Main Unit 8 Input/Output Connections 9 Remote Control 10 Installation 11 Connecting the Projector 11 Connect to Computer/Notebook......... 11 Connect to Video Sources 12 Connect to 3D Video... Projector..........16 Powering On the Projector 16 Powering off the projector 17 Warning Indicator 18 Adjusting the Projected Image..........19 Adjusting the Projector's Height ........ 19 Adjusting the Projector's... Troubleshooting 49 Image Problems 49 Other Problems 51 Remote Control Problems 51 LED Lighting Messages 52 On Screen Messages 53 Compatibility Modes 54 RS232 Commands ...
...Overview 8 Main Unit 8 Input/Output Connections 9 Remote Control 10 Installation 11 Connecting the Projector 11 Connect to Computer/Notebook......... 11 Connect to Video Sources 12 Connect to 3D Video... Projector..........16 Powering On the Projector 16 Powering off the projector 17 Warning Indicator 18 Adjusting the Projected Image..........19 Adjusting the Projector's Height ........ 19 Adjusting the Projector's... Troubleshooting 49 Image Problems 49 Other Problems 51 Remote Control Problems 51 LED Lighting Messages 52 On Screen Messages 53 Compatibility Modes 54 RS232 Commands ...

User Manual
Page 3
...;■ Warning▀■ Warning- 4" (10cm) Do not look into the projector's lens when the LED is on the top, sides, and rear of fire or electric shock, do not open or disassemble the projector as recommended in operation. When switching the projector off, please ensure the cooling cycle has been completed before disconnecting...
...;■ Warning▀■ Warning- 4" (10cm) Do not look into the projector's lens when the LED is on the top, sides, and rear of fire or electric shock, do not open or disassemble the projector as recommended in operation. When switching the projector off, please ensure the cooling cycle has been completed before disconnecting...

User Manual
Page 7
Projector with lens cap Power Cord LED Brightness HDMI Link Menu 16:9 Letter-Box Pure Engine Mode 4:3 Native 2D/3D 3D Format ™™ Due to ensure all parts listed below are ...; Warranty Card Quick Start Card WEEE Card (for EMEA only) IR Remote Control (Remote may vary de- If something is missing, please contact Optoma customer service. pending on model) ™™ For European warranty information please visit www.optomaeurope.com 7 English Introduction Package Overview Unpack and inspect the box...
Projector with lens cap Power Cord LED Brightness HDMI Link Menu 16:9 Letter-Box Pure Engine Mode 4:3 Native 2D/3D 3D Format ™™ Due to ensure all parts listed below are ...; Warranty Card Quick Start Card WEEE Card (for EMEA only) IR Remote Control (Remote may vary de- If something is missing, please contact Optoma customer service. pending on model) ™™ For European warranty information please visit www.optomaeurope.com 7 English Introduction Package Overview Unpack and inspect the box...

User Manual
Page 8
Temp LED 3. Tilt-Adjustment Feet 12. Power Socket Ventilation (inlet) 5. Ventilation (outlet) 7. Zoom Ring 8. Source Button 4. Lens Cap 11. IR Receivers 6. Focus Ring 9. Lens 10. Introduction Product Overview Main Unit 4 1 5 23 78 5 6 9 11 12 10 ™™ The interface is subject to model's specifications. ™™ Do not block projector in/out air 11 vents. 13 3D SYNC Out (5V) 5V PWR Out (6W) 11 English 8 1. Input / Output Connections 13. Power Button / Power LED 2.
Temp LED 3. Tilt-Adjustment Feet 12. Power Socket Ventilation (inlet) 5. Ventilation (outlet) 7. Zoom Ring 8. Source Button 4. Lens Cap 11. IR Receivers 6. Focus Ring 9. Lens 10. Introduction Product Overview Main Unit 4 1 5 23 78 5 6 9 11 12 10 ™™ The interface is subject to model's specifications. ™™ Do not block projector in/out air 11 vents. 13 3D SYNC Out (5V) 5V PWR Out (6W) 11 English 8 1. Input / Output Connections 13. Power Button / Power LED 2.

User Manual
Page 15
... glasses: Press the "Power" button and hold until the LED switches off. 8. To turn ON 3D glasses: Press the "Power" button and the LED will flash one time indicating the glasses are ready to 3D glasses user's guide. rectly to the projector and signal is located in 3D, please check 3D device... set up cor- For more detailed information, please refer to use projector's "3D Sync. Verify that 3D ...
... glasses: Press the "Power" button and hold until the LED switches off. 8. To turn ON 3D glasses: Press the "Power" button and the LED will flash one time indicating the glasses are ready to 3D glasses user's guide. rectly to the projector and signal is located in 3D, please check 3D device... set up cor- For more detailed information, please refer to use projector's "3D Sync. Verify that 3D ...

User Manual
Page 16
...or the direct source keys on the remote control to "SETUP". Turn on the projector by pressing " " button either on the side of the projector or on the projector first and then select the signal sources. 2 Power LED Brightness HDMI Link English 16 1 Lens Cap Menu 16:9 Mode 4:3 Securely connect ... If not, push menu button and go to switch between inputs. ™™ Turn on the remote. Installation Powering On/Off the Projector Powering On the Projector 1. When connected, the Power LED will turn blue. The startup screen will detect the source automatically. The...
...or the direct source keys on the remote control to "SETUP". Turn on the projector by pressing " " button either on the side of the projector or on the projector first and then select the signal sources. 2 Power LED Brightness HDMI Link English 16 1 Lens Cap Menu 16:9 Mode 4:3 Securely connect ... If not, push menu button and go to switch between inputs. ™™ Turn on the remote. Installation Powering On/Off the Projector Powering On the Projector 1. When connected, the Power LED will turn blue. The startup screen will detect the source automatically. The...

User Manual
Page 17
... " " button on , you press the " " button for cooling cycle and the Power LED will be displayed on the projector immediately following message will flash blue. If you wish to turn off the projector 1. When the Power LED lights solid red, the projector has entered standby mode. Disconnect the power cord from the electrical outlet and...
... " " button on , you press the " " button for cooling cycle and the Power LED will be displayed on the projector immediately following message will flash blue. If you wish to turn off the projector 1. When the Power LED lights solid red, the projector has entered standby mode. Disconnect the power cord from the electrical outlet and...

User Manual
Page 18
... shutdown: ™™ Contact the nearest service center if the projector displays these symptoms. See pages 61-62 for more information. "Power" LED indicator flashes red. "TEMP" LED indicator is lit red and if "Power" LED indicator flashes red. This indicates the projector has overheated. If the warning indicator light up again, please...
... shutdown: ™™ Contact the nearest service center if the projector displays these symptoms. See pages 61-62 for more information. "Power" LED indicator flashes red. "TEMP" LED indicator is lit red and if "Power" LED indicator flashes red. This indicates the projector has overheated. If the warning indicator light up again, please...

User Manual
Page 22
SOURCE Press "SOURCE" to the "Power On/Off the Projector" section on pages 16-17. User Controls Control Panel & Remote Control Control Panel Using the Control Panel Power Button / Power LED Refer to select an input signal. Indicate the projector's status. English 22 Temp LED Indicate the projector's temperature status.
SOURCE Press "SOURCE" to the "Power On/Off the Projector" section on pages 16-17. User Controls Control Panel & Remote Control Control Panel Using the Control Panel Power Button / Power LED Refer to select an input signal. Indicate the projector's status. English 22 Temp LED Indicate the projector's temperature status.

User Manual
Page 23
...Select Keys Mode 4:3 Native 3D Format Re-Sync Video HDMI2 VGA YPbPr Turn off the projector. The input source will be displayed without scaling. Set up gamma curve type. User Controls LED Brightness HDMI Link Menu 16:9 Letter-Box Pure Engine Mode 4:3 Native 2D/3D 3D Format... Remote Control Using the Remote Control Power On Turn on the projector. Automatically synchronizes the projector to your 3D content. Use directional select keys...
...Select Keys Mode 4:3 Native 3D Format Re-Sync Video HDMI2 VGA YPbPr Turn off the projector. The input source will be displayed without scaling. Set up gamma curve type. User Controls LED Brightness HDMI Link Menu 16:9 Letter-Box Pure Engine Mode 4:3 Native 2D/3D 3D Format... Remote Control Using the Remote Control Power On Turn on the projector. Automatically synchronizes the projector to your 3D content. Use directional select keys...

User Manual
Page 24
...less than 2.35:1. 16:9 Menu Scale the image at full screen width. Display or exit the on-screen display menus for projector. English 24 User Controls LED Brightness HDMI Link Menu 16:9 Letter-Box Pure Engine Mode 4:3 Native 2D/3D 3D Format Using the Remote Control HDMI1 PureEngine... Press "HDM1" to adjust its x/y offset and brightness. LED Brightness CMS (Color Management System) Contrast Brightness Increase/Decrease the luminance of the image. (refer to page 30) Select one of the picture....
...less than 2.35:1. 16:9 Menu Scale the image at full screen width. Display or exit the on-screen display menus for projector. English 24 User Controls LED Brightness HDMI Link Menu 16:9 Letter-Box Pure Engine Mode 4:3 Native 2D/3D 3D Format Using the Remote Control HDMI1 PureEngine... Press "HDM1" to adjust its x/y offset and brightness. LED Brightness CMS (Color Management System) Contrast Brightness Increase/Decrease the luminance of the image. (refer to page 30) Select one of the picture....

User Manual
Page 40
...Color Use this feature to be operated by the remote control from front IR receiver. User Controls SYSTEM SYSTEM IMAGE DISPLAY SYSTEM Menu Location LED Hours Projection Test Pattern Background Color IR Function 12V Trigger A 12V Trigger B Anamorhic Lens FW:B01 0 Off Black All On Off...upside down position Test Pattern Display a test pattern. IR Function `` All: Choose "All", the projector can be operated by the remote control from front or top IR receiver. `` Front: Choose "Front", the projector can be used with a translucent screen. ` ` Front-Projection This is available. The image ...
...Color Use this feature to be operated by the remote control from front IR receiver. User Controls SYSTEM SYSTEM IMAGE DISPLAY SYSTEM Menu Location LED Hours Projection Test Pattern Background Color IR Function 12V Trigger A 12V Trigger B Anamorhic Lens FW:B01 0 Off Black All On Off...upside down position Test Pattern Display a test pattern. IR Function `` All: Choose "All", the projector can be operated by the remote control from front or top IR receiver. `` Front: Choose "Front", the projector can be used with a translucent screen. ` ` Front-Projection This is available. The image ...

User Manual
Page 41
...SETUP `` Auto235: SYSTEM | 12V Trigger B IMAGE DISPLAY Off On Auto235 Auto 3D Exit SYSTEM SETUP SETUP SYSTEM IMAGE DISPLAY SYSTEM Menu Location LED Hours Projection Test Pattern Background Color IR Function 12V Trigger A 12V Trigger B Anamorhic Lens SETUP FW:B01 0 Off Black All Off Auto235 ...Movable `` Auto 3D: When "Auto 3D" is enabled, the projector will automatically detect when a 3D image is shown and will be active when the projector display mode is selected. User Controls `` Top: Choose "Top", the projector can be operated by selecting the "On" option then pressing the...
...SETUP `` Auto235: SYSTEM | 12V Trigger B IMAGE DISPLAY Off On Auto235 Auto 3D Exit SYSTEM SETUP SETUP SYSTEM IMAGE DISPLAY SYSTEM Menu Location LED Hours Projection Test Pattern Background Color IR Function 12V Trigger A 12V Trigger B Anamorhic Lens SETUP FW:B01 0 Off Black All Off Auto235 ...Movable `` Auto 3D: When "Auto 3D" is enabled, the projector will automatically detect when a 3D image is shown and will be active when the projector display mode is selected. User Controls `` Top: Choose "Top", the projector can be operated by selecting the "On" option then pressing the...
User Manual
Page 53
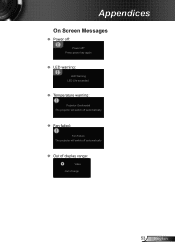
Appendices On Screen Messages ™™ Power off: Power off autormatically ™™ Out of display range: Video Out of range 53 English Press power key again ™™ LED warning: LED Warning LED Life exceeded. ™™ Temperature warning: Projector Overheated The projector will switch off autormatically ™™ Fan failed: Fan Failure The projector will switch off ?
Appendices On Screen Messages ™™ Power off: Power off autormatically ™™ Out of display range: Video Out of range 53 English Press power key again ™™ LED warning: LED Warning LED Life exceeded. ™™ Temperature warning: Projector Overheated The projector will switch off autormatically ™™ Fan failed: Fan Failure The projector will switch off ?

User Manual
Page 57
... Rate : 9600 Data Bits: 8 Parity: None Optoma Data and HT Projectors HD91/HD90 Baud Rate Stop Bits96:001 Data Bits Parity Flow ConNo8tnreol : None Stop Bits Flow Control UART16N5o1n5e 0 FIFO: Disable UART16550 FIFO Disable Projector Return (Pass): P Projector Return (Fail): F XX=00-99, projector's ID, XX=00 is for all projectors There is a after all ASCII commands...
... Rate : 9600 Data Bits: 8 Parity: None Optoma Data and HT Projectors HD91/HD90 Baud Rate Stop Bits96:001 Data Bits Parity Flow ConNo8tnreol : None Stop Bits Flow Control UART16N5o1n5e 0 FIFO: Disable UART16550 FIFO Disable Projector Return (Pass): P Projector Return (Fail): F XX=00-99, projector's ID, XX=00 is for all projectors There is a after all ASCII commands...
User Manual
Page 58
... Okabbbbbccddddee ~XX151 n Oka English 58 Position White level Black level Saturation Hue IRE Information from Projector Automatically when: Standby Mode Warming up Cooling Down Out of Range LED Fail Thermal Switch Error Fan Lock Over Temperature Lamp Hours Running Out READ/Return Information from... mode Model Name X X Command ID 3D->2D 3D Format 3D Sync. Appendices DISPLAY ~ X X Projector ID Zoom H Image Shift V Image Shift V Keystone Menu Location LED Hours Projection Test Pattern Background Color IR Function 12V Trigger A 12V Trigger B 3D Top Left Top Right...
... Okabbbbbccddddee ~XX151 n Oka English 58 Position White level Black level Saturation Hue IRE Information from Projector Automatically when: Standby Mode Warming up Cooling Down Out of Range LED Fail Thermal Switch Error Fan Lock Over Temperature Lamp Hours Running Out READ/Return Information from... mode Model Name X X Command ID 3D->2D 3D Format 3D Sync. Appendices DISPLAY ~ X X Projector ID Zoom H Image Shift V Image Shift V Keystone Menu Location LED Hours Projection Test Pattern Background Color IR Function 12V Trigger A 12V Trigger B 3D Top Left Top Right...


