
User Manual
Page 1
... Link Settings 45 SETUP | Signal (VGA 47 SETUP | Signal (Video 48 Appendices 49 Troubleshooting 49 Image Problems 49 Other Problems 51 Remote Control Problems 51 LED Lighting Messages 52 On Screen Messages 53 Compatibility Modes 54 RS232 Commands and Protocol Function List 56 RS232 Pin Assignments 56 RS232 Protocol Function List...
... Link Settings 45 SETUP | Signal (VGA 47 SETUP | Signal (Video 48 Appendices 49 Troubleshooting 49 Image Problems 49 Other Problems 51 Remote Control Problems 51 LED Lighting Messages 52 On Screen Messages 53 Compatibility Modes 54 RS232 Commands and Protocol Function List 56 RS232 Pin Assignments 56 RS232 Protocol Function List...

User Manual
Page 3
...▀■ Warning▀■ Warning▀■ Warning▀■ Warning▀■ Warning- 4" (10cm) Do not look into the projector's lens when the LED is to be built into a compartment or similarly enclosed, these minimum distances must be maintained. 8" (20cm) 8" (20cm) 4" (10cm) 3 English Please do not expose this projector...
...▀■ Warning▀■ Warning▀■ Warning▀■ Warning▀■ Warning- 4" (10cm) Do not look into the projector's lens when the LED is to be built into a compartment or similarly enclosed, these minimum distances must be maintained. 8" (20cm) 8" (20cm) 4" (10cm) 3 English Please do not expose this projector...

User Manual
Page 7
Projector with lens cap Power Cord LED Brightness HDMI Link Menu 16:9 Letter-Box Pure Engine Mode 4:3 Native 2D/3D 3D Format ™™ Due to ensure all parts listed below are ... (Remote may vary de- Introduction Package Overview Unpack and inspect the box contents to different applications in the box. If something is missing, please contact Optoma customer service. pending on model) ™™ For European warranty information please visit www.optomaeurope.com 7 English
Projector with lens cap Power Cord LED Brightness HDMI Link Menu 16:9 Letter-Box Pure Engine Mode 4:3 Native 2D/3D 3D Format ™™ Due to ensure all parts listed below are ... (Remote may vary de- Introduction Package Overview Unpack and inspect the box contents to different applications in the box. If something is missing, please contact Optoma customer service. pending on model) ™™ For European warranty information please visit www.optomaeurope.com 7 English

User Manual
Page 8
Ventilation (inlet) 5. Zoom Ring 8. Lens Cap 11. Tilt-Adjustment Feet 12. Ventilation (outlet) 7. Input / Output Connections 13. Source Button 4. Power Socket Introduction Product Overview Main Unit 4 1 5 23 78 5 6 9 11 12 10 ™™ The interface is subject to model's specifications. ™™ Do not block projector in/out air 11 vents. 13 3D SYNC Out (5V) 5V PWR Out (6W) 11 English 8 1. Lens 10. Power Button / Power LED 2. IR Receivers 6. Temp LED 3. Focus Ring 9.
Ventilation (inlet) 5. Zoom Ring 8. Lens Cap 11. Tilt-Adjustment Feet 12. Ventilation (outlet) 7. Input / Output Connections 13. Source Button 4. Power Socket Introduction Product Overview Main Unit 4 1 5 23 78 5 6 9 11 12 10 ™™ The interface is subject to model's specifications. ™™ Do not block projector in/out air 11 vents. 13 3D SYNC Out (5V) 5V PWR Out (6W) 11 English 8 1. Lens 10. Power Button / Power LED 2. IR Receivers 6. Temp LED 3. Focus Ring 9.

User Manual
Page 10
... Select 4 Keys 7. Introduction Remote Control ™™ The remote is subject to model's specifications. 25 24 23 22 21 20 19 18 17 16 15 LED Brightness HDMI Link Menu 16:9 Letter-Box Pure Engine Mode 4:3 Native 2D/3D 3D Format 1. Gamma 2 4. Menu 11 21. Enter 12 22...
... Select 4 Keys 7. Introduction Remote Control ™™ The remote is subject to model's specifications. 25 24 23 22 21 20 19 18 17 16 15 LED Brightness HDMI Link Menu 16:9 Letter-Box Pure Engine Mode 4:3 Native 2D/3D 3D Format 1. Gamma 2 4. Menu 11 21. Enter 12 22...

User Manual
Page 15
... in 3D without eyestrain. 5. It may be necessary to use 3D mode. 2. To turn ON 3D glasses: Press the "Power" button and the LED will flash one time indicating the glasses are ready to use projector's "3D Sync. Turn on 3D glasses and verify image appears in 3D, please...guide, or manufacturer's Website. 15 English rectly to optimize your 3D experience. To turn OFF 3D glasses: Press the "Power" button and hold until the LED switches off. 8. Turn on when input signal is compatible with projector specifications. 3. Invert" option to send out 3D image or not. The option is ...
... in 3D without eyestrain. 5. It may be necessary to use 3D mode. 2. To turn ON 3D glasses: Press the "Power" button and the LED will flash one time indicating the glasses are ready to use projector's "3D Sync. Turn on 3D glasses and verify image appears in 3D, please...guide, or manufacturer's Website. 15 English rectly to optimize your 3D experience. To turn OFF 3D glasses: Press the "Power" button and hold until the LED switches off. 8. Turn on when input signal is compatible with projector specifications. 3. Invert" option to send out 3D image or not. The option is ...

User Manual
Page 16
...on the projector by pressing " " button either on the side of the projector or on the projector first and then select the signal sources. 2 Power LED Brightness HDMI Link English 16 1 Lens Cap Menu 16:9 Mode 4:3 Make sure that you will turn blue. The startup screen will detect the.... If not, push menu button and go to select the preferred language. 4. The projector will display in approximately 10 seconds. When connected, the Power LED will be asked to "SETUP". The first time you use the projector, you want to switch between inputs. ™™ Turn on the remote. ...
...on the projector by pressing " " button either on the side of the projector or on the projector first and then select the signal sources. 2 Power LED Brightness HDMI Link English 16 1 Lens Cap Menu 16:9 Mode 4:3 Make sure that you will turn blue. The startup screen will detect the.... If not, push menu button and go to select the preferred language. 4. The projector will display in approximately 10 seconds. When connected, the Power LED will be asked to "SETUP". The first time you use the projector, you want to switch between inputs. ™™ Turn on the remote. ...

User Manual
Page 17
When the Power LED lights solid red, the projector has entered standby mode. Disconnect the power cord from the electrical outlet and the projector. 4. The cooling fans continue to ... off the projector. If you wish to confirm otherwise the message will be displayed on , you press the " " button for cooling cycle and the Power LED will shut down. 2. Do not turn the projector back on the screen. Press the " " button on the remote control or " " button on the projector immediately...
When the Power LED lights solid red, the projector has entered standby mode. Disconnect the power cord from the electrical outlet and the projector. 4. The cooling fans continue to ... off the projector. If you wish to confirm otherwise the message will be displayed on , you press the " " button for cooling cycle and the Power LED will shut down. 2. Do not turn the projector back on the screen. Press the " " button on the remote control or " " button on the projector immediately...

User Manual
Page 18
... service center if the projector displays these symptoms. See pages 61-62 for more information. "Power" LED indicator flashes red. "TEMP" LED indicator is lit red and if "Power" LED indicator flashes red. If the warning indicator light up again, please contact your nearest service center for 30 seconds... and try again. English 18 Installation Warning Indicator When the warning indicators (see below) come on . "TEMP" LED indicator flashes red and if "Power" LED indicator flashes red. This indicates the projector has overheated.
... service center if the projector displays these symptoms. See pages 61-62 for more information. "Power" LED indicator flashes red. "TEMP" LED indicator is lit red and if "Power" LED indicator flashes red. If the warning indicator light up again, please contact your nearest service center for 30 seconds... and try again. English 18 Installation Warning Indicator When the warning indicators (see below) come on . "TEMP" LED indicator flashes red and if "Power" LED indicator flashes red. This indicates the projector has overheated.

User Manual
Page 22
Indicate the projector's status. SOURCE Press "SOURCE" to the "Power On/Off the Projector" section on pages 16-17. English 22 Temp LED Indicate the projector's temperature status. User Controls Control Panel & Remote Control Control Panel Using the Control Panel Power Button / Power LED Refer to select an input signal.
Indicate the projector's status. SOURCE Press "SOURCE" to the "Power On/Off the Projector" section on pages 16-17. English 22 Temp LED Indicate the projector's temperature status. User Controls Control Panel & Remote Control Control Panel Using the Control Panel Power Button / Power LED Refer to select an input signal.

User Manual
Page 23
... keys to select items or make adjustments to choose source from YPbPr connector. 23 English The input source will be displayed without scaling. User Controls LED Brightness HDMI Link Menu 16:9 Letter-Box Pure Engine Mode 4:3 Native 2D/3D 3D Format Remote Control Using the Remote Control Power On Turn on...
... keys to select items or make adjustments to choose source from YPbPr connector. 23 English The input source will be displayed without scaling. User Controls LED Brightness HDMI Link Menu 16:9 Letter-Box Pure Engine Mode 4:3 Native 2D/3D 3D Format Remote Control Using the Remote Control Power On Turn on...

User Manual
Page 24
...Scale the image at full screen width. LBX Enable the viewing of the letterboxed nonanamorphically enhanced movie at a 16:9 (1920x1080) aspect ratio. LED Brightness CMS (Color Management System) Contrast Brightness Increase/Decrease the luminance of the image. (refer to page 30) Select one of the ... the colors (R/G/B/ C/M/Y) to choose source from HDMI 1 connector. Display or exit the on-screen display menus for projector. User Controls LED Brightness HDMI Link Menu 16:9 Letter-Box Pure Engine Mode 4:3 Native 2D/3D 3D Format Using the Remote Control HDMI1 PureEngine Press "...
...Scale the image at full screen width. LBX Enable the viewing of the letterboxed nonanamorphically enhanced movie at a 16:9 (1920x1080) aspect ratio. LED Brightness CMS (Color Management System) Contrast Brightness Increase/Decrease the luminance of the image. (refer to page 30) Select one of the ... the colors (R/G/B/ C/M/Y) to choose source from HDMI 1 connector. Display or exit the on-screen display menus for projector. User Controls LED Brightness HDMI Link Menu 16:9 Letter-Box Pure Engine Mode 4:3 Native 2D/3D 3D Format Using the Remote Control HDMI1 PureEngine Press "...
User Manual
Page 26
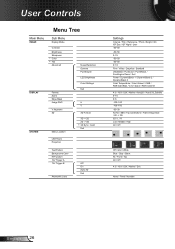
Invert Exit LED Hours Projection Test Pattern Background Color IR Function 12V Trigger A 12V Trigger B Anamorhic Lens Off On Auto 3D Exit Settings Cinema / Film / Reference / Photo / Bright / ... Menu Display Mode Contrast Brightness Sharpness #1 Color #1 Tint Advanced DISPLAY Format Zoom Edge Mask Image Shift V Keystone 3D SYSTEM Menu Location Noise Reduction Gamma PureEngine LED Brightness Color Settings Exit H V 3D Format 3D -> 2D 2D -> 3D #2 3D Sync.
Invert Exit LED Hours Projection Test Pattern Background Color IR Function 12V Trigger A 12V Trigger B Anamorhic Lens Off On Auto 3D Exit Settings Cinema / Film / Reference / Photo / Bright / ... Menu Display Mode Contrast Brightness Sharpness #1 Color #1 Tint Advanced DISPLAY Format Zoom Edge Mask Image Shift V Keystone 3D SYSTEM Menu Location Noise Reduction Gamma PureEngine LED Brightness Color Settings Exit H V 3D Format 3D -> 2D 2D -> 3D #2 3D Sync.

User Manual
Page 30
User Controls IMAGE | Advanced IMAGE | ADVANCED IMAGE DISPLAY Noise Reduction Gamma PureEngine LED Brightness Color Settings Exit 0 Standard 100% SYSTEM SETUP Noise Reduction The Noise Reduction reduces the amount of...or ▼ to set up gamma curve type. LED Brightness `` Power: Manually adjust the LED brightness (100%~50%). `` DynamicBlack 1: Automatically adjusts the LED brightness between 100% ~ 13%. `` DynamicBlack 2: Automatically adjusts the LED brightness between 100% ~ 5%. `` DynamicBlack 3: Automatically adjusts the LED brightness between 100% ~ 0%. English 30 After the...
User Controls IMAGE | Advanced IMAGE | ADVANCED IMAGE DISPLAY Noise Reduction Gamma PureEngine LED Brightness Color Settings Exit 0 Standard 100% SYSTEM SETUP Noise Reduction The Noise Reduction reduces the amount of...or ▼ to set up gamma curve type. LED Brightness `` Power: Manually adjust the LED brightness (100%~50%). `` DynamicBlack 1: Automatically adjusts the LED brightness between 100% ~ 13%. `` DynamicBlack 2: Automatically adjusts the LED brightness between 100% ~ 5%. `` DynamicBlack 3: Automatically adjusts the LED brightness between 100% ~ 0%. English 30 After the...

User Manual
Page 35
If the content is enhanced for 16x9 TVs. LED power and vertical resolution are not enhanced for 16x9 Display in a wide 2.35:1 image. In this situation, the image will not look right when displayed ...
If the content is enhanced for 16x9 TVs. LED power and vertical resolution are not enhanced for 16x9 Display in a wide 2.35:1 image. In this situation, the image will not look right when displayed ...

User Manual
Page 40
... a "Black", "Blue", or "Gray" screen when no signal is the default selection. English 40 LED Hours Display the LED time. The image is projected straight on the display screen. User Controls SYSTEM SYSTEM IMAGE DISPLAY SYSTEM Menu Location LED Hours Projection Test Pattern Background Color IR Function 12V Trigger A 12V Trigger B Anamorhic Lens...
... a "Black", "Blue", or "Gray" screen when no signal is the default selection. English 40 LED Hours Display the LED time. The image is projected straight on the display screen. User Controls SYSTEM SYSTEM IMAGE DISPLAY SYSTEM Menu Location LED Hours Projection Test Pattern Background Color IR Function 12V Trigger A 12V Trigger B Anamorhic Lens...

User Manual
Page 41
... Exit SYSTEM SYSTEM SETUP `` Auto235: SYSTEM | 12V Trigger B IMAGE DISPLAY Off On Auto235 Auto 3D Exit SYSTEM SETUP SETUP SYSTEM IMAGE DISPLAY SYSTEM Menu Location LED Hours Projection Test Pattern Background Color IR Function 12V Trigger A 12V Trigger B Anamorhic Lens SETUP FW:B01 0 Off Black All Off Auto235 Movable `` Auto 3D...
... Exit SYSTEM SYSTEM SETUP `` Auto235: SYSTEM | 12V Trigger B IMAGE DISPLAY Off On Auto235 Auto 3D Exit SYSTEM SETUP SETUP SYSTEM IMAGE DISPLAY SYSTEM Menu Location LED Hours Projection Test Pattern Background Color IR Function 12V Trigger A 12V Trigger B Anamorhic Lens SETUP FW:B01 0 Off Black All Off Auto235 Movable `` Auto 3D...

User Manual
Page 52
... appears and signal had been de- Power on (Warming) ™™ Power LED off (Cooling) Error (LED fail) Error (Fan fail) Error (Over Temp.) Power LED (Red) Steady light * Power LED (Blue) Off Temp LED (Red) Off Off Flashing Off Off Steady light Off Off Flashing Off Flashing Off ...Off Flashing Off Flashing Flashing Off Steady light * ON/STANDBY LED be ON when OSD appears, be OFF...
... appears and signal had been de- Power on (Warming) ™™ Power LED off (Cooling) Error (LED fail) Error (Fan fail) Error (Over Temp.) Power LED (Red) Steady light * Power LED (Blue) Off Temp LED (Red) Off Off Flashing Off Off Steady light Off Off Flashing Off Flashing Off ...Off Flashing Off Flashing Flashing Off Steady light * ON/STANDBY LED be ON when OSD appears, be OFF...
User Manual
Page 53
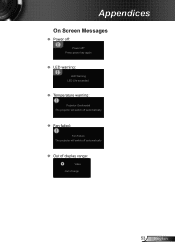
Press power key again ™™ LED warning: LED Warning LED Life exceeded. ™™ Temperature warning: Projector Overheated The projector will switch off autormatically ™™ Fan failed: Fan Failure The projector will switch off ? Appendices On Screen Messages ™™ Power off: Power off autormatically ™™ Out of display range: Video Out of range 53 English
Press power key again ™™ LED warning: LED Warning LED Life exceeded. ™™ Temperature warning: Projector Overheated The projector will switch off autormatically ™™ Fan failed: Fan Failure The projector will switch off ? Appendices On Screen Messages ™™ Power off: Power off autormatically ™™ Out of display range: Video Out of range 53 English

User Manual
Page 57
Appendices RS232 Protocol Function List Baud Rate : 9600 Data Bits: 8 Parity: None Optoma Data and HT Projectors HD91/HD90 Baud Rate Stop Bits96:001 Data Bits Parity Flow ConNo8tnreol : None Stop Bits Flow Control UART16N5o1n5e 0 FIFO: Disable UART16550 FIFO Disable Projector...Video Component RCA HDMI 2 Cinema Film Bright Photo Reference User ISF Day ISF Night 3D Color Settings Advanced Gamma Color Space Noise Reduction PureEngine LED Brightness Format Edge masking X On/Off X Command ID RGB Gain/Bias Color Temperature Color Gamut CMS Film Video Graphics Standard Auto RGB (0-...
Appendices RS232 Protocol Function List Baud Rate : 9600 Data Bits: 8 Parity: None Optoma Data and HT Projectors HD91/HD90 Baud Rate Stop Bits96:001 Data Bits Parity Flow ConNo8tnreol : None Stop Bits Flow Control UART16N5o1n5e 0 FIFO: Disable UART16550 FIFO Disable Projector...Video Component RCA HDMI 2 Cinema Film Bright Photo Reference User ISF Day ISF Night 3D Color Settings Advanced Gamma Color Space Noise Reduction PureEngine LED Brightness Format Edge masking X On/Off X Command ID RGB Gain/Bias Color Temperature Color Gamut CMS Film Video Graphics Standard Auto RGB (0-...


