
GT1080Darbee User Manual
Page 2
... of Conformity for EU countries 7 WEEE...7 INTRODUCTION 8 Package Overview...8 Standard accessories...8 Optional accessories...8 Product Overview...9 Connections...10 Keypad...11 Remote control...12 SETUP AND INSTALLATION 13 Installing the projector...13 Connecting sources to the projector 15 Adjusting the projector image...16 Remote... setup...17 USING THE PROJECTOR 19 Powering on / off the projector 19 Selecting an input source...20 USING THE PROJECTOR 21 Menu ...
... of Conformity for EU countries 7 WEEE...7 INTRODUCTION 8 Package Overview...8 Standard accessories...8 Optional accessories...8 Product Overview...9 Connections...10 Keypad...11 Remote control...12 SETUP AND INSTALLATION 13 Installing the projector...13 Connecting sources to the projector 15 Adjusting the projector image...16 Remote... setup...17 USING THE PROJECTOR 19 Powering on / off the projector 19 Selecting an input source...20 USING THE PROJECTOR 21 Menu ...
GT1080Darbee User Manual
Page 3
Setup projection menu...33 Setup lamp settings menu...33 Setup filter settings menu...34 Setup power settings menu...34 Setup security menu...35 Setup HDMI link settings menu 35 Setup test pattern menu...35 Setup remote settings menu...36 Setup 12V trigger menu...36 Setup options menu...36 Setup reset OSD menu...37 Setup reset to default menu...37 Info menu...38 MAINTENANCE......42 Image size and projection distance 43 Projector dimensions and ceiling mount installation 44 IR remote codes...45 Troubleshooting...47 Warning indicators...49 Specifications...51 Optoma global offices...52 English 3
Setup projection menu...33 Setup lamp settings menu...33 Setup filter settings menu...34 Setup power settings menu...34 Setup security menu...35 Setup HDMI link settings menu 35 Setup test pattern menu...35 Setup remote settings menu...36 Setup 12V trigger menu...36 Setup options menu...36 Setup reset OSD menu...37 Setup reset to default menu...37 Info menu...38 MAINTENANCE......42 Image size and projection distance 43 Projector dimensions and ceiling mount installation 44 IR remote codes...45 Troubleshooting...47 Warning indicators...49 Specifications...51 Optoma global offices...52 English 3
GT1080Darbee User Manual
Page 5
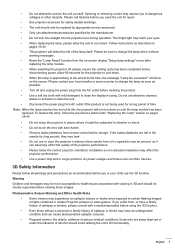
... warnings and precautions as described on pages 39-40. ‡‡ This projector will show on pages 39-40. ‡‡ Do not setup the projector in 3D and should be repaired by the manufacturer. ‡‡ Do not look into straight into the projector lens during operation. ... video games. ‡‡ Do not attempt to dangerous voltages or other hazards. Follow instructions as recommended before disconnecting power. Please call Optoma before storage. If the battery/batteries are sleep deprived or under "Replacing the Lamp" section on the screen. English 5
... warnings and precautions as described on pages 39-40. ‡‡ This projector will show on pages 39-40. ‡‡ Do not setup the projector in 3D and should be repaired by the manufacturer. ‡‡ Do not look into straight into the projector lens during operation. ... video games. ‡‡ Do not attempt to dangerous voltages or other hazards. Follow instructions as recommended before disconnecting power. Please call Optoma before storage. If the battery/batteries are sleep deprived or under "Replacing the Lamp" section on the screen. English 5
GT1080Darbee User Manual
Page 13
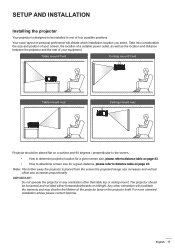
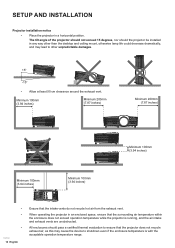
...in any orientation other orientation will dictate which installation location you select. IMPORTANT! Any other that table top or ceiling mount. SETUP AND INSTALLATION Installing the projector Your projector is placed from the screen the projected image size increases and vertical offset also increases ...proportionally. For none standard installation advise please contact Optoma. Note: The further away the projector is designed to distance table on page 43. Do not operate the projector in one...
...in any orientation other orientation will dictate which installation location you select. IMPORTANT! Any other that table top or ceiling mount. SETUP AND INSTALLATION Installing the projector Your projector is placed from the screen the projected image size increases and vertical offset also increases ...proportionally. For none standard installation advise please contact Optoma. Note: The further away the projector is designed to distance table on page 43. Do not operate the projector in one...
GT1080Darbee User Manual
Page 14
..., and may cause the device to other unpredictable damages. 15° -15° ‡‡ Allow at least 50 cm clearance around the exhaust vent. SETUP AND INSTALLATION Projector installation notice ‡‡ Place the projector in an enclosed space, ensure that the intake vents do not recycle hot air from...
..., and may cause the device to other unpredictable damages. 15° -15° ‡‡ Allow at least 50 cm clearance around the exhaust vent. SETUP AND INSTALLATION Projector installation notice ‡‡ Place the projector in an enclosed space, ensure that the intake vents do not recycle hot air from...
GT1080Darbee User Manual
Page 15
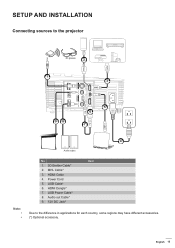
USB Power Cable* 8. English 15 Power Cord 5. Audio out Cable* 9. 12V DC Jack* Item Due to the projector 3D glasses 2 1 3 98 5 6 7 MOLEX 4 Audio output Note: ‡‡ ‡‡ No 1. 3D Emitter Cable* 2. HDMI Dongle* 7. SETUP AND INSTALLATION Connecting sources to the difference in applications for each country, some regions may have different accessories. (*) Optional accessory. USB Cable* 6. MHL Cable* 3. HDMI Cable 4.
USB Power Cable* 8. English 15 Power Cord 5. Audio out Cable* 9. 12V DC Jack* Item Due to the projector 3D glasses 2 1 3 98 5 6 7 MOLEX 4 Audio output Note: ‡‡ ‡‡ No 1. 3D Emitter Cable* 2. HDMI Dongle* 7. SETUP AND INSTALLATION Connecting sources to the difference in applications for each country, some regions may have different accessories. (*) Optional accessory. USB Cable* 6. MHL Cable* 3. HDMI Cable 4.
GT1080Darbee User Manual
Page 16
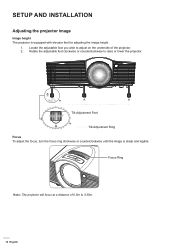
Locate the adjustable foot you wish to 3.35m. 16 English SETUP AND INSTALLATION Adjusting the projector image Image height The projector is sharp and legible. Focus Ring Note: The projector will focus at a distance of 0.5m to adjust on the underside of the projector. 2. Rotate the adjustable foot clockwise or counterclockwise to raise or lower the projector. Tilt-Adjustment Feet Tilt-Adjustment Ring Focus To adjust the focus, turn the focus ring clockwise or counterclockwise until the image is equipped with elevator feet for adjusting the image height. 1.
Locate the adjustable foot you wish to 3.35m. 16 English SETUP AND INSTALLATION Adjusting the projector image Image height The projector is sharp and legible. Focus Ring Note: The projector will focus at a distance of 0.5m to adjust on the underside of the projector. 2. Rotate the adjustable foot clockwise or counterclockwise to raise or lower the projector. Tilt-Adjustment Feet Tilt-Adjustment Ring Focus To adjust the focus, turn the focus ring clockwise or counterclockwise until the image is equipped with elevator feet for adjusting the image height. 1.
GT1080Darbee User Manual
Page 17
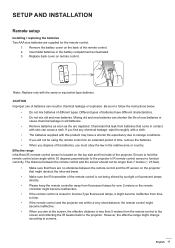
.... However, the effective range might change according to follow the instructions below. ‡‡ Do not mix batteries of different types. English 17 SETUP AND INSTALLATION Remote setup Installing / replacing the batteries Two AAA size batteries are depleted. Be sure to screens. The distance between the remote control and the IR sensor...
.... However, the effective range might change according to follow the instructions below. ‡‡ Do not mix batteries of different types. English 17 SETUP AND INSTALLATION Remote setup Installing / replacing the batteries Two AAA size batteries are depleted. Be sure to screens. The distance between the remote control and the IR sensor...

GT1080Darbee User Manual
Page 18
SETUP AND INSTALLATION HDMI1 HDMI2 VGA1 VGA2 Video YPbPr Volume Menu Source Re-sync Volume Mute Sleep Timer DB 3D Aspect ratio Keystone Brightness Contrast User3 Mode User1 User2 ON OFF Approx. 15° Approx. 15° ON Mute KeystonDBeBrighAtsnUpeesscetsrr1atioContrUasster2ModeUser3 OFF Source Volume Sleep 3D Timer Menu Re-sync VGA1 HDMI1 VGA2 HDMI2 Volume Video YPbPr 18 English
SETUP AND INSTALLATION HDMI1 HDMI2 VGA1 VGA2 Video YPbPr Volume Menu Source Re-sync Volume Mute Sleep Timer DB 3D Aspect ratio Keystone Brightness Contrast User3 Mode User1 User2 ON OFF Approx. 15° Approx. 15° ON Mute KeystonDBeBrighAtsnUpeesscetsrr1atioContrUasster2ModeUser3 OFF Source Volume Sleep 3D Timer Menu Re-sync VGA1 HDMI1 VGA2 HDMI2 Volume Video YPbPr 18 English
GT1080Darbee User Manual
Page 24
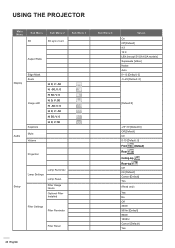
V: 50 H: -50; V: 0 H: 0; V: 50 Projection Setup Lamp Settings Lamp Reminder Lamp Reset Filter Usage Hours Optional Filter Installed Filter Settings Filter Reminder Filter Reset Sub Menu 4 Values On Off [Default] 4:3 16:9 ...
V: 50 H: -50; V: 0 H: 0; V: 50 Projection Setup Lamp Settings Lamp Reminder Lamp Reset Filter Usage Hours Optional Filter Installed Filter Settings Filter Reminder Filter Reset Sub Menu 4 Values On Off [Default] 4:3 16:9 ...

GT1080Darbee User Manual
Page 25
... Sub Menu 2 Sub Menu 3 Direct Power On Signal Power On Auto Power Off (min) Power Settings Sleep Timer (min) Always On Quick Resume USB Power Setup Security HDMI Link Settings Security Security Timer Change Password HDMI Link Month Day Hour Inclusive of TV Power On Link Power Off Link Test Pattern...
... Sub Menu 2 Sub Menu 3 Direct Power On Signal Power On Auto Power Off (min) Power Settings Sleep Timer (min) Always On Quick Resume USB Power Setup Security HDMI Link Settings Security Security Timer Change Password HDMI Link Month Day Hour Inclusive of TV Power On Link Power Off Link Test Pattern...
GT1080Darbee User Manual
Page 26
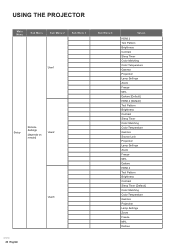
USING THE PROJECTOR Main Menu Sub Menu Sub Menu 2 Sub Menu 3 User1 Setup Remote Settings [depends on remote] User2 User3 Sub Menu 4 Values HDMI 2 Test Pattern Brightness Contrast Sleep Timer Color Matching Color Temperature Gamma Projection Lamp Settings ...
USING THE PROJECTOR Main Menu Sub Menu Sub Menu 2 Sub Menu 3 User1 Setup Remote Settings [depends on remote] User2 User3 Sub Menu 4 Values HDMI 2 Test Pattern Brightness Contrast Sleep Timer Color Matching Color Temperature Gamma Projection Lamp Settings ...
GT1080Darbee User Manual
Page 28
... THE PROJECTOR Main Menu Sub Menu Sub Menu 2 Sub Menu 3 Input Name HDMI2 HDMI1/MHL High Altitude Display Mode Lock Keypad Lock Options Information Hide Setup Logo Logo Capture Background Color Reset Reset OSD Reset to Default Regulatory Serial Number Source Resolution Refresh Rate Display Mode Information Lamp Hours Filter Hours...
... THE PROJECTOR Main Menu Sub Menu Sub Menu 2 Sub Menu 3 Input Name HDMI2 HDMI1/MHL High Altitude Display Mode Lock Keypad Lock Options Information Hide Setup Logo Logo Capture Background Color Reset Reset OSD Reset to Default Regulatory Serial Number Source Resolution Refresh Rate Display Mode Information Lamp Hours Filter Hours...

GT1080Darbee User Manual
Page 30
..., utilize the Gamma Adjustment steps to be shown in incredible detail. 30 English USING THE PROJECTOR Gamma Set up gamma curve type. After the initial setup and fine tuning is white. ±± Reset: Return the factory default settings for color matching. ±± Exit: Exit the "Color Matching" menu. ‡...
..., utilize the Gamma Adjustment steps to be shown in incredible detail. 30 English USING THE PROJECTOR Gamma Set up gamma curve type. After the initial setup and fine tuning is white. ±± Reset: Return the factory default settings for color matching. ±± Exit: Exit the "Color Matching" menu. ‡...
GT1080Darbee User Manual
Page 33
...135;‡ On: Choose the "On" to turn mute off. The message will appear 30 hours before suggested replacement of video source. English 33 Setup lamp settings menu Lamp Reminder Choose this function to show or to turn mute on. ‡‡ Off: Choose the "Off" to hide ...the warning message when the changing lamp message is displayed. Setup menu Setup projection menu Projection Select the preferred projection between front, rear, ceiling-top, and rear-top. USING THE PROJECTOR Display edge mask menu Edge Mask...
...135;‡ On: Choose the "On" to turn mute off. The message will appear 30 hours before suggested replacement of video source. English 33 Setup lamp settings menu Lamp Reminder Choose this function to show or to turn mute on. ‡‡ Off: Choose the "Off" to hide ...the warning message when the changing lamp message is displayed. Setup menu Setup projection menu Projection Select the preferred projection between front, rear, ceiling-top, and rear-top. USING THE PROJECTOR Display edge mask menu Edge Mask...

GT1080Darbee User Manual
Page 34
... dust filter counter after 500 hours of the projector in standby mode will automatically power off when the countdown has finished (in minutes). Setup power settings menu Direct Power On Choose "On" to activate Signal Power mode. Note: If the "Signal Power On" option is ...projector. Sleep Timer (min) Configure the sleep timer. ‡‡ Sleep Timer (min): Sets the countdown timer interval. USING THE PROJECTOR Setup filter settings menu Filter Usage Hours Display the filter time. The projector will automatically power on when a signal is detected, without pressing the "...
... dust filter counter after 500 hours of the projector in standby mode will automatically power off when the countdown has finished (in minutes). Setup power settings menu Direct Power On Choose "On" to activate Signal Power mode. Note: If the "Signal Power On" option is ...projector. Sleep Timer (min) Configure the sleep timer. ‡‡ Sleep Timer (min): Sets the countdown timer interval. USING THE PROJECTOR Setup filter settings menu Filter Usage Hours Display the filter time. The projector will automatically power on when a signal is detected, without pressing the "...

GT1080Darbee User Manual
Page 35
...on command. Power Off Link Enable this function to let both HDMI Link and projector to be automatically turned off at the same time. Setup test pattern menu Test Pattern Select the test pattern from green grid, magenta grid, white grid, white, or disable this function (off link...Off: Choose "Off" to be used. To prevent both TV and projector to be automatically turned off at the same time. USING THE PROJECTOR Setup security menu Security Enable this function to prompt for a password before using the HDMI Link control feature in a typical configuration, your password again. ...
...on command. Power Off Link Enable this function to let both HDMI Link and projector to be automatically turned off at the same time. Setup test pattern menu Test Pattern Select the test pattern from green grid, magenta grid, white grid, white, or disable this function (off link...Off: Choose "Off" to be used. To prevent both TV and projector to be automatically turned off at the same time. USING THE PROJECTOR Setup security menu Security Enable this function to prompt for a password before using the HDMI Link control feature in a typical configuration, your password again. ...
GT1080Darbee User Manual
Page 36
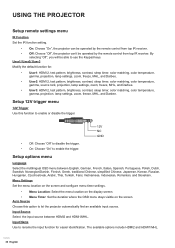
... projector automatically find an available input source. By selecting "Off", you will be operated by the remote control from top IR receiver. Setup 12V trigger menu 12V Trigger Use this option to rename the input function for : ‡‡ User1: HDMI 2, test pattern, brightness..., brightness, contrast, sleep timer, color matching, color temperature, gamma, projection, lamp settings, zoom, freeze, MHL, and Darbee. USING THE PROJECTOR Setup remote settings menu IR Function Set the IR function setting. ‡‡ On: Choose "On", the projector can be operated by the remote control...
... projector automatically find an available input source. By selecting "Off", you will be operated by the remote control from top IR receiver. Setup 12V trigger menu 12V Trigger Use this option to rename the input function for : ‡‡ User1: HDMI 2, test pattern, brightness..., brightness, contrast, sleep timer, color matching, color temperature, gamma, projection, lamp settings, zoom, freeze, MHL, and Darbee. USING THE PROJECTOR Setup remote settings menu IR Function Set the IR function setting. ‡‡ On: Choose "On", the projector can be operated by the remote control...

GT1080Darbee User Manual
Page 37
... Lock Choose "On" or "Off" to reuse the Keypad. Keypad Lock When the keypad lock function is selected, the fans will spin faster. Setup reset OSD menu Reset OSD Return the factory default settings for all settings. English 37 USING THE PROJECTOR High Altitude When "On" is "On", ... successful logo capture, ensure that the on the screen. Background Color Use this function to Default Return the factory default settings for OSD menu settings. Setup reset to default menu Reset to display a blue, red, green, grey color, none, or logo screen when no signal is exclusively for capturing ...
... Lock Choose "On" or "Off" to reuse the Keypad. Keypad Lock When the keypad lock function is selected, the fans will spin faster. Setup reset OSD menu Reset OSD Return the factory default settings for all settings. English 37 USING THE PROJECTOR High Altitude When "On" is "On", ... successful logo capture, ensure that the on the screen. Background Color Use this function to Default Return the factory default settings for OSD menu settings. Setup reset to default menu Reset to display a blue, red, green, grey color, none, or logo screen when no signal is exclusively for capturing ...
GT1080Darbee User Manual
Page 40
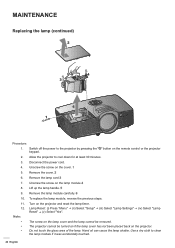
... the power cord. 4. Remove the lamp cord.3 7. Use a dry cloth to cool down for at least 30 minutes. 3. Lamp Reset: (i) Press "Menu" (ii) Select "Setup" (iii) Select "Lamp Settings" (iv) Select "Lamp Reset" (v) Select "Yes". Switch off the power to the projector by pressing the " " button on...
... the power cord. 4. Remove the lamp cord.3 7. Use a dry cloth to cool down for at least 30 minutes. 3. Lamp Reset: (i) Press "Menu" (ii) Select "Setup" (iii) Select "Lamp Settings" (iv) Select "Lamp Reset" (v) Select "Yes". Switch off the power to the projector by pressing the " " button on...

