
User's Manual
Page 1
... Powering On the Projector 13 Powering Off the projector 14 Warning Indicator 14 Adjusting the Projected Image 15 Adjusting the Projector's Height 15 Adjusting the Projector's Zoom / Focus 16 Adjusting Projected Image Size 16 User Controls 17 On-screen Display Menus 17 How to operate ...17 Menu Tree...18 Image...19 Display...23 Setup...26 Options...32 Appendices 35 Troubleshooting 35 Image Problems 35 Other Problems 38 Projector Status Indication 38 Remote Control Problems 39 Replacing the Lamp 40 Compatibility Modes 42 RS232 Commands 44 Ceiling Mount Installation 48 Optoma...
... Powering On the Projector 13 Powering Off the projector 14 Warning Indicator 14 Adjusting the Projected Image 15 Adjusting the Projector's Height 15 Adjusting the Projector's Zoom / Focus 16 Adjusting Projected Image Size 16 User Controls 17 On-screen Display Menus 17 How to operate ...17 Menu Tree...18 Image...19 Display...23 Setup...26 Options...32 Appendices 35 Troubleshooting 35 Image Problems 35 Other Problems 38 Projector Status Indication 38 Remote Control Problems 39 Replacing the Lamp 40 Compatibility Modes 42 RS232 Commands 44 Ceiling Mount Installation 48 Optoma...
User's Manual
Page 2
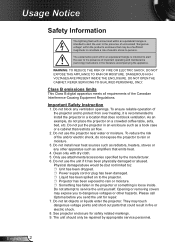
... 4. Please call Optoma before you to the presence of important operating and maintenance (servicing) instructions in the projector or something is loose inside. Only use the projector near heat sources such as radiators, heaters, stoves or any ventilation openings. Opening or removing covers may expose you...Power supply cord or plug has been damaged. Liquid has been spilled on a crowded coffee table, sofa, bed, etc. To ensure reliable operation of the projector and to install the projector in fire or electric shock. 8. Do not install near water or moisture. Clean...
... 4. Please call Optoma before you to the presence of important operating and maintenance (servicing) instructions in the projector or something is loose inside. Only use the projector near heat sources such as radiators, heaters, stoves or any ventilation openings. Opening or removing covers may expose you...Power supply cord or plug has been damaged. Liquid has been spilled on a crowded coffee table, sofa, bed, etc. To ensure reliable operation of the projector and to install the projector in fire or electric shock. 8. Do not install near water or moisture. Clean...
User's Manual
Page 3
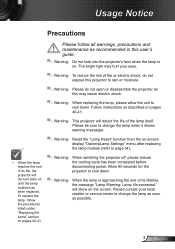
...; Warning- Reset the "Lamp Reset" function from the on-screen display "Options|Lamp Settings" menu after replacing the lamp module (refer to cool down . When switching the projector off, please ensure the cooling cycle has been completed before disconnecting power. Usage Notice Precautions Please follow the procedures listed under "Replacing the Lamp" section on until the lamp module has been replaced. When the lamp is on the screen. The bright light...
...; Warning- Reset the "Lamp Reset" function from the on-screen display "Options|Lamp Settings" menu after replacing the lamp module (refer to cool down . When switching the projector off, please ensure the cooling cycle has been completed before disconnecting power. Usage Notice Precautions Please follow the procedures listed under "Replacing the Lamp" section on until the lamp module has been replaced. When the lamp is on the screen. The bright light...
User's Manual
Page 9
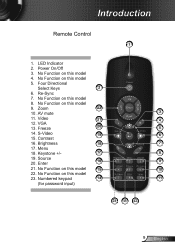
... this model 4. AV mute 3 11. VGA 13. Numbered keypad 14 11 (for password input) 23 13 12 9 English No Function on this model 8. No Function on this model 9. Brightness 18 7 17. Four Directional Select Keys 2 6. Freeze 20 5 14. S-Video 19 6 15. Menu 18. No Function on this model 15 10 22. Power On/Off 3. Zoom 22 10. Keystone +/- 17 8 19. Video 21 4 12. Introduction Remote Control 1 1. LED Indicator 2.
... this model 4. AV mute 3 11. VGA 13. Numbered keypad 14 11 (for password input) 23 13 12 9 English No Function on this model 8. No Function on this model 9. Brightness 18 7 17. Four Directional Select Keys 2 6. Freeze 20 5 14. S-Video 19 6 15. Menu 18. No Function on this model 15 10 22. Power On/Off 3. Zoom 22 10. Keystone +/- 17 8 19. Video 21 4 12. Introduction Remote Control 1 1. LED Indicator 2.

User's Manual
Page 13
... "SOURCE" button or direct source keys on the screen (computer, notebook, video player, etc). If not, push menu button and go to switch between inputs. Turn on the lamp by pressing "POWER" button either on the top of the projector or on the projector first and then select the signal sources. 13 English The first time you use the projector, you want to display on the remote control to "OPTIONS". Installation Powering On/Off the Projector Powering...
... "SOURCE" button or direct source keys on the screen (computer, notebook, video player, etc). If not, push menu button and go to switch between inputs. Turn on the lamp by pressing "POWER" button either on the top of the projector or on the projector first and then select the signal sources. 13 English The first time you use the projector, you want to display on the remote control to "OPTIONS". Installation Powering On/Off the Projector Powering...

User's Manual
Page 14
... projector. 4. Please call the nearest Optoma facility for more jector will shut down automatically. information. Under normal conditions, the projector can be displayed on , you press the "POWER" button a second time, the system will be switched on again after 15 seconds. Warning Indicator Contact the nearest service center if the When the "POWER" indicator flashes red (0.5 sec off the projector lamp. Once in standby mode, simply press "POWER" button to operate...
... projector. 4. Please call the nearest Optoma facility for more jector will shut down automatically. information. Under normal conditions, the projector can be displayed on , you press the "POWER" button a second time, the system will be switched on again after 15 seconds. Warning Indicator Contact the nearest service center if the When the "POWER" indicator flashes red (0.5 sec off the projector lamp. Once in standby mode, simply press "POWER" button to operate...
User's Manual
Page 27
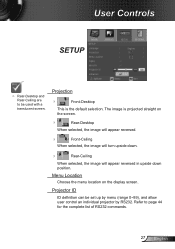
... is projected straight on the display screen. Menu Location Choose the menu location on the screen. Rear-Desktop When selected, the image will appear reversed. Front-Ceiling When selected, the image will turn upside down. Rear-Ceiling When selected, the image will appear reversed in upside down position. The image is the default selection. Refer to be set up by menu (range 0~99), and allow user control an individual projector...
... is projected straight on the display screen. Menu Location Choose the menu location on the screen. Rear-Desktop When selected, the image will appear reversed. Front-Ceiling When selected, the image will turn upside down. Rear-Ceiling When selected, the image will appear reversed in upside down position. The image is the default selection. Refer to be set up by menu (range 0~99), and allow user control an individual projector...
User's Manual
Page 29
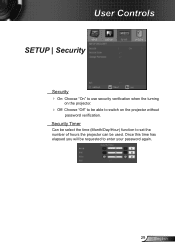
Once this time has elapsed you will be able to switch on the projector without password verification. User Controls SETUP | Security Security On: Choose "On" to use security verification when the turning on the projector. Off: Choose "Off" to be requested to enter your password again. 29 English Security Timer Can be select the time (Month/Day/Hour) function to set the number of hours the projector can be used.
Once this time has elapsed you will be able to switch on the projector without password verification. User Controls SETUP | Security Security On: Choose "On" to use security verification when the turning on the projector. Off: Choose "Off" to be requested to enter your password again. 29 English Security Timer Can be select the time (Month/Day/Hour) function to set the number of hours the projector can be used.

User's Manual
Page 33
User Controls OPTIONS | Advanced Direct Power On Choose "On" to the projector. The projector will automatically power on when AC power is supplied, without a signal being sent to activate Direct Power mode. Auto Power Off (min) Sets the countdown timer interval. The countdown timer will start , with or without pressing "POWER" button either on the top of the projector or on the remote. The projector will automatically power off when the countdown has finished...
User Controls OPTIONS | Advanced Direct Power On Choose "On" to the projector. The projector will automatically power on when AC power is supplied, without a signal being sent to activate Direct Power mode. Auto Power Off (min) Sets the countdown timer interval. The countdown timer will start , with or without pressing "POWER" button either on the top of the projector or on the remote. The projector will automatically power off when the countdown has finished...

User's Manual
Page 34
The message will lower power consumption and extend the lamp life by up to 130%. BRIGHT: Choose "BRIGHT" to increase the brightness. English 34 Brightness Mode STD: Choose "STD" to hide the warning message when the changing lamp message is displayed. Lamp Reset Reset the lamp hour counter after replacing the lamp. User Controls OPTIONS | Lamp Settings Lamp Hours Display the projection time. Lamp Reminder Choose this function to show or to dim the projector lamp which will appear 30 hours before suggested replacement of lamp.
The message will lower power consumption and extend the lamp life by up to 130%. BRIGHT: Choose "BRIGHT" to increase the brightness. English 34 Brightness Mode STD: Choose "STD" to hide the warning message when the changing lamp message is displayed. Lamp Reset Reset the lamp hour counter after replacing the lamp. User Controls OPTIONS | Lamp Settings Lamp Hours Display the projection time. Lamp Reminder Choose this function to show or to dim the projector lamp which will appear 30 hours before suggested replacement of lamp.
User's Manual
Page 35
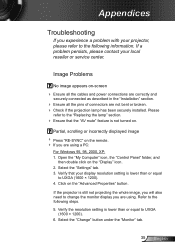
... display resolution setting is not turned on -screen Ensure all the cables and power connections are correctly and securely connected as described in the "Installation" section. Ensure all the pins of connectors are using a PC: For Windows 95, 98, 2000, XP: 1. Image Problems No image appears on . Open the "My Computer" icon, the "Control Panel" folder, and then double click on the "Advanced Properties" button. Select the "Change" button...
... display resolution setting is not turned on -screen Ensure all the cables and power connections are correctly and securely connected as described in the "Installation" section. Ensure all the pins of connectors are using a PC: For Windows 95, 98, 2000, XP: 1. Image Problems No image appears on . Open the "My Computer" icon, the "Control Panel" folder, and then double click on the "Advanced Properties" button. Select the "Change" button...

User's Manual
Page 37
... the screen. Use of Keystone is Press "Keystone +/-" button on the remote control, go to the following: Please setup the display format as 16:9 (wide) aspect ratio type on the projector lens. Make sure the projection screen is reversed Select "SETUP Projection" from the screen. Press "MENU" button on the remote control until the sides not recommended. Appendices Image is out of focus Adjust the Focus...
... the screen. Use of Keystone is Press "Keystone +/-" button on the remote control, go to the following: Please setup the display format as 16:9 (wide) aspect ratio type on the projector lens. Make sure the projection screen is reversed Select "SETUP Projection" from the screen. Press "MENU" button on the remote control until the sides not recommended. Appendices Image is out of focus Adjust the Focus...

User's Manual
Page 38
...may make a loud popping sound. Projector Status Indication LED lighting message Message Standby State (Input power cord) Power on (Warming) Power LED (Red) Power LED (Blue) Flashing (0.5 sec off, 0.5 sec on) Lamp lighting Power off (Cooling) Error (Over Temp.) Steady light Error (Fan fail) No light Error (Lamp fail) Flashing (1 sec off, 1 sec on) Flashing (0.5 sec off, 2.0 sec on) Flashing (0.5 sec off, 0.5 sec on) Flashing (1 sec off the projector, then unplug the power cord and wait at least 60 seconds before reconnecting power. To replace the lamp, follow the...
...may make a loud popping sound. Projector Status Indication LED lighting message Message Standby State (Input power cord) Power on (Warming) Power LED (Red) Power LED (Blue) Flashing (0.5 sec off, 0.5 sec on) Lamp lighting Power off (Cooling) Error (Over Temp.) Steady light Error (Fan fail) No light Error (Lamp fail) Flashing (1 sec off, 1 sec on) Flashing (0.5 sec off, 2.0 sec on) Flashing (0.5 sec off, 0.5 sec on) Flashing (1 sec off the projector, then unplug the power cord and wait at least 60 seconds before reconnecting power. To replace the lamp, follow the...

User's Manual
Page 39
... batteries are inserted correctly. Replace batteries if they are not any obstructions between the remote control and the projector. Appendices On Screen Messages Temperature warning: Fan failed: Lamp warning: Out of display range: Remote Control Problems If the remote control does not work Check the operating angle of the remote control is within 7 m (±0°) of the IR receivers on the projector. Make sure there are...
... batteries are inserted correctly. Replace batteries if they are not any obstructions between the remote control and the projector. Appendices On Screen Messages Temperature warning: Fan failed: Lamp warning: Out of display range: Remote Control Problems If the remote control does not work Check the operating angle of the remote control is within 7 m (±0°) of the IR receivers on the projector. Make sure there are...

User's Manual
Page 41
... lamp handle and remove the lamp module slowly and carefully. 4 To replace the lamp module, reverse the previous steps. 8. Lift up and remove the cover. 2 6. Lamp Reset: (i) Press "MENU" (ii) Select "OPTIONS" (iii) Select "Lamp Settings" (iv) Select "Lamp Reset" (v) Select "Yes". 41 English Unscrew the two screws on the cover. 1 5. Use a dry cloth to the projector by pressing the "POWER" button. 2. Switch off the power to clean the lamp...
... lamp handle and remove the lamp module slowly and carefully. 4 To replace the lamp module, reverse the previous steps. 8. Lift up and remove the cover. 2 6. Lamp Reset: (i) Press "MENU" (ii) Select "OPTIONS" (iii) Select "Lamp Settings" (iv) Select "Lamp Reset" (v) Select "Yes". 41 English Unscrew the two screws on the cover. 1 5. Use a dry cloth to the projector by pressing the "POWER" button. 2. Switch off the power to clean the lamp...

User's Manual
Page 46
...Color Blue ~XX104 2 7E 30 30 31 30 34 20 32 0D Black ~XX104 3 7E 30 30 31 30 34 20 33 0D Red ~XX104 4 7E 30 30 31 30 34 20 34 0D Green ~XX104 5 7E 30 30 31 30 34 20 35 0D White...0D Auto Power Off (min) n = 0 (a=30) ~ 180 (a=31 38 30) step:5 ~XX107 n 7E 30 30 31 30 37 20 a 0D Sleep Timer (...Lamp Reset Yes ~XX111 0 7E 30 30 31 31 31 20 30 0D No (0/2 for backward compatible) English 46 n = 1 enable ~XX74 n 7E 30 30 37 34 20 a 0D Phase n = 0 (a=30) ~ 31 (a=33 31) By signal ~XX75 n 7E 30 30 37 35 20 a 0D H. Appendices SEND to projector 232 ASCII Code HEX Code...
...Color Blue ~XX104 2 7E 30 30 31 30 34 20 32 0D Black ~XX104 3 7E 30 30 31 30 34 20 33 0D Red ~XX104 4 7E 30 30 31 30 34 20 34 0D Green ~XX104 5 7E 30 30 31 30 34 20 35 0D White...0D Auto Power Off (min) n = 0 (a=30) ~ 180 (a=31 38 30) step:5 ~XX107 n 7E 30 30 31 30 37 20 a 0D Sleep Timer (...Lamp Reset Yes ~XX111 0 7E 30 30 31 31 31 20 30 0D No (0/2 for backward compatible) English 46 n = 1 enable ~XX74 n 7E 30 30 37 34 20 a 0D Phase n = 0 (a=30) ~ 31 (a=33 31) By signal ~XX75 n 7E 30 30 37 35 20 a 0D H. Appendices SEND to projector 232 ASCII Code HEX Code...

User's Manual
Page 47
... 232 ASCII Code HEX Code Function Projector Return Description when Standby/Warming/Cooling/Out of Range/ INFOn n : 0/1/2/3/4/6/7/8/9 = Standby/Warming/Cooling/Out of Range/ Lamp fail/Fan Lock/Over Temperature/Lamp Hours Running Out/ Lamp fail/Fan Lock/Over Temperature/Lamp Hours Running Out/ Cover Open Cover Open READ from projector 232 ASCII Code HEX Code Function Projector Return Description ~XX121 1 7E 30 30 31 32 31 20 31 0D Input Source Commands OKn n : 0/1/2/3/4/ = None/VGA1/VGA2/S-Video/Video/ ~XX122 1 7E...
... 232 ASCII Code HEX Code Function Projector Return Description when Standby/Warming/Cooling/Out of Range/ INFOn n : 0/1/2/3/4/6/7/8/9 = Standby/Warming/Cooling/Out of Range/ Lamp fail/Fan Lock/Over Temperature/Lamp Hours Running Out/ Lamp fail/Fan Lock/Over Temperature/Lamp Hours Running Out/ Cover Open Cover Open READ from projector 232 ASCII Code HEX Code Function Projector Return Description ~XX121 1 7E 30 30 31 32 31 20 31 0D Input Source Commands OKn n : 0/1/2/3/4/ = None/VGA1/VGA2/S-Video/Video/ ~XX122 1 7E...
Datasheet
Page 1
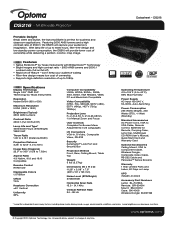
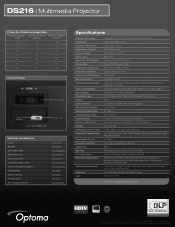
... audience waiting Filter-free design means low cost of ownership Supports high-definition resolution of ownership while delivering a perfect, colorful, crisp image. With lamp life of 2500:1, the DS216 will provide lower cost of up to 40°C), 85% Max Humidity Power Supply AC Input 100-240 V, 50-60Hz, Auto-Switching Power Consumption 255 Watts (Bright), 230 Watts (STD), DS216 − Multimedia Projector Datasheet - DS216 Portable Delight Small...
... audience waiting Filter-free design means low cost of ownership Supports high-definition resolution of ownership while delivering a perfect, colorful, crisp image. With lamp life of 2500:1, the DS216 will provide lower cost of up to 40°C), 85% Max Humidity Power Supply AC Input 100-240 V, 50-60Hz, Auto-Switching Power Consumption 255 Watts (Bright), 230 Watts (STD), DS216 − Multimedia Projector Datasheet - DS216 Portable Delight Small...
Brochure
Page 2
... 115 Control Panel Power/ Standby Optional Accessories Lamp: Remote: VGA Cable (1.8m): Power Cord (1m): Power Cord (11m): Composite Cable (1.8m): VGA to Component Adapter: Ceiling Mount: Wireless Dongle: Carrying Case: 84" 4:3 Manual Screen: Zoom In/Out Power LED BL-FU185A BR-3043N BC-VGVGXX02 BC-PUPIXY01 BC-PUPIXY11 BC-COCOXX02 BC-VGCRXY00 BM-5001U BI-EXTGB BK-4006 DS-3084PMG+ Specifications Display Technology: Resolution: Maximum Resolution: Brightness (Typical): Contrast Ratio: Lamp Type: Lamp Life (STD/Bright): Throw Ratio: Image Size (Diagonal): Projection Distance...
... 115 Control Panel Power/ Standby Optional Accessories Lamp: Remote: VGA Cable (1.8m): Power Cord (1m): Power Cord (11m): Composite Cable (1.8m): VGA to Component Adapter: Ceiling Mount: Wireless Dongle: Carrying Case: 84" 4:3 Manual Screen: Zoom In/Out Power LED BL-FU185A BR-3043N BC-VGVGXX02 BC-PUPIXY01 BC-PUPIXY11 BC-COCOXX02 BC-VGCRXY00 BM-5001U BI-EXTGB BK-4006 DS-3084PMG+ Specifications Display Technology: Resolution: Maximum Resolution: Brightness (Typical): Contrast Ratio: Lamp Type: Lamp Life (STD/Bright): Throw Ratio: Image Size (Diagonal): Projection Distance...

Protocol Function
Page 3
...Projection Front-Desktop ~XX71 2 7E 30 30 37 31 20 32 0D Rear-Desktop ~XX71 3 7E 30 30 37 31 20 33 0D Front-Ceiling ~XX71 4 7E 30 30 37 31 20 34 0D Rear-Ceiling ~XX72 1 7E 30 30 37 32 20 31 0D Menu Location...Color Blue ~XX104 2 7E 30 30 31 30 34 20 32 0D Black ~XX104 3 7E 30 30 31 30 34 20 33 0D Red ~XX104 4 7E 30 30 31 30 34 20 34 0D Green ~XX104 5 7E 30 30 31 30 34 20 35 0D White...) ~XX106 n 7E 30 30 31 30 36 20 a 0D Auto Power Off (min) n = 0 (a=30) ~ 180 (a=31 38 30) step:5 ~XX107 n 7E 30 30 31 30 37 20 a 0D Sleep Timer (min) n = 0 (a=30) ~ 995 (a=39 39 39...
...Projection Front-Desktop ~XX71 2 7E 30 30 37 31 20 32 0D Rear-Desktop ~XX71 3 7E 30 30 37 31 20 33 0D Front-Ceiling ~XX71 4 7E 30 30 37 31 20 34 0D Rear-Ceiling ~XX72 1 7E 30 30 37 32 20 31 0D Menu Location...Color Blue ~XX104 2 7E 30 30 31 30 34 20 32 0D Black ~XX104 3 7E 30 30 31 30 34 20 33 0D Red ~XX104 4 7E 30 30 31 30 34 20 34 0D Green ~XX104 5 7E 30 30 31 30 34 20 35 0D White...) ~XX106 n 7E 30 30 31 30 36 20 a 0D Auto Power Off (min) n = 0 (a=30) ~ 180 (a=31 38 30) step:5 ~XX107 n 7E 30 30 31 30 37 20 a 0D Sleep Timer (min) n = 0 (a=30) ~ 995 (a=39 39 39...


