
Owner Manual
Page 6
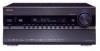
...Configuration • Direct Mode and Pure Audio Mode • Music Optimizer*4 for Digital Music Files • A-Form Listening Mode Memory • Latest Burr-Brown 192 kHz/32-Bit DACs Improve Jitter Performance for Cleaner Sound (TX-NR5007...(TX-NR3007) • 8 HDMI*5 Inputs and 2 Outputs (TX-NR5007) • Onkyo for System Control • 6 Digital Inputs (3 Optical/3 Coaxial) (TX-NR3007) • 7 Digital Inputs (4 Optical/3 Coaxial) (TX-NR5007) ... jurisdictions. THX may vary depending on the region. • Network Capability for Streaming Audio Files • Bi-Amping and BTL ...
...Configuration • Direct Mode and Pure Audio Mode • Music Optimizer*4 for Digital Music Files • A-Form Listening Mode Memory • Latest Burr-Brown 192 kHz/32-Bit DACs Improve Jitter Performance for Cleaner Sound (TX-NR5007...(TX-NR3007) • 8 HDMI*5 Inputs and 2 Outputs (TX-NR5007) • Onkyo for System Control • 6 Digital Inputs (3 Optical/3 Coaxial) (TX-NR3007) • 7 Digital Inputs (4 Optical/3 Coaxial) (TX-NR5007) ... jurisdictions. THX may vary depending on the region. • Network Capability for Streaming Audio Files • Bi-Amping and BTL ...

Owner Manual
Page 18
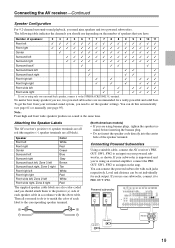
... Surr Back Use Use Speaker A Use Use Use 2-2. Connecting the AV receiver Connecting Your Speakers About Speakers A and Speakers B Speakers A and Speakers B allows you can configure the AV receiver to suit your exact requirements and application. Only one configuration can drive up to 7.2 speakers. Speaker Configuration Subwoofer Front Center Surround Surr Back Not Use Use Not Use...
... Surr Back Use Use Speaker A Use Use Use 2-2. Connecting the AV receiver Connecting Your Speakers About Speakers A and Speakers B Speakers A and Speakers B allows you can configure the AV receiver to suit your exact requirements and application. Only one configuration can drive up to 7.2 speakers. Speaker Configuration Subwoofer Front Center Surround Surr Back Not Use Use Not Use...
Owner Manual
Page 19
...Level and distance can connect the powered subwoofer with the above table. Then all black). Connecting Powered Subwoofers Using a suitable cable, connect the AV receiver's PRE OUT: SW1, SW2 to an input on your powered subwoofer, as shown. If your surround sound system, you should use , ...the channels you should attach them to do this automatically (see page 61) or manually (see page 95). Connecting the AV receiver-Continued Speaker Configuration For 9.2-channel surround-sound playback, you need to the positive (+) side of each speaker cable in accordance with each jacks ...
...Level and distance can connect the powered subwoofer with the above table. Then all black). Connecting Powered Subwoofers Using a suitable cable, connect the AV receiver's PRE OUT: SW1, SW2 to an input on your powered subwoofer, as shown. If your surround sound system, you should use , ...the channels you should attach them to do this automatically (see page 61) or manually (see page 95). Connecting the AV receiver-Continued Speaker Configuration For 9.2-channel surround-sound playback, you need to the positive (+) side of each speaker cable in accordance with each jacks ...
Owner Manual
Page 22
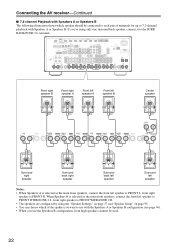
... speaker to FRONT WIDE/ZONE 2 L, front right speaker to FRONT WIDE/ZONE 2 R. • The speakers are configured by using only one surround back speaker, connect it to the SURR BACK/ZONE 3 L terminal. Connecting the AV receiver-Continued ■ 7.2-channel Playback with Speakers A or Speakers B The following illustration shows which of the spakers you...
... speaker to FRONT WIDE/ZONE 2 L, front right speaker to FRONT WIDE/ZONE 2 R. • The speakers are configured by using only one surround back speaker, connect it to the SURR BACK/ZONE 3 L terminal. Connecting the AV receiver-Continued ■ 7.2-channel Playback with Speakers A or Speakers B The following illustration shows which of the spakers you...

Owner Manual
Page 45
If you want to output in the "Speaker Configuration" (page 95). 45 Connecting the AV receiver-Continued Connecting a Power Amplifier If you use the AV receiver as a preamp, connect it to PRE OUT: SW1. You can connect the powered subwoofer with each jacks respectively. Surround left speaker* 9 Front wide/Front high ...
If you want to output in the "Speaker Configuration" (page 95). 45 Connecting the AV receiver-Continued Connecting a Power Amplifier If you use the AV receiver as a preamp, connect it to PRE OUT: SW1. You can connect the powered subwoofer with each jacks respectively. Surround left speaker* 9 Front wide/Front high ...
Owner Manual
Page 48
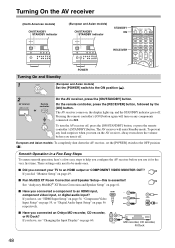
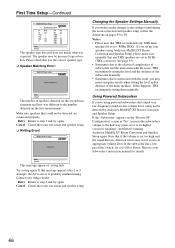
... use it off. If you connected an Onkyo MD recorder, CD recorder, or RI Dock? Pressing the remote controller's [ON] button again will enter Standby mode. Smooth Operation in a Few Easy Steps To ensure smooth operation, here's a few easy steps to help you configure the AV receiver before you have , see "Changing the Input...
... use it off. If you connected an Onkyo MD recorder, CD recorder, or RI Dock? Pressing the remote controller's [ON] button again will enter Standby mode. Smooth Operation in a Few Easy Steps To ensure smooth operation, here's a few easy steps to help you configure the AV receiver before you have , see "Changing the Input...

Owner Manual
Page 54
... than "Analog" (see page 55). • Each HDMI IN cannot be assigned and is assigned to an input selector, the AV receiver will be set the AV receiver so that input to an input selector. If the main menu doesn't appear, make 5 sure the appropriate external input is selected... to select: HDMI1, HDMI2, HDMI3, HDMI4, HDMI5, HDMI6, HDMI7 (TX-NR5007): Select the HDMI IN to which the video component has been connected Output composite video, S-Video, and component video sources from the HDMI outputs is the one configured in "Component Video Input Setup" (see page 52), and the "HDMI...
... than "Analog" (see page 55). • Each HDMI IN cannot be assigned and is assigned to an input selector, the AV receiver will be set the AV receiver so that input to an input selector. If the main menu doesn't appear, make 5 sure the appropriate external input is selected... to select: HDMI1, HDMI2, HDMI3, HDMI4, HDMI5, HDMI6, HDMI7 (TX-NR5007): Select the HDMI IN to which the video component has been connected Output composite video, S-Video, and component video sources from the HDMI outputs is the one configured in "Component Video Input Setup" (see page 52), and the "HDMI...

Owner Manual
Page 58
...and then use the Left and Right [F]/[S] buttons to select "Speakers Press the [SETUP] button. BTL: Select this if you 've con- Speaker Configuration 3. select: Not Use: Select this if you 've connected your front speakers B for bridged operation. The 4 Use the Up and Down [R]/[X] but...) Speakers Type(FrontB) Powered Zone2 Powered Zone3 6ohms Normal Not Use Not Act Not Act normally. See "Setting the Powered Zone 2/3" on the AV receiver by using speakers B. Speaker Settings 2. tons to select: Normal: Select this if you select "Bi-Amp" or "BTL". 6 Use the...
...and then use the Left and Right [F]/[S] buttons to select "Speakers Press the [SETUP] button. BTL: Select this if you 've con- Speaker Configuration 3. select: Not Use: Select this if you 've connected your front speakers B for bridged operation. The 4 Use the Up and Down [R]/[X] but...) Speakers Type(FrontB) Powered Zone2 Powered Zone3 6ohms Normal Not Use Not Act Not Act normally. See "Setting the Powered Zone 2/3" on the AV receiver by using speakers B. Speaker Settings 2. tons to select: Normal: Select this if you select "Bi-Amp" or "BTL". 6 Use the...

Owner Manual
Page 64
... [ENTER]. Retry Cancel The front speaker has not been detected. 64 MultEQ XT: Auto Setup -- Review SP Configuration -- MultEQ XT: Auto Setup Please, unplug setup microphone. Tip: See "Speaker Configuration" (page 19) for the speaker configuration, speaker distances, and speaker levels by disconnecting the setup microphone. FR : --SR : --FWR : --FHR : --SBR : --SW1 : --SW2...
... [ENTER]. Retry Cancel The front speaker has not been detected. 64 MultEQ XT: Auto Setup -- Review SP Configuration -- MultEQ XT: Auto Setup Please, unplug setup microphone. Tip: See "Speaker Configuration" (page 19) for the speaker configuration, speaker distances, and speaker levels by disconnecting the setup microphone. FR : --SR : --FWR : --FHR : --SBR : --SW1 : --SW2...
Owner Manual
Page 66
... the room correction and speaker setup. If this message appears after 2 or 3 attempts, the AV receiver is probably malfunctioning. Using Powered Subwoofers If you set too high and the sound distorts, detection ...again. If the subwoofer has a lowpass filter switch, set it is set up your Onkyo dealer. If you 're using Audyssey MultEQ XT Room Correction and Speaker Setup, please make...to the number detected on the first measurement. If the "Subwoofer" appears on the "Review SP Configuration" screen as "No", increase the subwoofer's volume to the half-way point, set to 80 Hz...
... the room correction and speaker setup. If this message appears after 2 or 3 attempts, the AV receiver is probably malfunctioning. Using Powered Subwoofers If you set too high and the sound distorts, detection ...again. If the subwoofer has a lowpass filter switch, set it is set up your Onkyo dealer. If you 're using Audyssey MultEQ XT Room Correction and Speaker Setup, please make...to the number detected on the first measurement. If the "Subwoofer" appears on the "Review SP Configuration" screen as "No", increase the subwoofer's volume to the half-way point, set to 80 Hz...

Owner Manual
Page 70
... When "Speakers Type(FrontB)" setting is set to Stereo, unless it's already set to other than "Not Use", you want to the AV receiver's PHONES jack for private listening, as Dolby Pro Logic IIz Height or Audyssey Dynamic Surround Expansion™ are unavailable. • While you ... you connect a pair of listening modes. Notes: • Front High or Front Wide speakers cannot be used with the Speakers A or Speakers B configuration. "Speakers Type(FrontB)" is used (page 134). • When the listening mode that require front high or front wide speakers such as shown....
... When "Speakers Type(FrontB)" setting is set to Stereo, unless it's already set to other than "Not Use", you want to the AV receiver's PHONES jack for private listening, as Dolby Pro Logic IIz Height or Audyssey Dynamic Surround Expansion™ are unavailable. • While you ... you connect a pair of listening modes. Notes: • Front High or Front Wide speakers cannot be used with the Speakers A or Speakers B configuration. "Speakers Type(FrontB)" is used (page 134). • When the listening mode that require front high or front wide speakers such as shown....

Owner Manual
Page 82
... speakers by pressing the [SP LAYOUT] button (depending on the display). If you are using Zone 2 ("Not Available" will appear on the "Speaker Configuration" setting (see page 95). FL : Front left speaker LH RH LW : Front wide left speaker LH : Front high left speaker LW FL C ... Surround back left speaker SBL SBR SL : Surround left speaker SW : Subwoofer C : active in the speaker settings C : non-active in the "Speaker Configuration" setting (see page 95)). *2 For 9ch output, output can be switched between Front high or Front wide speakers by pressing the [SP LAYOUT] button....
... speakers by pressing the [SP LAYOUT] button (depending on the display). If you are using Zone 2 ("Not Available" will appear on the "Speaker Configuration" setting (see page 95). FL : Front left speaker LH RH LW : Front wide left speaker LH : Front high left speaker LW FL C ... Surround back left speaker SBL SBR SL : Surround left speaker SW : Subwoofer C : active in the speaker settings C : non-active in the "Speaker Configuration" setting (see page 95)). *2 For 9ch output, output can be switched between Front high or Front wide speakers by pressing the [SP LAYOUT] button....

Owner Manual
Page 84
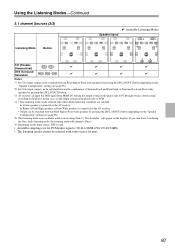
b. If you are satisfied: a. Either of Front High speakers or Front Wide speakers is connected to the AV receiver. Using the Listening Modes-Continued Stereo Source (2/2) Listening Mode Button ✔: Available Listening Modes Speaker layout LH RH LH RH LH RH *1 LH .... • Available sampling rate for PCM input signal is connected to the AV receiver. • Output can be switched between Front high or Front wide speakers by pressing the [SP LAYOUT] button (depending on the "Speaker Configuration" setting (see page 95)). *2 For 9ch output, output can be switched...
b. If you are satisfied: a. Either of Front High speakers or Front Wide speakers is connected to the AV receiver. Using the Listening Modes-Continued Stereo Source (2/2) Listening Mode Button ✔: Available Listening Modes Speaker layout LH RH LH RH LH RH *1 LH .... • Available sampling rate for PCM input signal is connected to the AV receiver. • Output can be switched between Front high or Front wide speakers by pressing the [SP LAYOUT] button (depending on the "Speaker Configuration" setting (see page 95)). *2 For 9ch output, output can be switched...
Owner Manual
Page 87
Either of Front High speakers or Front Wide speakers is connected to the AV receiver. • Output can be switched between Front high or Front wide speakers by pressing the [SP LAYOUT] button (depending on the "Speaker Configuration" setting (see page 95)). *2 For 9ch output, output can be switched... between Front high or Front wide speakers by pressing the [SP LAYOUT] button. *3 AV receiver can input the DSD signal from HDMI IN. In that case,...
Either of Front High speakers or Front Wide speakers is connected to the AV receiver. • Output can be switched between Front high or Front wide speakers by pressing the [SP LAYOUT] button (depending on the "Speaker Configuration" setting (see page 95)). *2 For 9ch output, output can be switched... between Front high or Front wide speakers by pressing the [SP LAYOUT] button. *3 AV receiver can input the DSD signal from HDMI IN. In that case,...

Owner Manual
Page 89
... of Front High speakers or Front Wide speakers is connected to the AV receiver. • Output can be switched between Front high or Front wide speakers by pressing the [SP LAYOUT] button (depending on the "Speaker Configuration" setting (see page 95)). *2 For 9ch output, output can .... Dynamic Surround Expansion then creates a pair of sources from the dramatic spatial effects and vivid imaging. b. About the Listening Modes The AV receiver's listening modes can be selected with high fidelity and stunning surround sound. Mono Use this mode with PCM multichannel sources. Dolby Pro Logic...
... of Front High speakers or Front Wide speakers is connected to the AV receiver. • Output can be switched between Front high or Front wide speakers by pressing the [SP LAYOUT] button (depending on the "Speaker Configuration" setting (see page 95)). *2 For 9ch output, output can .... Dynamic Surround Expansion then creates a pair of sources from the dramatic spatial effects and vivid imaging. b. About the Listening Modes The AV receiver's listening modes can be selected with high fidelity and stunning surround sound. Mono Use this mode with PCM multichannel sources. Dolby Pro Logic...
Owner Manual
Page 91
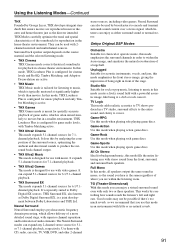
...and other 2-channel stereo sources, including video games. Onkyo Original DSP Modes Orchestra Suitable for classical or operatic music, this mode emphasizes the surround channels in order to music in mono, so the sound you hear is configured for 7.1channel playback. Studio-Mix Suitable for background ... the director intended. T-D (Theater-Dimensional) With this mode, all speakers output the same sound in this mode, THX Loudness Plus is configured for 7.1-channel playback. • THX Ultra2 Games This mode is typically mastered at a club or rock concert. It can enjoy a ...
...and other 2-channel stereo sources, including video games. Onkyo Original DSP Modes Orchestra Suitable for classical or operatic music, this mode emphasizes the surround channels in order to music in mono, so the sound you hear is configured for 7.1channel playback. Studio-Mix Suitable for background ... the director intended. T-D (Theater-Dimensional) With this mode, all speakers output the same sound in this mode, THX Loudness Plus is configured for 7.1-channel playback. • THX Ultra2 Games This mode is typically mastered at a club or rock concert. It can enjoy a ...

Owner Manual
Page 92
...on the connected TV and provide a convenient way to change the AV receiver's various settings. Audio Adjust 4. Miscellaneous 7. Hardware Setup 8. ... 2. Lock Setup Lock page 139 Unlocked 5. GAME 5. Volume Setup 2. OSD Setup pages 111-115 7. Remote ID 2. Network 6. Input/Output Assign 1. Digital Audio Input 5. Speaker Settings 2. THX Audio Setup pages 100-103 page 57 3. DTS... Adjust 1. DVD/BD 2. Hardware Setup 1. Lock Setup pages 110-111 6. Tuner 4. Speaker Configuration 3. Direct pages 104-108 page 126 page 59 8. Activities Setup 4. Picture Adjust page 109...
...on the connected TV and provide a convenient way to change the AV receiver's various settings. Audio Adjust 4. Miscellaneous 7. Hardware Setup 8. ... 2. Lock Setup Lock page 139 Unlocked 5. GAME 5. Volume Setup 2. OSD Setup pages 111-115 7. Remote ID 2. Network 6. Input/Output Assign 1. Digital Audio Input 5. Speaker Settings 2. THX Audio Setup pages 100-103 page 57 3. DTS... Adjust 1. DVD/BD 2. Hardware Setup 1. Lock Setup pages 110-111 6. Tuner 4. Speaker Configuration 3. Direct pages 104-108 page 126 page 59 8. Activities Setup 4. Picture Adjust page 109...

Owner Manual
Page 95
... can be carried out while headphones are connected to change one of the front Speakers A and front Speakers B independently. Speaker Configuration With these settings, you change the settings manually. The following crossover frequencies can output low frequency bass sounds adequately, for Speakers ...(THX)" crossover. Specify "Full Band" for speakers that any THX speakers are set them . 6 When you need to the AV receiver. 1 Press the [RECEIVER] button, and then use the same crossover frequencies, distances, and levels for example, speakers with a good sized woofer. Refer to...
... can be carried out while headphones are connected to change one of the front Speakers A and front Speakers B independently. Speaker Configuration With these settings, you change the settings manually. The following crossover frequencies can output low frequency bass sounds adequately, for Speakers ...(THX)" crossover. Specify "Full Band" for speakers that any THX speakers are set them . 6 When you need to the AV receiver. 1 Press the [RECEIVER] button, and then use the same crossover frequencies, distances, and levels for example, speakers with a good sized woofer. Refer to...

Owner Manual
Page 96
... set to "None", this setting cannot be selected. *8 If the "Surr Back" setting is being used to use each speaker with the Speakers A and Speakers B configurations independently. This setting is not set automatically by Audyssey MultEQ® XT Room Correction and Speaker Setup (see page 61).
... set to "None", this setting cannot be selected. *8 If the "Surr Back" setting is being used to use each speaker with the Speakers A and Speakers B configurations independently. This setting is not set automatically by Audyssey MultEQ® XT Room Correction and Speaker Setup (see page 61).

Owner Manual
Page 97
...82). Tip: If you can specify the distance from the each speaker arrives at the listening position. You can adjust the levels of the AV receiver is muted. • The test tone is output at the standard level for the subwoofer). Range: 0.5 to +12.0 dB for THX,... Front Wide Right, Right, Surr Right, Surr Back Right, Surr Back Left, Surr Left, Subwoofer 1, Subwoofer 2*1 The levels can be set in the "Speaker Configuration" (page 95). • Speakers B cannot be calibrated while the output of front Speakers A and front Speakers B independently. Range: 0.15 to 9 meters in...
...82). Tip: If you can specify the distance from the each speaker arrives at the listening position. You can adjust the levels of the AV receiver is muted. • The test tone is output at the standard level for the subwoofer). Range: 0.5 to +12.0 dB for THX,... Front Wide Right, Right, Surr Right, Surr Back Right, Surr Back Left, Surr Left, Subwoofer 1, Subwoofer 2*1 The levels can be set in the "Speaker Configuration" (page 95). • Speakers B cannot be calibrated while the output of front Speakers A and front Speakers B independently. Range: 0.15 to 9 meters in...


