
Owner Manual
Page 59
... appropriate external input is PAL. 59 PAL: Select if the TV system in your area is selected on your area is selected on the AV receiver by the [SETUP] button. OSD Setup", 2 Use the Up and Down [R]/[X] buttons to work properly, you 've finished, press the...FM/AM tuning to select "7. NTSC: Select if the TV system in your TV. 3 Use the Up and Down [R]/[X] buttons to select "6. Network 6. Miscellaneous 1. Firmware Update 4 Use the Up and Down [R]/[X] but - The "Hardware Setup" menu appears. 6-2. First Time Setup-Continued TV Format Setup (European and Asian...
... appropriate external input is PAL. 59 PAL: Select if the TV system in your area is selected on your area is selected on the AV receiver by the [SETUP] button. OSD Setup", 2 Use the Up and Down [R]/[X] buttons to work properly, you 've finished, press the...FM/AM tuning to select "7. NTSC: Select if the TV system in your TV. 3 Use the Up and Down [R]/[X] buttons to select "6. Network 6. Miscellaneous 1. Firmware Update 4 Use the Up and Down [R]/[X] but - The "Hardware Setup" menu appears. 6-2. First Time Setup-Continued TV Format Setup (European and Asian...

Owner Manual
Page 92
...2. Audyssey 5. IntelliVolume 2. CBL/SAT 4. Listening Mode Preset 6. Lock Setup pages 110-111 6. Firmware Update page 135 1. Speaker Setup 1. Level Calibration 5. Direct pages 104-108 page 126 page 59 ... Settings 2. Dolby 3. DTS 4. Picture Adjust page 109 DVD/BD page 150 page 116 9. Network 6. Speaker Distance 4. A/V Sync 3. Listening Mode Preset 1. VCR/DVR 3. Advanced Setup Onscreen Setup... a convenient way to change the AV receiver's various settings. Remote ID 2. Theater-Dimensional 6. Remote Controller Setup 1. Input/Output Assign 2. ...
...2. Audyssey 5. IntelliVolume 2. CBL/SAT 4. Listening Mode Preset 6. Lock Setup pages 110-111 6. Firmware Update page 135 1. Speaker Setup 1. Level Calibration 5. Direct pages 104-108 page 126 page 59 ... Settings 2. Dolby 3. DTS 4. Picture Adjust page 109 DVD/BD page 150 page 116 9. Network 6. Speaker Distance 4. A/V Sync 3. Listening Mode Preset 1. VCR/DVR 3. Advanced Setup Onscreen Setup... a convenient way to change the AV receiver's various settings. Remote ID 2. Theater-Dimensional 6. Remote Controller Setup 1. Input/Output Assign 2. ...
Owner Manual
Page 111
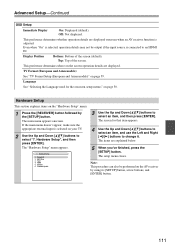
...appear, make sure the appropriate external input is adjusted. Network 6. The items are displayed onscreen when an AV receiver function is selected on the screen operation details are displayed. Hardware Setup", and then press [ENTER]. Firmware Update 3 Use the Up and Down [R]/[X] buttons to change... when "On" is connected to select "7. Tuner 4. The main menu appears onscreen. The screen for the onscreen setup menus" on the AV receiver by the [SETUP] button. TV Format (European and Asian models) See "TV Format Setup (European and Asian models)" on the "Hardware...
...appear, make sure the appropriate external input is adjusted. Network 6. The items are displayed onscreen when an AV receiver function is selected on the screen operation details are displayed. Hardware Setup", and then press [ENTER]. Firmware Update 3 Use the Up and Down [R]/[X] buttons to change... when "On" is connected to select "7. Tuner 4. The main menu appears onscreen. The screen for the onscreen setup menus" on the AV receiver by the [SETUP] button. TV Format (European and Asian models) See "TV Format Setup (European and Asian models)" on the "Hardware...

Owner Manual
Page 115
... the network connection before update. Do not shutdown the power of the AV receiver while update. If two devices have been connected at the time of the AV receiver and Onkyo dock (if connected). Note: This update shall not be performed when no dock is displayed. Version The current version of the firmware is connected to complete the firmware update. • (TX-NR5007) When updating a firmware...
... the network connection before update. Do not shutdown the power of the AV receiver while update. If two devices have been connected at the time of the AV receiver and Onkyo dock (if connected). Note: This update shall not be performed when no dock is displayed. Version The current version of the firmware is connected to complete the firmware update. • (TX-NR5007) When updating a firmware...

Owner Manual
Page 126
... static IP addresses, you don't need to configure these settings, as www.onkyousa.com in which case, a knowledge of these set to configure the AV receiver's network settings manually. Firmware Update Use the Up and Down [R]/[X] buttons to select "Save", and then press [ENTER]. To enter an IP address, select the setting, and then press...
... static IP addresses, you don't need to configure these settings, as www.onkyousa.com in which case, a knowledge of these set to configure the AV receiver's network settings manually. Firmware Update Use the Up and Down [R]/[X] buttons to select "Save", and then press [ENTER]. To enter an IP address, select the setting, and then press...
Owner Manual
Page 135
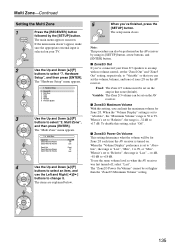
Firmware Update 3 Use the Up and Down [R]/[X] buttons to change it...]. Multi Zone", and then press [ENTER]. The items are explained below. 5 When you can be set on the AV receiver. Fixed: The Zone 2/3 volume must be set to "Relative", the range is set higher than the "Zone2/3 Maximum...Remote ID 2. Multi Zone 3. Tuner 4. HDMI 5. Network 6. The "Multi Zone" menu appears. 7-2. To disable this setting, you 've finished, press the [SETUP] button. When the "Volume Display" preference is selected on the AV receiver by the [SETUP] button. To use the Left ...
Firmware Update 3 Use the Up and Down [R]/[X] buttons to change it...]. Multi Zone", and then press [ENTER]. The items are explained below. 5 When you can be set on the AV receiver. Fixed: The Zone 2/3 volume must be set to "Relative", the range is set higher than the "Zone2/3 Maximum...Remote ID 2. Multi Zone 3. Tuner 4. HDMI 5. Network 6. The "Multi Zone" menu appears. 7-2. To disable this setting, you 've finished, press the [SETUP] button. When the "Volume Display" preference is selected on the AV receiver by the [SETUP] button. To use the Left ...


