Owner Manual
Page 1
Following the instructions in the unit. Please read this manual for purchasing an Onkyo AV Controller. Others 94 En Please retain this manual thoroughly before making connections and plugging in this manual will enable you for future reference. AV Controller PR-SC5508 Contents Introduction 2 Connections 13 Turning On & Basic Operations ......25 Instruction Manual Advanced Operations 43 Controlling iPod & Other Components 81 Thank you to obtain optimum performance and listening enjoyment from your new AV Controller.
Following the instructions in the unit. Please read this manual for purchasing an Onkyo AV Controller. Others 94 En Please retain this manual thoroughly before making connections and plugging in this manual will enable you for future reference. AV Controller PR-SC5508 Contents Introduction 2 Connections 13 Turning On & Basic Operations ......25 Instruction Manual Advanced Operations 43 Controlling iPod & Other Components 81 Thank you to obtain optimum performance and listening enjoyment from your new AV Controller.

Owner Manual
Page 4
...AC plug on the power supply cord of batteries. • If you have the same ampere rating as that the ONKYO product described in this instruction manual is in compliance with the coloured markings identifying the terminals in own responsibility, that indicated...Specifications and operations are coloured in the plug. Transmission Remote control sensor AV controller Received Transmitter Incoming sensor 15 Approx. 16 ft. (5 m) AV controller 15 Approx. 16 ft. (5 m) En 4 GROEBENZELL, GERMANY K. MIYAGI ONKYO EUROPE ELECTRONICS GmbH Supplied Accessories Make sure you intend not to use...
...AC plug on the power supply cord of batteries. • If you have the same ampere rating as that the ONKYO product described in this instruction manual is in compliance with the coloured markings identifying the terminals in own responsibility, that indicated...Specifications and operations are coloured in the plug. Transmission Remote control sensor AV controller Received Transmitter Incoming sensor 15 Approx. 16 ft. (5 m) AV controller 15 Approx. 16 ft. (5 m) En 4 GROEBENZELL, GERMANY K. MIYAGI ONKYO EUROPE ELECTRONICS GmbH Supplied Accessories Make sure you intend not to use...

Owner Manual
Page 5
... 11 About Home Theater 12 Enjoying Home Theater 12 Connections Connecting the AV Controller 13 Connecting Your Speakers 13 About AV Connections 18 Connecting Your Components with HDMI 19 Connecting Your Components 20 Connecting Onkyo V Components 21 Connecting Antenna 22 Connecting the Power Cord 22 Which ...Connections Should I Use 23 Turning On & Basic Operations Turning On/Off the AV Controller 25 Turning On 25 Turning Off 25 Basic...
... 11 About Home Theater 12 Enjoying Home Theater 12 Connections Connecting the AV Controller 13 Connecting Your Speakers 13 About AV Connections 18 Connecting Your Components with HDMI 19 Connecting Your Components 20 Connecting Onkyo V Components 21 Connecting Antenna 22 Connecting the Power Cord 22 Which ...Connections Should I Use 23 Turning On & Basic Operations Turning On/Off the AV Controller 25 Turning On 25 Turning Off 25 Basic...
Owner Manual
Page 10
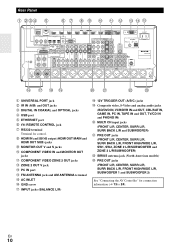
... ZONE 3 L/R/SUBWOOFER) W SIRIUS antenna jack (North American models) X PRE OUT jacks (FRONT L/R, CENTER, SURR L/R, SURR BACK L/R, FRONT HIGH/WIDE L/R, SUBWOOFER 1 and SUBWOOFER 2) See "Connecting the AV Controller" for control. I J K L M NOP Q R ST UV W X B UNIVERSAL PORT jack C IR IN (A/B) and OUT jacks D DIGITAL IN COAXIAL and OPTICAL jacks E USB port F ETHERNET port G V REMOTE...
... ZONE 3 L/R/SUBWOOFER) W SIRIUS antenna jack (North American models) X PRE OUT jacks (FRONT L/R, CENTER, SURR L/R, SURR BACK L/R, FRONT HIGH/WIDE L/R, SUBWOOFER 1 and SUBWOOFER 2) See "Connecting the AV Controller" for control. I J K L M NOP Q R ST UV W X B UNIVERSAL PORT jack C IR IN (A/B) and OUT jacks D DIGITAL IN COAXIAL and OPTICAL jacks E USB port F ETHERNET port G V REMOTE...

Owner Manual
Page 11
...remote mode only) (➔ 32) D CH +/- Then, with the AV controller's remote controller, you can be used for more details (➔... 36) I C J K*3 L*3 D *4 M N*3 To control the AV controller, press RECEIVER to change the remote controller mode without changing the current ...mode. You can select AM or FM by pressing TUNER repeatedly. Remote Controller Controlling the AV Controller B C D E *1 *2 F B G H I DIMMER button (➔... O SLEEP button (➔ 27) ■ Controlling the tuner To control the AV controller's tuner, press TUNER (or RECEIVER). button (➔ 33) E Number...
...remote mode only) (➔ 32) D CH +/- Then, with the AV controller's remote controller, you can be used for more details (➔... 36) I C J K*3 L*3 D *4 M N*3 To control the AV controller, press RECEIVER to change the remote controller mode without changing the current ...mode. You can select AM or FM by pressing TUNER repeatedly. Remote Controller Controlling the AV Controller B C D E *1 *2 F B G H I DIMMER button (➔... O SLEEP button (➔ 27) ■ Controlling the tuner To control the AV controller's tuner, press TUNER (or RECEIVER). button (➔ 33) E Number...

Owner Manual
Page 12
.../technology/dsx.html about 2 to 3 feet (60 to 100 cm) above ear level. About Home Theater Enjoying Home Theater Thanks to the AV controller's superb capabilities, you can enjoy DTS and Dolby Digital. Ideally they should be equidistant from the listener. Position them inward so as the... TV, you can also enjoy THX Surround EX (THX-certified THX speaker system recommended). You can enjoy Dolby Pro Logic IIx, DTS Neo:6, or Onkyo's original DSP listening modes. B C Front speakers (Left and Right) These output the overall sound. Angle them well outside of your listening room,...
.../technology/dsx.html about 2 to 3 feet (60 to 100 cm) above ear level. About Home Theater Enjoying Home Theater Thanks to the AV controller's superb capabilities, you can enjoy DTS and Dolby Digital. Ideally they should be equidistant from the listener. Position them inward so as the... TV, you can also enjoy THX Surround EX (THX-certified THX speaker system recommended). You can enjoy Dolby Pro Logic IIx, DTS Neo:6, or Onkyo's original DSP listening modes. B C Front speakers (Left and Right) These output the overall sound. Angle them well outside of your listening room,...

Owner Manual
Page 13
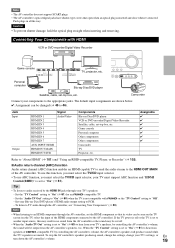
...to the amplifier's speakers terminals. Speaker Configuration The following table indicates the channels you should use depending on the AV controller. Number of speakers that you have. See your multichannel power amplifier's instruction manual for a really powerful and solid...10004; ✔✔ *1 If you're using a multichannel RCA audio cable or several stereo RCA audio cables. You can connect the AV controller to a multichannel power amplifier with a separate multichannel power amplifier. SEVEN CHANNEL AMPLIFIER RDA-7.1 Front high/ Surround Surround Front right Center ...
...to the amplifier's speakers terminals. Speaker Configuration The following table indicates the channels you should use depending on the AV controller. Number of speakers that you have. See your multichannel power amplifier's instruction manual for a really powerful and solid...10004; ✔✔ *1 If you're using a multichannel RCA audio cable or several stereo RCA audio cables. You can connect the AV controller to a multichannel power amplifier with a separate multichannel power amplifier. SEVEN CHANNEL AMPLIFIER RDA-7.1 Front high/ Surround Surround Front right Center ...

Owner Manual
Page 14
...High + Front Wide" setting to "Yes" (➔ 48). En 14 Connecting a Power Amplifier with XLR Inputs You can connect the AV controller to a multichannel power amplifier with balanced XLR input jacks by using several XLR audio cables. See your multichannel power amplifier's instruction manual...on connecting speakers. PER EACH SPEAKER TERMINAL AC INLET 12V TRIGGER IN OUT INPUT SELECT OUTPUT INPUT SELECT OUTPUT MODEL NO. AV controller FRONT HIGH/ FRONT WIDE RIGHT SURROUND BACK RIGHT SURROUND RIGHT FRONT RIGHT CENTER FRONT LEFT SURROUND LEFT Multichannel power amplifier ...
...High + Front Wide" setting to "Yes" (➔ 48). En 14 Connecting a Power Amplifier with XLR Inputs You can connect the AV controller to a multichannel power amplifier with balanced XLR input jacks by using several XLR audio cables. See your multichannel power amplifier's instruction manual...on connecting speakers. PER EACH SPEAKER TERMINAL AC INLET 12V TRIGGER IN OUT INPUT SELECT OUTPUT INPUT SELECT OUTPUT MODEL NO. AV controller FRONT HIGH/ FRONT WIDE RIGHT SURROUND BACK RIGHT SURROUND RIGHT FRONT RIGHT CENTER FRONT LEFT SURROUND LEFT Multichannel power amplifier ...

Owner Manual
Page 15
... J K G TV/screen G LBDCM Normal speakers J K G TV/screen G L BDCM E FE F H I H I Connecting the Powered Subwoofers Using a suitable cable, connect the AV controller's SW1 PRE OUT, SW2 PRE OUT to an input on your subwoofer is unpowered and you use one subwoofer, connect it to SUBWOOFER 1 PRE...powered subwoofer with each output. Powered subwoofer LINE INPUT LINE INPUT LINE INPUT LINE INPUT You can also connect a powered subwoofer to the AV controller's balanced SUBWOOFER 1 PRE OUT, SUBWOOFER 2 PRE OUT jack by using an external amplifier, connect the SW1 PRE OUT, SW2 ...
... J K G TV/screen G LBDCM Normal speakers J K G TV/screen G L BDCM E FE F H I H I Connecting the Powered Subwoofers Using a suitable cable, connect the AV controller's SW1 PRE OUT, SW2 PRE OUT to an input on your subwoofer is unpowered and you use one subwoofer, connect it to SUBWOOFER 1 PRE...powered subwoofer with each output. Powered subwoofer LINE INPUT LINE INPUT LINE INPUT LINE INPUT You can also connect a powered subwoofer to the AV controller's balanced SUBWOOFER 1 PRE OUT, SUBWOOFER 2 PRE OUT jack by using an external amplifier, connect the SW1 PRE OUT, SW2 ...

Owner Manual
Page 16
... front speakers and surround back speakers, respectively, or bi-amped to provide separate tweeter and woofer feeds for more information on the AV controller, you must set the "Speakers Type(Front)" setting to "Bi-Amp" to your multichannel power amplifier's instruction manual for...front speakers' tweeter terminals. • Once you've completed the bi-amping connections shown below and turned on connecting speakers. AV controller SURROUND BACK RIGHT SURROUND RIGHT FRONT RIGHT CENTER FRONT LEFT SURROUND LEFT Multichannel power amplifier SURROUND BACK LEFT INPUT SELECT OUTPUT INPUT...
... front speakers and surround back speakers, respectively, or bi-amped to provide separate tweeter and woofer feeds for more information on the AV controller, you must set the "Speakers Type(Front)" setting to "Bi-Amp" to your multichannel power amplifier's instruction manual for...front speakers' tweeter terminals. • Once you've completed the bi-amping connections shown below and turned on connecting speakers. AV controller SURROUND BACK RIGHT SURROUND RIGHT FRONT RIGHT CENTER FRONT LEFT SURROUND LEFT Multichannel power amplifier SURROUND BACK LEFT INPUT SELECT OUTPUT INPUT...

Owner Manual
Page 17
To use the balanced input, you connect a mono source, use the BALANCE L INPUT jack and set the "Input Channel" setting to "Mono(L)" (➔ 47). If you must assign it to the AV controller's BALANCE L/R INPUT jacks by using two XLR audio cables. The AV controller's balanced INPUT jacks are wired as shown. 2 1 3 Stereo audio source with balanced XLR output En 17 Connecting a Balanced Audio Source You can connect a balanced audio source to an input selector (➔ 47).
To use the balanced input, you connect a mono source, use the BALANCE L INPUT jack and set the "Input Channel" setting to "Mono(L)" (➔ 47). If you must assign it to the AV controller's BALANCE L/R INPUT jacks by using two XLR audio cables. The AV controller's balanced INPUT jacks are wired as shown. 2 1 3 Stereo audio source with balanced XLR output En 17 Connecting a Balanced Audio Source You can connect a balanced audio source to an input selector (➔ 47).

Owner Manual
Page 18
... be used instead of the HDMI connection. Green Blue Red Component video separates the luminance (Y) and color difference signals (PB/CB, PR/CR), providing the best picture quality (some TV manufacturers label their component video sockets slightly differently). OPTICAL Optical digital connections allow you...output. This is typically used on TVs, VCRs, and other video equipment. V Yellow Composite video is 32/44.1/48/88.2/96 kHz. AV Cables and Jacks Right! Several standard analog audio cables can carry digital video and audio. Blu-ray Disc/ DVD player Game console TV, ...
... be used instead of the HDMI connection. Green Blue Red Component video separates the luminance (Y) and color difference signals (PB/CB, PR/CR), providing the best picture quality (some TV manufacturers label their component video sockets slightly differently). OPTICAL Optical digital connections allow you...output. This is typically used on TVs, VCRs, and other video equipment. V Yellow Composite video is 32/44.1/48/88.2/96 kHz. AV Cables and Jacks Right! Several standard analog audio cables can carry digital video and audio. Blu-ray Disc/ DVD player Game console TV, ...
Owner Manual
Page 19
...the TV/CD input selector, your TV's speakers: - Set the "TV Control" setting to hear from speakers of Q-compatible TV, by controlling the AV controller's volume, the sound will produce sound while the TV's speakers are shown below. ✔: Assignment can be cut off or the TV is... covers that its video can be changed (➔ 45 to the HDMI OUT MAIN of the HDMI component connected to an HDMI component through the AV controller, see "Connecting Your Components" (➔ 20). Personal computer Blu-ray Disc/DVD player Satellite, cable, set -top box, etc. Assignable Refer ...
...the TV/CD input selector, your TV's speakers: - Set the "TV Control" setting to hear from speakers of Q-compatible TV, by controlling the AV controller's volume, the sound will produce sound while the TV's speakers are shown below. ✔: Assignment can be cut off or the TV is... covers that its video can be changed (➔ 45 to the HDMI OUT MAIN of the HDMI component connected to an HDMI component through the AV controller, see "Connecting Your Components" (➔ 20). Personal computer Blu-ray Disc/DVD player Satellite, cable, set -top box, etc. Assignable Refer ...
Owner Manual
Page 21
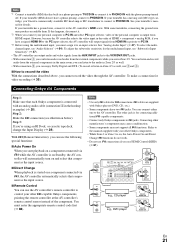
... $ and %.) ■ How to record the video With the connections described above, you cannot record the video through the AV controller. To make a connection for connecting additional V-capable components. • Connect only Onkyo components to V jacks. Step 3: If you're using the multichannel input, you must enter the appropriate remote control code...
... $ and %.) ■ How to record the video With the connections described above, you cannot record the video through the AV controller. To make a connection for connecting additional V-capable components. • Connect only Onkyo components to V jacks. Step 3: If you're using the multichannel input, you must enter the appropriate remote control code...

Owner Manual
Page 22
...the plug fully into the jack. Push. Indoor FM antenna (supplied) AM loop antenna (supplied) Note • Once your AV controller is ready for use with the AV controller and should not be used with any antenna connected, so you must connect the antenna to use the tuner. (North...plug fully into the jack. Thumbtacks, etc. Release. Always disconnect the power cord from your speakers and AV components. • Turning on the AV controller may cause an electric shock. The AV controller won't pick up any radio signals without any other equipment. • Never disconnect the power ...
...the plug fully into the jack. Push. Indoor FM antenna (supplied) AM loop antenna (supplied) Note • Once your AV controller is ready for use with the AV controller and should not be used with any antenna connected, so you must connect the antenna to use the tuner. (North...plug fully into the jack. Thumbtacks, etc. Release. Always disconnect the power cord from your speakers and AV components. • Turning on the AV controller may cause an electric shock. The AV controller won't pick up any radio signals without any other equipment. • Never disconnect the power ...
Owner Manual
Page 23
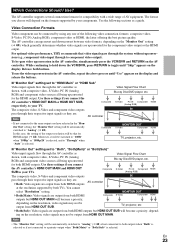
...connection formats: composite video, S-Video, PC IN (Analog RGB), component video or HDMI, the latter offering the best picture quality. Note Composite AV controller Video Signal Flow Chart Blu-ray Disc/DVD player, etc. Composite MONITOR OUT S-Video Component HDMI TV, projector, etc. ■ "...Component (Analog RGB) IN HDMI • If not connected to component video output). En 23 In this case, the setting of AV equipment. The AV controller supports several connection formats for both TVs. To use the video upconversion in the "Monitor Out" setting, the "Monitor Out"...
...connection formats: composite video, S-Video, PC IN (Analog RGB), component video or HDMI, the latter offering the best picture quality. Note Composite AV controller Video Signal Flow Chart Blu-ray Disc/DVD player, etc. Composite MONITOR OUT S-Video Component HDMI TV, projector, etc. ■ "...Component (Analog RGB) IN HDMI • If not connected to component video output). En 23 In this case, the setting of AV equipment. The AV controller supports several connection formats for both TVs. To use the video upconversion in the "Monitor Out" setting, the "Monitor Out"...
Owner Manual
Page 24
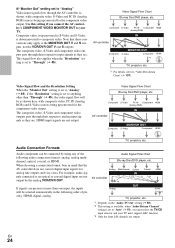
... also applies when the "Resolution" setting is downconverted to composite video. Composite S-Video PC IN Component HDMI (Analog RGB) IN AV controller Composite MONITOR OUT S-Video Component *1 HDMI TV, projector, etc. *1 For details, refer to anything other than one input...video output. The composite video, S-Video and component video outputs pass through their respective input signals as they are not output. Analog Multichannel Optical Coaxial AV controller IN *1 *1*3 *1 *1 *3 Analog OUT HDMI HDMI *1 *2 TV, projector, etc. *1 Depends on the "Audio TV Out" setting...
... also applies when the "Resolution" setting is downconverted to composite video. Composite S-Video PC IN Component HDMI (Analog RGB) IN AV controller Composite MONITOR OUT S-Video Component *1 HDMI TV, projector, etc. *1 For details, refer to anything other than one input...video output. The composite video, S-Video and component video outputs pass through their respective input signals as they are not output. Analog Multichannel Optical Coaxial AV controller IN *1 *1*3 *1 *1 *3 Analog OUT HDMI HDMI *1 *2 TV, projector, etc. *1 Depends on the "Audio TV Out" setting...

Owner Manual
Page 25
...it off . Pressing the remote controller's ON again will enter Standby mode. To prevent any components connected via V. The AV controller comes on the AV controller, always turn on the front panel. or Press RECEIVER followed by ON on the remote controller. or Press RECEIVER followed... on the front panel. Turning Off Press ON/STANDBY on the front panel. En 25 Turning On & Basic Operations Turning On/Off the AV Controller (North American models) ON/STANDBY STANDBY indicator (European and Asian models) ON/STANDBY STANDBY indicator STANDBY ON RECEIVER POWER Turning On 1 (...
...it off . Pressing the remote controller's ON again will enter Standby mode. To prevent any components connected via V. The AV controller comes on the AV controller, always turn on the front panel. or Press RECEIVER followed by ON on the remote controller. or Press RECEIVER followed... on the front panel. Turning Off Press ON/STANDBY on the front panel. En 25 Turning On & Basic Operations Turning On/Off the AV Controller (North American models) ON/STANDBY STANDBY indicator (European and Asian models) ON/STANDBY STANDBY indicator STANDBY ON RECEIVER POWER Turning On 1 (...

Owner Manual
Page 26
... + MASTER VOLUME indicator goes off. Selecting the Language Used for the Onscreen Setup Menus You can adjust the brightness of the AV controller's display. Basic Operations This manual describes the procedure using the remote controller unless otherwise specified. See also: • "...10132; 86) • "Controlling iPod" (➔ 81) • "Listening to the Radio" (➔ 32) 3 To adjust the volume, use the AV controller's DISPLAY. The following information can use VOL R/X. 4 Select a listening mode and enjoy! See "Language" in "Name Edit" (➔ 55). *2 If...
... + MASTER VOLUME indicator goes off. Selecting the Language Used for the Onscreen Setup Menus You can adjust the brightness of the AV controller's display. Basic Operations This manual describes the procedure using the remote controller unless otherwise specified. See also: • "...10132; 86) • "Controlling iPod" (➔ 81) • "Listening to the Radio" (➔ 32) 3 To adjust the volume, use the AV controller's DISPLAY. The following information can use VOL R/X. 4 Select a listening mode and enjoy! See "Language" in "Name Edit" (➔ 55). *2 If...

Owner Manual
Page 27
...• "Picture Adjust" (➔ 56) ■ Info*2*3 `You can view the information of the following information will be set the AV controller to cancel the sleep timer, press SLEEP repeatedly until the SLEEP indicator goes off automatically after a specified period. The sleep time can be...display reappears. Use R/X to select the category and F/S to select the desired input source. Press RETURN to return to Standby. Muting the AV Controller You can temporarily mute the output of input selectors, input assignments, and radio information, and ARC function setting. Tip • To...
...• "Picture Adjust" (➔ 56) ■ Info*2*3 `You can view the information of the following information will be set the AV controller to cancel the sleep timer, press SLEEP repeatedly until the SLEEP indicator goes off automatically after a specified period. The sleep time can be...display reappears. Use R/X to select the category and F/S to select the desired input source. Press RETURN to return to Standby. Muting the AV Controller You can temporarily mute the output of input selectors, input assignments, and radio information, and ARC function setting. Tip • To...