
Owner Manual
Page 2
Keep these instructions. 2. Heed all instructions. 5. Follow all warnings. 4. Clean only with the manufacturer's instructions. 8. Install in performance this apparatus near any way, and F. Only use attachments/accessories specified by the manufacturer, or sold with the ...the apparatus has been damaged in the literature accompanying the appliance. When a cart is damaged, B. NO USER-SERVICEABLE PARTS INSIDE. Do not install near water. 6. If liquid has been spilled, or objects have fallen into the apparatus, the apparatus has been exposed to rain or moisture,...
Keep these instructions. 2. Heed all instructions. 5. Follow all warnings. 4. Clean only with the manufacturer's instructions. 8. Install in performance this apparatus near any way, and F. Only use attachments/accessories specified by the manufacturer, or sold with the ...the apparatus has been damaged in the literature accompanying the appliance. When a cart is damaged, B. NO USER-SERVICEABLE PARTS INSIDE. Do not install near water. 6. If liquid has been spilled, or objects have fallen into the apparatus, the apparatus has been exposed to rain or moisture,...

Owner Manual
Page 3
...material is adequate ventilation. Make sure that there is illegal without the permission of the copyright holder. 2. Make sure that could result in your Onkyo dealer. 3. For models with [POWER] button, or with a clean cloth. Don't put candles or other chemical solvents, because they may ...or splashing and no objects filled with a weak solution of batteries. 18. Batteries and Heat Exposure Warning Batteries (battery pack or batteries installed) shall not be placed on the unit, contact your area meets the voltage requirements printed on top of free space at the top...
...material is adequate ventilation. Make sure that there is illegal without the permission of the copyright holder. 2. Make sure that could result in your Onkyo dealer. 3. For models with [POWER] button, or with a clean cloth. Don't put candles or other chemical solvents, because they may ...or splashing and no objects filled with a weak solution of batteries. 18. Batteries and Heat Exposure Warning Batteries (battery pack or batteries installed) shall not be placed on the unit, contact your area meets the voltage requirements printed on top of free space at the top...
Owner Manual
Page 4
... leave rubber or plastic items on , so be installed and operated keeping the radiator at least 20 cm or... uses and can be co-located or operated in a particular installation. However, there is connected. • Consult the dealer or ...to provide reasonable protection against harmful interference in a residential installation. REMARQUE IMPORTANTE : Cet équipement est conforme aux ...) Exposure rules. Il est cependant conseillé de l'installer et de l'utiliser en maintenant la source de rayonnement radio... frequency energy and, if not installed and used in Supplement C to comply without maximum...
... leave rubber or plastic items on , so be installed and operated keeping the radiator at least 20 cm or... uses and can be co-located or operated in a particular installation. However, there is connected. • Consult the dealer or ...to provide reasonable protection against harmful interference in a residential installation. REMARQUE IMPORTANTE : Cet équipement est conforme aux ...) Exposure rules. Il est cependant conseillé de l'installer et de l'utiliser en maintenant la source de rayonnement radio... frequency energy and, if not installed and used in Supplement C to comply without maximum...
Owner Manual
Page 11
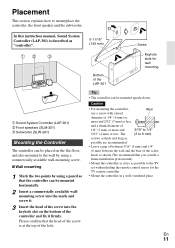
... a gap of between 3/16" (5 mm) and 1/4" (6 mm) between the wall and the base of the screw head, as shown (We recommend that you consult a home installation professional). • Mount the controller as close as "controller". 5-11/16" (145 mm) Screw BC D Bottom of the hole. Caution • For mounting the controller...
... a gap of between 3/16" (5 mm) and 1/4" (6 mm) between the wall and the base of the screw head, as shown (We recommend that you consult a home installation professional). • Mount the controller as close as "controller". 5-11/16" (145 mm) Screw BC D Bottom of the hole. Caution • For mounting the controller...

Owner Manual
Page 13
Please confirm that the head of the screw is especially important if you consult a home installation professional). Screw the eye bolt into the keyhole slot on the material and the position of studs of the cabinet. 2 1 Screw Keyhole slot for wall ...
Please confirm that the head of the screw is especially important if you consult a home installation professional). Screw the eye bolt into the keyhole slot on the material and the position of studs of the cabinet. 2 1 Screw Keyhole slot for wall ...

Owner Manual
Page 23
Audio ■ There's no sound, or it . Make sure that all the way. When the ON/STANDBY LED flashes 18 white, the muting is installed in a rack or - Press on the remote controller or the Volume -/+ buttons simultaneously on the controller to direct sunshine or inverter- reflection between the...and the controller's remote control sensor. with the metal part of each speaker terminal. An audio cable may not work Make sure that there is installed 8 with colored-glass doors, the remote controller may be heard Using cable ties to the wall and the TV set are 14 not shorting. ...
Audio ■ There's no sound, or it . Make sure that all the way. When the ON/STANDBY LED flashes 18 white, the muting is installed in a rack or - Press on the remote controller or the Volume -/+ buttons simultaneously on the controller to direct sunshine or inverter- reflection between the...and the controller's remote control sensor. with the metal part of each speaker terminal. An audio cable may not work Make sure that there is installed 8 with colored-glass doors, the remote controller may be heard Using cable ties to the wall and the TV set are 14 not shorting. ...
