
Owner Manual
Page 1
Troubleshooting 18 Specifications ...... Following the instructions in the unit. Back cover page En Contents Integrated Amplifier A-9755/A-9555 Introduction 2 Instruction Manual Connections 10 Enjoying Audio Sources 14 Thank you to obtain optimum performance and listening enjoyment from your new Integrated Amplifier. Please retain this manual will enable you for future reference. Please read this manual thoroughly before making connections and plugging in this manual for purchasing an Onkyo Integrated Amplifier.
Troubleshooting 18 Specifications ...... Following the instructions in the unit. Back cover page En Contents Integrated Amplifier A-9755/A-9555 Introduction 2 Instruction Manual Connections 10 Enjoying Audio Sources 14 Thank you to obtain optimum performance and listening enjoyment from your new Integrated Amplifier. Please retain this manual will enable you for future reference. Please read this manual thoroughly before making connections and plugging in this manual for purchasing an Onkyo Integrated Amplifier.
Owner Manual
Page 4
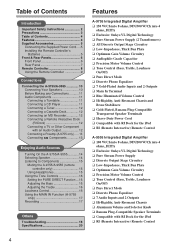
... 17 Recording 17 Others Troubleshooting 18 Specifications 20 Features A-9755 Integrated Digital Amplifier ❑ 150 W/Ch into 8 ohms, DIN/300 W/Ch into 4 ohms, JEITA ❑ Exclusive Onkyo VL Digital Technology ❑ Pure Stream Power Supply (2 Transformers) ❑ All Discrete Output Stage... A-9555 Integrated Digital Amplifier ❑ 100 W/Ch into 8 ohms, DIN/200 W/Ch into 4 ohms, JEITA ❑ Exclusive Onkyo VL Digital Technology ❑ Pure Stream Power Supply ❑ Discrete Output Stage Circuitry ❑ Low-Impedance, Thick Bus Plate ❑ Optimum ...
... 17 Recording 17 Others Troubleshooting 18 Specifications 20 Features A-9755 Integrated Digital Amplifier ❑ 150 W/Ch into 8 ohms, DIN/300 W/Ch into 4 ohms, JEITA ❑ Exclusive Onkyo VL Digital Technology ❑ Pure Stream Power Supply (2 Transformers) ❑ All Discrete Output Stage... A-9555 Integrated Digital Amplifier ❑ 100 W/Ch into 8 ohms, DIN/200 W/Ch into 4 ohms, JEITA ❑ Exclusive Onkyo VL Digital Technology ❑ Pure Stream Power Supply ❑ Discrete Output Stage Circuitry ❑ Low-Impedance, Thick Bus Plate ❑ Optimum ...
Owner Manual
Page 7
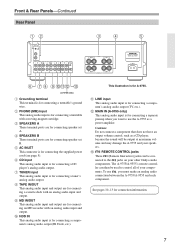
... input This analog audio input is for connecting the supplied power cord (see page 5). J HDD IN This analog audio input is for A-9755. M REMOTE CONTROL jacks These (Remote Interactive) jacks can then be used to control all of your speakers. This illustration is for connecting... because the sound will be con- C SPEAKERS A These terminal posts are for connecting a separate preamp when you want to the jacks on your other Onkyo audio components. nents. B PHONO (MM) input This analog audio input is for connecting a turntable's ground wire. Front & Rear Panels-Continued Rear Panel...
... input This analog audio input is for connecting the supplied power cord (see page 5). J HDD IN This analog audio input is for A-9755. M REMOTE CONTROL jacks These (Remote Interactive) jacks can then be used to control all of your speakers. This illustration is for connecting... because the sound will be con- C SPEAKERS A These terminal posts are for connecting a separate preamp when you want to the jacks on your other Onkyo audio components. nents. B PHONO (MM) input This analog audio input is for connecting a turntable's ground wire. Front & Rear Panels-Continued Rear Panel...
Owner Manual
Page 8
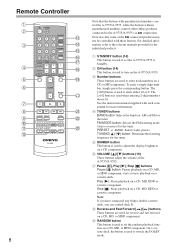
...the relevant manuals provided for the tuner. To enter a single-digit number, simply press the corresponding button. Note: If you have connected any Onkyo double cassette deck, you can control deck B. On a cassette deck, the button is used to switch the DOLBY mode. Note also that... the buttons with parenthesized numbers control the A-9755/A-9555, while the buttons without parenthesized numbers control other Onkyo products connected to the A-9755/A-9555 via connection. FM MODE button: Selects the FM listening mode (stereo or mono) for ...
...the relevant manuals provided for the tuner. To enter a single-digit number, simply press the corresponding button. Note: If you have connected any Onkyo double cassette deck, you can control deck B. On a cassette deck, the button is used to switch the DOLBY mode. Note also that... the buttons with parenthesized numbers control the A-9755/A-9555, while the buttons without parenthesized numbers control other Onkyo products connected to the A-9755/A-9555 via connection. FM MODE button: Selects the FM listening mode (stereo or mono) for ...
Owner Manual
Page 12
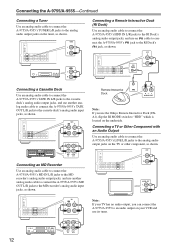
...input jacks, as shown. OUT Connecting a Cassette Deck Use an analog audio cable to connect the A-9755/A-9555's TAPE IN L/R jacks to the cassette deck's analog audio output jacks, and use the Onkyo Remote Interactive Dock (DSA1), flip the RI MODE switch to an audio output on the underside.... Remote Interactive Dock R ---- L AUDIO OUT Note: If you can connect the A-9755/A-9555 to "HDD" which is located on your TV ...
...input jacks, as shown. OUT Connecting a Cassette Deck Use an analog audio cable to connect the A-9755/A-9555's TAPE IN L/R jacks to the cassette deck's analog audio output jacks, and use the Onkyo Remote Interactive Dock (DSA1), flip the RI MODE switch to an audio output on the underside.... Remote Interactive Dock R ---- L AUDIO OUT Note: If you can connect the A-9755/A-9555 to "HDD" which is located on your TV ...
Owner Manual
Page 13
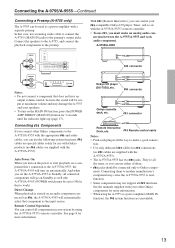
...and may not support all the same, so you turn on Standby as well (the A-9755/A-9555's POWER switch must make a good connec- Connecting Components If you connect other Onkyo components for 3 seconds until the indicator lights up (page 17). Auto Power On When ... on a component that component as the input source. Connecting the A-9755/A-9555-Continued Connecting a Preamp (A-9755 only) The A-9755 can be used as a power amplifier with your other Onkyo components to the A-9755/A-9555 with the A-9755/A-9555's remote controller. • To use the following system functions....
...and may not support all the same, so you turn on Standby as well (the A-9755/A-9555's POWER switch must make a good connec- Connecting Components If you connect other Onkyo components for 3 seconds until the indicator lights up (page 17). Auto Power On When ... on a component that component as the input source. Connecting the A-9755/A-9555-Continued Connecting a Preamp (A-9755 only) The A-9755 can be used as a power amplifier with your other Onkyo components to the A-9755/A-9555 with the A-9755/A-9555's remote controller. • To use the following system functions....
Owner Manual
Page 18
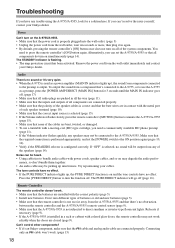
...'s no sound will go off (page 16). Relocate if necessary (page 9). • If the A-9755/A-9555 is selected, no sound or it 's an Onkyo component, make sure that 's connected to the A-9755, or to the A-9755/A-9555. Can't control other components? • If it 's very quiet. • When the... A-9755 is used as a preamp, press the [POWER AMP DIRECT (MAIN IN)] button for a solution here....
...'s no sound will go off (page 16). Relocate if necessary (page 9). • If the A-9755/A-9555 is selected, no sound or it 's an Onkyo component, make sure that 's connected to the A-9755, or to the A-9755/A-9555. Can't control other components? • If it 's very quiet. • When the... A-9755 is used as a preamp, press the [POWER AMP DIRECT (MAIN IN)] button for a solution here....
Owner Manual
Page 19
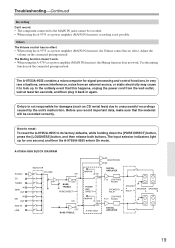
... A SPEAKER SPEAKER RELAY A B 19 Adjust the volume on the connected preamp instead. How to reset: To reset the A-9755/A-9555 to lock up for one second, and then the A-9755/A-9555 enters On mode. Onkyo is not possible. The Muting function doesn't work . Use the muting function on the connected preamp instead. Troubleshooting...
... A SPEAKER SPEAKER RELAY A B 19 Adjust the volume on the connected preamp instead. How to reset: To reset the A-9755/A-9555 to lock up for one second, and then the A-9755/A-9555 enters On mode. Onkyo is not possible. The Muting function doesn't work . Use the muting function on the connected preamp instead. Troubleshooting...
Owner Manual
Page 20
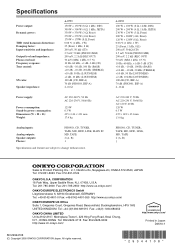
...(A, B) 1 Sales & Product Planning Div. : 2-1, Nisshin-cho, Neyagawa-shi, OSAKA 572-8540, JAPAN Tel: 072-831-8023 Fax: 072-831-8124 ONKYO U.S.A. CORPORATION 18 Park Way, Upper Saddle River, N.J. 07458, U.S.A. All rights reserved. * 2 9 3 4 4 1 0 8 * Specifications... power: THD (total harmonic distortion): Damping factor: Input sensitivity and impedance: Output level and impedance: Phono overload: Frequency response: Tone control: SN ratio: Speaker impedance: A-9755 150 W + 150 W (8 Ω, 1 kHz, DIN) 300 W + 300 W (4 Ω, 1 kHz, JEITA) 330 W + 330 W (3 Ω, Front) 270 W + ...
...(A, B) 1 Sales & Product Planning Div. : 2-1, Nisshin-cho, Neyagawa-shi, OSAKA 572-8540, JAPAN Tel: 072-831-8023 Fax: 072-831-8124 ONKYO U.S.A. CORPORATION 18 Park Way, Upper Saddle River, N.J. 07458, U.S.A. All rights reserved. * 2 9 3 4 4 1 0 8 * Specifications... power: THD (total harmonic distortion): Damping factor: Input sensitivity and impedance: Output level and impedance: Phono overload: Frequency response: Tone control: SN ratio: Speaker impedance: A-9755 150 W + 150 W (8 Ω, 1 kHz, DIN) 300 W + 300 W (4 Ω, 1 kHz, JEITA) 330 W + 330 W (3 Ω, Front) 270 W + ...
