Owner Manual
Page 1
Stereo Receiver TX-8522/ TX-8222 Instruction Manual Contents Introduction 2 Connections 12 Enjoying Audio Sources 20 Thank you to obtain optimum performance and listening enjoyment from your new Stereo Receiver. Please retain this manual thoroughly before making connections and plugging in this manual will enable you for future reference. Others Troubleshooting 32 Specifications 34 En Please read this manual for purchasing an Onkyo Stereo Receiver. Following the instructions in the unit.
Stereo Receiver TX-8522/ TX-8222 Instruction Manual Contents Introduction 2 Connections 12 Enjoying Audio Sources 20 Thank you to obtain optimum performance and listening enjoyment from your new Stereo Receiver. Please retain this manual thoroughly before making connections and plugging in this manual will enable you for future reference. Others Troubleshooting 32 Specifications 34 En Please read this manual for purchasing an Onkyo Stereo Receiver. Following the instructions in the unit.

Owner Manual
Page 4
...Introduction Important Safety Instructions 2 Precautions 3 Table of Contents 4 Supplied Accessories 4 Installing the Batteries 5 Features 5 Getting to Know the Receiver 6 Front Panel 6 Rear Panel 8 Display 9 Remote Controller 10 Using the Remote Controller 10 Connections Connecting Your Speakers 12 Speaker Connection...Sources 21 Muting the receiver (remote controller only) ........ 22 Using Headphones 22 Setting the Display Brightness 22 Using the Sleep Timer (remote controller only) ... 22 Using the Tone and Balance Controls 23 Setting the DIRECT Function (TX-8522 only) ..... ...
...Introduction Important Safety Instructions 2 Precautions 3 Table of Contents 4 Supplied Accessories 4 Installing the Batteries 5 Features 5 Getting to Know the Receiver 6 Front Panel 6 Rear Panel 8 Display 9 Remote Controller 10 Using the Remote Controller 10 Connections Connecting Your Speakers 12 Speaker Connection...Sources 21 Muting the receiver (remote controller only) ........ 22 Using Headphones 22 Setting the Display Brightness 22 Using the Sleep Timer (remote controller only) ... 22 Using the Tone and Balance Controls 23 Setting the DIRECT Function (TX-8522 only) ..... ...
Owner Manual
Page 6
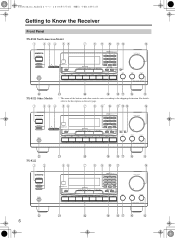
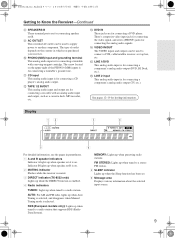
For details, refer to the shipping destination. Getting to Know the Receiver Front Panel TX-8522 North American Model 1 23 4 56 7 8 9 J KL N V U T S RQ P O TX-8522 Other Models * The name of the buttons and other controls varies according to the description on the next page. 1 23 4 56 7 8 9* J K* L M N V TX-8222 12 U 56 T S RQ P O 7 89 J K N V U 6 T S RQ P O
For details, refer to the shipping destination. Getting to Know the Receiver Front Panel TX-8522 North American Model 1 23 4 56 7 8 9 J KL N V U T S RQ P O TX-8522 Other Models * The name of the buttons and other controls varies according to the description on the next page. 1 23 4 56 7 8 9* J K* L M N V TX-8222 12 U 56 T S RQ P O 7 89 J K N V U 6 T S RQ P O

Owner Manual
Page 7
... tuning mode for radio tuning. S MEMORY button (27) Used when storing or deleting radio presets. A STANDBY/ON button (20) Sets the receiver to find a station in parentheses. F DISPLAY (30) Displays various information about the currently selected input source. V PHONES jack (22...) This 1/4-inch phone jack is being received from the remote controller. D DIRECT button (23) Outputs the original sound source without applying any effects. RT/PTY/TP button (29) On...
... tuning mode for radio tuning. S MEMORY button (27) Used when storing or deleting radio presets. A STANDBY/ON button (20) Sets the receiver to find a station in parentheses. F DISPLAY (30) Displays various information about the currently selected input source. V PHONES jack (22...) This 1/4-inch phone jack is being received from the remote controller. D DIRECT button (23) Outputs the original sound source without applying any effects. RT/PTY/TP button (29) On...
Owner Manual
Page 8
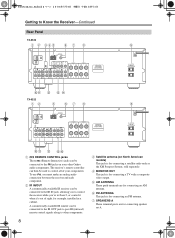
... to the IR OUT jack to pass IR (infrared) remote control signals along to other Onkyo audio components. F FM ANTENNA This jack is for connecting an FM antenna. The receiver's remote controller can then be connected to the jacks on North American models) This jack ...is for connecting speaker set A. Getting to Know the Receiver-Continued Rear Panel TX-8522 1 B 345 67 8 9 JK L M N TX-8222 1B 5 67 8 9 JK L OP A REMOTE CONTROL jacks These (Remote Interactive) jacks can be used to control all...
... to the IR OUT jack to pass IR (infrared) remote control signals along to other Onkyo audio components. F FM ANTENNA This jack is for connecting an FM antenna. The receiver's remote controller can then be connected to the jacks on North American models) This jack ...is for connecting speaker set A. Getting to Know the Receiver-Continued Rear Panel TX-8522 1 B 345 67 8 9 JK L M N TX-8222 1B 5 67 8 9 JK L OP A REMOTE CONTROL jacks These (Remote Interactive) jacks can be used to control all...
Owner Manual
Page 9
...3 4 5 6 For detailed information, see the pages in which you purchased your receiver. Indicator B lights up when speaker set B is on. 2 MUTING indicator Flashes while the receiver is muted. 3 DIRECT indicator (TX-8522 only) Lights up while the DIRECT function is enabled. 4 Radio indicators TUNED:... Message area Displays various information about the selected input source. 9 I AC OUTLET This switched AC outlet can be used to Know the Receiver-Continued H SPEAKERS B These terminal posts are for connecting a turntable's ground wire. K CD input This analog audio input is for connecting...
...3 4 5 6 For detailed information, see the pages in which you purchased your receiver. Indicator B lights up when speaker set B is on. 2 MUTING indicator Flashes while the receiver is muted. 3 DIRECT indicator (TX-8522 only) Lights up while the DIRECT function is enabled. 4 Radio indicators TUNED:... Message area Displays various information about the selected input source. 9 I AC OUTLET This switched AC outlet can be used to Know the Receiver-Continued H SPEAKERS B These terminal posts are for connecting a turntable's ground wire. K CD input This analog audio input is for connecting...

Owner Manual
Page 10
... the batteries. • The remote controller may not work if there's an obstacle between it and the receiver's remote control sensor. Using the Remote Controller Point the remote controller toward the remote control sensor. Keep this..., such as direct sunlight or inverter-type fluorescent lights. Keep this in a rack behind colored glass doors. Remote Controller TX-8522 North American model (RC-664S) TX-8522 Other models (RC-665S) TX-8222 All models (RC-666S) 1 1 9 9 2 J 2 J K K 3 3* L L 4 5 M 4 5 M N N O O P P Q Q R R 6 S 7 T T 8 U 8 U...
... the batteries. • The remote controller may not work if there's an obstacle between it and the receiver's remote control sensor. Using the Remote Controller Point the remote controller toward the remote control sensor. Keep this..., such as direct sunlight or inverter-type fluorescent lights. Keep this in a rack behind colored glass doors. Remote Controller TX-8522 North American model (RC-664S) TX-8522 Other models (RC-665S) TX-8222 All models (RC-666S) 1 1 9 9 2 J 2 J K K 3 3* L L 4 5 M 4 5 M N N O O P P Q Q R R 6 S 7 T T 8 U 8 U...

Owner Manual
Page 11
...When SAT RADIO is used to select categories. Stop [ ]: Stops playback. U VOL [ ]/[ ] buttons (21) Adjusts the volume of the receiver regardless of these buttons work for radio tuning. J DISPLAY button (30) Displays various information about 5 seconds. Pressing them repeatedly selects earlier or ...button (22) Adjusts the display brightness. starts reverse playback on an HDD or cassette component. A ON/STANDBY button (20) Sets the receiver to access the setup menus. After the DIRECT TUNING button is pressed, these buttons is pressed, the input source will be changed to...
...When SAT RADIO is used to select categories. Stop [ ]: Stops playback. U VOL [ ]/[ ] buttons (21) Adjusts the volume of the receiver regardless of these buttons work for radio tuning. J DISPLAY button (30) Displays various information about 5 seconds. Pressing them repeatedly selects earlier or ...button (22) Adjusts the display brightness. starts reverse playback on an HDD or cassette component. A ON/STANDBY button (20) Sets the receiver to access the setup menus. After the DIRECT TUNING button is pressed, these buttons is pressed, the input source will be changed to...
Owner Manual
Page 12
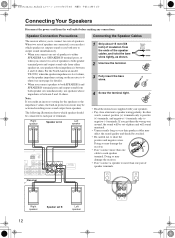
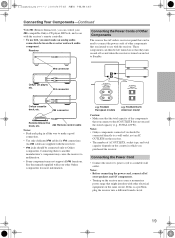
Doing so may damage the receiver. • Don't connect more than one cable to negative (-) terminals. The following illustration shows which speaker set outputs sound or use speakers whose impedance is between 4 and 16 ohms. For the North American model TX-8522, when the speaker impedance is between 8 and 16 ohms. Note: If...
Doing so may damage the receiver. • Don't connect more than one cable to negative (-) terminals. The following illustration shows which speaker set outputs sound or use speakers whose impedance is between 4 and 16 ohms. For the North American model TX-8522, when the speaker impedance is between 8 and 16 ohms. Note: If...

Owner Manual
Page 13
Note: Be sure to minimize the volume level on the receiver 4 before performing the procedures below. The "Impedance: 8 ohms" indication appears in the display. 3 Change the impedance value to complete the setting. When you change the ... power. 2 Press the SETUP button on the remote controller to "6 ohms" using the [ ]/[ ] buttons. 13 Connecting Your Speakers-Continued Configuring the Speaker Impedance (TX-8522 North American model only) In this model, the factory default for speaker impedance is "8 ohms."
Note: Be sure to minimize the volume level on the receiver 4 before performing the procedures below. The "Impedance: 8 ohms" indication appears in the display. 3 Change the impedance value to complete the setting. When you change the ... power. 2 Press the SETUP button on the remote controller to "6 ohms" using the [ ]/[ ] buttons. 13 Connecting Your Speakers-Continued Configuring the Speaker Impedance (TX-8522 North American model only) In this model, the factory default for speaker impedance is "8 ohms."

Owner Manual
Page 14
... This section explains how to connect the supplied indoor FM antenna and AM loop antenna, and how to achieve the best possible reception. The receiver won't pick up any radio signals without any antenna connected, so you 'll need to tune into an FM radio station and adjust the...antenna instead (see page 15). Thumbtacks, etc. Caution: Be careful that the push terminals are gripping the bare wires, not the insulation. Once your receiver is for use , you must connect the antenna to tune into position. If you don't injure yourself when using it with the supplied indoor FM...
... This section explains how to connect the supplied indoor FM antenna and AM loop antenna, and how to achieve the best possible reception. The receiver won't pick up any radio signals without any antenna connected, so you 'll need to tune into an FM radio station and adjust the...antenna instead (see page 15). Thumbtacks, etc. Caution: Be careful that the push terminals are gripping the bare wires, not the insulation. Once your receiver is for use , you must connect the antenna to tune into position. If you don't injure yourself when using it with the supplied indoor FM...

Owner Manual
Page 15
TV/FM antenna splitter To the receiver To TV (or VCR) 15 Outdoor antenna AM loop antenna Insulated antenna cable Notes: • Outdoor FM antennas work best when installed outside , but good ...
TV/FM antenna splitter To the receiver To TV (or VCR) 15 Outdoor antenna AM loop antenna Insulated antenna cable Notes: • Outdoor FM antennas work best when installed outside , but good ...

Owner Manual
Page 16
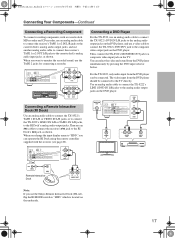
..., keep power cords and speaker cables away from the tuner's antenna. Connecting a CD Player Use an analog audio cable to connect the receiver's CD L/R jacks to make a good connection (loose connections can cause noise or malfunctions). AV Connection Color Coding RCA-type AV connections ...are for use yellow plugs to connect composite video inputs and outputs. (TX-8522) Left (white) Analog audio Left (white) Right (red) Right (red) (Yellow) Composite video (Yellow) • Push each ...
..., keep power cords and speaker cables away from the tuner's antenna. Connecting a CD Player Use an analog audio cable to connect the receiver's CD L/R jacks to make a good connection (loose connections can cause noise or malfunctions). AV Connection Color Coding RCA-type AV connections ...are for use yellow plugs to connect composite video inputs and outputs. (TX-8522) Left (white) Analog audio Left (white) Right (red) Right (red) (Yellow) Composite video (Yellow) • Push each ...
Owner Manual
Page 17
...the Onkyo Remote Interactive Dock (DS-A1), flip the RI MODE switch to "HDD" which is located on the DVD player. You can select the video and sound from the DVD player can operate the RI Dock using the remote controller supplied with the receiver (see page 20). For the TX-8222, only... audio input from the DVD player simultaneously by pressing the DVD input selector button. L AUDIO OUT Note: If you use a video cable to connect the TX-8522's DVD IN V jack to the composite video output...
...the Onkyo Remote Interactive Dock (DS-A1), flip the RI MODE switch to "HDD" which is located on the DVD player. You can select the video and sound from the DVD player can operate the RI Dock using the remote controller supplied with the receiver (see page 20). For the TX-8222, only... audio input from the DVD player simultaneously by pressing the DVD input selector button. L AUDIO OUT Note: If you use a video cable to connect the TX-8522's DVD IN V jack to the composite video output...
Owner Manual
Page 18
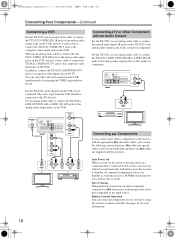
...to the analog audio output jacks on the connected component. For the TX-8222, audio input from the VCR can control all connected components will go on the connected component. For the TX-8222, use a video cable to connect the TX-8522's VIDEO IN V jack to the analog audio output jacks on... VCR. The video input from the VCR simultaneously by using the receiver's remote controller. See page 10 for use with Onkyo products (no cables are supplied with an Audio Output For the TX-8522, use a video cable to connect the TX-8522's VIDEO OUT V jack to a composite video input jack...
...to the analog audio output jacks on the connected component. For the TX-8222, audio input from the VCR can control all connected components will go on the connected component. For the TX-8222, use a video cable to connect the TX-8522's VIDEO IN V jack to the analog audio output jacks on... VCR. The video input from the VCR simultaneously by using the receiver's remote controller. See page 10 for use with Onkyo products (no cables are supplied with an Audio Output For the TX-8522, use a video cable to connect the TX-8522's VIDEO OUT V jack to a composite video input jack...
Owner Manual
Page 19
... total capacity depends on the country in all functions. e.g. TX-8222 European models e.g. Connecting the Power Cord • Connect the receiver's power cord to make an analog audio connection between the receiver and each plug in which you intend to use , you connect to Onkyo components. connector Onkyo CD player, etc. connector Remote Interactive Dock, etc...
... total capacity depends on the country in all functions. e.g. TX-8222 European models e.g. Connecting the Power Cord • Connect the receiver's power cord to make an analog audio connection between the receiver and each plug in which you intend to use , you connect to Onkyo components. connector Onkyo CD player, etc. connector Remote Interactive Dock, etc...

Owner Manual
Page 20
... the other button cannot be changed to "HDD" for one of the buttons below , you can change the display name to "HDD." The receiver will enter Standby mode. TX-8222 or 2 Press and hold down the volume before you next turn it off , press the [STANDBY/ON] button, or press the remote controller...
... the other button cannot be changed to "HDD" for one of the buttons below , you can change the display name to "HDD." The receiver will enter Standby mode. TX-8222 or 2 Press and hold down the volume before you next turn it off , press the [STANDBY/ON] button, or press the remote controller...
Owner Manual
Page 21
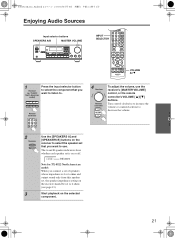
... whose impedance is 4 or 6 ohms and output sound only from this speaker set, the speaker impedance setting on the receiver should be set is on the selected component. 21 Indicators Note for TX-8522 North American model: When you want to listen to 6 ohms (see page 13). Enjoying Audio Sources Input selector...
... whose impedance is 4 or 6 ohms and output sound only from this speaker set, the speaker impedance setting on the receiver should be set is on the selected component. 21 Indicators Note for TX-8522 North American model: When you want to listen to 6 ohms (see page 13). Enjoying Audio Sources Input selector...
Owner Manual
Page 22
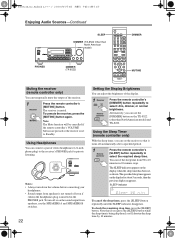
...10 minute steps. The specified sleep time appears on the TX-8522 (other than North American model) DIMMER PHONES DIMMER (TX-8222) MUTING Muting the receiver (remote controller only) You can set the receiver so that if you press the [SLEEP] button while the sleep... connect a pair of the display. 1 Receiver Remote controller Press the remote controller's [DIMMER] button repeatedly to select: dim, dimmer, or normal brightness. Enjoying Audio Sources-Continued SLEEP DIMMER (TX-8522 Other than North American model) and TX-8222. To turn down the volume before connecting your...
...10 minute steps. The specified sleep time appears on the TX-8522 (other than North American model) DIMMER PHONES DIMMER (TX-8222) MUTING Muting the receiver (remote controller only) You can set the receiver so that if you press the [SLEEP] button while the sleep... connect a pair of the display. 1 Receiver Remote controller Press the remote controller's [DIMMER] button repeatedly to select: dim, dimmer, or normal brightness. Enjoying Audio Sources-Continued SLEEP DIMMER (TX-8522 Other than North American model) and TX-8222. To turn down the volume before connecting your...
Owner Manual
Page 24
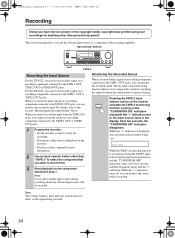
..."T2 MONITOR ON" indication along with recording capability. Input selector buttons TAPE 2 Recording the Input Source For the TX-8522, you can monitor the recorded sound. For the TX-8222, you can record an audio signal on a recording component connected to the TAPE 2 OUT jacks, you can ...record an audio signal on a recording component connected to the input source name in step 1. Pressing the TAPE 2 input selector button on the receiver activates the TAPE...
..."T2 MONITOR ON" indication along with recording capability. Input selector buttons TAPE 2 Recording the Input Source For the TX-8522, you can monitor the recorded sound. For the TX-8222, you can record an audio signal on a recording component connected to the TAPE 2 OUT jacks, you can ...record an audio signal on a recording component connected to the input source name in step 1. Pressing the TAPE 2 input selector button on the receiver activates the TAPE...


