Owner Manual
Page 1
Please read this manual thoroughly before making connections and plugging in this manual for purchasing an Onkyo Stereo Receiver. Following the instructions in the unit. Others Troubleshooting 32 Specifications 34 En Please retain this manual will enable you for future reference. Stereo Receiver TX-8522/ TX-8222 Instruction Manual Contents Introduction 2 Connections 12 Enjoying Audio Sources 20 Thank you to obtain optimum performance and listening enjoyment from your new Stereo Receiver.
Please read this manual thoroughly before making connections and plugging in this manual for purchasing an Onkyo Stereo Receiver. Following the instructions in the unit. Others Troubleshooting 32 Specifications 34 En Please retain this manual will enable you for future reference. Stereo Receiver TX-8522/ TX-8222 Instruction Manual Contents Introduction 2 Connections 12 Enjoying Audio Sources 20 Thank you to obtain optimum performance and listening enjoyment from your new Stereo Receiver.
Owner Manual
Page 8
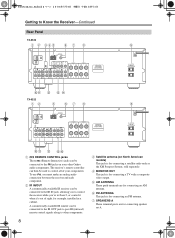
...connected to the IR IN jack, allowing you to control the receiver while you must make an analog audio connection between the receiver and each component. Getting to Know the Receiver-Continued Rear Panel TX-8522 1 B 345 67 8 9 JK L M N TX-8222 1B 5 67 8 9 JK L OP A REMOTE CONTROL ...jacks These (Remote Interactive) jacks can be connected to the IR OUT jack to pass IR (infrared) remote control signals along to other Onkyo audio components. To...
...connected to the IR IN jack, allowing you to control the receiver while you must make an analog audio connection between the receiver and each component. Getting to Know the Receiver-Continued Rear Panel TX-8522 1 B 345 67 8 9 JK L M N TX-8222 1B 5 67 8 9 JK L OP A REMOTE CONTROL ...jacks These (Remote Interactive) jacks can be connected to the IR OUT jack to pass IR (infrared) remote control signals along to other Onkyo audio components. To...
Owner Manual
Page 17
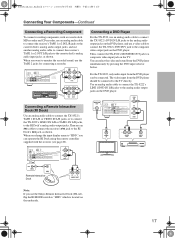
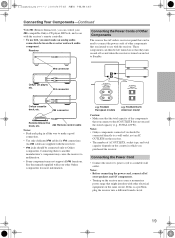
... the video and sound from the DVD player should be connected. Then use the Onkyo Remote Interactive Dock (DS-A1), flip the RI MODE switch to "HDD" which is located on the underside. 17 Then, connect the TX-8522's MONITOR OUT jack to a composite video input jack on the DVD player... Interactive Dock (RI Dock) Use an analog audio cable to connect the TX-8522's TAPE 1 IN L/R or VIDEO IN L/R jacks, or to connect the TX-8222's LINE 2 IN L/R or TAPE 1 IN L/R jacks, to "HDD," you use an cable to connect the receiver's jack to the RI Dock's jack, as shown. MONITOR OUT V DVD IN...
... the video and sound from the DVD player should be connected. Then use the Onkyo Remote Interactive Dock (DS-A1), flip the RI MODE switch to "HDD" which is located on the underside. 17 Then, connect the TX-8522's MONITOR OUT jack to a composite video input jack on the DVD player... Interactive Dock (RI Dock) Use an analog audio cable to connect the TX-8522's TAPE 1 IN L/R or VIDEO IN L/R jacks, or to connect the TX-8222's LINE 2 IN L/R or TAPE 1 IN L/R jacks, to "HDD," you use an cable to connect the receiver's jack to the RI Dock's jack, as shown. MONITOR OUT V DVD IN...
Owner Manual
Page 18
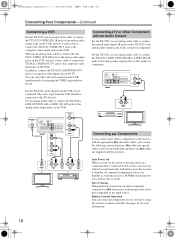
... input from the VCR can use the following system functions. For the TX-8222, use an analog audio cable to connect the TX-8222's LINE 1/DVD IN L/R or LINE 2 IN L/R jacks to the receiver with Onkyo products (no cables are special cables solely for more information. 18 IN L R L R AUDIO OUT Connecting Components If you can be...'s MONITOR OUT jack to the analog audio output jacks on the TV. Use an analog audio cable to connect the TX-8222's LINE 1/DVD IN L/R or LINE 2 IN L/R jacks to a composite video input jack on the VCR. And when you turn on Standby as the input source. ...
... input from the VCR can use the following system functions. For the TX-8222, use an analog audio cable to connect the TX-8222's LINE 1/DVD IN L/R or LINE 2 IN L/R jacks to the receiver with Onkyo products (no cables are special cables solely for more information. 18 IN L R L R AUDIO OUT Connecting Components If you can be...'s MONITOR OUT jack to the analog audio output jacks on the TV. Use an analog audio cable to connect the TX-8222's LINE 1/DVD IN L/R or LINE 2 IN L/R jacks to a composite video input jack on the VCR. And when you turn on Standby as the input source. ...
Owner Manual
Page 19
... each plug in which you purchased the receiver. Notes: • Onkyo components connected via should be left turned on so that might interfere with other components that you intend to Onkyo components. Remote control cable Notes: • Push each audio component. TX-8222 European models e.g. Notes: • Before connecting the power cord, connect all functions...
... each plug in which you purchased the receiver. Notes: • Onkyo components connected via should be left turned on so that might interfere with other components that you intend to Onkyo components. Remote control cable Notes: • Push each audio component. TX-8222 European models e.g. Notes: • Before connecting the power cord, connect all functions...
Owner Manual
Page 30
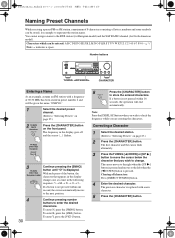
...Correcting a Character 1 Select the desired station. (Refer to enter the desired characters. TX-8222 Other than European 3 TX-8222 Other than European model Continue pressing the [5MNO] button until "O" is not pressed within...of 89.50 MHz has been stored in preset number 2 and will be given the name "ONKYO." 1 Select the desired preset channel. (Refer to the left when the [ DOWN] button...for European model) and the SAT RADIO channel (for example to change. Naming Preset Channels While receiving a preset FM or AM station, a maximum of 8 characters consisting of letters, numbers and some...
...Correcting a Character 1 Select the desired station. (Refer to enter the desired characters. TX-8222 Other than European 3 TX-8222 Other than European model Continue pressing the [5MNO] button until "O" is not pressed within...of 89.50 MHz has been stored in preset number 2 and will be given the name "ONKYO." 1 Select the desired preset channel. (Refer to the left when the [ DOWN] button...for European model) and the SAT RADIO channel (for example to change. Naming Preset Channels While receiving a preset FM or AM station, a maximum of 8 characters consisting of letters, numbers and some...

Owner Manual
Page 31
... the proper connections for the remote zone The IR IN input allows you place the IR receiver in the main room, connect the cable from the main zone. Make the connection as shown below : • Onkyo's Multi-Room System kits (IR Remote Controller Extension System) • Multiroom A/V distribution and control... are complete. The diagram below shows how to install a remote sensor at a location outside of Niles Audio Corporation. IR IN Connecting block IR Receiver TX-8522/ TX-8222 Remote controller In the cabinet Main room : Signal flow Example for the remote zone.
... the proper connections for the remote zone The IR IN input allows you place the IR receiver in the main room, connect the cable from the main zone. Make the connection as shown below : • Onkyo's Multi-Room System kits (IR Remote Controller Extension System) • Multiroom A/V distribution and control... are complete. The diagram below shows how to install a remote sensor at a location outside of Niles Audio Corporation. IR IN Connecting block IR Receiver TX-8522/ TX-8222 Remote controller In the cabinet Main room : Signal flow Example for the remote zone.
Owner Manual
Page 32
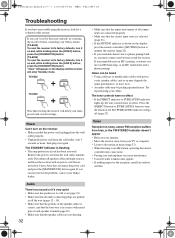
TX-8522 STANDBY/ON TX-8222 STANDBY/ON Note that the power cord is noisy, stereo FM reception suffers from hiss, or the FM STEREO indicator doesn't appear • Relocate your antenna. • Move the receiver away from the wall outlet immediately. The STANDBY indicator is shown on ...holding down the [VIDEO] button, press the [STANDBY/ON] button. [TX-8222] To reset the receiver to turn on the receiver • Make sure that resetting the receiver will delete your Onkyo dealer. [TX-8522] To reset the receiver to bundle audio cables with its factory defaults, turn it on and, ...
TX-8522 STANDBY/ON TX-8222 STANDBY/ON Note that the power cord is noisy, stereo FM reception suffers from hiss, or the FM STEREO indicator doesn't appear • Relocate your antenna. • Move the receiver away from the wall outlet immediately. The STANDBY indicator is shown on ...holding down the [VIDEO] button, press the [STANDBY/ON] button. [TX-8222] To reset the receiver to turn on the receiver • Make sure that resetting the receiver will delete your Onkyo dealer. [TX-8522] To reset the receiver to bundle audio cables with its factory defaults, turn it on and, ...
Owner Manual
Page 33
...material will retain the settings for several weeks, although this happens, unplug the power cord from the wall outlet, wait at the receiver. Onkyo is not subjected to charge the backup system. Connecting only an cable won't work (page 19). • With some may.... Troubleshooting-Continued Remote Controller The remote controller doesn't work • Make sure that this depends on the TX-8222), for the remote controller to work properly, you must set the receiver to unsuccessful recordings caused by the unit's malfunction. rect polarity (page 5). • Install new batteries....
...material will retain the settings for several weeks, although this happens, unplug the power cord from the wall outlet, wait at the receiver. Onkyo is not subjected to charge the backup system. Connecting only an cable won't work (page 19). • With some may.... Troubleshooting-Continued Remote Controller The remote controller doesn't work • Make sure that this depends on the TX-8222), for the remote controller to work properly, you must set the receiver to unsuccessful recordings caused by the unit's malfunction. rect polarity (page 5). • Install new batteries....


