Instruction Manual
Page 2
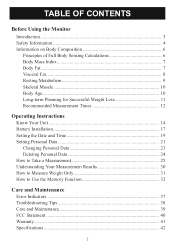
... Fat 8 Resting Metabolism 9 Skeletal Muscle 10 Body Age 10 Long-term Planning for Successful Weight Loss 11 Recommended Measurement Times 12 Operating Instructions Know Your Unit 14 Battery Installation 17 Setting the Date and Time 19 Setting Personal Data 21 Changing Personal Data 23 Deleting Personal Data 24 How to Take...
... Fat 8 Resting Metabolism 9 Skeletal Muscle 10 Body Age 10 Long-term Planning for Successful Weight Loss 11 Recommended Measurement Times 12 Operating Instructions Know Your Unit 14 Battery Installation 17 Setting the Date and Time 19 Setting Personal Data 21 Changing Personal Data 23 Deleting Personal Data 24 How to Take...
Instruction Manual
Page 3
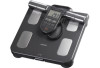
...on, select your purchase receipt here The Full Body Sensor Body Composition Monitor and Scale is easy to four personal profiles. SAVE THESE INSTRUCTIONS 3 Your HBF-514 comes with the following components: • Monitor/Scale • Instruction Manual • 4 "AA" Batteries • Measurement Log Sheet WARNING ...fitted with high and low readings for up to use , this device. The monitor calculates the estimated values for purchasing the OMRON® HBF-514 Full Body Sensor Body Composition Monitor and Scale. Fill in for each type of the information in the box before operating ...
...on, select your purchase receipt here The Full Body Sensor Body Composition Monitor and Scale is easy to four personal profiles. SAVE THESE INSTRUCTIONS 3 Your HBF-514 comes with the following components: • Monitor/Scale • Instruction Manual • 4 "AA" Batteries • Measurement Log Sheet WARNING ...fitted with high and low readings for up to use , this device. The monitor calculates the estimated values for purchasing the OMRON® HBF-514 Full Body Sensor Body Composition Monitor and Scale. Fill in for each type of the information in the box before operating ...
Instruction Manual
Page 4
...support device to prevent falling when stepping on the edge or the display area of young children. The monitor may be damaged. The display unit may tilt. Do not insert the batteries with disabilities or persons who are wet, for example after taking a measurement to slip and ...IN THIS INSTRUCTION MANUAL Warning Indicates a potentially hazardous situation which , if not avoided, may lose your physician or healthcare provider before operating the unit. Do not use, or allow others to use, this monitor if you to determine the amount of 50kHz and less than 500µA through...
...support device to prevent falling when stepping on the edge or the display area of young children. The monitor may be damaged. The display unit may tilt. Do not insert the batteries with disabilities or persons who are wet, for example after taking a measurement to slip and ...IN THIS INSTRUCTION MANUAL Warning Indicates a potentially hazardous situation which , if not avoided, may lose your physician or healthcare provider before operating the unit. Do not use, or allow others to use, this monitor if you to determine the amount of 50kHz and less than 500µA through...

Instruction Manual
Page 5
... use for any of eye or skin contact. Changes or modifications not approved by Omron Healthcare will not be trapped between the handle and the unit. Remove the batteries if the unit will void the user warranty. Do not hold the handle inside the electrode grips ...together. Replace old batteries with plenty of the device, batteries, components and optional accessories according to the unit, you try to remove the display unit while stepping on the unit. This unit is not intended for professional use only. SAFETY INFORMATION OPERATING THE DEVICE (continued) Do not use ...
... use for any of eye or skin contact. Changes or modifications not approved by Omron Healthcare will not be trapped between the handle and the unit. Remove the batteries if the unit will void the user warranty. Do not hold the handle inside the electrode grips ...together. Replace old batteries with plenty of the device, batteries, components and optional accessories according to the unit, you try to remove the display unit while stepping on the unit. This unit is not intended for professional use only. SAFETY INFORMATION OPERATING THE DEVICE (continued) Do not use ...

Instruction Manual
Page 12
After drinking alcohol or a large amount of water, after a meal Dinner 2 hours Recommended time Going to use this unit in the same environment and daily circumstances. Reference the chart below: Daily activities Waking up Recommended time Breakfast After waking up 2 hours Recommended time Lunch 2 ...
After drinking alcohol or a large amount of water, after a meal Dinner 2 hours Recommended time Going to use this unit in the same environment and daily circumstances. Reference the chart below: Daily activities Waking up Recommended time Breakfast After waking up 2 hours Recommended time Lunch 2 ...
Instruction Manual
Page 14
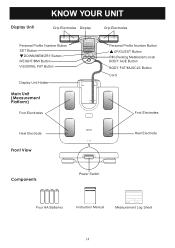
Operating Instructions Display Unit KNOW YOUR UNIT Grip Electrodes Display Grip Electrodes Personal Profile Number Button SET Button DOWN/MEMORY Button WEIGHT/BMI Button VISCERAL FAT Button Display Unit Holder Main Unit (Measurement Platform) Foot Electrodes Personal Profile Number Button UP/GUEST Button RM (Resting Metabolism) kcal/ BODY AGE Button BODY FAT/MUSCLE Button Cord Foot Electrodes Heel Electrode Front View Heel Electrode Components Power Switch Four AA Batteries Instruction Manual Measurement Log Sheet 14
Operating Instructions Display Unit KNOW YOUR UNIT Grip Electrodes Display Grip Electrodes Personal Profile Number Button SET Button DOWN/MEMORY Button WEIGHT/BMI Button VISCERAL FAT Button Display Unit Holder Main Unit (Measurement Platform) Foot Electrodes Personal Profile Number Button UP/GUEST Button RM (Resting Metabolism) kcal/ BODY AGE Button BODY FAT/MUSCLE Button Cord Foot Electrodes Heel Electrode Front View Heel Electrode Components Power Switch Four AA Batteries Instruction Manual Measurement Log Sheet 14
Instruction Manual
Page 15
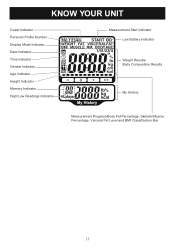
KNOW YOUR UNIT Guest Indicator Personal Profile Number Display Mode Indicator Date Indicator Time Indicator Gender Indicator Age Indicator Height Indicator Memory Indicator High/Low Readings Indicator Measurement Start Indicator Low Battery Indicator Weight Results/ Body Composition Results My History Measurement Progress/Body Fat Percentage, Skeletal Muscle Percentage, Visceral Fat Level and BMI Classification Bar 15
KNOW YOUR UNIT Guest Indicator Personal Profile Number Display Mode Indicator Date Indicator Time Indicator Gender Indicator Age Indicator Height Indicator Memory Indicator High/Low Readings Indicator Measurement Start Indicator Low Battery Indicator Weight Results/ Body Composition Results My History Measurement Progress/Body Fat Percentage, Skeletal Muscle Percentage, Visceral Fat Level and BMI Classification Bar 15
Instruction Manual
Page 16
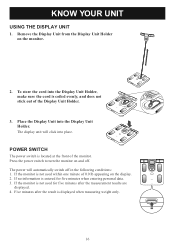
...front of the monitor. Remove the Display Unit from the Display Unit Holder on the display. 2. POWER SWITCH The power switch is not used for five minutes when entering personal data. 3. KNOW YOUR UNIT USING THE DISPLAY UNIT 1. The display unit will automatically switch off . If no information... is not used within one minute of the Display Unit Holder. 3. To store the cord into the Display Unit Holder, make sure the cord is displayed ...
...front of the monitor. Remove the Display Unit from the Display Unit Holder on the display. 2. POWER SWITCH The power switch is not used for five minutes when entering personal data. 3. KNOW YOUR UNIT USING THE DISPLAY UNIT 1. The display unit will automatically switch off . If no information... is not used within one minute of the Display Unit Holder. 3. To store the cord into the Display Unit Holder, make sure the cord is displayed ...
Instruction Manual
Page 17
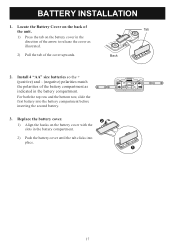
... the battery cover with the slots in the battery compartment. BATTERY INSTALLATION 1. Locate the Battery Cover on the battery cover in the direction of the unit. Tab 1) Press the tab on the back of the arrow to release the cover as indicated in the battery compartment. 2) Push the battery cover until...
... the battery cover with the slots in the battery compartment. BATTERY INSTALLATION 1. Locate the Battery Cover on the battery cover in the direction of the unit. Tab 1) Press the tab on the back of the arrow to release the cover as indicated in the battery compartment. 2) Push the battery cover until...

Instruction Manual
Page 18
Unlawful disposal may have a shorter life. • Remove the batteries if you do not intend to use the unit for approximately one year if the unit is turned back on the display screen, remove all four batteries. NOTES: • New batteries will need to applicable local regulations. Low ...fluid leak and contact your physician in case of clean water. Replace with plenty of eye or skin contact. Trial batteries supplied with the unit may cause environmental pollution. 18 CAUTION: Dispose of three months or longer before placing in the memory will not be set when monitor ...
Unlawful disposal may have a shorter life. • Remove the batteries if you do not intend to use the unit for approximately one year if the unit is turned back on the display screen, remove all four batteries. NOTES: • New batteries will need to applicable local regulations. Low ...fluid leak and contact your physician in case of clean water. Replace with plenty of eye or skin contact. Trial batteries supplied with the unit may cause environmental pollution. 18 CAUTION: Dispose of three months or longer before placing in the memory will not be set when monitor ...
Instruction Manual
Page 21
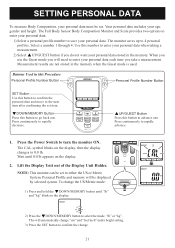
.... Personal Profile and memory will be set. Press continuously to rapidly advance. 1. Select a number 1 through 4. Press continuously to rapidly decrease. Lift the Display Unit out of the Display Unit Holder. The monitor saves up to enter your personal data when taking a measurement. 2) Select UP/GUEST button if you do not want your...
.... Personal Profile and memory will be set. Press continuously to rapidly advance. 1. Select a number 1 through 4. Press continuously to rapidly decrease. Lift the Display Unit out of the Display Unit Holder. The monitor saves up to enter your personal data when taking a measurement. 2) Select UP/GUEST button if you do not want your...
Instruction Manual
Page 25
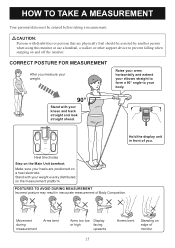
...25 Knees bent Standing on edge of you measure your heels are physically frail should be entered before taking a measurement. Hold the display unit in inaccurate measurement of Body Composition. Stand with your knees and back straight and look straight ahead. HOW TO TAKE A MEASUREMENT Your...measurement platform. Heel Electrodes Step on a heel electrode. CAUTION: Persons with disabilities or persons that are positioned on the Main Unit barefoot. POSTURES TO AVOID DURING MEASUREMENT Incorrect posture may result in front of monitor CORRECT POSTURE FOR MEASUREMENT After you .
...25 Knees bent Standing on edge of you measure your heels are physically frail should be entered before taking a measurement. Hold the display unit in inaccurate measurement of Body Composition. Stand with your knees and back straight and look straight ahead. HOW TO TAKE A MEASUREMENT Your...measurement platform. Heel Electrodes Step on a heel electrode. CAUTION: Persons with disabilities or persons that are positioned on the Main Unit barefoot. POSTURES TO AVOID DURING MEASUREMENT Incorrect posture may result in front of monitor CORRECT POSTURE FOR MEASUREMENT After you .
Instruction Manual
Page 26
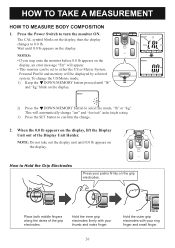
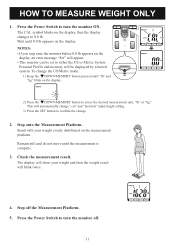
This will appear. • This monitor can be displayed by selected system. Place both middle fingers along the dents of the Display Unit Holder. Press the Power Switch to 0.0 lb. Hold the outer grip electrodes with your ring finger and small finger. 26 Wait until 0.0 lb appears ... on the display. HOW TO TAKE A MEASUREMENT HOW TO MEASURE BODY COMPOSITION 1. NOTE: Do not take out the display unit until "lb" and "kg" blink on the display, lift the Display Unit out of the grip electrodes. The CAL symbol blinks on the grip electrodes. To change . 2. How to Hold the...
This will appear. • This monitor can be displayed by selected system. Place both middle fingers along the dents of the Display Unit Holder. Press the Power Switch to 0.0 lb. Hold the outer grip electrodes with your ring finger and small finger. 26 Wait until 0.0 lb appears ... on the display. HOW TO TAKE A MEASUREMENT HOW TO MEASURE BODY COMPOSITION 1. NOTE: Do not take out the display unit until "lb" and "kg" blink on the display, lift the Display Unit out of the grip electrodes. The CAL symbol blinks on the grip electrodes. To change . 2. How to Hold the...
Instruction Manual
Page 27
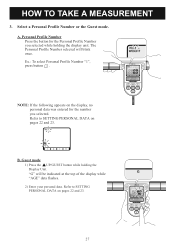
Personal Profile Number Press the button for the number you selected while holding the Display Unit. Ex.: To select Personal Profile Number "1", press button . A. The Personal Profile Number selected will be indicated at the top of the display while "AGE" data ... on pages 22 and 23. 27 Select a Personal Profile Number or the Guest mode. Guest mode 1) Press the UP/GUEST button while holding the display unit. Refer to SETTING PERSONAL DATA on pages 22 and 23. NOTE: If the following appears on the display, no personal data was entered for the...
Personal Profile Number Press the button for the number you selected while holding the Display Unit. Ex.: To select Personal Profile Number "1", press button . A. The Personal Profile Number selected will be indicated at the top of the display while "AGE" data ... on pages 22 and 23. 27 Select a Personal Profile Number or the Guest mode. Guest mode 1) Press the UP/GUEST button while holding the display unit. Refer to SETTING PERSONAL DATA on pages 22 and 23. NOTE: If the following appears on the display, no personal data was entered for the...

Instruction Manual
Page 29
... ago for the body fat percentage classification is 20 to turn the monitor off. Press the Power Switch to 79 years old. 6. Store the Display Unit in the My History area of the display. [WEIGHT] [BMI] Weight My History [BODY FAT PERCENTAGE] BMI BMI Classification My History [SKELETAL MUSCLE PERCENTAGE] Body... metabolism, body age and visceral fat level is 18 to 80 years old. • The age range for that result are shown in the Display Unit Holder. 29 Press the appropriate button to check the measurement results. HOW TO TAKE A MEASUREMENT 5.
... ago for the body fat percentage classification is 20 to turn the monitor off. Press the Power Switch to 79 years old. 6. Store the Display Unit in the My History area of the display. [WEIGHT] [BMI] Weight My History [BODY FAT PERCENTAGE] BMI BMI Classification My History [SKELETAL MUSCLE PERCENTAGE] Body... metabolism, body age and visceral fat level is 18 to 80 years old. • The age range for that result are shown in the Display Unit Holder. 29 Press the appropriate button to check the measurement results. HOW TO TAKE A MEASUREMENT 5.
Instruction Manual
Page 31
... mode: 1) Keep the DOWN/MEMORY button pressed until "lb" and "kg" blink on the display. 2) Press the DOWN/MEMORY button to select the desired measurement unit, "lb" or "kg". The display will show your weight evenly distributed on the display, an error message "Err" will be set to turn the monitor...
... mode: 1) Keep the DOWN/MEMORY button pressed until "lb" and "kg" blink on the display. 2) Press the DOWN/MEMORY button to select the desired measurement unit, "lb" or "kg". The display will show your weight evenly distributed on the display, an error message "Err" will be set to turn the monitor...
Instruction Manual
Page 32
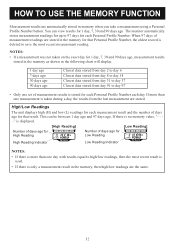
... 14 Closest data stored from day 31 to day 37 Closest data stored from the last measurement are the same. 32 High/Low Readings The unit displays high (H) and low (L) readings for each measurement result and the number of days ago for High Reading. High Reading Indicator Low Reading Indicator NOTES...
... 14 Closest data stored from day 31 to day 37 Closest data stored from the last measurement are the same. 32 High/Low Readings The unit displays high (H) and low (L) readings for each measurement result and the number of days ago for High Reading. High Reading Indicator Low Reading Indicator NOTES...

Instruction Manual
Page 35
... view and compare previous measurement results without taking a measurement. 1. Press the desired Personal Profile Number button. NOTE: Do not take out the display unit until 0.0 lb appears on the display. 3. Ex.: To select Personal Profile Number "1", press button . 35 The CAL symbol blinks on the display..., lift the Display Unit out of the Display Unit Holder. Wait until 0.0 lb appears on the display. When the 0.0 lb appears on the display, then the display changes to ...
... view and compare previous measurement results without taking a measurement. 1. Press the desired Personal Profile Number button. NOTE: Do not take out the display unit until 0.0 lb appears on the display. 3. Ex.: To select Personal Profile Number "1", press button . 35 The CAL symbol blinks on the display..., lift the Display Unit out of the Display Unit Holder. Wait until 0.0 lb appears on the display. When the 0.0 lb appears on the display, then the display changes to ...

Instruction Manual
Page 37
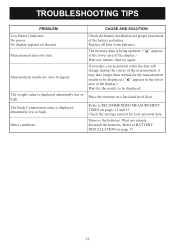
... page 17. Your palms or feet are barefoot. Slightly moisten your palms or the soles of your personal data. Retake the measurement. • The main unit cannot measure body composition outside the measurement range. • Check the settings entered for your feet are clean and dry. This monitor can only be...
... page 17. Your palms or feet are barefoot. Slightly moisten your palms or the soles of your personal data. Retake the measurement. • The main unit cannot measure body composition outside the measurement range. • Check the settings entered for your feet are clean and dry. This monitor can only be...
Instruction Manual
Page 38
... a hard and level floor. Refer to be displayed. (" " appears in the lower area of the battery polarities. Reinstall the batteries. Place the monitor on the unit Measurement does not start. Refer to appear. Replace all four worn batteries. Remove the batteries. The weight value is displayed abnormally low or high. The...
... a hard and level floor. Refer to be displayed. (" " appears in the lower area of the battery polarities. Reinstall the batteries. Place the monitor on the unit Measurement does not start. Refer to appear. Replace all four worn batteries. Remove the batteries. The weight value is displayed abnormally low or high. The...