
Instruction Manual
Page 2
... of Electrical Shock 7 Care and Maintenance 7 Before Taking a Measurement 8 Operating Instructions Know Your Unit 9 Unit Display 11 Display Symbols 12 Irregular Heartbeat Symbol 12 Movement Error Symbol 12 USER ID Symbol 12 Morning Hypertension Symbol 13 Heartbeat Symbol 14 Average Value Symbol 14 Morning Average Symbol 14 Evening Average Symbol 14...
... of Electrical Shock 7 Care and Maintenance 7 Before Taking a Measurement 8 Operating Instructions Know Your Unit 9 Unit Display 11 Display Symbols 12 Irregular Heartbeat Symbol 12 Movement Error Symbol 12 USER ID Symbol 12 Morning Hypertension Symbol 13 Heartbeat Symbol 14 Average Value Symbol 14 Morning Average Symbol 14 Evening Average Symbol 14...
Instruction Manual
Page 3
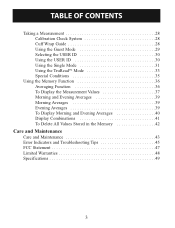
... Display Morning and Evening Averages 40 Display Combinations 41 To Delete All Values Stored in the Memory 42 Care and Maintenance Care and Maintenance 43 Error Indicators and Troubleshooting Tips 45 FCC Statement 47 Limited Warranties 48 Specifications 49 3
... Display Morning and Evening Averages 40 Display Combinations 41 To Delete All Values Stored in the Memory 42 Care and Maintenance Care and Maintenance 43 Error Indicators and Troubleshooting Tips 45 FCC Statement 47 Limited Warranties 48 Specifications 49 3
Instruction Manual
Page 12
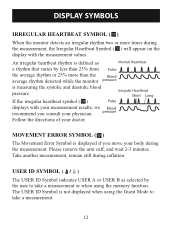
Please remove the arm cuff, and wait 2-3 minutes. pressure Follow the directions of your physician. MOVEMENT ERROR SYMBOL ( ) The Movement Error Symbol is measuring the systolic and diastolic blood pressure. USER ID SYMBOL ( / ) The USER ID Symbol indicates USER A or USER B as Normal Heartbeat a rhythm that ...
Please remove the arm cuff, and wait 2-3 minutes. pressure Follow the directions of your physician. MOVEMENT ERROR SYMBOL ( ) The Movement Error Symbol is measuring the systolic and diastolic blood pressure. USER ID SYMBOL ( / ) The USER ID Symbol indicates USER A or USER B as Normal Heartbeat a rhythm that ...

Instruction Manual
Page 28
... device only as intended. CALIBRATION CHECK SYSTEM When you press the START/STOP button, the Calibration Check System light turns on the display. If an error is detected, the Calibration Check System light flashes and "ER" will appear on and the unit starts monitoring your physician or licensed healthcare provider. Measurements...
... device only as intended. CALIBRATION CHECK SYSTEM When you press the START/STOP button, the Calibration Check System light turns on the display. If an error is detected, the Calibration Check System light flashes and "ER" will appear on and the unit starts monitoring your physician or licensed healthcare provider. Measurements...

Instruction Manual
Page 45
.... "Taking a Measurement". Remain still and do not talk during measurement. Refer to "Applying the Arm Cuff". 45 Device error. Refer to mmHg when inflating the cuff manually. Movement during measurement. Cuff is leaking from the arm cuff. Refer to ...a Measurement". Repeat measurement. Contact Customer Service. Apply the arm cuff correctly. Contact Customer Service for repair information. ERROR INDICATORS AND TROUBLESHOOTING TIPS ERROR INDICATORS SYMBOL CAUSE Air plug disconnected. Refer to "Taking a Measurement". Arm cuff not applied correctly. Air is...
.... "Taking a Measurement". Remain still and do not talk during measurement. Refer to "Applying the Arm Cuff". 45 Device error. Refer to mmHg when inflating the cuff manually. Movement during measurement. Cuff is leaking from the arm cuff. Refer to ...a Measurement". Repeat measurement. Contact Customer Service. Apply the arm cuff correctly. Contact Customer Service for repair information. ERROR INDICATORS AND TROUBLESHOOTING TIPS ERROR INDICATORS SYMBOL CAUSE Air plug disconnected. Refer to "Taking a Measurement". Arm cuff not applied correctly. Air is...

Instruction Manual
Page 46
... TIPS PROBLEM CAUSES AND SOLUTIONS No power. No display appears on the unit. Review the sections "Before Taking a Measurement" and "Taking a Measurement." 46 ERROR INDICATORS AND TROUBLESHOOTING TIPS ERROR INDICATORS SYMBOL CAUSE Batteries are worn CORRECTION Replace the four batteries. Refer to "Battery Installation." Check the battery installation for proper placement of...
... TIPS PROBLEM CAUSES AND SOLUTIONS No power. No display appears on the unit. Review the sections "Before Taking a Measurement" and "Taking a Measurement." 46 ERROR INDICATORS AND TROUBLESHOOTING TIPS ERROR INDICATORS SYMBOL CAUSE Batteries are worn CORRECTION Replace the four batteries. Refer to "Battery Installation." Check the battery installation for proper placement of...


