

VP-1 Quick Reference Guide (English)
Page 1
... the projector. Connect the Power cable to the documentation located on the input screen from the PC connector. Please wait 60 seconds and then press the POWER button again. 3. Turn on the Remote Control. If the projector continues to search, you begin blinking red. Adjusting the projected image. To align the image with your computer's User Guide for information on POWER (Press button for 1 second to adjust Gamma, Color Temperature, and White Emphasis. 6. Adjust the focus. Display Item Adjustment Setting You can use...
... the projector. Connect the Power cable to the documentation located on the input screen from the PC connector. Please wait 60 seconds and then press the POWER button again. 3. Turn on the Remote Control. If the projector continues to search, you begin blinking red. Adjusting the projected image. To align the image with your computer's User Guide for information on POWER (Press button for 1 second to adjust Gamma, Color Temperature, and White Emphasis. 6. Adjust the focus. Display Item Adjustment Setting You can use...

VP-1 User's Manual (English)
Page 1
...,VGA,XGA are not used in this document. SVGA is a trademark of International Business Machines Corporation. Other names of companies and products mentioned are trademarks and registered trademarks of the respective companies. ™, ® and © marks are trademarks and registered trademarks of Apple Computer Inc. MEQNUIUCK AUTO POWER STATUS POWER SOURCE MENU Data Projector VP-1 User's Manual IMPORTANT Digital Light Processing, DLP™, Digital Micromirror Device and DMD...
...,VGA,XGA are not used in this document. SVGA is a trademark of International Business Machines Corporation. Other names of companies and products mentioned are trademarks and registered trademarks of the respective companies. ™, ® and © marks are trademarks and registered trademarks of Apple Computer Inc. MEQNUIUCK AUTO POWER STATUS POWER SOURCE MENU Data Projector VP-1 User's Manual IMPORTANT Digital Light Processing, DLP™, Digital Micromirror Device and DMD...

VP-1 User's Manual (English)
Page 5
... equipped with one DMD. Digital technology corrects the horizontal and vertical keystone distortion of the projected picture New technology is projected as those from DVD Faithful reproduction of small characters and diagrams with picture in picture The video image is used to correct the horizontal keystone distortion in color expression are an essential strength of Supported Frequencies on specifications. This permits even simpler setup adjustments. By widening the...
... equipped with one DMD. Digital technology corrects the horizontal and vertical keystone distortion of the projected picture New technology is projected as those from DVD Faithful reproduction of small characters and diagrams with picture in picture The video image is used to correct the horizontal keystone distortion in color expression are an essential strength of Supported Frequencies on specifications. This permits even simpler setup adjustments. By widening the...

VP-1 User's Manual (English)
Page 6
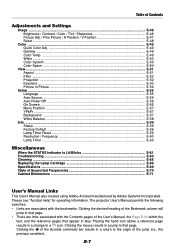
... Video Equipment with S-VIDEO Connectors E-21 Connections with Component Video Sources E-22 When the Video Connectors are Y, Cb, and Cr Connectors E-22 Connections with Remote Control Operation E-43 List of the Main Unit Buttons Used in Picture E-31 Freezing a Moving Picture E-31 Suspending Video and Audio Temporarily E-31 Using the Quick Menu E-32 Correcting Keystone Distortion of the Projection Screen E-34 Enlargement of the Image and Video Movement E-35 Adjustment of the Volume E-36 Menu Operations Menu Operation...
... Video Equipment with S-VIDEO Connectors E-21 Connections with Component Video Sources E-22 When the Video Connectors are Y, Cb, and Cr Connectors E-22 Connections with Remote Control Operation E-43 List of the Main Unit Buttons Used in Picture E-31 Freezing a Moving Picture E-31 Suspending Video and Audio Temporarily E-31 Using the Quick Menu E-32 Correcting Keystone Distortion of the Projection Screen E-34 Enlargement of the Image and Video Movement E-35 Adjustment of the Volume E-36 Menu Operations Menu Operation...
VP-1 User's Manual (English)
Page 7
... results in blue. E-7 Please see "Acrobat Help" for operating information. The projector User's Manual permits the following searches. • Links are links associated with the bookmarks. Clicking the mouse results in Picture ...E-54 Setup ...E-55 Language ...E-55 Auto Source ...E-55 Auto Power Off ...E-56 On Screen ...E-56 Menu Position ...E-57 YPbPr ...E-57 Background ...E-57 White Balance ...E-58 Info...E-59 Status ...E-59 Factory Default ...E-59 Lamp Timer Reset ...E-59 Resolution / Frequency E-60 Lamp Timer ...E-60...
... results in blue. E-7 Please see "Acrobat Help" for operating information. The projector User's Manual permits the following searches. • Links are links associated with the bookmarks. Clicking the mouse results in Picture ...E-54 Setup ...E-55 Language ...E-55 Auto Source ...E-55 Auto Power Off ...E-56 On Screen ...E-56 Menu Position ...E-57 YPbPr ...E-57 Background ...E-57 White Balance ...E-58 Info...E-59 Status ...E-59 Factory Default ...E-59 Lamp Timer Reset ...E-59 Resolution / Frequency E-60 Lamp Timer ...E-60...
VP-1 User's Manual (English)
Page 9
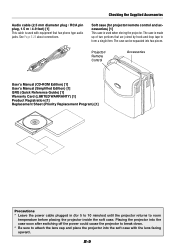
... Edition) [1] User's Manual (Simplified Edition) [1] QRG (Quick Reference Guide) [1] Warranty Card (LIMITED WARRANTY) [1] Product Registration [1] Replacement Sheet (Priority Replacement Program) [1] Precautions * Leave the power cable plugged in (for projector/remote control and accessories) [1] This case is made up of two portions that has phono type audio jacks. See Page E-23 about connections. Audio cable (2.5 mm diameter plug / RCA pin plug, 1.5 m / 4.9 feet) [1] This cable is used when...
... Edition) [1] User's Manual (Simplified Edition) [1] QRG (Quick Reference Guide) [1] Warranty Card (LIMITED WARRANTY) [1] Product Registration [1] Replacement Sheet (Priority Replacement Program) [1] Precautions * Leave the power cable plugged in (for projector/remote control and accessories) [1] This case is made up of two portions that has phono type audio jacks. See Page E-23 about connections. Audio cable (2.5 mm diameter plug / RCA pin plug, 1.5 m / 4.9 feet) [1] This cable is used when...

VP-1 User's Manual (English)
Page 25
... power. Power Off OK ? STATUS POWER STATUS POWER STATUS POWER ber and lights a steady amber after about 5 seconds), the projection screen will appear. Remote control operation: Press the POWER OFF button. The POWER indicator will go off and the unit will switch off operation. Doing so could shorten the life of the lamp or lead to blinking am- When the red bar extends fully (in about 90 sec- onds (when the unit enters the standby mode...
... power. Power Off OK ? STATUS POWER STATUS POWER STATUS POWER ber and lights a steady amber after about 5 seconds), the projection screen will appear. Remote control operation: Press the POWER OFF button. The POWER indicator will go off and the unit will switch off operation. Doing so could shorten the life of the lamp or lead to blinking am- When the red bar extends fully (in about 90 sec- onds (when the unit enters the standby mode...

VP-1 User's Manual (English)
Page 26
... desired screen size. See "Using the Adjusters" on Page E-27. (3) If the image is the result of the projector not being input to right using remote control or menu operations. Zoom ring Adjust the projection image to the rear or forward. recting Keystone Distortion of the Projection Screen" on Page E-35. See "Cor- See "Enlargement of the Image and Video Movement" on Page E-34. (1) (2) (3) (4) (5) Note * The projection image can be turned upside down with the video signal...
... desired screen size. See "Using the Adjusters" on Page E-27. (3) If the image is the result of the projector not being input to right using remote control or menu operations. Zoom ring Adjust the projection image to the rear or forward. recting Keystone Distortion of the Projection Screen" on Page E-35. See "Cor- See "Enlargement of the Image and Video Movement" on Page E-34. (1) (2) (3) (4) (5) Note * The projection image can be turned upside down with the video signal...

VP-1 User's Manual (English)
Page 31
... the video and audio at the same time. General Operation Projecting a Picture in Picture This function displays the video image (i.e., the picture of the VIDEO connector input) on Page E-54. Each press of the PIP button advances the screen size of On → Off (i.e., the sub-picture display is a still picture condition. Sub-picture Main-picture ON POWER OFF FREEZE MUTE PIP DIGITAL RGB YPbPr VIDEO S-VIDEO YCbCr QUICK ASPECT AUTO Freezing a Moving Picture This function is used...
... the video and audio at the same time. General Operation Projecting a Picture in Picture This function displays the video image (i.e., the picture of the VIDEO connector input) on Page E-54. Each press of the PIP button advances the screen size of On → Off (i.e., the sub-picture display is a still picture condition. Sub-picture Main-picture ON POWER OFF FREEZE MUTE PIP DIGITAL RGB YPbPr VIDEO S-VIDEO YCbCr QUICK ASPECT AUTO Freezing a Moving Picture This function is used...
VP-1 User's Manual (English)
Page 62
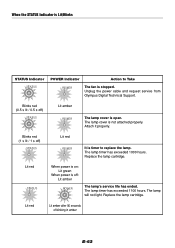
... power is not attached properly. Replace the lamp cartridge. The lamp will not light. When the STATUS Indicator is Lit/Blinks STATUS Indicator STATUS POWER Indicator Action to Take POWER The fan is timer to replace the lamp. Blinks red (1 s lit / 1 s off ) STATUS Lit amber POWER The lamp cover is open. Lit red Lit amber after 90 seconds of blinking in amber E-62 Blinks red (0.5 s lit / 0.5 s off ) STATUS Lit red POWER It is stopped. Replace the lamp cartridge. Unplug the power cable and request service from Olympus Digital Technical Support...
... power is not attached properly. Replace the lamp cartridge. The lamp will not light. When the STATUS Indicator is Lit/Blinks STATUS Indicator STATUS POWER Indicator Action to Take POWER The fan is timer to replace the lamp. Blinks red (1 s lit / 1 s off ) STATUS Lit amber POWER The lamp cover is open. Lit red Lit amber after 90 seconds of blinking in amber E-62 Blinks red (0.5 s lit / 0.5 s off ) STATUS Lit red POWER It is stopped. Replace the lamp cartridge. Unplug the power cable and request service from Olympus Digital Technical Support...

VP-1 User's Manual (English)
Page 63
... connected input been selected? * Is the cable of your personal com- played properly, set to protect the unit the power will no longer switch on . * Has the lamp timer exceeded 1100 hours? E-28 E-18 - 22 E-20 E-70 E-33, 46 E-61 E-61 E-28 Distorted video * Is the projector installed properly? * Is the keystone adjustment properly adjusted? frequency? E-70 Image is broken * When the image is broken in a warm location...
... connected input been selected? * Is the cable of your personal com- played properly, set to protect the unit the power will no longer switch on . * Has the lamp timer exceeded 1100 hours? E-28 E-18 - 22 E-20 E-70 E-33, 46 E-61 E-61 E-28 Distorted video * Is the projector installed properly? * Is the keystone adjustment properly adjusted? frequency? E-70 Image is broken * When the image is broken in a warm location...
VP-1 User's Manual (English)
Page 66
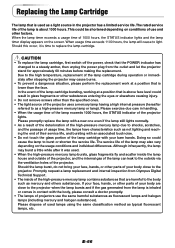
... replace the lamp cartridge, first switch off the power, check that the POWER indicator has changed to light. Replacing the Lamp Cartridge The lamp that is used as a light source in the projector has a limited service life.The rated service life of the lamp is time to replace the lamp cartridge. Although infrequently, the lamp may burst a little while after stopping the projector may also vary depending on the screen. If your face, hands, or other parts of...
... replace the lamp cartridge, first switch off the power, check that the POWER indicator has changed to light. Replacing the Lamp Cartridge The lamp that is used as a light source in the projector has a limited service life.The rated service life of the lamp is time to replace the lamp cartridge. Although infrequently, the lamp may burst a little while after stopping the projector may also vary depending on the screen. If your face, hands, or other parts of...
VP-1 User's Manual - Simplified Edition (English)
Page 1
... of the OLYMPUS VP-1 data projector. Please read the USER'S MANUAL (Simplified Edition) and the USER'S MANUAL (CDROM Edition) carefully and use the projector properly. Macintosh is a registered trademark of the respective companies. E-1 SVGA is a trademark of Silicon Image Inc. Other names of companies and products mentioned are all trademarks of Texas Instruments. IMPORTANT Digital Light Processing, DLP™, Digital Micromirror Device and DMD are trademarks...
... of the OLYMPUS VP-1 data projector. Please read the USER'S MANUAL (Simplified Edition) and the USER'S MANUAL (CDROM Edition) carefully and use the projector properly. Macintosh is a registered trademark of the respective companies. E-1 SVGA is a trademark of Silicon Image Inc. Other names of companies and products mentioned are all trademarks of Texas Instruments. IMPORTANT Digital Light Processing, DLP™, Digital Micromirror Device and DMD are trademarks...
VP-1 User's Manual - Simplified Edition (English)
Page 3
... removed by a qualified Olympus Digital Technical Support. • Do not place any objects that fell into the unit. Before disconnecting the power cable, make sure that can redirect light coming out of abnormal objects that the POWER indicator lights in amber (not blinking or in direct sunlight, near the unit and shall be careful not to use the lamp after using the vacuum cleaner. Warnings...
... removed by a qualified Olympus Digital Technical Support. • Do not place any objects that fell into the unit. Before disconnecting the power cable, make sure that can redirect light coming out of abnormal objects that the POWER indicator lights in amber (not blinking or in direct sunlight, near the unit and shall be careful not to use the lamp after using the vacuum cleaner. Warnings...

VP-1 User's Manual - Simplified Edition (English)
Page 5
... item. Projector/ Remote Control Accessories Using the User's Manual (CD-ROM Edition) The User's Manual (CD-ROM Edition) is displayed on "Index.pdf" within the CD-ROM. 4. For Macintosh : Run "Acrobat Reader Installer". 6. User's Manual (CD-ROM Edition) [1] User's Manual (Simplified Edition) [1] QRG (Quick Reference Guide) [1] Warranty Card (LIMITED WARRANTY) [1] Product Registration [1] Replacement Sheet (Priority Replacement Program) [1] Checking the Supplied Accessories Soft case (for the User's Manual will open. The case is used when...
... item. Projector/ Remote Control Accessories Using the User's Manual (CD-ROM Edition) The User's Manual (CD-ROM Edition) is displayed on "Index.pdf" within the CD-ROM. 4. For Macintosh : Run "Acrobat Reader Installer". 6. User's Manual (CD-ROM Edition) [1] User's Manual (Simplified Edition) [1] QRG (Quick Reference Guide) [1] Warranty Card (LIMITED WARRANTY) [1] Product Registration [1] Replacement Sheet (Priority Replacement Program) [1] Checking the Supplied Accessories Soft case (for the User's Manual will open. The case is used when...

VP-1 User's Manual - Simplified Edition (English)
Page 17
... standby mode). Finishing 1 Switch off the power of the connected equipment 2 Switch off operation. When the red bar extends fully (in amber. Warning Do not disconnect the power cable while the POWER indicator is lit steadily in amber, then unplug the power cable. Power off OK ? STATUS POWER POWER STATUS POWER Blinks amber (Approximately 90 seconds) STATUS POWER Lit amber Standby mode 3 Unplug the power cable Check that the sound of the projector. Remote control operation: Press the POWER OFF button. ON POWER OFF Power off OK ? The POWER indicator...
... standby mode). Finishing 1 Switch off the power of the connected equipment 2 Switch off operation. When the red bar extends fully (in amber. Warning Do not disconnect the power cable while the POWER indicator is lit steadily in amber, then unplug the power cable. Power off OK ? STATUS POWER POWER STATUS POWER Blinks amber (Approximately 90 seconds) STATUS POWER Lit amber Standby mode 3 Unplug the power cable Check that the sound of the projector. Remote control operation: Press the POWER OFF button. ON POWER OFF Power off OK ? The POWER indicator...

VP-1 User's Manual - Simplified Edition (English)
Page 18
... * The projection image can be turned upside down with the video signal being perpendicular to the projector. See "Using the Adjusters" on Page E-27(S). See "Projec- See "Correcting Keystone Distortion of the projector not being input to the screen. Projection Screen Position Adjustment Turn the zoom ring to the rear or forward. Check that the screen is set level and vertically. (1) If the image is shifted to the left to right using remote control or menu operations.
... * The projection image can be turned upside down with the video signal being perpendicular to the projector. See "Using the Adjusters" on Page E-27(S). See "Projec- See "Correcting Keystone Distortion of the projector not being input to the screen. Projection Screen Position Adjustment Turn the zoom ring to the rear or forward. Check that the screen is set level and vertically. (1) If the image is shifted to the left to right using remote control or menu operations.

VP-1 User's Manual - Simplified Edition (English)
Page 32
... 1100 hours. Replace the lamp cartridge. The lamp will not light. Blinks red (0.5 s lit / 0.5 s off ) STATUS Lit red POWER It is timer to Take STATUS POWER The fan is stopped. The lamp cover is off: Lit amber POWER The lamp's service life has ended. Attach it properly. Blinks red (1 s lit / 1 s off ) STATUS Lit amber POWER The lamp cover is open. Replace the lamp cartridge. E-32 When the STATUS Indicator is Lit/Blinks STATUS Indicator POWER Indicator Action to replace the lamp. Unplug the power cable and request service from Olympus Digital Technical Support...
... 1100 hours. Replace the lamp cartridge. The lamp will not light. Blinks red (0.5 s lit / 0.5 s off ) STATUS Lit red POWER It is timer to Take STATUS POWER The fan is stopped. The lamp cover is off: Lit amber POWER The lamp's service life has ended. Attach it properly. Blinks red (1 s lit / 1 s off ) STATUS Lit amber POWER The lamp cover is open. Replace the lamp cartridge. E-32 When the STATUS Indicator is Lit/Blinks STATUS Indicator POWER Indicator Action to replace the lamp. Unplug the power cable and request service from Olympus Digital Technical Support...

VP-1 User's Manual - Simplified Edition (English)
Page 33
... keystone adjustment properly adjusted? E-19(S) * Are the projection screen and the projector installed E-10, 11(S) at the proper distance? * Has the projection distance exceeded the focussing E-10, 11(S) range? * Is there condensation on the lens and other internal optical parts. Check the resolution of the input connector properly connected? Perform the color space setting. E-31, 38(S) * Has the internal temperature become disconnected from the personal computer? * Has a signal that the image adjustment...
... keystone adjustment properly adjusted? E-19(S) * Are the projection screen and the projector installed E-10, 11(S) at the proper distance? * Has the projection distance exceeded the focussing E-10, 11(S) range? * Is there condensation on the lens and other internal optical parts. Check the resolution of the input connector properly connected? Perform the color space setting. E-31, 38(S) * Has the internal temperature become disconnected from the personal computer? * Has a signal that the image adjustment...

VP-1 User's Manual - Simplified Edition (English)
Page 36
.... Due to the high temperature, replacement of the lamp cartridge during operation or immediately after it is lower than the specified ones. • The light source of the projector. In the event of the lamp cartridge bursting, working at a position that is time to replace the lamp cartridge. Promptly request a lamp replacement and internal inspection from Olympus Digital Technical Support. • The inside the lamp house and outside of...
.... Due to the high temperature, replacement of the lamp cartridge during operation or immediately after it is lower than the specified ones. • The light source of the projector. In the event of the lamp cartridge bursting, working at a position that is time to replace the lamp cartridge. Promptly request a lamp replacement and internal inspection from Olympus Digital Technical Support. • The inside the lamp house and outside of...