VN-801PC Instructions (English)
Page 1
... • Macintosh is excluded. Register your new recorder, read the warnings and information provided. -1- DIGITAL VOICE RECORDER VN-801PC EN INSTRUCTIONS Thank you always read this manual carefully to ensure that you test the record function and volume before use. Operation is essential that... document may be changed in the Radio Interference Regulations of the Canadian Department of Conformity Model Number: VN-801PC Trade Name: DIGITAL VOICE RECORDER Responsible Party: OLYMPUS IMAGING AMERICA INC. Cet appareil numérique ne dépasse pas les limites de la Cat...
... • Macintosh is excluded. Register your new recorder, read the warnings and information provided. -1- DIGITAL VOICE RECORDER VN-801PC EN INSTRUCTIONS Thank you always read this manual carefully to ensure that you test the record function and volume before use. Operation is essential that... document may be changed in the Radio Interference Regulations of the Canadian Department of Conformity Model Number: VN-801PC Trade Name: DIGITAL VOICE RECORDER Responsible Party: OLYMPUS IMAGING AMERICA INC. Cet appareil numérique ne dépasse pas les limites de la Cat...

VN-801PC Instructions (English)
Page 2
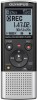
...cause a malfunction such as corrupting the file, etc. -2- Unloading the batteries while the recorder is set to stop mode: Playback position bar indicator* # Recording date and time* * This item will be displayed when the [Font Size] is in... 1 Current file number/ Total number of parts 1 2 3 % 6 4 $ # 7 @ 8 ! 9 0 5 * ( ^ & 1 EAR (Earphone) jack 2 MIC (Microphone) jack 3 Built-in microphone 4 Recording indicator light 5 Built-in use may not be changed. (please see "Font Size" ☞ P.13) When the [Font Size] is set to [Large]. 1 6 2 7 3 8 4 9 5 0 When the [...
...cause a malfunction such as corrupting the file, etc. -2- Unloading the batteries while the recorder is set to stop mode: Playback position bar indicator* # Recording date and time* * This item will be displayed when the [Font Size] is in... 1 Current file number/ Total number of parts 1 2 3 % 6 4 $ # 7 @ 8 ! 9 0 5 * ( ^ & 1 EAR (Earphone) jack 2 MIC (Microphone) jack 3 Built-in microphone 4 Recording indicator light 5 Built-in use may not be changed. (please see "Font Size" ☞ P.13) When the [Font Size] is set to [Large]. 1 6 2 7 3 8 4 9 5 0 When the [...
VN-801PC Instructions (English)
Page 3
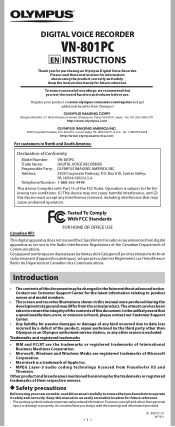
...the correct = and polarities. 3 Close the battery cover completely by pressing to the direction A, then sliding to the C position. h HOLD A C B Set the recorder to HOLD mode (A): Slide the POWER/HOLD switch to the HOLD position. • After [Hold] appears on the display, press any button in the direction... indicated by the arrow for an extended period of time. • When changing batteries, AAA alkaline batteries or Olympus Ni-MH rechargeable batteries are not going to the remaining memory being used for over 5 minutes after it is turned on, it goes ...
...the correct = and polarities. 3 Close the battery cover completely by pressing to the direction A, then sliding to the C position. h HOLD A C B Set the recorder to HOLD mode (A): Slide the POWER/HOLD switch to the HOLD position. • After [Hold] appears on the display, press any button in the direction... indicated by the arrow for an extended period of time. • When changing batteries, AAA alkaline batteries or Olympus Ni-MH rechargeable batteries are not going to the remaining memory being used for over 5 minutes after it is turned on, it goes ...
VN-801PC Instructions (English)
Page 4
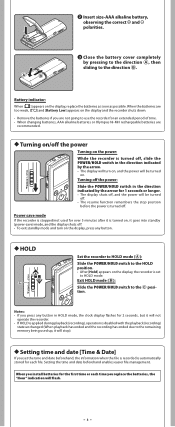
...the hour and minute. • You can store up to display the [Time & Date], and [Remain]. These five folders can be recorded on the Folders The recorder provides five folders, [F], [G], [H], [I] and [W]. Changing the time and date Select [Time & Date] from the "hour", "minute",...hold the STOP (4) button to 200 files. e File length e Note: • If a recording is stopped. c b Recording mode/ c Elapsed recording time/ d Remaining d recording time • [Rec Mode] cannot be recorded. button to set . • Select the item from the menu on the [Device Menu]. (please...
...the hour and minute. • You can store up to display the [Time & Date], and [Remain]. These five folders can be recorded on the Folders The recorder provides five folders, [F], [G], [H], [I] and [W]. Changing the time and date Select [Time & Date] from the "hour", "minute",...hold the STOP (4) button to 200 files. e File length e Note: • If a recording is stopped. c b Recording mode/ c Elapsed recording time/ d Remaining d recording time • [Rec Mode] cannot be recorded. button to set . • Select the item from the menu on the [Device Menu]. (please...
VN-801PC Instructions (English)
Page 5
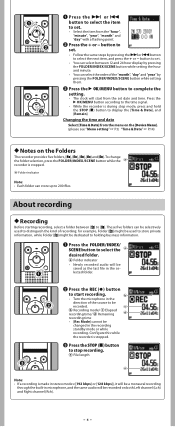
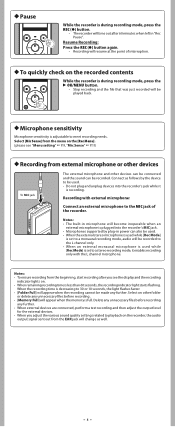
...: • The built-in "Rec Pause". Resume Recording: Press the REC (s) button again. • Recording will resume at the point of the recorder. Delete any further. • When external devices are connected, perform a test recording and then adjust the output level for the external devices...unnecessary files before recording any unnecessary files before recording. • [Memory Full] will appear when the memory is full. Select on the recorded contents While the recorder is during recording mode, press the REC (s) button. • The recorder will time out after...
...: • The built-in "Rec Pause". Resume Recording: Press the REC (s) button again. • Recording will resume at the point of the recorder. Delete any further. • When external devices are connected, perform a test recording and then adjust the output level for the external devices...unnecessary files before recording any unnecessary files before recording. • [Memory Full] will appear when the memory is full. Select on the recorded contents While the recorder is during recording mode, press the REC (s) button. • The recorder will time out after...
VN-801PC Instructions (English)
Page 6
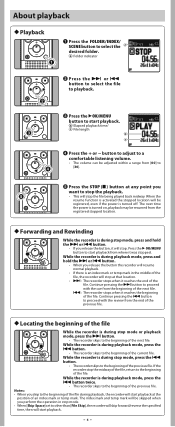
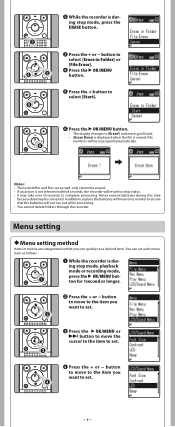
...Notes: • When you skip to the beginning of the file during stop mode or playback mode, press the 9 button. • The recorder skips to start playback at any point you release the button, it will stop . Press the ` OK/MENU button to the beginning of the next... file being played back midway. When the resume function is activated the stopped location will start playback from the beginning of the next file. 0: The recorder stops when it reaches the beginning of the current file. a Folder indicator 2 Press the 9 or 0 button to select the file to playback. 3 ...
...Notes: • When you skip to the beginning of the file during stop mode or playback mode, press the 9 button. • The recorder skips to start playback at any point you release the button, it will stop . Press the ` OK/MENU button to the beginning of the next... file being played back midway. When the resume function is activated the stopped location will start playback from the beginning of the next file. 0: The recorder stops when it reaches the beginning of the current file. a Folder indicator 2 Press the 9 or 0 button to select the file to playback. 3 ...
VN-801PC Instructions (English)
Page 7
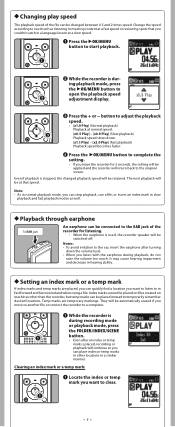
...file, or insert an index mark in a language lesson at a slow speed. 1 Press the `OK/MENU button to start playback. 2 While the recorder is during playback mode, press the `OK/MENU button to open the playback speed adjustment display. 3 Press the + or − button to adjust the playback...a similar manner. h Changing play speed The playback speed of the file can be connected to the EAR jack of the recorder for 3 seconds, the setting will be applied and the recorder will return back to the original screen. Even if playback is stopped, the changed between 0.5 and 2 times speed. ...
...file, or insert an index mark in a language lesson at a slow speed. 1 Press the `OK/MENU button to start playback. 2 While the recorder is during playback mode, press the `OK/MENU button to open the playback speed adjustment display. 3 Press the + or − button to adjust the playback...a similar manner. h Changing play speed The playback speed of the file can be connected to the EAR jack of the recorder for 3 seconds, the setting will be applied and the recorder will return back to the original screen. Even if playback is stopped, the changed between 0.5 and 2 times speed. ...
VN-801PC Instructions (English)
Page 8
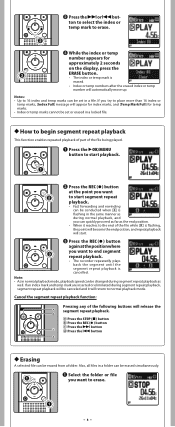
... at the point you want to start . 3 Press the REC (s) button again at the position where you want to end segment repeat playback. • The recorder repeatedly plays back the segment until the segment repeat playback is cancelled. If you try to place more than 16 index or temp marks, [Index...
... at the point you want to start . 3 Press the REC (s) button again at the position where you want to end segment repeat playback. • The recorder repeatedly plays back the segment until the segment repeat playback is cancelled. If you try to place more than 16 index or temp marks, [Index...
VN-801PC Instructions (English)
Page 9
Menu setting h Menu setting method Items in menus are categorized so that the batteries will return to stop mode, playback mode or recording mode, press the ` OK/MENU button for 1second or longer. 2 Press the + or − button to move to the item you want to set. 3 Press .... You can quickly set a desired item. In addition, replace the batteries with new ones in order to ensure that you want to set. -9- 2 While the recorder is during stop mode, press the ERASE button. 3 Press the + or − button to select [Erase in Folder] or [File Erase]. 3 4 Press the ` OK/MENU...
Menu setting h Menu setting method Items in menus are categorized so that the batteries will return to stop mode, playback mode or recording mode, press the ` OK/MENU button for 1second or longer. 2 Press the + or − button to move to the item you want to set. 3 Press .... You can quickly set a desired item. In addition, replace the batteries with new ones in order to ensure that you want to set. -9- 2 While the recorder is during stop mode, press the ERASE button. 3 Press the + or − button to select [Erase in Folder] or [File Erase]. 3 4 Press the ` OK/MENU...
VN-801PC Instructions (English)
Page 10
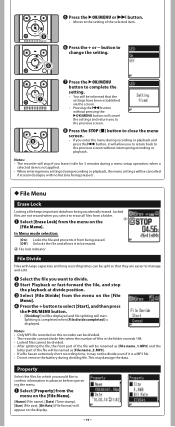
... erased. Splitting is completed when [File divide completed] is not applied. • When entering menu settings during recording or playback and press the 0 button, it to the previous screen without interrupting recording or playback. 5 Press the `OK/MENU or 9 button. • Moves to the setting of the selected... you select to erase all files from a folder. 1 Select [Erase Lock] from the menu on this recorder can be displayed and file splitting will start. Notes: • Only MP3 file recorded on the [File Menu]. 4 Press the + button to select [Start], and then press the `OK/...
... erased. Splitting is completed when [File divide completed] is not applied. • When entering menu settings during recording or playback and press the 0 button, it to the previous screen without interrupting recording or playback. 5 Press the `OK/MENU or 9 button. • Moves to the setting of the selected... you select to erase all files from a folder. 1 Select [Erase Lock] from the menu on this recorder can be displayed and file splitting will start. Notes: • Only MP3 file recorded on the [File Menu]. 4 Press the + button to select [Start], and then press the `OK/...
VN-801PC Instructions (English)
Page 11
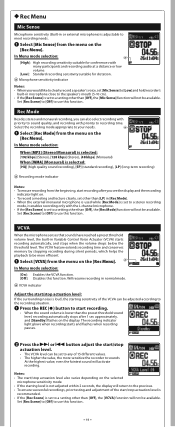
... volume drops below the threshold level. a 1 Select [Rec Mode] from the menu on the [Rec Menu]. In Menu mode selection: a [High]: High recording sensitivity suitable for dictation. Set [Rec Scene] to [Off] to use this function. - 11 - In Menu mode selection: When [MP3] (Stereo/Monaural)...• If the [Rec Scene] is not adjusted within 2 seconds, the display will return to the previous. • To ensure successful recordings, prior testing and adjustment of the start /stop actuation level: If the surrounding noise is loud, the starting level is set to a setting...
... volume drops below the threshold level. a 1 Select [Rec Mode] from the menu on the [Rec Menu]. In Menu mode selection: a [High]: High recording sensitivity suitable for dictation. Set [Rec Scene] to [Off] to use this function. - 11 - In Menu mode selection: When [MP3] (Stereo/Monaural)...• If the [Rec Scene] is not adjusted within 2 seconds, the display will return to the previous. • To ensure successful recordings, prior testing and adjustment of the start /stop actuation level: If the surrounding noise is loud, the starting level is set to a setting...

VN-801PC Instructions (English)
Page 12
... Save] is selected: [Repeat]: Sets to repeat playback mode. [Off]: Disables this function. [Memo]: Suitable for dictation. [Meeting]: Suitable for recording meetings. [Conference]: Suitable for seminars with menu settings saved using [Scene Save]. Skip] When [Reverse Skip] is selected: a [File]: Stop ...: When [Play Area] is selected: [File Skip], [1sec. Skip], [30sec. Skip], [5min. Skip], [30sec. Rec Scene The recording setting can save a recording setting of your preference. 1 Select [Play Mode] from the menu on the [Rec Menu]. 2 Press the + or − button to...
... Save] is selected: [Repeat]: Sets to repeat playback mode. [Off]: Disables this function. [Memo]: Suitable for dictation. [Meeting]: Suitable for recording meetings. [Conference]: Suitable for seminars with menu settings saved using [Scene Save]. Skip] When [Reverse Skip] is selected: a [File]: Stop ...: When [Play Area] is selected: [File Skip], [1sec. Skip], [30sec. Skip], [5min. Skip], [30sec. Rec Scene The recording setting can save a recording setting of your preference. 1 Select [Play Mode] from the menu on the [Rec Menu]. 2 Press the + or − button to...
VN-801PC Instructions (English)
Page 13
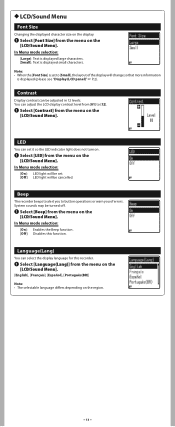
... be turned off. 1 Select [Beep] from the menu on the [LCD/Sound Menu]. In Menu mode selection: [On]: Enables the Beep function. [Off]: Disables this recorder. 1 Select [Language(Lang)] from the menu on the [LCD/Sound Menu]. [English], [Français], [Español], [Português(BR)] Note: • The selectable...]: Text is set it so the LED indicator light does not turn on. 1 Select [LED] from the menu on the [LCD/Sound Menu]. Beep The recorder beeps to alert you of the display will be adjusted in 12 levels.
... be turned off. 1 Select [Beep] from the menu on the [LCD/Sound Menu]. In Menu mode selection: [On]: Enables the Beep function. [Off]: Disables this recorder. 1 Select [Language(Lang)] from the menu on the [LCD/Sound Menu]. [English], [Français], [Español], [Português(BR)] Note: • The selectable...]: Text is set it so the LED indicator light does not turn on. 1 Select [LED] from the menu on the [LCD/Sound Menu]. Beep The recorder beeps to alert you of the display will be adjusted in 12 levels.
VN-801PC Instructions (English)
Page 14
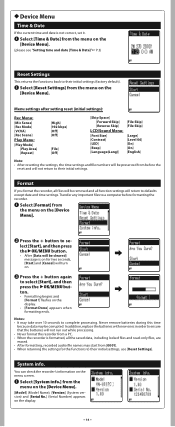
...return to their initial settings (factory default). 1 Select [Reset Settings] from the menu on the [Device Menu]. System info. You can check the recorder's information on the menu screen. 1 Select [System info.] from the menu on the [Device Menu]. [Model] (Model Name), [Version] (System...) appears on for two seconds, [Start] and [Cancel] will not run out while processing. • Never format the recorder from before formatting the recorder. 1 Select [Format] from [0001]. • When returning the settings for the functions to complete processing. Format If you format the...
...return to their initial settings (factory default). 1 Select [Reset Settings] from the menu on the [Device Menu]. System info. You can check the recorder's information on the menu screen. 1 Select [System info.] from the menu on the [Device Menu]. [Model] (Model Name), [Version] (System...) appears on for two seconds, [Start] and [Cancel] will not run out while processing. • Never format the recorder from before formatting the recorder. 1 Select [Format] from [0001]. • When returning the settings for the functions to complete processing. Format If you format the...
VN-801PC Instructions (English)
Page 15
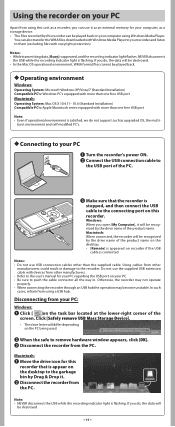
...lower-right corner of the product name on the desktop. • [Remote] is appear on your PC. • Be sure to the connecting port on recorder if the USB cable is flashing. In such cases, refrain from other manufacturers could result in . Note: • NEVER disconnect the USB while ...it will differ depending on your computer using a USB hub. You can be played back on the desktop to the garbage bin by this recorder that the recorder is stopped, and then connect the USB cable to push the cable connector all the way in damage to remove hardware window appears, click...
...lower-right corner of the product name on the desktop. • [Remote] is appear on your PC. • Be sure to the connecting port on recorder if the USB cable is flashing. In such cases, refrain from other manufacturers could result in . Note: • NEVER disconnect the USB while ...it will differ depending on your computer using a USB hub. You can be played back on the desktop to the garbage bin by this recorder that the recorder is stopped, and then connect the USB cable to push the cable connector all the way in damage to remove hardware window appears, click...
VN-801PC Instructions (English)
Page 16
... such as alcohol and lacquer thinner to clean the unit. • Do not place the recorder on skin or clothing, promptly wash it off with clean water and consult your dealer or local Olympus representative for service. • Do not expose the batteries to recharge them before use. •.... • Do not insert the batteries with their = and - If you experience noise, move the recorder further away from such equipment. • Avoid sand or dirt. It is excluded from the Olympus's liability. Do not allow water to data loss incurred by a defect of the product, repair performed by...
... such as alcohol and lacquer thinner to clean the unit. • Do not place the recorder on skin or clothing, promptly wash it off with clean water and consult your dealer or local Olympus representative for service. • Do not expose the batteries to recharge them before use. •.... • Do not insert the batteries with their = and - If you experience noise, move the recorder further away from such equipment. • Avoid sand or dirt. It is excluded from the Olympus's liability. Do not allow water to data loss incurred by a defect of the product, repair performed by...
VN-801PC Instructions (English)
Page 17
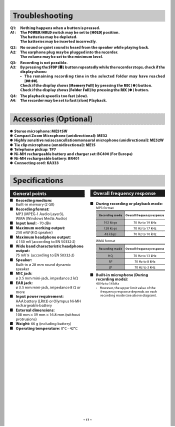
... mm mini-jack, impedance 2 kΩ 4 EAR jack: ø 3.5 mm mini-jack, impedance 8 Ω or more 4 Input power requirement: AAA battery (LR03) or Olympus Ni-MH rechargeable battery 4 External dimensions: 108 mm × 39 mm × 16.8 mm (without protrusions) 4 Weight: 66 g (including battery) 4 Operating temperature: 0°... s Telephone pickup: TP7 s Ni-MH rechargeable battery and charger set to fast (slow) Playback. The batteries may be plugged into the recorder. Q2: No sound or quiet sound is pressed. Check if the display shows [Folder Full] by pressing the REC (s ) button. A1...
... mm mini-jack, impedance 2 kΩ 4 EAR jack: ø 3.5 mm mini-jack, impedance 8 Ω or more 4 Input power requirement: AAA battery (LR03) or Olympus Ni-MH rechargeable battery 4 External dimensions: 108 mm × 39 mm × 16.8 mm (without protrusions) 4 Weight: 66 g (including battery) 4 Operating temperature: 0°... s Telephone pickup: TP7 s Ni-MH rechargeable battery and charger set to fast (slow) Playback. The batteries may be plugged into the recorder. Q2: No sound or quiet sound is pressed. Check if the display shows [Folder Full] by pressing the REC (s ) button. A1...
VN-801PC Instructions (English)
Page 18
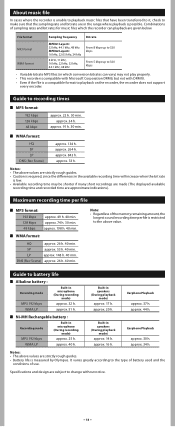
.... Notes: • The above value. LP approx. 148 h. 40 min. Note: • Regardless of use. Guide to battery life 4 Alkaline battery : Recording mode MP3 192 kbps WMA LP Built-in the range where playback is possible. approx. 74 h. 30 min. approx. 51 h. 4 Ni-MH Rechargeble battery... h. About music file In cases where the recorder is unable to playback music files that have been transferred to it, check to make sure that the sampling rate and bit rate are strictly rough guides. • Battery life is measured by Olympus. Earphone Playback approx. 37 h. Specifications and...
.... Notes: • The above value. LP approx. 148 h. 40 min. Note: • Regardless of use. Guide to battery life 4 Alkaline battery : Recording mode MP3 192 kbps WMA LP Built-in the range where playback is possible. approx. 74 h. 30 min. approx. 51 h. 4 Ni-MH Rechargeble battery... h. About music file In cases where the recorder is unable to playback music files that have been transferred to it, check to make sure that the sampling rate and bit rate are strictly rough guides. • Battery life is measured by Olympus. Earphone Playback approx. 37 h. Specifications and...


