SP-570UZ Instruction Manual (English)
Page 1
...life. Before you start to use your camera better Appendix ( Thank you for future reference. ( We recommend that you get started using your camera before taking important photographs. ( In the interest of continually improving products, Olympus reserves the right to update or modify ...in this manual. ( The screen and camera illustrations shown in this manual in a safe place for purchasing an Olympus digital camera. Keep this manual were produced during the development stages and may differ from the actual product. DIGITAL CAMERA SP-570UZ Instruction Manual Quick Start Guide This...
...life. Before you start to use your camera better Appendix ( Thank you for future reference. ( We recommend that you get started using your camera before taking important photographs. ( In the interest of continually improving products, Olympus reserves the right to update or modify ...in this manual. ( The screen and camera illustrations shown in this manual in a safe place for purchasing an Olympus digital camera. Keep this manual were produced during the development stages and may differ from the actual product. DIGITAL CAMERA SP-570UZ Instruction Manual Quick Start Guide This...
SP-570UZ Instruction Manual (English)
Page 2
... by following the illustrations and trying them out. Using OLYMPUS Master P.64 Learn how to transfer and save pictures to the functions of the camera's functions. Use this section as reference for the functions. P.59 Learn how to print pictures you have taken. Menu operations ... perform basic operations, and then try them out on how to use your camera and learn what to know your camera better P.68 Find out more about convenient functions and safety precautions on the camera. Getting to do when you have a question regarding operations. Contents Quick Start...
... by following the illustrations and trying them out. Using OLYMPUS Master P.64 Learn how to transfer and save pictures to the functions of the camera's functions. Use this section as reference for the functions. P.59 Learn how to print pictures you have taken. Menu operations ... perform basic operations, and then try them out on how to use your camera and learn what to know your camera better P.68 Find out more about convenient functions and safety precautions on the camera. Getting to do when you have a question regarding operations. Contents Quick Start...
SP-570UZ Instruction Manual (English)
Page 3
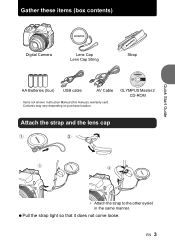
Contents may vary depending on purchase location. Pull the strap tight so that it does not come loose. Gather these items (box contents) Quick Start Guide Digital Camera Lens Cap Lens Cap String Strap AA Batteries (four) USB cable AV Cable Items not shown: Instruction Manual (this manual), warranty card. OLYMPUS Master 2 CD-ROM Attach the strap and the lens cap 3 4 • Attach the strap to the other eyelet in the same manner. EN 3
Contents may vary depending on purchase location. Pull the strap tight so that it does not come loose. Gather these items (box contents) Quick Start Guide Digital Camera Lens Cap Lens Cap String Strap AA Batteries (four) USB cable AV Cable Items not shown: Instruction Manual (this manual), warranty card. OLYMPUS Master 2 CD-ROM Attach the strap and the lens cap 3 4 • Attach the strap to the other eyelet in the same manner. EN 3
SP-570UZ Instruction Manual (English)
Page 4
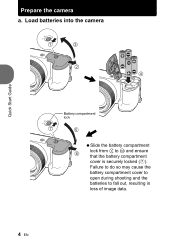
Load batteries into the camera 1 3 2 4 Battery compartment lock 7 5 Slide the battery compartment lock from ) to fall out, resulting in loss of image data. 4 EN Failure to do so may cause the battery compartment cover to open during shooting and the batteries to = and ensure 6 that the battery compartment cover is securely locked (7). Quick Start Guide Prepare the camera a.
Load batteries into the camera 1 3 2 4 Battery compartment lock 7 5 Slide the battery compartment lock from ) to fall out, resulting in loss of image data. 4 EN Failure to do so may cause the battery compartment cover to open during shooting and the batteries to = and ensure 6 that the battery compartment cover is securely locked (7). Quick Start Guide Prepare the camera a.
SP-570UZ Instruction Manual (English)
Page 5
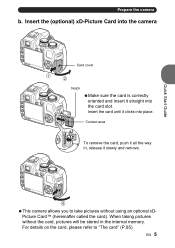
... refer to take pictures without the card, pictures will be stored in , release it clicks into place. Insert the (optional) xD-Picture Card into the camera Quick Start Guide Card cover 1 2 Notch Make sure the card is correctly oriented and insert it straight into the card slot. 3 Insert the card until...
... refer to take pictures without the card, pictures will be stored in , release it clicks into place. Insert the (optional) xD-Picture Card into the camera Quick Start Guide Card cover 1 2 Notch Make sure the card is correctly oriented and insert it straight into the card slot. 3 Insert the card until...

SP-570UZ Instruction Manual (English)
Page 6
...target items by selecting a scene according to the shooting condition. S This function allows you to change the aperture manually. The camera automatically sets the optimum aperture value and shutter speed. Remove the lens cap and set each shooting function manually and use as...mode) Quick Start Guide When viewing pictures When shooting movies (playback mode) (shooting mode) Still picture shooting modes h P The camera determines the optimum settings for the shooting conditions automatically. s This function allows you to shoot pictures by following the shooting guide displayed ...
...target items by selecting a scene according to the shooting condition. S This function allows you to change the aperture manually. The camera automatically sets the optimum aperture value and shutter speed. Remove the lens cap and set each shooting function manually and use as...mode) Quick Start Guide When viewing pictures When shooting movies (playback mode) (shooting mode) Still picture shooting modes h P The camera determines the optimum settings for the shooting conditions automatically. s This function allows you to shoot pictures by following the shooting guide displayed ...
SP-570UZ Instruction Manual (English)
Page 7
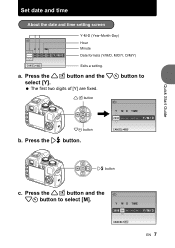
X Y M D TIME 2008 08 -- -- -- a. Press the 1 z button and the 2Y button to select [Y]. Y M D CANCEL MENU EN 7 Press the 1 z button and the 2Y button to select [M]. CANCEL MENU Quick Start Guide 3# button c. Press the 3# button. The first two digits of [Y] are fixed. 1 z button X Y M D TIME 2008 Y M D 2Y button b. Set date and time About the date and time setting screen X Y M D TIME Y M D Y-M-D (Year-Month-Day) Hour Minute Date formats (Y/M/D, M/D/Y, D/M/Y) CANCEL MENU Exits a setting.
X Y M D TIME 2008 08 -- -- -- a. Press the 1 z button and the 2Y button to select [Y]. Y M D CANCEL MENU EN 7 Press the 1 z button and the 2Y button to select [M]. CANCEL MENU Quick Start Guide 3# button c. Press the 3# button. The first two digits of [Y] are fixed. 1 z button X Y M D TIME 2008 Y M D 2Y button b. Set date and time About the date and time setting screen X Y M D TIME Y M D Y-M-D (Year-Month-Day) Hour Minute Date formats (Y/M/D, M/D/Y, D/M/Y) CANCEL MENU Exits a setting.

SP-570UZ Instruction Manual (English)
Page 8
Quick Start Guide Set date and time d. e. Press the 3# button. h. Press the 3# button. i. Y M D f. Press the 1 z button and the 2Y button to select the hours and minutes. Press the 1 z button and the 2Y button to select [Y/M/D]. g. CANCEL MENU X Y M D TIME 2008 08 26 12 30 Y M D CANCEL MENU SET OK X Y M D TIME 2008 08 26 12 30 Y M D j. For precise time setting, press the o button as the time signal strikes 00 seconds. AUTO 8 EN o button 10M NORM IN 4 The number of remaining still pictures is displayed in the 24-hour format. X Y M D TIME 2008 08 26 -- --...
Quick Start Guide Set date and time d. e. Press the 3# button. h. Press the 3# button. i. Y M D f. Press the 1 z button and the 2Y button to select the hours and minutes. Press the 1 z button and the 2Y button to select [Y/M/D]. g. CANCEL MENU X Y M D TIME 2008 08 26 12 30 Y M D CANCEL MENU SET OK X Y M D TIME 2008 08 26 12 30 Y M D j. For precise time setting, press the o button as the time signal strikes 00 seconds. AUTO 8 EN o button 10M NORM IN 4 The number of remaining still pictures is displayed in the 24-hour format. X Y M D TIME 2008 08 26 -- --...
SP-570UZ Instruction Manual (English)
Page 9
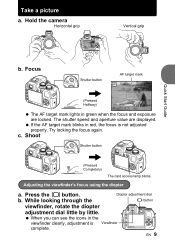
...'s focus using the diopter a. Shoot Shutter button (Pressed Completely) The card access lamp blinks. EN 9 Try locking the focus again. Press the u button. Hold the camera Horizontal grip AUTO 10M NORM IN 4 Vertical grip Quick Start Guide b. c. Focus Shutter button AF target mark AUTO (Pressed Halfway) 1/400 F3.5 The AF target...
...'s focus using the diopter a. Shoot Shutter button (Pressed Completely) The card access lamp blinks. EN 9 Try locking the focus again. Press the u button. Hold the camera Horizontal grip AUTO 10M NORM IN 4 Vertical grip Quick Start Guide b. c. Focus Shutter button AF target mark AUTO (Pressed Halfway) 1/400 F3.5 The AF target...

SP-570UZ Instruction Manual (English)
Page 10
b. Quick Start Guide Mode Dial Arrow pad Prev. Picture Next Picture 2008.08.26 12:30 NORM 10M 100-0001 IN 1 Erase pictures a. Press the 4& button and the 3# button to display the picture you want to erase the picture. 1 z button ERASE IN 10 EN o button CANCEL MENU YES NO SET OK Press the 1 z button to select [YES], and press the o button to erase. Press the f/S button. 4& button 3# button ERASE IN YES NO f/S button CANCEL MENU SET OK c. Set the mode dial to q. View pictures a.
b. Quick Start Guide Mode Dial Arrow pad Prev. Picture Next Picture 2008.08.26 12:30 NORM 10M 100-0001 IN 1 Erase pictures a. Press the 4& button and the 3# button to display the picture you want to erase the picture. 1 z button ERASE IN 10 EN o button CANCEL MENU YES NO SET OK Press the 1 z button to select [YES], and press the o button to erase. Press the f/S button. 4& button 3# button ERASE IN YES NO f/S button CANCEL MENU SET OK c. Set the mode dial to q. View pictures a.

SP-570UZ Instruction Manual (English)
Page 11
Camera diagram Camera Flash (P.23, P.43) F Button (Exposure Compensation) (P.22) Shutter Button (P.9, P.21) Microphone Strap Eyelet (P.3) Lens Self-Timer Lamp/AF Illuminator (P.28, P.38, P.42) Strap Eyelet (P.3) #UP Button (Flash Pop-up) (P.23) j Button (Drive) (P.24) DC-IN Jack (P.86) Card Cover (P.5) Card Slot (P.5) AF/MF Switch (P.24) Multi-connector Connector Cover (P.56, P.59, P.65) (P.56, P.59, P.65) EN 11
Camera diagram Camera Flash (P.23, P.43) F Button (Exposure Compensation) (P.22) Shutter Button (P.9, P.21) Microphone Strap Eyelet (P.3) Lens Self-Timer Lamp/AF Illuminator (P.28, P.38, P.42) Strap Eyelet (P.3) #UP Button (Flash Pop-up) (P.23) j Button (Drive) (P.24) DC-IN Jack (P.86) Card Cover (P.5) Card Slot (P.5) AF/MF Switch (P.24) Multi-connector Connector Cover (P.56, P.59, P.65) (P.56, P.59, P.65) EN 11

SP-570UZ Instruction Manual (English)
Page 12
Zoom Ring (P.21) Hot Shoe (P.82) Mode Dial (P.6, P.16) Control Dial (P.22) Power Switch (P.6, P.16) Viewfinder (P.9) Diopter Adjustment Dial (P.9) q/P Button (Playback/Print) (P.25, P.61) f/S Button (Shadow Adjustment Technology/Erase) (P.25) u Button (Monitor/Viewfinder) (P.22) AEL AFL/m Button (AE Lock, AF Lock/Sequential Playback) (P.23) & Button (Macro) (P.27) z Button (Custom) (P.27) Arrow Pad (P.27) # Button (Flash) (P.23) m Button (P.25) DISP./E Button (P.26) Monitor Card Access Lamp (P.13, P.54) (P.9, P.67, P.73) o Button (OK/FUNC) (P.28) Y Button (Self-timer) (P.28) ...
Zoom Ring (P.21) Hot Shoe (P.82) Mode Dial (P.6, P.16) Control Dial (P.22) Power Switch (P.6, P.16) Viewfinder (P.9) Diopter Adjustment Dial (P.9) q/P Button (Playback/Print) (P.25, P.61) f/S Button (Shadow Adjustment Technology/Erase) (P.25) u Button (Monitor/Viewfinder) (P.22) AEL AFL/m Button (AE Lock, AF Lock/Sequential Playback) (P.23) & Button (Macro) (P.27) z Button (Custom) (P.27) Arrow Pad (P.27) # Button (Flash) (P.23) m Button (P.25) DISP./E Button (P.26) Monitor Card Access Lamp (P.13, P.54) (P.9, P.67, P.73) o Button (OK/FUNC) (P.28) Y Button (Self-timer) (P.28) ...

SP-570UZ Instruction Manual (English)
Page 13
... 28 VGA 27 15 +2.0 26 22 19 17 12s 18 IN 00:34 20 23 21 Movie Item 1 Shooting mode 2 Flash mode 3 Silent mode 4 Digital image stabilization 5 Macro mode Super macro mode 6 Shadow Adjustment Technology 7 Noise reduction 8 AE lock mark 9 Battery check 10 AF lock mark Manual focus AF ...predict 11 Flash standby Camera movement warning/Flash charge 12 Flash intensity control 13 Saturation 14 Sharpness 15 Contrast 16 Conversion lens 17 Sound record 18 Dual time 19 Alarm...
... 28 VGA 27 15 +2.0 26 22 19 17 12s 18 IN 00:34 20 23 21 Movie Item 1 Shooting mode 2 Flash mode 3 Silent mode 4 Digital image stabilization 5 Macro mode Super macro mode 6 Shadow Adjustment Technology 7 Noise reduction 8 AE lock mark 9 Battery check 10 AF lock mark Manual focus AF ...predict 11 Flash standby Camera movement warning/Flash charge 12 Flash intensity control 13 Saturation 14 Sharpness 15 Contrast 16 Conversion lens 17 Sound record 18 Dual time 19 Alarm...

SP-570UZ Instruction Manual (English)
Page 14
y, V j, c, d, g, i, 7 B1 - Page P.85 P.9, P.21, P.41 P.28 P.17 P.17 P.22 P.34 P.34 P.35 P.34 P.41 P.40 P.39 P.24, P.40 P.43 14 EN R7 Ref. Item 21 Current memory 22 AF target mark 23 Self-timer 24 Aperture value 25 Shutter speed 26 Exposure compensation 27 Image quality Compression Frame rate 28 Image size 29 Spot metering 30 ISO 31 White balance 32 Drive 33 White balance compensation Indication B: Pictures are recorded to the internal memory No indication: Pictures are recorded to the card R Y, W F2.8 to F8.0 15", 1/2, 1/400, 1/2000, BULB, etc. -2.0 - +2.0 P, Q M (Normal), L (Fine) O ...
y, V j, c, d, g, i, 7 B1 - Page P.85 P.9, P.21, P.41 P.28 P.17 P.17 P.22 P.34 P.34 P.35 P.34 P.41 P.40 P.39 P.24, P.40 P.43 14 EN R7 Ref. Item 21 Current memory 22 AF target mark 23 Self-timer 24 Aperture value 25 Shutter speed 26 Exposure compensation 27 Image quality Compression Frame rate 28 Image size 29 Spot metering 30 ISO 31 White balance 32 Drive 33 White balance compensation Indication B: Pictures are recorded to the internal memory No indication: Pictures are recorded to the card R Y, W F2.8 to F8.0 15", 1/2, 1/400, 1/2000, BULB, etc. -2.0 - +2.0 P, Q M (Normal), L (Fine) O ...

SP-570UZ Instruction Manual (English)
Page 15
( Playback mode 1 2 3456 x10 7 1/1000 F3.5 8 +2.0 9 ISO 1600 10 11 NORM 10M 100-0004 12 17 2008.08.26 12:30 IN 4 13 16 15 14 Still picture 1 34 6 15 10 15 VGA 11 2008.08.26 12:30 17 100-0004 12 IN 00:14 /00:34 13 14 Movie Item Indication 1 Silent mode j 2 Print reservation/Number of prints
( Playback mode 1 2 3456 x10 7 1/1000 F3.5 8 +2.0 9 ISO 1600 10 11 NORM 10M 100-0004 12 17 2008.08.26 12:30 IN 4 13 16 15 14 Still picture 1 34 6 15 10 15 VGA 11 2008.08.26 12:30 17 100-0004 12 IN 00:14 /00:34 13 14 Movie Item Indication 1 Silent mode j 2 Print reservation/Number of prints

SP-570UZ Instruction Manual (English)
Page 16
...mode Flash mode 10M NORM 1 Power switch Power on: Shooting mode • Monitor turns on the position of the mode dial. Turning the camera on and off Playback mode • Monitor turns on 2 Mode dial Switching between shooting and playback modes Set the mode dial to the ...desired shooting or playback mode. • Some functions cannot be changed . g "Functions available in the [CAMERA MENU] such as WB and ISO sensitivity can be set depending on • Lens extends Playback mode i g h 0 k j Macro mode/ Super macro ...
...mode Flash mode 10M NORM 1 Power switch Power on: Shooting mode • Monitor turns on the position of the mode dial. Turning the camera on and off Playback mode • Monitor turns on 2 Mode dial Switching between shooting and playback modes Set the mode dial to the ...desired shooting or playback mode. • Some functions cannot be changed . g "Functions available in the [CAMERA MENU] such as WB and ISO sensitivity can be set depending on • Lens extends Playback mode i g h 0 k j Macro mode/ Super macro ...
SP-570UZ Instruction Manual (English)
Page 17
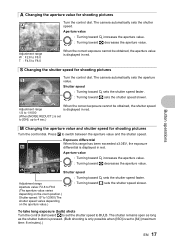
... the aperture value. Adjustment range Aperture value: F2.8 to F8.0 (The aperture value varies depending on the zoom position.) Shutter speed: 15" to BULB. The camera automatically sets the aperture S value. Aperture value : Turning toward U increases the aperture value. 10M NORM +2.0 1/1000 F2.8 : Turning toward G sets the shutter speed slower. To... value for shooting pictures A 10M NORM 1/1000 F4.0 Adjustment range W : F2.8 to F8.0 T : F4.5 to switch between the aperture value and the shutter speed. The camera automatically sets the shutter speed.
... the aperture value. Adjustment range Aperture value: F2.8 to F8.0 (The aperture value varies depending on the zoom position.) Shutter speed: 15" to BULB. The camera automatically sets the aperture S value. Aperture value : Turning toward U increases the aperture value. 10M NORM +2.0 1/1000 F2.8 : Turning toward G sets the shutter speed slower. To... value for shooting pictures A 10M NORM 1/1000 F4.0 Adjustment range W : F2.8 to F8.0 T : F4.5 to switch between the aperture value and the shutter speed. The camera automatically sets the shutter speed.

SP-570UZ Instruction Manual (English)
Page 18
...m to display the shooting guide again. • To change the display. g "R (movies) Recording sound with movies" (P.45) "DIGITAL ZOOM Zooming in when recording with sound, set [DIGITAL ZOOM] to [ON], audio is recorded with the movie. • When recording with sound, only the... pictures SHOOTING GUIDE 1 Shoot w/ effects preview. 2 Brightening subject. 3 Shooting into backlight. 4 Set particular lighting. 5 Blurring background. The camera automatically switches to shooting mode and allows you to set the target items by following the shooting guide displayed on your subject" (P.41) Button...
...m to display the shooting guide again. • To change the display. g "R (movies) Recording sound with movies" (P.45) "DIGITAL ZOOM Zooming in when recording with sound, set [DIGITAL ZOOM] to [ON], audio is recorded with the movie. • When recording with sound, only the... pictures SHOOTING GUIDE 1 Shoot w/ effects preview. 2 Brightening subject. 3 Shooting into backlight. 4 Set particular lighting. 5 Blurring background. The camera automatically switches to shooting mode and allows you to set the target items by following the shooting guide displayed on your subject" (P.41) Button...

SP-570UZ Instruction Manual (English)
Page 19
...OFF]. g "Control dial Index display/Calendar display/Close-up playback, index display and calendar display. Remove the battery and allow the camera to cool down for a long period will stop operation automatically. This is displayed. Or you press the button, the playback speed changes...in the following order: 1×; 2×; 20×; When the remaining recording time reaches 0, recording will cause the camera's internal temperature to rise and the camera may stop automatically. • When [IMAGE STABILIZER] is displayed. • Press the arrow pad to view other pictures...
...OFF]. g "Control dial Index display/Calendar display/Close-up playback, index display and calendar display. Remove the battery and allow the camera to cool down for a long period will stop operation automatically. This is displayed. Or you press the button, the playback speed changes...in the following order: 1×; 2×; 20×; When the remaining recording time reaches 0, recording will cause the camera's internal temperature to rise and the camera may stop automatically. • When [IMAGE STABILIZER] is displayed. • Press the arrow pad to view other pictures...

SP-570UZ Instruction Manual (English)
Page 20
... for pictures that have been shot continuously (Sequential Pictures Auto Playback) Only the first frame will be displayed for pictures taken with [COMBINE IN CAMERA 1] [COMBINE IN CAMERA 2] (Panorama playback) • Use the arrow pad to select a panoramic picture, and then press o. g "PANORAMA Taking and combining panoramic pictures" (P.36) Displaying pictures that...
... for pictures that have been shot continuously (Sequential Pictures Auto Playback) Only the first frame will be displayed for pictures taken with [COMBINE IN CAMERA 1] [COMBINE IN CAMERA 2] (Panorama playback) • Use the arrow pad to select a panoramic picture, and then press o. g "PANORAMA Taking and combining panoramic pictures" (P.36) Displaying pictures that...
