SP-510UZ Advanced Manual (English)
Page 1
DIGITAL CAMERA SP-510UZ Advanced Manual Quick Start Guide This manual will help you start to use your new camera, please read these instructions carefully to enjoy optimum performance and a longer service life. In the interest of continually improving products, Olympus reserves the right to get started using your camera before taking important photographs. Keep this manual...
DIGITAL CAMERA SP-510UZ Advanced Manual Quick Start Guide This manual will help you start to use your new camera, please read these instructions carefully to enjoy optimum performance and a longer service life. In the interest of continually improving products, Olympus reserves the right to get started using your camera before taking important photographs. Keep this manual...

SP-510UZ Advanced Manual (English)
Page 2
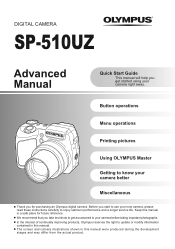
... effectively. 2 EN Contents Quick Start Guide P. 3 Button operations Menu operations Printing pictures Using OLYMPUS Master Getting to use your camera more about convenient functions and safety precautions on the camera. P. 76 Read about your camera better Miscellaneous P. 10 Test out the functions of each menu and their various settings. P. ... to print pictures you have taken. P. 46 Learn how to a computer and save them out on how to know your camera and learn what to the functions of the camera buttons by following the illustrations and actually trying them .
... effectively. 2 EN Contents Quick Start Guide P. 3 Button operations Menu operations Printing pictures Using OLYMPUS Master Getting to use your camera more about convenient functions and safety precautions on the camera. P. 76 Read about your camera better Miscellaneous P. 10 Test out the functions of each menu and their various settings. P. ... to print pictures you have taken. P. 46 Learn how to a computer and save them out on how to know your camera and learn what to the functions of the camera buttons by following the illustrations and actually trying them .
SP-510UZ Advanced Manual (English)
Page 3
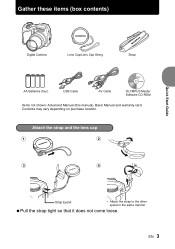
Pull the strap tight so that it does not come loose. Gather these items (box contents) Quick Start Guide Digital Camera Lens Cap/Lens Cap String Strap AA Batteries (four) USB Cable AV Cable OLYMPUS Master Software CD-ROM Items not shown: Advanced Manual (this manual), Basic Manual and warranty card. EN 3 Attach the strap and the lens cap 1 2 3 4 Strap Eyelet • Attach the strap to the other eyelet in the same manner. Contents may vary depending on purchase location.
Pull the strap tight so that it does not come loose. Gather these items (box contents) Quick Start Guide Digital Camera Lens Cap/Lens Cap String Strap AA Batteries (four) USB Cable AV Cable OLYMPUS Master Software CD-ROM Items not shown: Advanced Manual (this manual), Basic Manual and warranty card. EN 3 Attach the strap and the lens cap 1 2 3 4 Strap Eyelet • Attach the strap to the other eyelet in the same manner. Contents may vary depending on purchase location.

SP-510UZ Advanced Manual (English)
Page 4
Prepare the battery 1 3 2 4 Quick Start Guide 7 5 6 For details on inserting an optional xD-Picture Card (hereinafter called the card), please refer to "Inserting and removing the card" (P. 78). 4 EN
Prepare the battery 1 3 2 4 Quick Start Guide 7 5 6 For details on inserting an optional xD-Picture Card (hereinafter called the card), please refer to "Inserting and removing the card" (P. 78). 4 EN

SP-510UZ Advanced Manual (English)
Page 5
... by following the shooting guide displayed on the screen. Allows you to take pictures with full automatic settings. To turn off the camera, press the o button once again. b. EN 5 Press the o button. Set the mode dial to set . • To turn on the... camera in shooting mode. Turn the camera on This explains how to turn on the camera, press the POWER button after removing the lens cap. The camera automatically sets the optimum aperture value and shutter speed. a. s Allows you to h.
... by following the shooting guide displayed on the screen. Allows you to take pictures with full automatic settings. To turn off the camera, press the o button once again. b. EN 5 Press the o button. Set the mode dial to set . • To turn on the... camera in shooting mode. Turn the camera on This explains how to turn on the camera, press the POWER button after removing the lens cap. The camera automatically sets the optimum aperture value and shutter speed. a. s Allows you to h.

SP-510UZ Advanced Manual (English)
Page 6
... VIEW Button b. Press the q# button. 6 EN CANCEL MENU Y / M / D d. Press the sF button and the rQUICK VIEW button to select [M]. to select [Y]. • The first two digits of the year are fixed. Set date and time About the date and time setting screen X Y M D TIME Y / M / D CANCEL MENU Y-M-D (Year-Month-Day) Date formats (Y-M-D, M-D-Y, D-M-Y) Minute...
... VIEW Button b. Press the q# button. 6 EN CANCEL MENU Y / M / D d. Press the sF button and the rQUICK VIEW button to select [M]. to select [Y]. • The first two digits of the year are fixed. Set date and time About the date and time setting screen X Y M D TIME Y / M / D CANCEL MENU Y-M-D (Year-Month-Day) Date formats (Y-M-D, M-D-Y, D-M-Y) Minute...

SP-510UZ Advanced Manual (English)
Page 7
Press the sF button and the rQUICK VIEW button to select "hour", "minute". • The time is displayed in the 24-hour format. X Y M D TIME 2006.11.26 12:30 Y / M / D CANCEL MENU SET OK j. X Y M D TIME 2006.11.26 --:-- X Y M D TIME 2006.11.26 12:30 Y / M / D CANCEL MENU SET OK h. Press the q# button. o Button [] [IN] HQ 3072×2304 4 EN 7 Quick Start Guide e. Press the q# button. Press the sF button and the rQUICK VIEW button to select [D]. g. i. After all items have been set, press the o button. • For precise time setting, press the o button ...
Press the sF button and the rQUICK VIEW button to select "hour", "minute". • The time is displayed in the 24-hour format. X Y M D TIME 2006.11.26 12:30 Y / M / D CANCEL MENU SET OK j. X Y M D TIME 2006.11.26 --:-- X Y M D TIME 2006.11.26 12:30 Y / M / D CANCEL MENU SET OK h. Press the q# button. o Button [] [IN] HQ 3072×2304 4 EN 7 Quick Start Guide e. Press the q# button. Press the sF button and the rQUICK VIEW button to select [D]. g. i. After all items have been set, press the o button. • For precise time setting, press the o button ...

SP-510UZ Advanced Manual (English)
Page 8
Shoot Place this mark over your subject. The green lamp indicates the focus and exposure are locked. Focus c. Shutter Button (Pressed Completely) The card access lamp blinks. 8 EN Shoot a. Shutter Button (Pressed Halfway) [] [IN] HQ 3072×2304 4 The number of storable still pictures is displayed. Hold the camera Horizontal grip Vertical grip Quick Start Guide b.
Shoot Place this mark over your subject. The green lamp indicates the focus and exposure are locked. Focus c. Shutter Button (Pressed Completely) The card access lamp blinks. 8 EN Shoot a. Shutter Button (Pressed Halfway) [] [IN] HQ 3072×2304 4 The number of storable still pictures is displayed. Hold the camera Horizontal grip Vertical grip Quick Start Guide b.

SP-510UZ Advanced Manual (English)
Page 9
Quick Start Guide Arrow Pad Mode Dial Next Picture [IN] HQ Prev. above, display the picture you want to erase the image. Press the Y/S button. Press the sF button to select [YES], and press the o button to erase. ERASE [IN] YES NO Y/S Button BACK MENU SET OK c. As described in a. Picture '06.11.26 12:30 100-0001 1 Erase pictures a. sF Button ERASE BACK MENU YES NO SET OK EN 9 b. View pictures a. Set the mode dial to q.
Quick Start Guide Arrow Pad Mode Dial Next Picture [IN] HQ Prev. above, display the picture you want to erase the image. Press the Y/S button. Press the sF button to select [YES], and press the o button to erase. ERASE [IN] YES NO Y/S Button BACK MENU SET OK c. As described in a. Picture '06.11.26 12:30 100-0001 1 Erase pictures a. sF Button ERASE BACK MENU YES NO SET OK EN 9 b. View pictures a. Set the mode dial to q.
SP-510UZ Advanced Manual (English)
Page 10
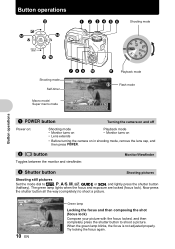
...Self-timer Macro mode/ Super macro mode 789 0 a Playback mode P 1/4000 F8.0 Flash mode [] [IN] HQ 3072×2304 4 1 o button Turning the camera on and off Power on: Shooting mode • Monitor turns on • Lens extends Playback mode • Monitor turns on • Before turning the... camera on in shooting mode, remove the lens cap, and then press o. 2 u button Toggles between the monitor and viewfinder. P 1/4000 F8.0 [] HQ ...
...Self-timer Macro mode/ Super macro mode 789 0 a Playback mode P 1/4000 F8.0 Flash mode [] [IN] HQ 3072×2304 4 1 o button Turning the camera on and off Power on: Shooting mode • Monitor turns on • Lens extends Playback mode • Monitor turns on • Before turning the... camera on in shooting mode, remove the lens cap, and then press o. 2 u button Toggles between the monitor and viewfinder. P 1/4000 F8.0 [] HQ ...

SP-510UZ Advanced Manual (English)
Page 11
Close-up playback • Pull the lever toward T to incrementally enlarge the picture up to display the [IN] pictures on the zoom button to 10 times the original size. W W Calendar display • Use the arrow pad to select the date, and press o or pull the lever toward W. Press the shutter button again to start recording. Recording movies Set the mode dial to n, and press the shutter button halfway to lock the focus, and then press the shutter button completely to stop recording. Button operations 4 Zoom lever Zooming while shooting/close -up playback Shooting mode: ...
Close-up playback • Pull the lever toward T to incrementally enlarge the picture up to display the [IN] pictures on the zoom button to 10 times the original size. W W Calendar display • Use the arrow pad to select the date, and press o or pull the lever toward W. Press the shutter button again to start recording. Recording movies Set the mode dial to n, and press the shutter button halfway to lock the focus, and then press the shutter button completely to stop recording. Button operations 4 Zoom lever Zooming while shooting/close -up playback Shooting mode: ...

SP-510UZ Advanced Manual (English)
Page 12
... t toon r s , DIS. g "DIS MOVIE MODE Reducing the blur incurred by camera movement or subject movement when taking pictures. g "DIS MODE Shooting still pictures using digital image stabilization" (P. 25) Movie shooting mode: Shooting with digital image stabilization This function reduces the blur incurred by camera movement when taking movies. Locking the focus position (AF lock...
... t toon r s , DIS. g "DIS MOVIE MODE Reducing the blur incurred by camera movement or subject movement when taking pictures. g "DIS MODE Shooting still pictures using digital image stabilization" (P. 25) Movie shooting mode: Shooting with digital image stabilization This function reduces the blur incurred by camera movement when taking movies. Locking the focus position (AF lock...
SP-510UZ Advanced Manual (English)
Page 13
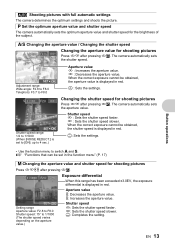
...value. o: Sets the settings. • Use the function menu to F8.0 Aperture value s : Increases the aperture value. o: Completes the setting. The camera automatically sets the shutter speed. [] SET OK Adjustment range: Wide angle: F2.8 to F8.0 Telephoto: F3.7 to switch A and S. q: Increases ...the aperture value. r : Sets the shutter speed slower. P Set the optimum aperture value and shutter speed The camera automatically sets the optimum aperture value and shutter speed for shooting pictures Press sr after pressing sF. When the correct exposure cannot be...
...value. o: Sets the settings. • Use the function menu to F8.0 Aperture value s : Increases the aperture value. o: Completes the setting. The camera automatically sets the shutter speed. [] SET OK Adjustment range: Wide angle: F2.8 to F8.0 Telephoto: F3.7 to switch A and S. q: Increases ...the aperture value. r : Sets the shutter speed slower. P Set the optimum aperture value and shutter speed The camera automatically sets the optimum aperture value and shutter speed for shooting pictures Press sr after pressing sF. When the correct exposure cannot be...
SP-510UZ Advanced Manual (English)
Page 14
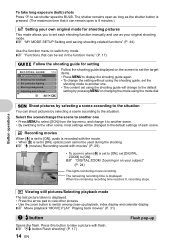
... for setting SHOOTING GUIDE 1/3 1 Brightening subject. 2 Shooting into backlight. 3 Set particular lighting. 4 Blurring background. 5 Adjusting area in when [R] is set to [ON], set [DIGITAL ZOOM] to switch my mode. To take long exposure (bulb) shots Press r to set shutter speed to take a picture with flash.... g "DIGITAL ZOOM Zooming in the function menu" (P. 17) g Follow the shooting guide for shooting pictures This mode allows you to select [SCN] from the ...
... for setting SHOOTING GUIDE 1/3 1 Brightening subject. 2 Shooting into backlight. 3 Set particular lighting. 4 Blurring background. 5 Adjusting area in when [R] is set to [ON], set [DIGITAL ZOOM] to switch my mode. To take long exposure (bulb) shots Press r to set shutter speed to take a picture with flash.... g "DIGITAL ZOOM Zooming in the function menu" (P. 17) g Follow the shooting guide for shooting pictures This mode allows you to select [SCN] from the ...

SP-510UZ Advanced Manual (English)
Page 15
Sets picture brightness for taking pictures. 8 DISP./E button Changing the information on display/Display the menu guide/Checking the time Changing the information displays Press DISP./E to change the display in the menu. g "u Displaying the histogram" (P. 44) g "FRAME ASSIST Displaying the frame assist/Determining the type of n. *2 Not displayed if it is set to [OFF] in the following order. Release DISP./E to display the menu guide. Button operations EN 15 Shooting mode Playback mode P 1/1000 F8.0 +2.0 Normal display $ [] ISO 1600 j% lR k[ I N ] n HQ 3072×2304...
Sets picture brightness for taking pictures. 8 DISP./E button Changing the information on display/Display the menu guide/Checking the time Changing the information displays Press DISP./E to change the display in the menu. g "u Displaying the histogram" (P. 44) g "FRAME ASSIST Displaying the frame assist/Determining the type of n. *2 Not displayed if it is set to [OFF] in the following order. Release DISP./E to display the menu guide. Button operations EN 15 Shooting mode Playback mode P 1/1000 F8.0 +2.0 Normal display $ [] ISO 1600 j% lR k[ I N ] n HQ 3072×2304...

SP-510UZ Advanced Manual (English)
Page 16
... and AF predict are not available. After blinking for setting. OFF & Macro mode % Super macro mode Cancels the macro mode. Checking the time While the camera is off, press DISP./E to display the set alarm time (when [ALARM CLOCK] is set for 2 seconds, the picture is taken. • To cancel the...
... and AF predict are not available. After blinking for setting. OFF & Macro mode % Super macro mode Cancels the macro mode. Checking the time While the camera is off, press DISP./E to display the set alarm time (when [ALARM CLOCK] is set for 2 seconds, the picture is taken. • To cancel the...

SP-510UZ Advanced Manual (English)
Page 17
... e rQUICK VIEW button Viewing pictures The last picture taken is set to set the aperture yourself and the camera automatically varies the shutter speed. To return to set the shutter speed yourself and the camera automatically varies the aperture. • Displayed when the mode dial is displayed on the monitor. s /2/3/4 Switching the...
... e rQUICK VIEW button Viewing pictures The last picture taken is set to set the aperture yourself and the camera automatically varies the shutter speed. To return to set the shutter speed yourself and the camera automatically varies the aperture. • Displayed when the mode dial is displayed on the monitor. s /2/3/4 Switching the...

SP-510UZ Advanced Manual (English)
Page 18
...operations, the button to be used and its function are displayed at g, press m to display the shooting guide screen. IMAGE QUALITY RESET CAMERA SETUP MENU SCN SILENT MODE EXIT MENU SET OK BACKym: Returns to select a setting. Top menu (in still picture shooting mode) IMAGE QUALITY ...PLAYBACK MENU], [EDIT], [ERASE], or [SETUP] is selected, the menu corresponding to the respective functions is displayed. • When your camera is set at the bottom of the monitor. Follow the guide for operations. Menu operations Menu operations Mode dial Menu operations m button Arrow ...
...operations, the button to be used and its function are displayed at g, press m to display the shooting guide screen. IMAGE QUALITY RESET CAMERA SETUP MENU SCN SILENT MODE EXIT MENU SET OK BACKym: Returns to select a setting. Top menu (in still picture shooting mode) IMAGE QUALITY ...PLAYBACK MENU], [EDIT], [ERASE], or [SETUP] is selected, the menu corresponding to the respective functions is displayed. • When your camera is set at the bottom of the monitor. Follow the guide for operations. Menu operations Menu operations Mode dial Menu operations m button Arrow ...

SP-510UZ Advanced Manual (English)
Page 19
...The menu item is set and the previous menu is displayed in [CAMERA MENU]. CAMERA MENU 1 DIGITAL ZOOM OFF 2 AF MODE iESP 3 FOCUS MODE AF 4 FULLTIME AF OFF 5 AF PREDICT OFF BACK MENU SET OK CAMERA MENU 1 DIGITAL ZOOM OFF 2 AF MODE ON 3 FOCUS MODE 4 FULLTIME AF ...CAMERA SETUP MENU SCN SILENT MODE WB ISO 4 DRIVE METERING 5 FINE ZOOM DIGITAL ZOOM QFLASH R (still pictures) PANORAMA*1 > SHARPNESS CONTRAST EXIT MENU SET OK AF MODE SATURATION FOCUS MODE NOISE REDUCT. 3 FULLTIME AF TIMELAPSE AF PREDICT R (movies) DIS MODE w #SYNCRO DIS MOVIE MODE *1 An OLYMPUS...
...The menu item is set and the previous menu is displayed in [CAMERA MENU]. CAMERA MENU 1 DIGITAL ZOOM OFF 2 AF MODE iESP 3 FOCUS MODE AF 4 FULLTIME AF OFF 5 AF PREDICT OFF BACK MENU SET OK CAMERA MENU 1 DIGITAL ZOOM OFF 2 AF MODE ON 3 FOCUS MODE 4 FULLTIME AF ...CAMERA SETUP MENU SCN SILENT MODE WB ISO 4 DRIVE METERING 5 FINE ZOOM DIGITAL ZOOM QFLASH R (still pictures) PANORAMA*1 > SHARPNESS CONTRAST EXIT MENU SET OK AF MODE SATURATION FOCUS MODE NOISE REDUCT. 3 FULLTIME AF TIMELAPSE AF PREDICT R (movies) DIS MODE w #SYNCRO DIS MOVIE MODE *1 An OLYMPUS...
SP-510UZ Advanced Manual (English)
Page 20
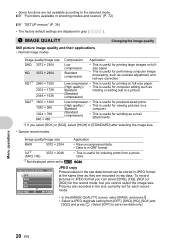
Pictures are recorded in raw data. Lowcompression • This is useful for printing on full-size paper. (High quality) / • This is useful for computer editing such as Standard rotating or adding text to a picture. (Standard compression) Lowcompression • This is useful for postcard-sized prints. (High quality) / • This is useful for viewing pictures on fullsize paper. • This is useful for ordering prints from [OFF], [SHQ], [HQ], [SQ1] and [SQ2] and press o. (Select [OFF] to h, s. • Some functions are displayed in gray ( ). 1 IMAGE QUALITY Still ...
Pictures are recorded in raw data. Lowcompression • This is useful for printing on full-size paper. (High quality) / • This is useful for computer editing such as Standard rotating or adding text to a picture. (Standard compression) Lowcompression • This is useful for postcard-sized prints. (High quality) / • This is useful for viewing pictures on fullsize paper. • This is useful for ordering prints from [OFF], [SHQ], [HQ], [SQ1] and [SQ2] and press o. (Select [OFF] to h, s. • Some functions are displayed in gray ( ). 1 IMAGE QUALITY Still ...
