
P-200 Instruction Manual (958 KB)
Page 5
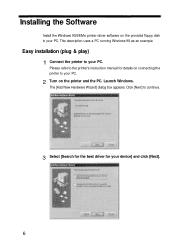
Click [Next] to continue. 3 Select [Search for the best driver for details on connecting the printer to your device] and click [Next]. 6 Please refer to your PC. The [Add New Hardware Wizard] dialog box appears. Launch Windows. Installing the Software Install the Windows 95/98/Me printer driver software on the provided floppy disk in your PC. This description uses a PC running Windows 98 as an example. Easy installation (plug & play) 1 Connect the printer to the printer's instruction manual for your PC. 2 Turn on the printer and the PC.
Click [Next] to continue. 3 Select [Search for the best driver for details on connecting the printer to your device] and click [Next]. 6 Please refer to your PC. The [Add New Hardware Wizard] dialog box appears. Launch Windows. Installing the Software Install the Windows 95/98/Me printer driver software on the provided floppy disk in your PC. This description uses a PC running Windows 98 as an example. Easy installation (plug & play) 1 Connect the printer to the printer's instruction manual for your PC. 2 Turn on the printer and the PC.
P-200 Instruction Manual (958 KB)
Page 9
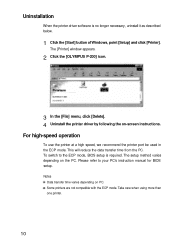
...] button ofWindows, point [Setup] and click [Printer]. Uninstallation When the printer driver software is required. This will reduce the data transfer time from the PC. The [Printer] window appears. 2 Click the [OLYMPUS P-200] icon. 3 In the [File] menu, click [Delete]. 4 Uninstall the printer driver by following the on PC. The setup method varies depending on...
...] button ofWindows, point [Setup] and click [Printer]. Uninstallation When the printer driver software is required. This will reduce the data transfer time from the PC. The [Printer] window appears. 2 Click the [OLYMPUS P-200] icon. 3 In the [File] menu, click [Delete]. 4 Uninstall the printer driver by following the on PC. The setup method varies depending on...
P-200 Instruction Manual (958 KB)
Page 10
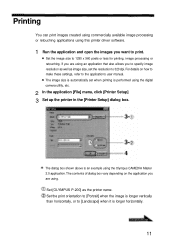
...depending on how to make these settings, refer to 1280 x 960 pixels or less for printing, image processing or retouching. Set [OLYMPUS P-200] as image size, set when printing is longer horizontally. 11 Set the print orientation to [Portrait] when the image is longer vertically... available image processing or retouching applications using . If you are using this printer driver software. 1 Run the application and open the images you to [Landscape] when it is performed using the Olympus CAMEDIA Master 2.0 application. For details on the application you are using an application...
...depending on how to make these settings, refer to 1280 x 960 pixels or less for printing, image processing or retouching. Set [OLYMPUS P-200] as image size, set when printing is longer horizontally. 11 Set the print orientation to [Portrait] when the image is longer vertically... available image processing or retouching applications using . If you are using this printer driver software. 1 Run the application and open the images you to [Landscape] when it is performed using the Olympus CAMEDIA Master 2.0 application. For details on the application you are using an application...
P-200 Instruction Manual (958 KB)
Page 16
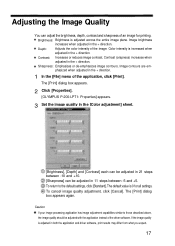
Contrast: Increases or reduces image contrast. The [Print] dialog box appears. 2 Click [Properties]. [OLYMPUS P-200-LPT1: Properties] appears. 3 Set the image quality in the [Color adjustment] sheet. [Brightness], [Depth] and [Contrast] each can be adjusted in 21 .... Sharpness: Emphasizes or de-emphasizes image contours. Image contours are emphasized when adjusted in the + direction. 1 In the [File] menu of the driver software. To return to those described above, the image quality should be adjusted with the application instead of the application, click [Print]. The [Print] dialog...
Contrast: Increases or reduces image contrast. The [Print] dialog box appears. 2 Click [Properties]. [OLYMPUS P-200-LPT1: Properties] appears. 3 Set the image quality in the [Color adjustment] sheet. [Brightness], [Depth] and [Contrast] each can be adjusted in 21 .... Sharpness: Emphasizes or de-emphasizes image contours. Image contours are emphasized when adjusted in the + direction. 1 In the [File] menu of the driver software. To return to those described above, the image quality should be adjusted with the application instead of the application, click [Print]. The [Print] dialog...