
P-200 Instruction Manual (958 KB)
Page 1
Keep this manual booklet in an easily accessible place for Windows 95/98/Me. DIGITAL COLOR PRINTER P-200 Installation Guide This Installation Guide explains how to install and use the Olympus P-200 Digital Printer software for future reference.
Keep this manual booklet in an easily accessible place for Windows 95/98/Me. DIGITAL COLOR PRINTER P-200 Installation Guide This Installation Guide explains how to install and use the Olympus P-200 Digital Printer software for future reference.
P-200 Instruction Manual (958 KB)
Page 8
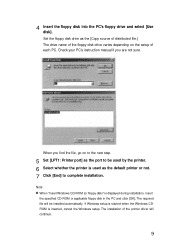
... file will continue. 9 Note When "Insert Windows CD-ROM (or floppy disk)" is inserted, cancel the Windows setup. 4 Insert the floppy disk into the PC's floppy drive and select [Use disk]. The installation of the floppy disk drive varies depending on to the next step. 5 Set [LPT1: Printer port] as the default printer or not. 7 Click [End] to be installed automatically. When you are not sure...
... file will continue. 9 Note When "Insert Windows CD-ROM (or floppy disk)" is inserted, cancel the Windows setup. 4 Insert the floppy disk into the PC's floppy drive and select [Use disk]. The installation of the floppy disk drive varies depending on to the next step. 5 Set [LPT1: Printer port] as the default printer or not. 7 Click [End] to be installed automatically. When you are not sure...
P-200 Instruction Manual (958 KB)
Page 10
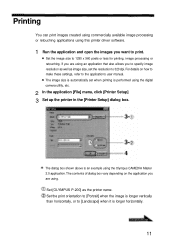
... image size is automatically set the resolution to print. Set [OLYMPUS P-200] as image size, set when printing is longer vertically than horizontally, or to the application's user manual. For details on the application you to 1280 x 960 pixels or less for printing, image processing or retouching. Set the print orientation to [Portrait] when the image is performed using this printer driver software. 1 Run the application and open the images you want to 320 dpi. Printing...
... image size is automatically set the resolution to print. Set [OLYMPUS P-200] as image size, set when printing is longer vertically than horizontally, or to the application's user manual. For details on the application you to 1280 x 960 pixels or less for printing, image processing or retouching. Set the print orientation to [Portrait] when the image is performed using this printer driver software. 1 Run the application and open the images you want to 320 dpi. Printing...
P-200 Instruction Manual (958 KB)
Page 12
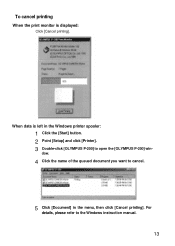
When data is displayed: Click [Cancel printing]. To cancel printing When the print monitor is left in the menu, then click [Cancel printing]. For details, please refer to open the [OLYMPUS P-200] win- dow. 4 Click the name of the queued document you want to cancel. 5 Click [Document] in the Windows printer spooler: 1 Click the [Start] button. 2 Point [Setup] and click [Printer]. 3 Double-click [OLYMPUS P-200] to the Windows instruction manual. 13
When data is displayed: Click [Cancel printing]. To cancel printing When the print monitor is left in the menu, then click [Cancel printing]. For details, please refer to open the [OLYMPUS P-200] win- dow. 4 Click the name of the queued document you want to cancel. 5 Click [Document] in the Windows printer spooler: 1 Click the [Start] button. 2 Point [Setup] and click [Printer]. 3 Double-click [OLYMPUS P-200] to the Windows instruction manual. 13
P-200 Instruction Manual (958 KB)
Page 17
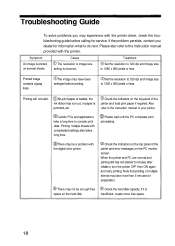
.... Printing multiple sheets with the printer driver, check the troubleshooting guide before printing. Check the indicators on the top panel of the printer and toad print paper if required. Symptom Cause Treatment An image is space on the top panel of the printer and error messages on several sheets. Printing will not start. Set the resolution to 320 dpi and image size to 1280 x 960 pixels or less. Also refer to the instruction manual...
.... Printing multiple sheets with the printer driver, check the troubleshooting guide before printing. Check the indicators on the top panel of the printer and toad print paper if required. Symptom Cause Treatment An image is space on the top panel of the printer and error messages on several sheets. Printing will not start. Set the resolution to 320 dpi and image size to 1280 x 960 pixels or less. Also refer to the instruction manual...
P-200 Instruction Manual (958 KB)
Page 18
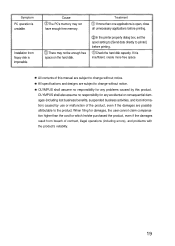
... free space. All specifications and designs are subject to change without notice. Cause The PC's memory may not be enough free space on the hard disk. OLYMPUS shall also assume no responsibility for any problems caused by use or malfunction of contract, illegal operations (including errors), and problems with the product's reliability. 19 There may not have enough free memory. Symptom PC operation is open...
... free space. All specifications and designs are subject to change without notice. Cause The PC's memory may not be enough free space on the hard disk. OLYMPUS shall also assume no responsibility for any problems caused by use or malfunction of contract, illegal operations (including errors), and problems with the product's reliability. 19 There may not have enough free memory. Symptom PC operation is open...

P-200 Instruction Manual (958 KB)
Page 22
... P-200 digital color printer 12 Identifying the parts 13 Setup Setting up the printer 15 Connecting the power supply ...... 15 Using print packs 17 Loading the ink ribbon cartridge ....... 18 Handling the ink ribbon cartridge 20 Loading print paper 21 Loading print paper in the paper feed cassette 21 Installing the paper feed cassette onto the printer 22 Other Printing Functions Making split prints 31 Making split prints of the same image 31 Index print 32 Printing all recorded images in a SmartMedia or CompactFlash card ... 34 Printing DPOF-reserved images......... 36 Printing the...
... P-200 digital color printer 12 Identifying the parts 13 Setup Setting up the printer 15 Connecting the power supply ...... 15 Using print packs 17 Loading the ink ribbon cartridge ....... 18 Handling the ink ribbon cartridge 20 Loading print paper 21 Loading print paper in the paper feed cassette 21 Installing the paper feed cassette onto the printer 22 Other Printing Functions Making split prints 31 Making split prints of the same image 31 Index print 32 Printing all recorded images in a SmartMedia or CompactFlash card ... 34 Printing DPOF-reserved images......... 36 Printing the...

P-200 Instruction Manual (958 KB)
Page 30
E2AC AC power adapter (1) Paper feed cassette (1) CB-200UC power cord (1) Rear cover (installed to the printer body) Sample kit [Ink ribbon cartridge (1) and standard paper (25 sheets)] Instruction manual (1) Limited warranty card (1) Getting Started 11 If you are supplied with your dealer immediately. Getting Started Unpacking the printer Make sure that the following accessories are missing any of these accessories, contact your printer.
E2AC AC power adapter (1) Paper feed cassette (1) CB-200UC power cord (1) Rear cover (installed to the printer body) Sample kit [Ink ribbon cartridge (1) and standard paper (25 sheets)] Instruction manual (1) Limited warranty card (1) Getting Started 11 If you are supplied with your dealer immediately. Getting Started Unpacking the printer Make sure that the following accessories are missing any of these accessories, contact your printer.

P-200 Instruction Manual (958 KB)
Page 31
... to 30 recorded images on printing images from SmartMedia or CompactFlash recorded with high-quality overcoating featuring excellent storability and durability to preserve important pictures for an extended period. 25-sheet continuous printing The supplied paper feed cassette can supply up to 25 sheets of print paper continuously to the Installation Guide provided with the optional P-200 connection kit.) High-quality overcoated prints The standard print paper is coated with Olympus digital cameras. Making a variety of printed images.
... to 30 recorded images on printing images from SmartMedia or CompactFlash recorded with high-quality overcoating featuring excellent storability and durability to preserve important pictures for an extended period. 25-sheet continuous printing The supplied paper feed cassette can supply up to 25 sheets of print paper continuously to the Installation Guide provided with the optional P-200 connection kit.) High-quality overcoated prints The standard print paper is coated with Olympus digital cameras. Making a variety of printed images.

P-200 Instruction Manual (958 KB)
Page 34
... want to use the AC adapter as the power supply to malfunction. Leaving the printer unplugged in printing mode may cause it to the printer, remove the rechargeable battery if possible. The printer turns ON with a short beep. If the printer power cord is displayed. 5. Press and hold the POWER button for more than 1.5 seconds. 4. Plug the printer power cord into the printer's DC power input connector. 3. This will turn off and the printer turns OFF...
... want to use the AC adapter as the power supply to malfunction. Leaving the printer unplugged in printing mode may cause it to the printer, remove the rechargeable battery if possible. The printer turns ON with a short beep. If the printer power cord is displayed. 5. Press and hold the POWER button for more than 1.5 seconds. 4. Plug the printer power cord into the printer's DC power input connector. 3. This will turn off and the printer turns OFF...

P-200 Instruction Manual (958 KB)
Page 36
... the paper feed cassette position (by about 2 mm), then remove the battery by sliding it in the opposite direction from when it . lights (turns off automatically): The battery is not connected. lights: No remaining battery power. A few pages may be printed but battery power may run out before printing is sufficient. Purpose (Printing) Standard Print Pack P-25N Print Paper Standard Ink Ribbon Cartridge For 25 prints Setup 17 Install the rear cover in the same carton. • Do not print on used print paper...
... the paper feed cassette position (by about 2 mm), then remove the battery by sliding it in the opposite direction from when it . lights (turns off automatically): The battery is not connected. lights: No remaining battery power. A few pages may be printed but battery power may run out before printing is sufficient. Purpose (Printing) Standard Print Pack P-25N Print Paper Standard Ink Ribbon Cartridge For 25 prints Setup 17 Install the rear cover in the same carton. • Do not print on used print paper...

P-200 Instruction Manual (958 KB)
Page 43
..., check the SmartMedia insertion orientation and retry insertion from the beginning. • The image recorded in the printer. Doing so could destroy the card's formatting, making it was recorded using an Olympus digital camera. The control panel also shows the card type (SmartMedia) and the frame number of the last recorded image. The ACCESS/CHARGE indicator on the operation panel is turned ON.) (without any card) Opening the card cover Open...
..., check the SmartMedia insertion orientation and retry insertion from the beginning. • The image recorded in the printer. Doing so could destroy the card's formatting, making it was recorded using an Olympus digital camera. The control panel also shows the card type (SmartMedia) and the frame number of the last recorded image. The ACCESS/CHARGE indicator on the operation panel is turned ON.) (without any card) Opening the card cover Open...

P-200 Instruction Manual (958 KB)
Page 45
... destroy the CompactFlash formatting, making it . • Keep the card cover open while CompactFlash is inserted in CompactFlash should be printed as it again to "Troubleshooting" on the operation panel is displayed (-E-) during insertion, retry insertion from the SmartMedia card, press the SmartMedia/ CompactFlash button to insert or remove CompactFlash while the ACCESS/CHARGE indicator on page 40. Notes • Always use data from the beginning. Even...
... destroy the CompactFlash formatting, making it . • Keep the card cover open while CompactFlash is inserted in CompactFlash should be printed as it again to "Troubleshooting" on the operation panel is displayed (-E-) during insertion, retry insertion from the SmartMedia card, press the SmartMedia/ CompactFlash button to insert or remove CompactFlash while the ACCESS/CHARGE indicator on page 40. Notes • Always use data from the beginning. Even...

P-200 Instruction Manual (958 KB)
Page 48
... replace the ink ribbon cartridge with a new one. Cautions • Never attempt to insert or remove the SmartMedia or CompactFlash card while the ACCESS/CHARGE indicator on the operation panel is being loaded, and the PRINTING indicator lights when printing starts. Should you remove the paper feed cassette by mistake, see page 43. • Never move the printer during printing: The printer beeps repeatedly, and the PAPER/ RIBBON alarm indicator on the top panel blinks...
... replace the ink ribbon cartridge with a new one. Cautions • Never attempt to insert or remove the SmartMedia or CompactFlash card while the ACCESS/CHARGE indicator on the operation panel is being loaded, and the PRINTING indicator lights when printing starts. Should you remove the paper feed cassette by mistake, see page 43. • Never move the printer during printing: The printer beeps repeatedly, and the PAPER/ RIBBON alarm indicator on the top panel blinks...

P-200 Instruction Manual (958 KB)
Page 49
... print surface to remove the ink ribbon cartridge or cause a paper jam. Printer malfunction may result if the printer is left in the printer. Therefore, you disconnect or remove the power supply by hand even when it . To cancel printing: Press and hold the POWER button for each printed sheet. Printing of any non-print copies is canceled, printing stops and the printer turns OFF. The control panel will turn off and the printer will turn...
... print surface to remove the ink ribbon cartridge or cause a paper jam. Printer malfunction may result if the printer is left in the printer. Therefore, you disconnect or remove the power supply by hand even when it . To cancel printing: Press and hold the POWER button for each printed sheet. Printing of any non-print copies is canceled, printing stops and the printer turns OFF. The control panel will turn off and the printer will turn...

P-200 Instruction Manual (958 KB)
Page 53
... printing: Turn the printer ON. 1 To print all the images recorded on a SmartMedia or CompactFlash card, press the PRINT MODE button until the all-frame display appears on the card will be printed in reverse order starting frame number when printing all images. Make sure that the last frame number is selected. SPLIT button PRINT MODE button NUMBER button (+) and (-) buttons PRINT button PAPER/RIBBON alarm indicator PRINTING indicator Note • In all-frame printing, all recorded images on the control panel. 34 Other Printing Functions Printing all recorded images...
... printing: Turn the printer ON. 1 To print all the images recorded on a SmartMedia or CompactFlash card, press the PRINT MODE button until the all-frame display appears on the card will be printed in reverse order starting frame number when printing all images. Make sure that the last frame number is selected. SPLIT button PRINT MODE button NUMBER button (+) and (-) buttons PRINT button PAPER/RIBBON alarm indicator PRINTING indicator Note • In all-frame printing, all recorded images on the control panel. 34 Other Printing Functions Printing all recorded images...

P-200 Instruction Manual (958 KB)
Page 59
... battery frame is displayed on it, the remaining battery power is not connected. Turn the printer ON again and wait until the file printing completes. The ink ribbon cartridge is not installed. Connect the AC adapter properly. (Page 15) Rechargeable battery is not installed. Install the rechargeable battery. (Page 16) The remaining battery power is communicating with any of operation buttons. Printing takes a long time to print a TIFF file. The printer takes about 2 minutes. Cannot print. Remove jammed paper and retry printing. (Page 21) The printer...
... battery frame is displayed on it, the remaining battery power is not connected. Turn the printer ON again and wait until the file printing completes. The ink ribbon cartridge is not installed. Connect the AC adapter properly. (Page 15) Rechargeable battery is not installed. Install the rechargeable battery. (Page 16) The remaining battery power is communicating with any of operation buttons. Printing takes a long time to print a TIFF file. The printer takes about 2 minutes. Cannot print. Remove jammed paper and retry printing. (Page 21) The printer...
P-200 Instruction Manual (958 KB)
Page 60
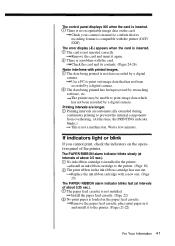
... time, the PRINTING indicator blinks.) This is not a malfunction. Replace the ink ribbon cartridge with the card. The paper feed cassette is inserted. Printing intervals are automatically extended during continuous printing to the printer. (Pages 21-22) For Your Information 41 Use a PC to confirm that has not been recorded by a digital camera. The control panel displays 000 when the card is not installed. Check your camera's manual to print out image data that its contents. (Pages...
... time, the PRINTING indicator blinks.) This is not a malfunction. Replace the ink ribbon cartridge with the card. The paper feed cassette is inserted. Printing intervals are automatically extended during continuous printing to the printer. (Pages 21-22) For Your Information 41 Use a PC to confirm that has not been recorded by a digital camera. The control panel displays 000 when the card is not installed. Check your camera's manual to print out image data that its contents. (Pages...

P-200 Instruction Manual (958 KB)
Page 61
... lights. The cartridge compartment lid is being accessed. Consult your dealer. The SmartMedia or CompactFlash card is open. Wait a few minutes. Trimming process is jammed, the ERROR, PAPER/RIBBON and PRINTING indicators blink and printing stops. If print paper is jammed If print paper is underway. Turn the printer ON again to automatically eject the print paper from the paper feed cassette compartment to remove by hand, pull it out. 5. If jammed print paper cannot be removed, do not re-install...
... lights. The cartridge compartment lid is being accessed. Consult your dealer. The SmartMedia or CompactFlash card is open. Wait a few minutes. Trimming process is jammed, the ERROR, PAPER/RIBBON and PRINTING indicators blink and printing stops. If print paper is jammed If print paper is underway. Turn the printer ON again to automatically eject the print paper from the paper feed cassette compartment to remove by hand, pull it out. 5. If jammed print paper cannot be removed, do not re-install...

P-200 Instruction Manual (958 KB)
Page 63
... period of time, remove the print paper from the paper feed cassette and store the paper in a bag in order to direct sunlight, high temperature/ humidity or in compliance with a new one. About the ink ribbon cartridge and print paper Always use the ink ribbon cartridge and print paper specified by ordering the following Olympus model number (as of October 2000). Print Pack, Standard Set: P-25N The standard set contains an ink ribbon cartridge and sheets of about 0.5 second). Replace the ink ribbon cartridge with the...
... period of time, remove the print paper from the paper feed cassette and store the paper in a bag in order to direct sunlight, high temperature/ humidity or in compliance with a new one. About the ink ribbon cartridge and print paper Always use the ink ribbon cartridge and print paper specified by ordering the following Olympus model number (as of October 2000). Print Pack, Standard Set: P-25N The standard set contains an ink ribbon cartridge and sheets of about 0.5 second). Replace the ink ribbon cartridge with the...