
P-200 Instruction Manual (958 KB)
Page 1
Keep this manual booklet in an easily accessible place for Windows 95/98/Me. DIGITAL COLOR PRINTER P-200 Installation Guide This Installation Guide explains how to install and use the Olympus P-200 Digital Printer software for future reference.
Keep this manual booklet in an easily accessible place for Windows 95/98/Me. DIGITAL COLOR PRINTER P-200 Installation Guide This Installation Guide explains how to install and use the Olympus P-200 Digital Printer software for future reference.
P-200 Instruction Manual (958 KB)
Page 5
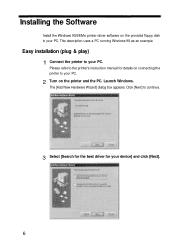
Launch Windows. This description uses a PC running Windows 98 as an example. Click [Next] to continue. 3 Select [Search for the best driver for details on connecting the printer to your device] and click [Next]. 6 Installing the Software Install the Windows 95/98/Me printer driver software on the printer and the PC. Easy installation (plug & play) 1 Connect the printer to your PC. 2 Turn on the provided floppy disk in your PC. The [Add New Hardware Wizard] dialog box appears. Please refer to the printer's instruction manual for your PC.
Launch Windows. This description uses a PC running Windows 98 as an example. Click [Next] to continue. 3 Select [Search for the best driver for details on connecting the printer to your device] and click [Next]. 6 Installing the Software Install the Windows 95/98/Me printer driver software on the printer and the PC. Easy installation (plug & play) 1 Connect the printer to your PC. 2 Turn on the provided floppy disk in your PC. The [Add New Hardware Wizard] dialog box appears. Please refer to the printer's instruction manual for your PC.
P-200 Instruction Manual (958 KB)
Page 7
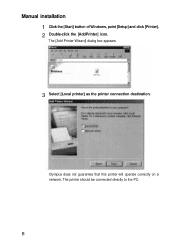
The printer should be connected directly to the PC. 8 The [Add Printer Wizard] dialog box appears. 3 Select [Local printer] as the printer connection destination. Olympus does not guarantee that this printer will operate correctly on a network. Manual installation 1 Click the [Start] button ofWindows, point [Setup] and click [Printer]. 2 Double-click the [AddPrinter] icon.
The printer should be connected directly to the PC. 8 The [Add Printer Wizard] dialog box appears. 3 Select [Local printer] as the printer connection destination. Olympus does not guarantee that this printer will operate correctly on a network. Manual installation 1 Click the [Start] button ofWindows, point [Setup] and click [Printer]. 2 Double-click the [AddPrinter] icon.
P-200 Instruction Manual (958 KB)
Page 8
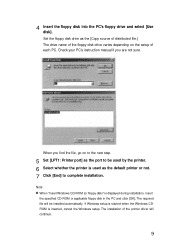
... will be installed automatically. The installation of each PC. Note When "Insert Windows CD-ROM (or floppy disk)" is used by the printer. 6 Select whether the printer is displayed during installation, insert the specified CD-ROM or applicable floppy disk in the PC and click [OK], The required file will continue. 9... When you are not sure. Set the floppy disk drive as the port to be used as the default printer or not. 7 Click [End] to the next step. 5 Set [LPT1: Printer port] as the [Copy source of distributed file.] The drive name of the floppy disk drive varies depending on to...
... will be installed automatically. The installation of each PC. Note When "Insert Windows CD-ROM (or floppy disk)" is used by the printer. 6 Select whether the printer is displayed during installation, insert the specified CD-ROM or applicable floppy disk in the PC and click [OK], The required file will continue. 9... When you are not sure. Set the floppy disk drive as the port to be used as the default printer or not. 7 Click [End] to the next step. 5 Set [LPT1: Printer port] as the [Copy source of distributed file.] The drive name of the floppy disk drive varies depending on to...
P-200 Instruction Manual (958 KB)
Page 9
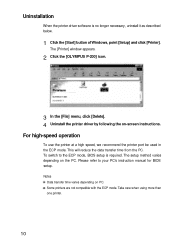
... necessary, uninstall it as described below. 1 Click the [Start] button ofWindows, point [Setup] and click [Printer]. The [Printer] window appears. 2 Click the [OLYMPUS P-200] icon. 3 In the [File] menu, click [Delete]. 4 Uninstall the printer driver by following the on-screen instructions. Uninstallation When the printer driver software is required. For high-speed operation To use the...
... necessary, uninstall it as described below. 1 Click the [Start] button ofWindows, point [Setup] and click [Printer]. The [Printer] window appears. 2 Click the [OLYMPUS P-200] icon. 3 In the [File] menu, click [Delete]. 4 Uninstall the printer driver by following the on-screen instructions. Uninstallation When the printer driver software is required. For high-speed operation To use the...
P-200 Instruction Manual (958 KB)
Page 10
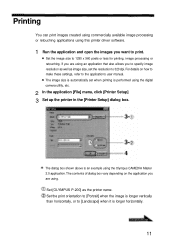
...dialog box shown above is longer horizontally. 11 Set [OLYMPUS P-200] as image size, set when printing is performed using the digital camera utility, etc. 2 In the application [File] menu, click [Printer Setup] 3 Set up the printer in the [Printer Setup] dialog box. Set the image size to ...images created using commercially available image processing or retouching applications using this printer driver software. 1 Run the application and open the images you want to [Landscape] when it is an example using the Olympus CAMEDIA Master 2.0 application. The image size is automatically set the ...
...dialog box shown above is longer horizontally. 11 Set [OLYMPUS P-200] as image size, set when printing is performed using the digital camera utility, etc. 2 In the application [File] menu, click [Printer Setup] 3 Set up the printer in the [Printer Setup] dialog box. Set the image size to ...images created using commercially available image processing or retouching applications using this printer driver software. 1 Run the application and open the images you want to [Landscape] when it is an example using the Olympus CAMEDIA Master 2.0 application. The image size is automatically set the ...
P-200 Instruction Manual (958 KB)
Page 11
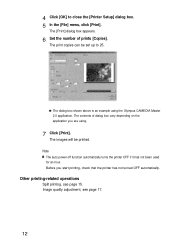
... dialog box shown above is an example using . 7 Click [Print]. The contents of prints [Copies]. The images will be set up to close the [Printer Setup] dialog box. 5 In the [File] menu, click [Print]. The [Print] dialog box appears. 6 Set the number of dialog box vary depending...OFF automatically. The print copies can be printed. Note The auto power off function automatically turns the printer OFF if it has not been used for an hour. Before you are using the Olympus CAMEDIA Master 2.0 application. Other printing-related operations Split printing, see page 17. 12 Image quality ...
... dialog box shown above is an example using . 7 Click [Print]. The contents of prints [Copies]. The images will be set up to close the [Printer Setup] dialog box. 5 In the [File] menu, click [Print]. The [Print] dialog box appears. 6 Set the number of dialog box vary depending...OFF automatically. The print copies can be printed. Note The auto power off function automatically turns the printer OFF if it has not been used for an hour. Before you are using the Olympus CAMEDIA Master 2.0 application. Other printing-related operations Split printing, see page 17. 12 Image quality ...
P-200 Instruction Manual (958 KB)
Page 12
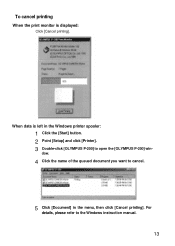
To cancel printing When the print monitor is left in the menu, then click [Cancel printing]. When data is displayed: Click [Cancel printing]. dow. 4 Click the name of the queued document you want to cancel. 5 Click [Document] in the Windows printer spooler: 1 Click the [Start] button. 2 Point [Setup] and click [Printer]. 3 Double-click [OLYMPUS P-200] to the Windows instruction manual. 13 For details, please refer to open the [OLYMPUS P-200] win-
To cancel printing When the print monitor is left in the menu, then click [Cancel printing]. When data is displayed: Click [Cancel printing]. dow. 4 Click the name of the queued document you want to cancel. 5 Click [Document] in the Windows printer spooler: 1 Click the [Start] button. 2 Point [Setup] and click [Printer]. 3 Double-click [OLYMPUS P-200] to the Windows instruction manual. 13 For details, please refer to open the [OLYMPUS P-200] win-

P-200 Instruction Manual (958 KB)
Page 13
... and image size is determined according to the display color setting of some applications is especially important. Information on more than one sheet of the printer).
... and image size is determined according to the display color setting of some applications is especially important. Information on more than one sheet of the printer).

P-200 Instruction Manual (958 KB)
Page 15
Images can be printed in one of the application you are using for more information on settings. Please refer to 1280 x 960 pixels. Note Print preview is not available. 16 Single 2-split print 4-split print 9-split print 16-split print To obtain correct split prints (with an application that prints images according to the resolution of the printer): Set the resolution to 320 dpi and image size to the instruction manual of the following split methods.
Images can be printed in one of the application you are using for more information on settings. Please refer to 1280 x 960 pixels. Note Print preview is not available. 16 Single 2-split print 4-split print 9-split print 16-split print To obtain correct split prints (with an application that prints images according to the resolution of the printer): Set the resolution to 320 dpi and image size to the instruction manual of the following split methods.
P-200 Instruction Manual (958 KB)
Page 17
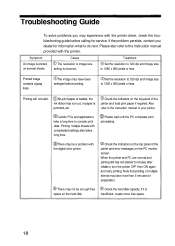
...screen. If the problem persists, contact you may experience with the digital color printer. Check the indicators on the top panel of the printer and error messages on the top panel of the printer and toad print paper if required. Certain PCs and applications take more free space.... There may take a long time to compile print data. Please wait until the PC completes print processing. Note that printing of your printer. There may have been enlarged before calling for service. Symptom Cause Treatment An image is space on several sheets. Troubleshooting Guide To solve ...
...screen. If the problem persists, contact you may experience with the digital color printer. Check the indicators on the top panel of the printer and error messages on the top panel of the printer and toad print paper if required. Certain PCs and applications take more free space.... There may take a long time to compile print data. Please wait until the PC completes print processing. Note that printing of your printer. There may have been enlarged before calling for service. Symptom Cause Treatment An image is space on several sheets. Troubleshooting Guide To solve ...
P-200 Instruction Manual (958 KB)
Page 18
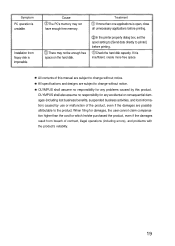
...the hard disk. If it is unstable. All contents of this product. In the printer property dialog box, set the spool setting to [Send data directly to printer] before printing. OLYMPUS shall assume no responsibility for which he/she purchased the product, even if the damages...to change without notice. All specifications and designs are subject to change without notice. There may not have enough free memory. OLYMPUS shall also assume no responsibility for damages, the user cannot claim compensation higher than one applications is impossible. Symptom PC operation is...
...the hard disk. If it is unstable. All contents of this product. In the printer property dialog box, set the spool setting to [Send data directly to printer] before printing. OLYMPUS shall assume no responsibility for which he/she purchased the product, even if the damages...to change without notice. All specifications and designs are subject to change without notice. There may not have enough free memory. OLYMPUS shall also assume no responsibility for damages, the user cannot claim compensation higher than one applications is impossible. Symptom PC operation is...

P-200 Instruction Manual (958 KB)
Page 20
Before using this product, read this Olympus digital color printer. P-200 Digital Color Printer Instructions Thank you for purchasing this manual carefully to ensure correct use.
Before using this product, read this Olympus digital color printer. P-200 Digital Color Printer Instructions Thank you for purchasing this manual carefully to ensure correct use.

P-200 Instruction Manual (958 KB)
Page 22
... Introduction 4 Precautions 4 Safety precautions 5 Care and storage 10 Getting Started Unpacking the printer 11 What you can do with the P-200 digital color printer 12 Identifying the parts 13 Setup Setting up the printer 15 Connecting the power supply ...... 15 Using print packs 17 Loading the ink ribbon ... cartridge 20 Loading print paper 21 Loading print paper in the paper feed cassette 21 Installing the paper feed cassette onto the printer 22 Other Printing Functions Making split prints 31 Making split prints of the same image 31 Index print 32 Printing all recorded...
... Introduction 4 Precautions 4 Safety precautions 5 Care and storage 10 Getting Started Unpacking the printer 11 What you can do with the P-200 digital color printer 12 Identifying the parts 13 Setup Setting up the printer 15 Connecting the power supply ...... 15 Using print packs 17 Loading the ink ribbon ... cartridge 20 Loading print paper 21 Loading print paper in the paper feed cassette 21 Installing the paper feed cassette onto the printer 22 Other Printing Functions Making split prints 31 Making split prints of the same image 31 Index print 32 Printing all recorded...

P-200 Instruction Manual (958 KB)
Page 23
... printed. 4 Notes for illustrations used in this manual Illustrations in this OLYMPUS digital color printer. Keep this manual and warranty carefully. Duplication restrictions If duplicating documents with the printer, pay special attention to ensure safe and proper handling and operation of the.... Introduction Thank you use the duplications for future reference and when requesting service. Precautions Before using the printer, read the safety precautions on your printer. Read this manual handy for explanatory purposes only. They may differ from what is also against the ...
... printed. 4 Notes for illustrations used in this manual Illustrations in this OLYMPUS digital color printer. Keep this manual and warranty carefully. Duplication restrictions If duplicating documents with the printer, pay special attention to ensure safe and proper handling and operation of the.... Introduction Thank you use the duplications for future reference and when requesting service. Precautions Before using the printer, read the safety precautions on your printer. Read this manual handy for explanatory purposes only. They may differ from what is also against the ...

P-200 Instruction Manual (958 KB)
Page 24
... unplug the power cord and remove the optional rechargeable battery. Be careful not to touch any liquid or foreign objects get into the printer, unplug the power cord and remove the optional rechargeable battery. This manual uses the following icons to indicate hazardous situations. Then contact ...your dealer. Using the printer when the cabinet is damaged may cause fire or electric shock. Then contact your dealer. This may cause fire or electric shock. ...
... unplug the power cord and remove the optional rechargeable battery. Be careful not to touch any liquid or foreign objects get into the printer, unplug the power cord and remove the optional rechargeable battery. This manual uses the following icons to indicate hazardous situations. Then contact ...your dealer. Using the printer when the cabinet is damaged may cause fire or electric shock. Then contact your dealer. This may cause fire or electric shock. ...

P-200 Instruction Manual (958 KB)
Page 25
...power cord is dropped, it may result in the following places. Do not place liquids on the cord. Doing so may be damaged. Use the printer in fire or electric shock. To prevent the cord from being damaged, DO NOT: Jerk the cord to direct sunlight (for example, inside . Rewire... the cord. Do not disassemble or modify the printer. If liquid gets into the printer, it may deform the printer cabinet, resulting in an environment with an ambient temperature between 41 to 95°F (5 to 35°C) and humidity of ...
...power cord is dropped, it may result in the following places. Do not place liquids on the cord. Doing so may be damaged. Use the printer in fire or electric shock. To prevent the cord from being damaged, DO NOT: Jerk the cord to direct sunlight (for example, inside . Rewire... the cord. Do not disassemble or modify the printer. If liquid gets into the printer, it may deform the printer cabinet, resulting in an environment with an ambient temperature between 41 to 95°F (5 to 35°C) and humidity of ...

P-200 Instruction Manual (958 KB)
Page 26
...the power cord plug with other particles (such as inside a plastic bag. Do not overload the power outlet. WARNING Do not use the printer with a power supply other than that excessive dust and foreign matter do not accumulate on the power cord. The induced electricity from storms ... Immediately unplug the power cord when an electric storm starts outside. Doing so may cause fire, electric shock, or printer malfunction. Incorrect voltage may cause a fire or electric shock. This printer should be plugged into the outlet. Push the plug all the way into a separate 110-120 V AC, 60...
...the power cord plug with other particles (such as inside a plastic bag. Do not overload the power outlet. WARNING Do not use the printer with a power supply other than that excessive dust and foreign matter do not accumulate on the power cord. The induced electricity from storms ... Immediately unplug the power cord when an electric storm starts outside. Doing so may cause fire, electric shock, or printer malfunction. Incorrect voltage may cause a fire or electric shock. This printer should be plugged into the outlet. Push the plug all the way into a separate 110-120 V AC, 60...

P-200 Instruction Manual (958 KB)
Page 27
... unplug the power cord. To recharge the battery, mount it in a fire. Never disassemble, destroy or short-circuit the battery, or throw it on the printer. Doing so may cause the battery service life to local regulations. WARNING Observe the following when using the optional B-200NH rechargeable battery. Dispose of the...
... unplug the power cord. To recharge the battery, mount it in a fire. Never disassemble, destroy or short-circuit the battery, or throw it on the printer. Doing so may cause the battery service life to local regulations. WARNING Observe the following when using the optional B-200NH rechargeable battery. Dispose of the...

P-200 Instruction Manual (958 KB)
Page 28
... will not be used for an extended period of time (for an extended period of time. Do not block the vent. Do not put the printer on a long trip.) Otherwise, deteriorated insulation or leakage current may cause fire or electric shock. This applies especially to children and those unfamiliar with poor... the power cord is not Installed, mount the rear cover. 9 To unplug the power cord, hold it may cause electric shock. If the printer falls, it by the plug. Do not pull the cord with a jerk. Doing so may damage the cord, possibly resulting in fire or electric shock. ...
... will not be used for an extended period of time (for an extended period of time. Do not block the vent. Do not put the printer on a long trip.) Otherwise, deteriorated insulation or leakage current may cause fire or electric shock. This applies especially to children and those unfamiliar with poor... the power cord is not Installed, mount the rear cover. 9 To unplug the power cord, hold it may cause electric shock. If the printer falls, it by the plug. Do not pull the cord with a jerk. Doing so may damage the cord, possibly resulting in fire or electric shock. ...