
P-200 Instruction Manual (958 KB)
Page 10
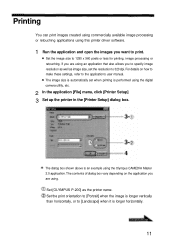
Set [OLYMPUS P-200] as image size, set when printing is longer horizontally. 11 Set the image size to print. The contents of dialog box vary depending on how ... is longer vertically than horizontally, or to 320 dpi. The image size is automatically set the resolution to [Landscape] when it is performed using the Olympus CAMEDIA Master 2.0 application. For details on the application you want to 1280 x 960 pixels or less for printing, image processing or retouching. The dialog box shown...
Set [OLYMPUS P-200] as image size, set when printing is longer horizontally. 11 Set the image size to print. The contents of dialog box vary depending on how ... is longer vertically than horizontally, or to 320 dpi. The image size is automatically set the resolution to [Landscape] when it is performed using the Olympus CAMEDIA Master 2.0 application. For details on the application you want to 1280 x 960 pixels or less for printing, image processing or retouching. The dialog box shown...
P-200 Instruction Manual (958 KB)
Page 11
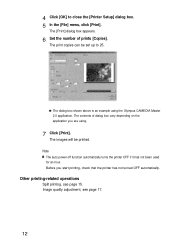
... automatically. The images will be set up to close the [Printer Setup] dialog box. 5 In the [File] menu, click [Print]. Before you are using the Olympus CAMEDIA Master 2.0 application. The print copies can be printed. The contents of prints [Copies]. Other printing-related operations Split printing, see page 17. 12 Image quality...
... automatically. The images will be set up to close the [Printer Setup] dialog box. 5 In the [File] menu, click [Print]. Before you are using the Olympus CAMEDIA Master 2.0 application. The print copies can be printed. The contents of prints [Copies]. Other printing-related operations Split printing, see page 17. 12 Image quality...