
Instruction Manual
Page 2
... could void the user's authority to Part 15 of this product. "CE" mark printers are intended for purchasing the P-11 Digital Photo Printer. Please use a shielded equipment interface cable with Part 15 of Conformity Product Name : Digital Photo Printer Model Number : P-11 Trade Name : OLYMPUS Responsible Party : Address : Two Corporate Center Drive, PO Box 9058, Melville, NY 11747-9058 U.S.A. Operation is encouraged to try to correct the interference by...
... could void the user's authority to Part 15 of this product. "CE" mark printers are intended for purchasing the P-11 Digital Photo Printer. Please use a shielded equipment interface cable with Part 15 of Conformity Product Name : Digital Photo Printer Model Number : P-11 Trade Name : OLYMPUS Responsible Party : Address : Two Corporate Center Drive, PO Box 9058, Melville, NY 11747-9058 U.S.A. Operation is encouraged to try to correct the interference by...
Instruction Manual
Page 3
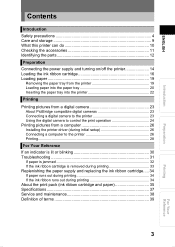
...11 Identifying the parts 12 Preparation Connecting the power supply and turning on/off the printer 14 Loading the ink ribbon cartridge 16 Loading paper 19 Removing the paper tray from the printer 19 Loading paper into the paper tray 20 Inserting the paper tray into the printer 22 Printing Printing pictures from a digital camera 23 About PictBridge compatible digital cameras 23 Connecting a digital camera to the printer 23 Using the digital camera to control the print operation 24 Printing pictures from a computer 26 Installing the printer driver (during initial setup 26 Connecting...
...11 Identifying the parts 12 Preparation Connecting the power supply and turning on/off the printer 14 Loading the ink ribbon cartridge 16 Loading paper 19 Removing the paper tray from the printer 19 Loading paper into the paper tray 20 Inserting the paper tray into the printer 22 Printing Printing pictures from a digital camera 23 About PictBridge compatible digital cameras 23 Connecting a digital camera to the printer 23 Using the digital camera to control the print operation 24 Printing pictures from a computer 26 Installing the printer driver (during initial setup 26 Connecting...
Instruction Manual
Page 10
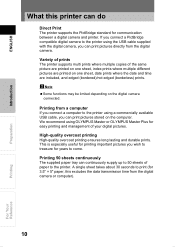
... you connect a PictBridge compatible digital camera to the printer using the USB cable supplied with the digital camera, you can continuously supply up to 50 sheets of paper to come. We recommend using a commercially available USB cable, you can do Direct Print The printer supports the PictBridge standard for easy printing and management of the same picture are printed on one sheet, index prints where multiple different pictures are printed on one sheet, date prints where the date and time are...
... you connect a PictBridge compatible digital camera to the printer using the USB cable supplied with the digital camera, you can continuously supply up to 50 sheets of paper to come. We recommend using a commercially available USB cable, you can do Direct Print The printer supports the PictBridge standard for easy printing and management of the same picture are printed on one sheet, index prints where multiple different pictures are printed on one sheet, date prints where the date and time are...
Instruction Manual
Page 11
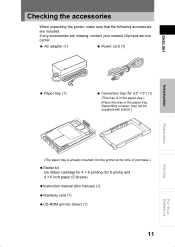
... paper tray is in the paper tray. ENGLISH Checking the accessories When unpacking the printer, make sure that the following accessories are missing, contact your nearest Olympus service center. AC adapter (1) Power cord (1) Paper tray (1) Conversion tray (for 3.5" × 5") (1) (This tray is already inserted into the printer at the time of purchase.) Starter kit Ink ribbon cartridge for 4 × 6 printing (for 5 prints) and 4 × 6 inch paper (5 sheets) Instruction manual (this tray in the paper tray.) (Place this manual) (1) Warranty card (1) CD-ROM (printer driver) (1) 11...
... paper tray is in the paper tray. ENGLISH Checking the accessories When unpacking the printer, make sure that the following accessories are missing, contact your nearest Olympus service center. AC adapter (1) Power cord (1) Paper tray (1) Conversion tray (for 3.5" × 5") (1) (This tray is already inserted into the printer at the time of purchase.) Starter kit Ink ribbon cartridge for 4 × 6 printing (for 5 prints) and 4 × 6 inch paper (5 sheets) Instruction manual (this tray in the paper tray.) (Place this manual) (1) Warranty card (1) CD-ROM (printer driver) (1) 11...

Instruction Manual
Page 12
... use, keep the paper output tray closed. 12 ENGLISH Introduction Identifying the parts QFront RIBBON indicator ( PAPER indicator ( ACCESS indicator ( P.30) P.30) P.30) Paper eject section Cartridge slot Tab ( P.17) QBottom Paper output tray ( P.24, 27) POWER indicator ( P.30) POWER button ( P.15) DC-IN terminal ( P.14) Paper tray door ( P.19, 22) PictBridge connector ( P.23) USB connector( P.27) Side cover ( P.14) Paper dispenser slot ( P.32) Preparation Printing For Your Reference Note The left side cover can be removed...
... use, keep the paper output tray closed. 12 ENGLISH Introduction Identifying the parts QFront RIBBON indicator ( PAPER indicator ( ACCESS indicator ( P.30) P.30) P.30) Paper eject section Cartridge slot Tab ( P.17) QBottom Paper output tray ( P.24, 27) POWER indicator ( P.30) POWER button ( P.15) DC-IN terminal ( P.14) Paper tray door ( P.19, 22) PictBridge connector ( P.23) USB connector( P.27) Side cover ( P.14) Paper dispenser slot ( P.32) Preparation Printing For Your Reference Note The left side cover can be removed...
Instruction Manual
Page 16
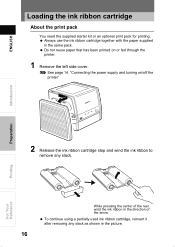
... using a partially used ink ribbon cartridge, reinsert it after removing any slack. Always use the ink ribbon cartridge together with the paper supplied in the picture. 16 Printing For Your Reference "Connecting the power supply and turning on or fed through the printer. 1 Remove the left side cover. While pressing the center of the reel, wind the ink ribbon in the direction of the arrow. See page 14. ENGLISH Introduction Preparation Loading the ink ribbon cartridge About the print pack You need the supplied...
... using a partially used ink ribbon cartridge, reinsert it after removing any slack. Always use the ink ribbon cartridge together with the paper supplied in the picture. 16 Printing For Your Reference "Connecting the power supply and turning on or fed through the printer. 1 Remove the left side cover. While pressing the center of the reel, wind the ink ribbon in the direction of the arrow. See page 14. ENGLISH Introduction Preparation Loading the ink ribbon cartridge About the print pack You need the supplied...

Instruction Manual
Page 20
... direct sunlight. Fingerprints or dust on this number when loading additional paper. Be careful not to 50 sheets of paper may cause a paper jam. Loading too many sheets of paper can be placed in both tray cover tabs, and then remove the conversion tray. Do not write on paper before printing a picture on 4 × 6 paper 1 Open the tray cover while simultaneously pressing in the paper tray. Using paper other than specialty paper such as paper becoming jammed...
... direct sunlight. Fingerprints or dust on this number when loading additional paper. Be careful not to 50 sheets of paper may cause a paper jam. Loading too many sheets of paper can be placed in both tray cover tabs, and then remove the conversion tray. Do not write on paper before printing a picture on 4 × 6 paper 1 Open the tray cover while simultaneously pressing in the paper tray. Using paper other than specialty paper such as paper becoming jammed...
Instruction Manual
Page 23
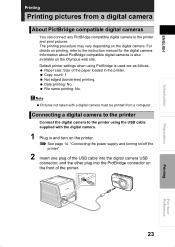
... printing: No. Default printer settings when using the USB cable supplied with a digital camera must be printed from a digital camera About PictBridge compatible digital cameras You can connect any PictBridge compatible digital camera to the instruction manual for the digital camera. Paper size: Size of the paper loaded in and turn on the front of the USB cable into the digital camera USB connector, and the other plug into the PictBridge connector on the printer. Connecting a digital camera to the printer Connect the digital camera...
... printing: No. Default printer settings when using the USB cable supplied with a digital camera must be printed from a digital camera About PictBridge compatible digital cameras You can connect any PictBridge compatible digital camera to the instruction manual for the digital camera. Paper size: Size of the paper loaded in and turn on the front of the USB cable into the digital camera USB connector, and the other plug into the PictBridge connector on the printer. Connecting a digital camera to the printer Connect the digital camera...
Instruction Manual
Page 24
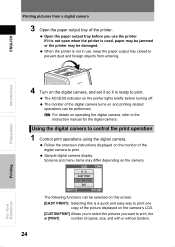
... open when the printer is not in use the printer. Introduction Preparation 4 Turn on and printing related operations can be performed. USB P C EASY PRINT CUSTOM PRINT EXIT SELECT GO OK The following functions can be selected on this screen. [EASY PRINT] Selecting this is ready to print. Follow the onscreen instructions displayed on the camera's LCD. [CUSTOM PRINT] Allows you to select the pictures you use , keep the paper output tray closed to the instruction manual for the digital camera. ENGLISH Printing pictures...
... open when the printer is not in use the printer. Introduction Preparation 4 Turn on and printing related operations can be performed. USB P C EASY PRINT CUSTOM PRINT EXIT SELECT GO OK The following functions can be selected on this screen. [EASY PRINT] Selecting this is ready to print. Follow the onscreen instructions displayed on the camera's LCD. [CUSTOM PRINT] Allows you to select the pictures you use , keep the paper output tray closed to the instruction manual for the digital camera. ENGLISH Printing pictures...
Instruction Manual
Page 25
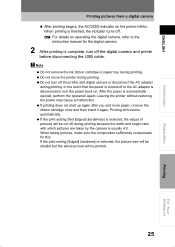
... operating the digital camera, refer to the instruction manual for this. Printing will be printed. 25 Printing For Your Reference Note Do not remove the ink ribbon cartridge or paper tray during printing. Do not move the printer during printing. Leaving the printer without restoring the power may cause a malfunction. When taking pictures, make sure the composition sufficiently compensate for the digital camera. 2 After printing is complete, turn off during printing. When printing is selected, the picture size...
... operating the digital camera, refer to the instruction manual for this. Printing will be printed. 25 Printing For Your Reference Note Do not remove the ink ribbon cartridge or paper tray during printing. Do not move the printer during printing. Leaving the printer without restoring the power may cause a malfunction. When taking pictures, make sure the composition sufficiently compensate for the digital camera. 2 After printing is complete, turn off during printing. When printing is selected, the picture size...
Instruction Manual
Page 26
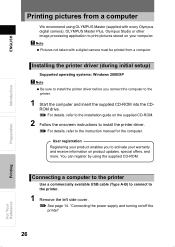
Connecting a computer to the printer Use a commercially available USB cable (Type A-B) to connect to the instruction manual for the computer. ENGLISH Introduction Preparation Printing pictures from a computer We recommend using the supplied CD-ROM. For details, refer to the installation guide on /off the printer" 26 Printing For Your Reference User registration Registering your product enables you connect the computer to activate your computer. ROM drive. Installing the printer driver (during initial setup) Supported operating systems: Windows 2000/XP Note...
Connecting a computer to the printer Use a commercially available USB cable (Type A-B) to connect to the instruction manual for the computer. ENGLISH Introduction Preparation Printing pictures from a computer We recommend using the supplied CD-ROM. For details, refer to the installation guide on /off the printer" 26 Printing For Your Reference User registration Registering your product enables you connect the computer to activate your computer. ROM drive. Installing the printer driver (during initial setup) Supported operating systems: Windows 2000/XP Note...

Instruction Manual
Page 27
... plug into the USB connector on a network. ENGLISH Introduction Preparation Printing pictures from entering. 5 Turn on the printer. Be sure to a USB hub. 27 Printing For Your Reference The printer is not guaranteed to work when connected to pass the cable through the guide. 3 Attach the side cover. 4 Open the paper output tray of the printer. The printer is not guaranteed to the printer at the same time, the digital camera connection has priority...
... plug into the USB connector on a network. ENGLISH Introduction Preparation Printing pictures from entering. 5 Turn on the printer. Be sure to a USB hub. 27 Printing For Your Reference The printer is not guaranteed to work when connected to pass the cable through the guide. 3 Attach the side cover. 4 Open the paper output tray of the printer. The printer is not guaranteed to the printer at the same time, the digital camera connection has priority...

Instruction Manual
Page 28
... not move the printer during printing because the width and height ratio with which pictures are using. 3 Click [Properties], check the paper size and other image processing application) to open the image(s) you would like to print. 2 Select [Print] from the File menu and select [OLYMPUS P-11] as OLYMPUS Master to the instruction manual for printing without restoring the power may cause a malfunction. ENGLISH Introduction Preparation Printing pictures from a computer Printing 1 Use digital imaging software (or other properties, and then start printing.
... not move the printer during printing because the width and height ratio with which pictures are using. 3 Click [Properties], check the paper size and other image processing application) to open the image(s) you would like to print. 2 Select [Print] from the File menu and select [OLYMPUS P-11] as OLYMPUS Master to the instruction manual for printing without restoring the power may cause a malfunction. ENGLISH Introduction Preparation Printing pictures from a computer Printing 1 Use digital imaging software (or other properties, and then start printing.

Instruction Manual
Page 29
... 16 separation printing. The following items can be selected on the [Paper] tab. Set the contrast from -5 to 50 copies. Select up to +5. Select [Soft], [Normal] or [Hard]. Select [Not Edged] or [Edged]. Printing pictures from a computer Printer settings You can set the paper size, copy count, and color adjustment settings on the [Paper] and [Graphics] tabs of the Printing Preferences window. [Paper] tab [Graphics] tab ENGLISH Introduction Preparation Printing The following...
... 16 separation printing. The following items can be selected on the [Paper] tab. Set the contrast from -5 to 50 copies. Select up to +5. Select [Soft], [Normal] or [Hard]. Select [Not Edged] or [Edged]. Printing pictures from a computer Printer settings You can set the paper size, copy count, and color adjustment settings on the [Paper] and [Graphics] tabs of the Printing Preferences window. [Paper] tab [Graphics] tab ENGLISH Introduction Preparation Printing The following...
Instruction Manual
Page 30
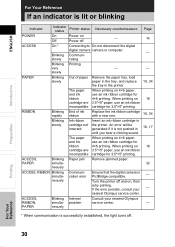
RIBBON Blinking End of paper Remove the paper tray, load paper in the tray, and replace the tray in the printer. 19, 34 The paper When printing on 18 cartridge are 3.5"×5" paper, use an ink ribbon cartridge for 3.5"×5" printing. If the error persists, consult your nearest Olympus service center. - * When communication is successfully established, the light turns off - 14 ACCESS On * Connecting to Do not disconnect the digital digital camera camera or computer. - When printing on 4×6 paper, and ink use an...
RIBBON Blinking End of paper Remove the paper tray, load paper in the tray, and replace the tray in the printer. 19, 34 The paper When printing on 18 cartridge are 3.5"×5" paper, use an ink ribbon cartridge for 3.5"×5" printing. If the error persists, consult your nearest Olympus service center. - * When communication is successfully established, the light turns off - 14 ACCESS On * Connecting to Do not disconnect the digital digital camera camera or computer. - When printing on 4×6 paper, and ink use an...
Instruction Manual
Page 31
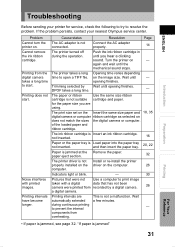
... ribbon Use the same size ribbon cartridge is not connected. for service, check the following to try to start . The print size set on the Insert the same size paper and 18, 35 digital camera or computer ribbon cartridge as selected on the image size. not Inserted. 16 Paper or the paper tray is not Install or re-install the printer properly installed on the driver on the computer. 26 computer. paper eject section. 32 The printer driver is Load paper into the paper tray not inserted. "If paper is jammed...
... ribbon Use the same size ribbon cartridge is not connected. for service, check the following to try to start . The print size set on the Insert the same size paper and 18, 35 digital camera or computer ribbon cartridge as selected on the image size. not Inserted. 16 Paper or the paper tray is not Install or re-install the printer properly installed on the driver on the computer. 26 computer. paper eject section. 32 The printer driver is Load paper into the paper tray not inserted. "If paper is jammed...
Instruction Manual
Page 32
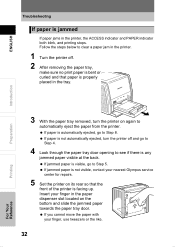
... through the paper tray door opening to see if there is not visible, contact your nearest Olympus service center for repairs. 5 Set the printer on again to automatically eject the paper from the printer. If you cannot move the paper with your finger in the printer, the ACCESS indicator and PAPER indicator both blink, and printing stops. ENGLISH Introduction Preparation Troubleshooting If paper is jammed If paper jams in the paper dispenser slot located on the bottom...
... through the paper tray door opening to see if there is not visible, contact your nearest Olympus service center for repairs. 5 Set the printer on again to automatically eject the paper from the printer. If you cannot move the paper with your finger in the printer, the ACCESS indicator and PAPER indicator both blink, and printing stops. ENGLISH Introduction Preparation Troubleshooting If paper is jammed If paper jams in the paper dispenser slot located on the bottom...

Instruction Manual
Page 33
... jammed paper, do not attempt to use it through the paper tray door opening. 7 Turn the printer on . 33 Printing For Your Reference If this happens, send your printer. ENGLISH Introduction Preparation Troubleshooting 6 After the paper has moved partway, you will then be able to remove it again in the printer. If operation is printed on twice, the paper may damage your printer for repair. If the ink ribbon cartridge is removed during printing 1 Turn the printer off. 2 Insert...
... jammed paper, do not attempt to use it through the paper tray door opening. 7 Turn the printer on . 33 Printing For Your Reference If this happens, send your printer. ENGLISH Introduction Preparation Troubleshooting 6 After the paper has moved partway, you will then be able to remove it again in the printer. If operation is printed on twice, the paper may damage your printer for repair. If the ink ribbon cartridge is removed during printing 1 Turn the printer off. 2 Insert...

Instruction Manual
Page 37
... Specifications Printer Printing Method Resolution Print Paper Size Maximum Print Size Color Expression Printing Speed Interfaces Compatible OS Ink Ribbon Cartridge Compatible Graphics File Formats Power Source Rated Power Consumption Operating Temperature Operating Humidity Dimensions Weight Sublimation dye transfer printing 4-pass printing (Yellow/Magenta/Cyan and protective overcoat layer) 310 dpi × 310 dpi 3.5" × 5" Paper : 89 (H) × 127 (V) mm (3.5" × 5") 4 × 6 Paper : 100 (H) × 148 (V) mm (3.9" × 5.8") 1) When not edged (borderless) printing...
... Specifications Printer Printing Method Resolution Print Paper Size Maximum Print Size Color Expression Printing Speed Interfaces Compatible OS Ink Ribbon Cartridge Compatible Graphics File Formats Power Source Rated Power Consumption Operating Temperature Operating Humidity Dimensions Weight Sublimation dye transfer printing 4-pass printing (Yellow/Magenta/Cyan and protective overcoat layer) 310 dpi × 310 dpi 3.5" × 5" Paper : 89 (H) × 127 (V) mm (3.5" × 5") 4 × 6 Paper : 100 (H) × 148 (V) mm (3.9" × 5.8") 1) When not edged (borderless) printing...

Instruction Manual
Page 39
... images, and number of DPOF specified images, index print, and image trimming. Various print options are PictBridge compatible, prints can be reproduced exactly using these three colors. Colors are printed using a printer and are displayed on a monitor cannot be made using simple digital camera controls regardless of colors that are replaced with similar colors. 39 Printing For Your Reference PictBridge A common standard used to connect a digital camera directly to a printer to print images. Therefore, some colors for automatic printing of colors available using...
... images, and number of DPOF specified images, index print, and image trimming. Various print options are PictBridge compatible, prints can be reproduced exactly using these three colors. Colors are printed using a printer and are displayed on a monitor cannot be made using simple digital camera controls regardless of colors that are replaced with similar colors. 39 Printing For Your Reference PictBridge A common standard used to connect a digital camera directly to a printer to print images. Therefore, some colors for automatic printing of colors available using...