FE-230 Advanced Manual (English)
Page 3
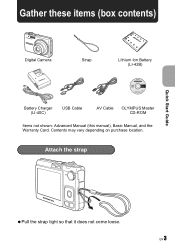
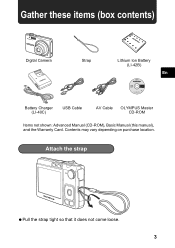
EN 3 Attach the strap Quick Start Guide Pull the strap tight so that it does not come loose. Quick Start Guide Gather these items (box contents) Digital Camera Strap Lithium Ion Battery (LI-42B) Battery Charger (LI-40C) USB Cable AV Cable OLYMPUS Master CD-ROM Items not shown: Advanced Manual (this manual), Basic Manual, and the Warranty Card. Contents may vary depending on purchase location.
EN 3 Attach the strap Quick Start Guide Pull the strap tight so that it does not come loose. Quick Start Guide Gather these items (box contents) Digital Camera Strap Lithium Ion Battery (LI-42B) Battery Charger (LI-40C) USB Cable AV Cable OLYMPUS Master CD-ROM Items not shown: Advanced Manual (this manual), Basic Manual, and the Warranty Card. Contents may vary depending on purchase location.
FE-230 Advanced Manual (English)
Page 31
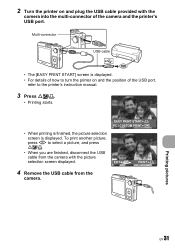
Multi-connector USB cable • The [EASY PRINT START] screen is displayed. • For details of how to turn the printer on and plug the USB cable provided with the camera into the multi-connector of the USB port, refer to the printer's instruction manual. 3 Press OF/ 2 Turn the printer on and the position of the camera and the printer's USB port.
Multi-connector USB cable • The [EASY PRINT START] screen is displayed. • For details of how to turn the printer on and plug the USB cable provided with the camera into the multi-connector of the USB port, refer to the printer's instruction manual. 3 Press OF/ 2 Turn the printer on and the position of the camera and the printer's USB port.
FE-230 Advanced Manual (English)
Page 32
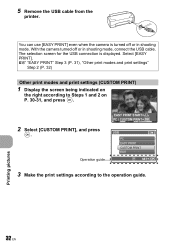
... is turned off or in shooting mode. You can use [EASY PRINT] even when the camera is displayed. With the camera turned off or in shooting mode, connect the USB cable. Select [EASY PRINT]. Printing pictures 32 EN g "EASY PRINT" Step 3 (P. 31), "Other print modes and print settings" Step 2 ...indicated on P. 30-31, and press . 2 Select [CUSTOM PRINT], and press . 5 Remove the USB cable from the printer. Operation guide EASY PRINT START PC / CUSTOM PRINT OK USB PC EASY PRINT CUSTOM PRINT EXIT SET OK 3 Make the print settings according to Steps 1 and 2 on the ...
... is turned off or in shooting mode. You can use [EASY PRINT] even when the camera is displayed. With the camera turned off or in shooting mode, connect the USB cable. Select [EASY PRINT]. Printing pictures 32 EN g "EASY PRINT" Step 3 (P. 31), "Other print modes and print settings" Step 2 ...indicated on P. 30-31, and press . 2 Select [CUSTOM PRINT], and press . 5 Remove the USB cable from the printer. Operation guide EASY PRINT START PC / CUSTOM PRINT OK USB PC EASY PRINT CUSTOM PRINT EXIT SET OK 3 Make the print settings according to Steps 1 and 2 on the ...
FE-230 Advanced Manual (English)
Page 34
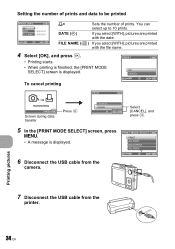
Setting the number of prints and data to be printed PRINT INFO DATE FILE NAME 1 WITHOUT WITHOUT BACK MENU SET OK
Setting the number of prints and data to be printed PRINT INFO DATE FILE NAME 1 WITHOUT WITHOUT BACK MENU SET OK
FE-230 Advanced Manual (English)
Page 38
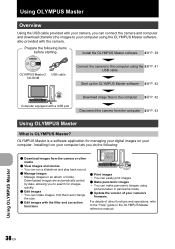
... Overview Using the USB cable provided with the camera. Installing it on your computer lets you to search for managing your digital images on your computer. Prepare the following : ( Download images from the computer gP. 43 Using OLYMPUS Master What is a software application for images ...following items before starting. Install the OLYMPUS Master software gP. 39 OLYMPUS Master 2 USB cable CD-ROM Connect the camera to the computer using the gP. 41 USB cable Start up the OLYMPUS Master software gP. 42 Computer equipped with a USB port Download image files to the computer...
... Overview Using the USB cable provided with the camera. Installing it on your computer lets you to search for managing your digital images on your computer. Prepare the following : ( Download images from the computer gP. 43 Using OLYMPUS Master What is a software application for images ...following items before starting. Install the OLYMPUS Master software gP. 39 OLYMPUS Master 2 USB cable CD-ROM Connect the camera to the computer using the gP. 41 USB cable Start up the OLYMPUS Master software gP. 42 Computer equipped with a USB port Download image files to the computer...
FE-230 Advanced Manual (English)
Page 39
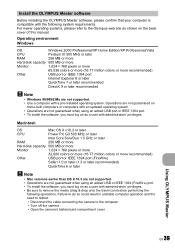
...operation and the need to reboot. • Disconnect the cable connecting the camera to remove the media (drag & drop onto the trash icon) before performing the following system requirements. Install the OLYMPUS Master software Before installing the OLYMPUS Master software, please confirm that your computer is compatible ...QuickTime 7 or later recommended DirectX 9 or later recommended Note • Windows 98/98SE/Me are not guaranteed when using an added USB port or IEEE 1394 port. • To install the software, you must log on the back cover of this manual. Operating environment...
...operation and the need to reboot. • Disconnect the cable connecting the camera to remove the media (drag & drop onto the trash icon) before performing the following system requirements. Install the OLYMPUS Master software Before installing the OLYMPUS Master software, please confirm that your computer is compatible ...QuickTime 7 or later recommended DirectX 9 or later recommended Note • Windows 98/98SE/Me are not guaranteed when using an added USB port or IEEE 1394 port. • To install the software, you must log on the back cover of this manual. Operating environment...

FE-230 Advanced Manual (English)
Page 41
.... • You must restart your computer before using the provided USB cable. • Refer to your computer's instruction manual to locate the position of the USB port. • The camera turns on automatically. • The monitor turns on -screen instructions. • When the OLYMPUS Master licensing agreement is displayed, read the agreement and click "Continue...
.... • You must restart your computer before using the provided USB cable. • Refer to your computer's instruction manual to locate the position of the USB port. • The camera turns on automatically. • The monitor turns on -screen instructions. • When the OLYMPUS Master licensing agreement is displayed, read the agreement and click "Continue...

FE-230 Advanced Manual (English)
Page 43
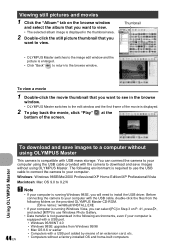
... The trash icon changes to the eject icon when the "Untitled" or "NO_NAME" icon on the eject icon. 3 Disconnect the USB cable from the camera and that the hardware can be displayed. Make sure that image data is displayed saying that all applications are displayed in the system ... the message that is displayed. 3 When a message is not being downloaded from the camera. Drag and drop it on the desktop is displayed. 4 Click "Browse images now". • The downloaded images are closed. Using OLYMPUS Master Note • Windows: When you click "Unplug or Eject Hardware", a warning ...
... The trash icon changes to the eject icon when the "Untitled" or "NO_NAME" icon on the eject icon. 3 Disconnect the USB cable from the camera and that the hardware can be displayed. Make sure that image data is displayed saying that all applications are displayed in the system ... the message that is displayed. 3 When a message is not being downloaded from the camera. Drag and drop it on the desktop is displayed. 4 Click "Browse images now". • The downloaded images are closed. Using OLYMPUS Master Note • Windows: When you click "Unplug or Eject Hardware", a warning ...
FE-230 Advanced Manual (English)
Page 44
... 9.0 to 9.2/X 44 EN Note • If your computer is running Windows 98SE, you can connect the camera to use the USB cable to connect the camera to install the USB driver. To download and save images without using OLYMPUS Master. The following environments, even if your computer is running Windows Vista, you will need to your...
... 9.0 to 9.2/X 44 EN Note • If your computer is running Windows 98SE, you can connect the camera to use the USB cable to connect the camera to install the USB driver. To download and save images without using OLYMPUS Master. The following environments, even if your computer is running Windows Vista, you will need to your...
FE-230 Advanced Manual (English)
Page 45
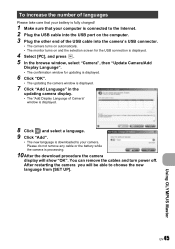
...OLYMPUS Master To increase the number of languages Please take care that your battery is fully charged! 1 Make sure that your computer is connected to the Internet. 2 Plug the USB cable into the USB port on the computer. 3 Plug the other end of the USB cable into the camera's USB connector. • The camera... turns on automatically. • The monitor turns on and the selection screen for the USB connection is displayed. 4 Select [PC...
...OLYMPUS Master To increase the number of languages Please take care that your battery is fully charged! 1 Make sure that your computer is connected to the Internet. 2 Plug the USB cable into the USB port on the computer. 3 Plug the other end of the USB cable into the camera's USB connector. • The camera... turns on automatically. • The monitor turns on and the selection screen for the USB connection is displayed. 4 Select [PC...
FE-230 Advanced Manual (English)
Page 65
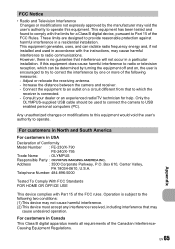
... Number : FE-230/X-790 FE-240/X-795 Trade Name : OLYMPUS Responsible Party : Address : 3500 Corporate Parkway, P.O. This equipment generates, uses, and can be used to connect the camera to which ... to operate this equipment. Adjust or relocate the receiving antenna. - Only the OLYMPUS-supplied USB cable should be determined by one or more of the FCC rules. Telephone Number:... interference received, including interference that interference will not occur in Canada This Class B digital apparatus meets all requirements of the FCC Rules. Connect the equipment to an outlet...
... Number : FE-230/X-790 FE-240/X-795 Trade Name : OLYMPUS Responsible Party : Address : 3500 Corporate Parkway, P.O. This equipment generates, uses, and can be used to connect the camera to which ... to operate this equipment. Adjust or relocate the receiving antenna. - Only the OLYMPUS-supplied USB cable should be determined by one or more of the FCC rules. Telephone Number:... interference received, including interference that interference will not occur in Canada This Class B digital apparatus meets all requirements of the FCC Rules. Connect the equipment to an outlet...
FE-230 Advanced Manual (English)
Page 74
...MOVIE PLAY 21 MOVIE W/SOUND 20 MULTI PRINT 33 Multi-connector 29, 31, 41 MY FAVORITE 24 N NTSC 28 Number of storable still pictures...... 49 O OLYMPUS Master 38, 42 Operation guide 16, 32 Optical zoom 12, 15 P PAL 28 PANORAMA 19 PC 38, 41 PictBridge 30 PICTURE + SOUND R 20 Picture... 3 SUNSET S 12 Super macro mode 13 T Top menu 16 Tripod socket 70 U UNDER WATER MACRO H.......... 12 UNDER WATER WIDE1 k 12 UNDER WATER WIDE2 l 12 USB cable 3, 31, 38, 41, 43 USB driver 44 V VIDEO OUT 28 VOLUME 22, 27 W Warning sound 8 27 X xD-Picture Card 19, 57 Z Zoom 15 Zoom lever 15
...MOVIE PLAY 21 MOVIE W/SOUND 20 MULTI PRINT 33 Multi-connector 29, 31, 41 MY FAVORITE 24 N NTSC 28 Number of storable still pictures...... 49 O OLYMPUS Master 38, 42 Operation guide 16, 32 Optical zoom 12, 15 P PAL 28 PANORAMA 19 PC 38, 41 PictBridge 30 PICTURE + SOUND R 20 Picture... 3 SUNSET S 12 Super macro mode 13 T Top menu 16 Tripod socket 70 U UNDER WATER MACRO H.......... 12 UNDER WATER WIDE1 k 12 UNDER WATER WIDE2 l 12 USB cable 3, 31, 38, 41, 43 USB driver 44 V VIDEO OUT 28 VOLUME 22, 27 W Warning sound 8 27 X xD-Picture Card 19, 57 Z Zoom 15 Zoom lever 15
FE-230 Basic Manual (English, Français, Español, Português)
Page 3
Attach the strap Pull the strap tight so that it does not come loose. 3 Gather these items (box contents) Digital Camera Strap Lithium Ion Battery (LI-42B) En Battery Charger (LI-40C) USB Cable AV Cable OLYMPUS Master CD-ROM Items not shown: Advanced Manual (CD-ROM), Basic Manual (this manual), and the Warranty Card. Contents may vary depending on purchase location.
Attach the strap Pull the strap tight so that it does not come loose. 3 Gather these items (box contents) Digital Camera Strap Lithium Ion Battery (LI-42B) En Battery Charger (LI-40C) USB Cable AV Cable OLYMPUS Master CD-ROM Items not shown: Advanced Manual (CD-ROM), Basic Manual (this manual), and the Warranty Card. Contents may vary depending on purchase location.
FE-230 Basic Manual (English, Français, Español, Português)
Page 16
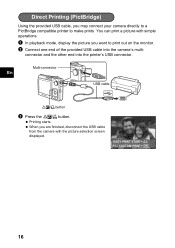
... to a PictBridge compatible printer to print out on the monitor. 2 Connect one end of the provided USB cable into the printer's USB connector. connector and the other end into the camera's multi- EASY PRINT START PC / CUSTOM PRINT OK 16 You can print a picture with the picture selection screen displayed. Direct Printing (PictBridge) Using...
... to a PictBridge compatible printer to print out on the monitor. 2 Connect one end of the provided USB cable into the printer's USB connector. connector and the other end into the camera's multi- EASY PRINT START PC / CUSTOM PRINT OK 16 You can print a picture with the picture selection screen displayed. Direct Printing (PictBridge) Using...
FE-230 Basic Manual (English, Français, Español, Português)
Page 17
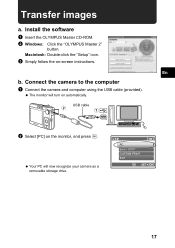
Install the software 1 Insert the OLYMPUS Master CD-ROM. 2 Windows: Click the "OLYMPUS Master 2" button. The monitor will now recognize your camera as a removable storage drive. USB PC EASY PRINT CUSTOM PRINT EXIT SET OK 17 En b. Your PC will turn on automatically. 2 USB cable 1 2 Select [PC] on -screen instructions. Transfer images a. Macintosh: Double-click the "Setup" icon. 3 Simply follow the on the monitor, and press . Connect the camera to the computer 1 Connect the camera and computer using the USB cable (provided).
Install the software 1 Insert the OLYMPUS Master CD-ROM. 2 Windows: Click the "OLYMPUS Master 2" button. The monitor will now recognize your camera as a removable storage drive. USB PC EASY PRINT CUSTOM PRINT EXIT SET OK 17 En b. Your PC will turn on automatically. 2 USB cable 1 2 Select [PC] on -screen instructions. Transfer images a. Macintosh: Double-click the "Setup" icon. 3 Simply follow the on the monitor, and press . Connect the camera to the computer 1 Connect the camera and computer using the USB cable (provided).
FE-230 Quick Start Guide (English, Português)
Page 1
VK557201 Gather these items (box contents) Digital Camera Strap Lithium Ion Battery (LI-42B) Battery Charger (LI-40C) USB Cable AV Cable OLYMPUS Master CD-ROM Items not shown: Advanced Manual (CD-ROM), Basic Manual, and the Warranty Card. h This ...MENU SET OK j. Press the OF/< button, select [YES], and press . Y / M / D a. f Select from 10 available scene modes (FE-240/X-795) or 13 available scene modes (FE-230/X-790), according to select [Y/M/D]. Shutter Button (Press Halfway) [] [IN] HQ 3072×2304 4 The number of pictures that it does not...
VK557201 Gather these items (box contents) Digital Camera Strap Lithium Ion Battery (LI-42B) Battery Charger (LI-40C) USB Cable AV Cable OLYMPUS Master CD-ROM Items not shown: Advanced Manual (CD-ROM), Basic Manual, and the Warranty Card. h This ...MENU SET OK j. Press the OF/< button, select [YES], and press . Y / M / D a. f Select from 10 available scene modes (FE-240/X-795) or 13 available scene modes (FE-230/X-790), according to select [Y/M/D]. Shutter Button (Press Halfway) [] [IN] HQ 3072×2304 4 The number of pictures that it does not...


