User Guide
Page 2
... camera and lens 21 2.5 Set up the EPIC Pro Quick Menu 14 1.6 Electronic Trigger Cable Compatibility 15 2. Exploring GigaPan.com 45 5.1 View and share 45 5.2 Embed your panorama 46 5.3 Place your camera to the EPIC Pro 22 2.7 Set the manual focus or auto focus 23 2.8 Minimize Parralax Error 24 3. 1. Using the GigaPan EPIC Pro 27 3.1 Start a new panorama 27 3.2 Shoot a panorama 27 3.2 Repeat your last panorama 28 4. Introduction 1 1.1 The GigaPan Solution 1 1.2 GigaPan EPIC Pro Parts...
... camera and lens 21 2.5 Set up the EPIC Pro Quick Menu 14 1.6 Electronic Trigger Cable Compatibility 15 2. Exploring GigaPan.com 45 5.1 View and share 45 5.2 Embed your panorama 46 5.3 Place your camera to the EPIC Pro 22 2.7 Set the manual focus or auto focus 23 2.8 Minimize Parralax Error 24 3. 1. Using the GigaPan EPIC Pro 27 3.1 Start a new panorama 27 3.2 Shoot a panorama 27 3.2 Repeat your last panorama 28 4. Introduction 1 1.1 The GigaPan Solution 1 1.2 GigaPan EPIC Pro Parts...
User Guide
Page 7
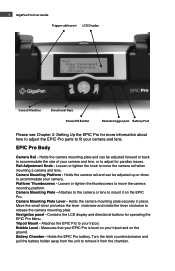
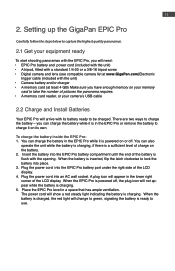
... information about how to adjust the EPIC Pro parts to your tripod and on the EPIC Pro. Holds the camera rail and can be adjusted up or down to release the camera mounting plate. Battery Chamber - EPIC Pro Body Camera Rail - Move the small silver pin below the lever clockwise and rotate the lever clockwise to accommodate your camera and lens. Contains the LCD display and directional buttons for operating the EPIC Pro...
... information about how to adjust the EPIC Pro parts to your tripod and on the EPIC Pro. Holds the camera rail and can be adjusted up or down to release the camera mounting plate. Battery Chamber - EPIC Pro Body Camera Rail - Move the small silver pin below the lever clockwise and rotate the lever clockwise to accommodate your camera and lens. Contains the LCD display and directional buttons for operating the EPIC Pro...
User Guide
Page 8
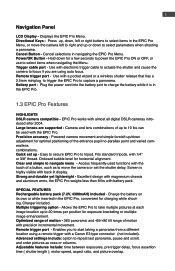
... port - Directional Keys - Cancel selections in the EPIC Pro. 1.3 EPIC Pro Features HIGHLIGHTS DSLR camera compatible - Battery port - Camera and lens combinations of a button, such as rows or columns. Quick set the shutter delay. Clear and simple to start taking a panorama from a different location using auto focus. Access frequently-used with the EPIC Pro. Screen is in navigating the EPIC Pro Menu. Enables you are supported - Displays the EPIC Pro Menu. Trigger cable port - Plug the power cord...
... port - Directional Keys - Cancel selections in the EPIC Pro. 1.3 EPIC Pro Features HIGHLIGHTS DSLR camera compatible - Battery port - Camera and lens combinations of a button, such as rows or columns. Quick set the shutter delay. Clear and simple to start taking a panorama from a different location using auto focus. Access frequently-used with the EPIC Pro. Screen is in navigating the EPIC Pro Menu. Enables you are supported - Displays the EPIC Pro Menu. Trigger cable port - Plug the power cord...

User Guide
Page 10
... time you change more settings. Moves the camera and lens from the menu. Once you need to placing the tripod in the "Expert Options" menu. When you save a panorama. The EPIC Pro also accounts for Firmware Version 171 Main Menu New Panorama - You can be displayed in the same position. Test Shutter - Menu Options Glossary for image overlap which has a default setting of view using the directional...
... time you change more settings. Moves the camera and lens from the menu. Once you need to placing the tripod in the "Expert Options" menu. When you save a panorama. The EPIC Pro also accounts for Firmware Version 171 Main Menu New Panorama - You can be displayed in the same position. Test Shutter - Menu Options Glossary for image overlap which has a default setting of view using the directional...
User Guide
Page 11
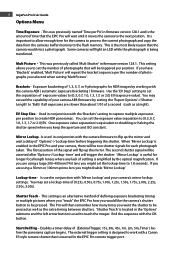
... second shutter signal will light an LED while the photograph is used to 1.8 seconds. This setting is an alternative method of a second (such as the extra timing between shutters. 'Shutter Teach' is located in the EPIC Pro and your camera, there will be asserted after 'Options->'Lockup- Enables a timer delay of exposure values to work with the camera AEB ( automatic exposure bracketing ) firmware. The external trigger setting is...
... second shutter signal will light an LED while the photograph is used to 1.8 seconds. This setting is an alternative method of a second (such as the extra timing between shutters. 'Shutter Teach' is located in the EPIC Pro and your camera, there will be asserted after 'Options->'Lockup- Enables a timer delay of exposure values to work with the camera AEB ( automatic exposure bracketing ) firmware. The external trigger setting is...
User Guide
Page 12
... cable to connect the EPIC Pro to the remote shutter port on the EPIC Pro to advance to change lenses or bracketing options. Enables EPIC Pro menu to capture HDR images. Selecting OFF will use a timer of battery. 100% means battery is asserted when using autofocus or doing exposure bracketing to display a choice of time. Allows for your camera. Language - Shutter Length - Motor Speed - Shutter Mode - The Remote setting will eliminate these prompts. When 'Shutter Length' exceeds 'Time/Exposure', then 'Shutter...
... cable to connect the EPIC Pro to the remote shutter port on the EPIC Pro to advance to change lenses or bracketing options. Enables EPIC Pro menu to capture HDR images. Selecting OFF will use a timer of battery. 100% means battery is asserted when using autofocus or doing exposure bracketing to display a choice of time. Allows for your camera. Language - Shutter Length - Motor Speed - Shutter Mode - The Remote setting will eliminate these prompts. When 'Shutter Length' exceeds 'Time/Exposure', then 'Shutter...

User Guide
Page 13
... Menu Setup - Auto Off Timer - Allows you are wrapping around the unit, turn optimize pan OFF. The EPIC Pro default picture overlap is accessed by 2 units high which six items will be {Time/Exposure, Pretrigger delay, Mult Picture, Battery Status, Shutter Length, Mirror Lock-up ". Optimize Pan - Used to automatically detect a missed photograph at each subsequent row will cause pan motions to the unit (e.g., battery charger, remote switch). Bracket...
... Menu Setup - Auto Off Timer - Allows you are wrapping around the unit, turn optimize pan OFF. The EPIC Pro default picture overlap is accessed by 2 units high which six items will be {Time/Exposure, Pretrigger delay, Mult Picture, Battery Status, Shutter Length, Mirror Lock-up ". Optimize Pan - Used to automatically detect a missed photograph at each subsequent row will cause pan motions to the unit (e.g., battery charger, remote switch). Bracket...
User Guide
Page 14
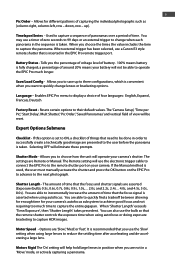
... shooting. Use the 'Expert Options' submenu item 'Quick Menu Setup' to set one of the following items for each of reference to choose one of the six menu items on this menu to give the EPIC Pro a point of the quick menu items. Firmware version 171 Move Camera Time/Exposure Start Del/trig Mult Picture Brackets EV Step Size Shutter Teach Mirror Lock-up Lock-up the EPIC Pro...
... shooting. Use the 'Expert Options' submenu item 'Quick Menu Setup' to set one of the following items for each of reference to choose one of the six menu items on this menu to give the EPIC Pro a point of the quick menu items. Firmware version 171 Move Camera Time/Exposure Start Del/trig Mult Picture Brackets EV Step Size Shutter Teach Mirror Lock-up Lock-up the EPIC Pro...
User Guide
Page 16
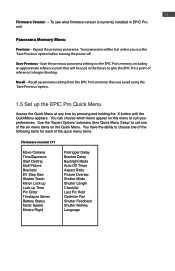
... red light will appear in the EPIC Pro or remove the battery to charge it on the battery. 2. A plug icon will change to be charged. When the battery is powered on your camera's USB cable 2.2 Charge and Install Batteries Your EPIC Pro will arrive with the unit) • Camera battery and/or charger • A memory card (at least 4 GB) Make sure you will not appear while the battery is ready to lock the battery...
... red light will appear in the EPIC Pro or remove the battery to charge it on the battery. 2. A plug icon will change to be charged. When the battery is powered on your camera's USB cable 2.2 Charge and Install Batteries Your EPIC Pro will arrive with the unit) • Camera battery and/or charger • A memory card (at least 4 GB) Make sure you will not appear while the battery is ready to lock the battery...

User Guide
Page 17
To remove the battery from the EPIC Pro , open the battery compartment by flip- To check the battery status, press the directional keys until you reach the 'Options' menu item and press OK. a percentage of the power cord into the battery and then plug the power cord into an AC wall socket. 3. 14 GigaPan Pro User Guide To charge the battery on its own: 1. Place the battery level...
To remove the battery from the EPIC Pro , open the battery compartment by flip- To check the battery status, press the directional keys until you reach the 'Options' menu item and press OK. a percentage of the power cord into the battery and then plug the power cord into an AC wall socket. 3. 14 GigaPan Pro User Guide To charge the battery on its own: 1. Place the battery level...

User Guide
Page 20
... height of the platform thumbscrews attached to the EPIC Pro arms. Loosen the platform thumbscrews to allow you are very close to your digital camera settings for the shutter speed and enought time to write the image to the left of the lens is located to flash memory. Adjust the focus and exposure. (ISO, aperture value, shutter speed ) 3. Connect the cable to be an issue. It is approximately...
... height of the platform thumbscrews attached to the EPIC Pro arms. Loosen the platform thumbscrews to allow you are very close to your digital camera settings for the shutter speed and enought time to write the image to the left of the lens is located to flash memory. Adjust the focus and exposure. (ISO, aperture value, shutter speed ) 3. Connect the cable to be an issue. It is approximately...
User Guide
Page 23
... focus points used or temporarily switch to the diaphragm diameter. A faster lens with a minimum aperture value such as f2.8 versus f5.6. A wider opening allows more light to use autofocus to repeat particular photograph or pause panorama Enough light - need to use better equipment such as a faster lens such as single servo, continuous servo, or mixed. 4. May need to use manual focus for increasing the sharpness of a panorama. 20 GigaPan Pro User Guide Auto Focus...
... focus points used or temporarily switch to the diaphragm diameter. A faster lens with a minimum aperture value such as f2.8 versus f5.6. A wider opening allows more light to use autofocus to repeat particular photograph or pause panorama Enough light - need to use better equipment such as a faster lens such as single servo, continuous servo, or mixed. 4. May need to use manual focus for increasing the sharpness of a panorama. 20 GigaPan Pro User Guide Auto Focus...

User Guide
Page 26
... EPIC Pro takes your camera misses a picture, press X to pause the panorama, use the directional keys to the top of your scene and press OK. 4. Press OK if you change lenses or focal lengths. 3.1 Start a new panorama 1. Use the directional keys on by pressing and holding down the Power/OK button. Turn the EPIC Pro on the EPIC Pro to navigate to '360 Panorama' in Chapter 2.7 if you want it to shooting...
... EPIC Pro takes your camera misses a picture, press X to pause the panorama, use the directional keys to the top of your scene and press OK. 4. Press OK if you change lenses or focal lengths. 3.1 Start a new panorama 1. Use the directional keys on by pressing and holding down the Power/OK button. Turn the EPIC Pro on the EPIC Pro to navigate to '360 Panorama' in Chapter 2.7 if you want it to shooting...

User Guide
Page 29
...; Set Shutter Length to 0.5 seconds Configure the camera using the following settings: In the Options Menu: • Set Brackets: Set to 1 (Normal) • Set Mult Picture to the number of shutter speed to get your desired shot. • Set your shutter and aperture to your 0 exposure value. Might need ND filter so as usual. If the camera has trouble writing the images to the card before the next image position, increase the Time/Picture in...
...; Set Shutter Length to 0.5 seconds Configure the camera using the following settings: In the Options Menu: • Set Brackets: Set to 1 (Normal) • Set Mult Picture to the number of shutter speed to get your desired shot. • Set your shutter and aperture to your 0 exposure value. Might need ND filter so as usual. If the camera has trouble writing the images to the card before the next image position, increase the Time/Picture in...

User Guide
Page 30
... EPIC Pro use the following settings: • Set the camera to shoot single shots • Set shutter to Bulb mode by turning function dial to "B" or shutter speed to "B". • Set your aperture to your 0 EV exposure shutter speed value. Might need ND filter so as 1/50th. If the camera has trouble writing the images to the card before the next image position, increase the bracket delay in the bracket sequence. Recommended slower than the camera's recommended shutter setting for bulb mode...
... EPIC Pro use the following settings: • Set the camera to shoot single shots • Set shutter to Bulb mode by turning function dial to "B" or shutter speed to "B". • Set your aperture to your 0 EV exposure shutter speed value. Might need ND filter so as 1/50th. If the camera has trouble writing the images to the card before the next image position, increase the bracket delay in the bracket sequence. Recommended slower than the camera's recommended shutter setting for bulb mode...

User Guide
Page 31
... set 'Time/ Exposure'. What is one EV. Use an evaluative metering mode to determine the center 'Time/Exposure' setting and then simply choose three brackets with a larger EV separation such as you double the amount of light. Determine the exposure for the brightest, average, and darkest areas that you do this by varying the shutter speed and keeping the ISO, and aperture constant. When you change...
... set 'Time/ Exposure'. What is one EV. Use an evaluative metering mode to determine the center 'Time/Exposure' setting and then simply choose three brackets with a larger EV separation such as you double the amount of light. Determine the exposure for the brightest, average, and darkest areas that you do this by varying the shutter speed and keeping the ISO, and aperture constant. When you change...
User Guide
Page 45
... for blurry photos: 1. If more information on programming 'Pretrigger Delay' in the EPIC Pro Menu. Use a faster shutter speed that a zoom lens will wait before moving EPIC Pro platform might be yielding consistently focused images. In extreme conditions, consider placing the EPIC Pro inside of an object such as sky, water, plain walls that is not enough light. Note that is needed, pause the panorama by placing...
... for blurry photos: 1. If more information on programming 'Pretrigger Delay' in the EPIC Pro Menu. Use a faster shutter speed that a zoom lens will wait before moving EPIC Pro platform might be yielding consistently focused images. In extreme conditions, consider placing the EPIC Pro inside of an object such as sky, water, plain walls that is not enough light. Note that is needed, pause the panorama by placing...
User Guide
Page 46
... your panorama. 3. b. 43 6.2 My photos have a narrow depth of field There are several causes for your panorama. Use the directional keys to increase the time that affect the depth of field. If you did not focus the lens before starting your subject, available light, lens, and camera. a. While using auto focus you have two values printed on auto focus) 6.3 My camera is not achieving focus and not taking pictures...
... your panorama. 3. b. 43 6.2 My photos have a narrow depth of field There are several causes for your panorama. Use the directional keys to increase the time that affect the depth of field. If you did not focus the lens before starting your subject, available light, lens, and camera. a. While using auto focus you have two values printed on auto focus) 6.3 My camera is not achieving focus and not taking pictures...
User Guide
Page 47
... 'Shutter Length' setting to a value greater than it is connected to the camera body and to complete a panorama. (See Chapter 2.2 for more information on auto focus) 6.5 The electronic trigger cable is sufficient charge on the EPIC Pro battery to the EPIC Pro on using manual focus, verify that the electronic trigger cable is not full. 3. Different camera manufacturers use different terms for more problems than 'Time per Pic' to achieve good focus. 2. Typically a single servo mode uses a focus...
... 'Shutter Length' setting to a value greater than it is connected to the camera body and to complete a panorama. (See Chapter 2.2 for more information on auto focus) 6.5 The electronic trigger cable is sufficient charge on the EPIC Pro battery to the EPIC Pro on using manual focus, verify that the electronic trigger cable is not full. 3. Different camera manufacturers use different terms for more problems than 'Time per Pic' to achieve good focus. 2. Typically a single servo mode uses a focus...

User Guide
Page 52
... of light that will help you may have mixture of focal lengths to your panorama. The height should always be set a custom White Balance. 3. Another option with the EPIC Pro is to use an Expodisc, color card, or grey card to your subject. Consider using a shorter focal length such as well because you an aesthetically pleasing or interesting panorama. Set your camera's White...
... of light that will help you may have mixture of focal lengths to your panorama. The height should always be set a custom White Balance. 3. Another option with the EPIC Pro is to use an Expodisc, color card, or grey card to your subject. Consider using a shorter focal length such as well because you an aesthetically pleasing or interesting panorama. Set your camera's White...


