EVOLT E-300 Basic Manual (English)
Page 3
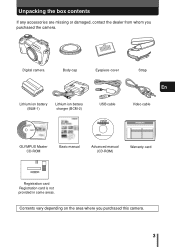
Contents vary depending on the area where you purchased the camera. Unpacking the box contents If any accessories are missing or damaged, contact the dealer from whom you purchased this camera. 3 Digital camera Body cap Eyepiece cover Strap En Lithium ion battery (BLM-1) Lithium ion battery charger (BCM-2) USB cable Video cable OLYMPUS Master CD-ROM Basic manual Advanced manual (CD-ROM) Warranty card Registration card Registration card is not provided in some areas.
Contents vary depending on the area where you purchased the camera. Unpacking the box contents If any accessories are missing or damaged, contact the dealer from whom you purchased this camera. 3 Digital camera Body cap Eyepiece cover Strap En Lithium ion battery (BLM-1) Lithium ion battery charger (BCM-2) USB cable Video cable OLYMPUS Master CD-ROM Basic manual Advanced manual (CD-ROM) Warranty card Registration card Registration card is not provided in some areas.
EVOLT E-300 Basic Manual (English)
Page 9
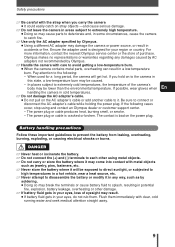
... battery from leaking, overheating, burning, exploding, or causing electrical shocks or burns. Flush them . For more information, contact the nearest Olympus service center or the store of eyesight may result. ● If battery fluid gets in accidents or fire. The power plug or ... plug. Safety precautions ੬ Be careful with the strap when you hold on to extremely cold temperatures, the temperature of the camera's body may be caused. - Battery handling precautions Follow these important guidelines to catch fire. ੬ Use only the AC adapter specified by soldering...
... battery from leaking, overheating, burning, exploding, or causing electrical shocks or burns. Flush them . For more information, contact the nearest Olympus service center or the store of eyesight may result. ● If battery fluid gets in accidents or fire. The power plug or ... plug. Safety precautions ੬ Be careful with the strap when you hold on to extremely cold temperatures, the temperature of the camera's body may be caused. - Battery handling precautions Follow these important guidelines to catch fire. ੬ Use only the AC adapter specified by soldering...
EVOLT E-300 Basic Manual (English)
Page 17
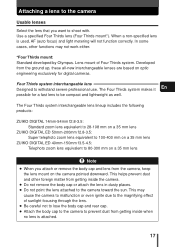
...digital cameras. The Four Thirds system interchangeable lens lineup includes the following products: ZUIKO DIGITAL 14mm-54mm f2.8-3.5: Standard zoom lens equivalent to 28-108 mm on a 35 mm lens ZUIKO DIGITAL ED 50mm-200mm f2.8-3.5: Super telephoto zoom lens equivalent to 100-400 mm on a 35 mm lens ZUIKO DIGITAL ED 40mm-150mm f3.5-4.5: Telephoto zoom lens... the lens that you attach or remove the body cap and lens from the ground up, these all-new interchangeable lenses are based on the camera pointed downward. This may not work either. *Four Thirds mount: Standard developed by Olympus. In...
...digital cameras. The Four Thirds system interchangeable lens lineup includes the following products: ZUIKO DIGITAL 14mm-54mm f2.8-3.5: Standard zoom lens equivalent to 28-108 mm on a 35 mm lens ZUIKO DIGITAL ED 50mm-200mm f2.8-3.5: Super telephoto zoom lens equivalent to 100-400 mm on a 35 mm lens ZUIKO DIGITAL ED 40mm-150mm f3.5-4.5: Telephoto zoom lens... the lens that you attach or remove the body cap and lens from the ground up, these all-new interchangeable lenses are based on the camera pointed downward. This may not work either. *Four Thirds mount: Standard developed by Olympus. In...
EVOLT E-300 Basic Manual (English)
Page 18
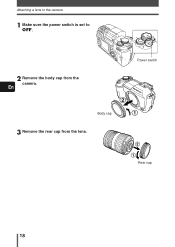
Attaching a lens to the camera 1 Make sure the power switch is set to OFF. 2 Remove the body cap from the lens. Power switch Rear cap 18 En Body cap 3 Remove the rear cap from the camera.
Attaching a lens to the camera 1 Make sure the power switch is set to OFF. 2 Remove the body cap from the lens. Power switch Rear cap 18 En Body cap 3 Remove the rear cap from the camera.

EVOLT E-300 Basic Manual (English)
Page 19
Lens release button 19 Lens attachment mark (Red) Alignment mark (Red) En 5 Remove the lens cap. Attaching a lens to OFF. 2 While pressing the lens release button, remove the lens from the camera by rotating it click. Rotate the lens clockwise until you hear it counterclockwise. Lens cap Removing the lens from the camera 1 Make sure the power switch is set to the camera 4 Align the lens attachment mark (red) on the camera with the alignment mark (red) on the lens, then insert the lens into the camera's body.
Lens release button 19 Lens attachment mark (Red) Alignment mark (Red) En 5 Remove the lens cap. Attaching a lens to OFF. 2 While pressing the lens release button, remove the lens from the camera by rotating it click. Rotate the lens clockwise until you hear it counterclockwise. Lens cap Removing the lens from the camera 1 Make sure the power switch is set to the camera 4 Align the lens attachment mark (red) on the camera with the alignment mark (red) on the lens, then insert the lens into the camera's body.

EVOLT E-300 Basic Manual (English)
Page 24
En ● Keep your fingers and the strap away from underneath with your right hand and keep your elbow at your side. 2 Rest your elbow gently against your upper body. Power on Holding the camera 1 Hold the camera's grip with your left hand. 3 Take a picture. ● Putting one leg a little forward helps stabilize your body and hold the lens section firmly from the front of the lens. Vertical grip Note Bad technique Lens 24
En ● Keep your fingers and the strap away from underneath with your right hand and keep your elbow at your side. 2 Rest your elbow gently against your upper body. Power on Holding the camera 1 Hold the camera's grip with your left hand. 3 Take a picture. ● Putting one leg a little forward helps stabilize your body and hold the lens section firmly from the front of the lens. Vertical grip Note Bad technique Lens 24
EVOLT E-300 Quick Start Guide (English)
Page 1
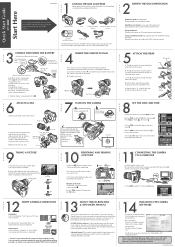
... cover. compartment cover. Unloading the battery: Tilt the camera while holding in the Setup window. Remove the body cap from the lens. lens. Rear cap Lens attachment mark (Red) Alignment mark (Red) Lens cap TAKING A PICTURE S T E P a. Press and hold the shutter button halfway to lock the ...facing toward the monitor side (the camera's rear side) as shown in the illustration. Align the lens attachment mark (red) on the lens, then insert the lens into your new Olympus Digital Camera. Use the arrow pad to select images you want to select PC. Press to view....
... cover. compartment cover. Unloading the battery: Tilt the camera while holding in the Setup window. Remove the body cap from the lens. lens. Rear cap Lens attachment mark (Red) Alignment mark (Red) Lens cap TAKING A PICTURE S T E P a. Press and hold the shutter button halfway to lock the ...facing toward the monitor side (the camera's rear side) as shown in the illustration. Align the lens attachment mark (red) on the lens, then insert the lens into your new Olympus Digital Camera. Use the arrow pad to select images you want to select PC. Press to view....
EVOLT E-300 Quick Start Guide (English)
Page 2
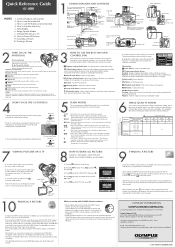
...DELETE ALL PICTURES STORED IN YOUR CAMERA! b. Press to register as the Olympus P-10 Digital Photo Printer. e. OLYMPUS Master allows you to perform multiple AF or to receive information on using one...* For detailed instructions on software or firmware upgrades from entering the camera body.) Diopter adjustment dia DC-IN jack USB connector VIDEO OUT jack Connector ...Lens attachment mark Battery compartment lock Shutter button SSWF indicator Battery compartment cover Flash Mirror Lens lock pin Lens release button Mount (Attach the lens after installation. • Install OLYMPUS...
...DELETE ALL PICTURES STORED IN YOUR CAMERA! b. Press to register as the Olympus P-10 Digital Photo Printer. e. OLYMPUS Master allows you to perform multiple AF or to receive information on using one...* For detailed instructions on software or firmware upgrades from entering the camera body.) Diopter adjustment dia DC-IN jack USB connector VIDEO OUT jack Connector ...Lens attachment mark Battery compartment lock Shutter button SSWF indicator Battery compartment cover Flash Mirror Lens lock pin Lens release button Mount (Attach the lens after installation. • Install OLYMPUS...

EVOLT E-300 Advanced Manual (English)
Page 13
...temperature burn may cause parts to deteriorate and, in some circumstances, cause the camera to catch fire. ੬ Use only the AC adapter specified by Olympus. ੬ Handle the camera with care to avoid getting a low-temperature burn. ● When the camera contains metal parts, overheating can result ...another cable to it. The power plug or cable is bad on the power plug. For more information, contact the nearest Olympus service center or the store of the camera's body may come into contact with metal objects such as jewelry, pins, fasteners, etc. ੬ Never store the battery where...
...temperature burn may cause parts to deteriorate and, in some circumstances, cause the camera to catch fire. ੬ Use only the AC adapter specified by Olympus. ੬ Handle the camera with care to avoid getting a low-temperature burn. ● When the camera contains metal parts, overheating can result ...another cable to it. The power plug or cable is bad on the power plug. For more information, contact the nearest Olympus service center or the store of the camera's body may come into contact with metal objects such as jewelry, pins, fasteners, etc. ੬ Never store the battery where...
EVOLT E-300 Advanced Manual (English)
Page 173
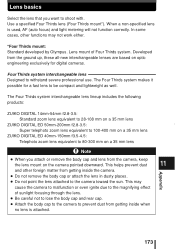
... the body cap and lens from the camera, keep the lens mount on the camera pointed downward. The Four Thirds system interchangeable lens lineup includes the following products: ZUIKO DIGITAL 14mm-54mm f2.8-3.5: Standard zoom lens equivalent to 28-108 mm on a 35 mm lens ZUIKO DIGITAL ED 50mm-200mm f2.8-3.5: Super telephoto zoom lens equivalent to 100-400 mm on a 35 mm lens ZUIKO DIGITAL ED...
... the body cap and lens from the camera, keep the lens mount on the camera pointed downward. The Four Thirds system interchangeable lens lineup includes the following products: ZUIKO DIGITAL 14mm-54mm f2.8-3.5: Standard zoom lens equivalent to 28-108 mm on a 35 mm lens ZUIKO DIGITAL ED 50mm-200mm f2.8-3.5: Super telephoto zoom lens equivalent to 100-400 mm on a 35 mm lens ZUIKO DIGITAL ED...
EVOLT E-300 Advanced Manual (English)
Page 198
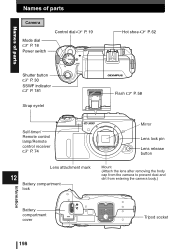
Names of parts Names of parts Camera Mode dial ~ P. 18 Power switch Control dial ~ P. 19 Hot shoe ~ P. 62 Shutter button ~ P. 30 SSWF indicator ~ P. 181 Strap eyelet Flash ~ P. 58 Self-timer/ Remote control lamp/Remote control receiver ~ P. 74 Mirror Lens lock pin Lens release button Lens attachment mark 12 Battery compartment lock Mount (Attach the lens after removing the body cap from the camera to prevent dust and dirt from entering the camera body.) Information Battery compartment cover Tripod socket 198
Names of parts Names of parts Camera Mode dial ~ P. 18 Power switch Control dial ~ P. 19 Hot shoe ~ P. 62 Shutter button ~ P. 30 SSWF indicator ~ P. 181 Strap eyelet Flash ~ P. 58 Self-timer/ Remote control lamp/Remote control receiver ~ P. 74 Mirror Lens lock pin Lens release button Lens attachment mark 12 Battery compartment lock Mount (Attach the lens after removing the body cap from the camera to prevent dust and dirt from entering the camera body.) Information Battery compartment cover Tripod socket 198