
DS-150 Operation Manual (English)
Page 2
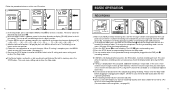
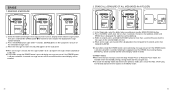
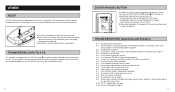
... of incorrect operation. Position the batteries with a torn or cracked outer cover. • Remove the batteries if you for future reference. • The following symbols indicate important safety related information. Batteries should never be exposed to burn yourself,and; ᕄ call your new recorder, read this manual in an easily accessible location for purchasing the Olympus Digital Voice Recorder DS-150. Doing so...
... of incorrect operation. Position the batteries with a torn or cracked outer cover. • Remove the batteries if you for future reference. • The following symbols indicate important safety related information. Batteries should never be exposed to burn yourself,and; ᕄ call your new recorder, read this manual in an easily accessible location for purchasing the Olympus Digital Voice Recorder DS-150. Doing so...

DS-150 Operation Manual (English)
Page 3
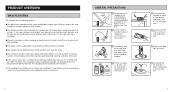
...Olympus representative for servicing. Continued use the recorder in an medical establishment, please follow the instructions from each establishment. 5 Use only the correct power supply voltage as abnormal noise, heat, smoke, or a burning odor: ᕃ immediately disconnect the power supply plug from the power outlet by putting the earphone cord around the neck; - Make sure the power supply plug... thinner). Do not increase the volume level before starting operation. Continued use this recorder out of the reach of the AC adapter under these circumstances could result in...
...Olympus representative for servicing. Continued use the recorder in an medical establishment, please follow the instructions from each establishment. 5 Use only the correct power supply voltage as abnormal noise, heat, smoke, or a burning odor: ᕃ immediately disconnect the power supply plug from the power outlet by putting the earphone cord around the neck; - Make sure the power supply plug... thinner). Do not increase the volume level before starting operation. Continued use this recorder out of the reach of the AC adapter under these circumstances could result in...

DS-150 Operation Manual (English)
Page 4
... DISPLAY (LCD) PANEL c c c c c c c c c c c c c c c c c c c c c c 11 INSTALLING THE BATTERIES c c c c c c c c c c c c c c c c c c c c c c c c c c c 11 REPLACING THE BATTERIES c c c c c c c c c c c c c c c c c c c c c c c c c c c 12 USING THE AC ADAPTER c c c c c c c c c c c c c c c c c c c c c c c c c c c c c 12 SETTING THE CLOCK AND ID NUMBER c c c c c c c c c c c c c c c c c c c c c c 13 BASIC OPERATION RECORDING c c c c c c c c c c c c c c c c c c c c c c c c c c c c c c c c c c c 15 RECORD PAUSE c c c c c c c c c c c c c c c c c c c c c c c c c c c c c c c c c 16 PLAYBACK...
... DISPLAY (LCD) PANEL c c c c c c c c c c c c c c c c c c c c c c 11 INSTALLING THE BATTERIES c c c c c c c c c c c c c c c c c c c c c c c c c c c 11 REPLACING THE BATTERIES c c c c c c c c c c c c c c c c c c c c c c c c c c c 12 USING THE AC ADAPTER c c c c c c c c c c c c c c c c c c c c c c c c c c c c c 12 SETTING THE CLOCK AND ID NUMBER c c c c c c c c c c c c c c c c c c c c c c 13 BASIC OPERATION RECORDING c c c c c c c c c c c c c c c c c c c c c c c c c c c c c c c c c c c 15 RECORD PAUSE c c c c c c c c c c c c c c c c c c c c c c c c c c c c c c c c c 16 PLAYBACK...
DS-150 Operation Manual (English)
Page 5
.... Do not operate the recorder in flash memory. vThe LCD panel includes a dot matrix display and clearly displays message numbers, a real-time counter, time remaining, current time and date, operating mode, warnings and other information. Avoid strong vibrations or shocks. the standard play (LP) mode allows long recording of short recordings are available for transferring recorded voice data to excessive moisture. 9 vThis digital voice recorder converts voice to excessive moisture or dust. Do not use organ...
.... Do not operate the recorder in flash memory. vThe LCD panel includes a dot matrix display and clearly displays message numbers, a real-time counter, time remaining, current time and date, operating mode, warnings and other information. Avoid strong vibrations or shocks. the standard play (LP) mode allows long recording of short recordings are available for transferring recorded voice data to excessive moisture. 9 vThis digital voice recorder converts voice to excessive moisture or dust. Do not use organ...
DS-150 Operation Manual (English)
Page 6
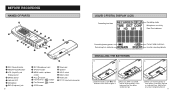
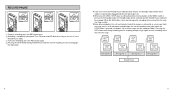
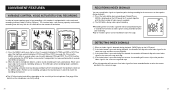
...; REC (Record) button ᕢ INDEX/FOLDER button ᕣ LCD (Liquid Crystal Display) panel ᕤ ERASE button ᕥ Indicator LED ᕦ Microphone ᕧ EAR (Earphone) jack 10 ᕨ MIC (Microphone) jack ᕩ SP DICT button µ MENU switch, up/down control ¸ Play ( ) button ¹ Fast Reverse ( Ƹ Fast Forward ( ) button ) button ƹ STOP button ƺ Strap hook ƻ Speaker Ƽ HOLD switch ƽ Battery cover ƾ Power jack ƿ PC I/F (interface) connector LIQUID CRYSTAL DISPLAY (LCD) Recording time/date Recording mode Microphone sensitivity...
...; REC (Record) button ᕢ INDEX/FOLDER button ᕣ LCD (Liquid Crystal Display) panel ᕤ ERASE button ᕥ Indicator LED ᕦ Microphone ᕧ EAR (Earphone) jack 10 ᕨ MIC (Microphone) jack ᕩ SP DICT button µ MENU switch, up/down control ¸ Play ( ) button ¹ Fast Reverse ( Ƹ Fast Forward ( ) button ) button ƹ STOP button ƺ Strap hook ƻ Speaker Ƽ HOLD switch ƽ Battery cover ƾ Power jack ƿ PC I/F (interface) connector LIQUID CRYSTAL DISPLAY (LCD) Recording time/date Recording mode Microphone sensitivity...
DS-150 Operation Manual (English)
Page 7
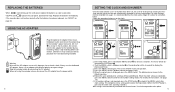
... or output voltage. Never use the dedicated AC adapter. This completes menu setting and restores the Stop mode. (When the STOP button is displayed, press the MENU switch. The menu will be displayed on the LCD panel, operation will blink in the up /down control to play back the voice data being recorded. Replace the batteries immediately. Do not connect the AC adapter to display the [Date] and [Time]. ᕅ Press the MENU switch again. If [BATT] and light on...
... or output voltage. Never use the dedicated AC adapter. This completes menu setting and restores the Stop mode. (When the STOP button is displayed, press the MENU switch. The menu will be displayed on the LCD panel, operation will blink in the up /down control to play back the voice data being recorded. Replace the batteries immediately. Do not connect the AC adapter to display the [Date] and [Time]. ᕅ Press the MENU switch again. If [BATT] and light on...
DS-150 Operation Manual (English)
Page 8
... start . t If [NEW] is not displayed when you always check the display before plugging or unplugging the adapter. In this case, erase unnecessary messages to free up direction to change the folder, press the INDEX/FOLDER button ᕢ to move to the position after ID setting ends menu setting and restores the Stop mode. t The recording monitor volume cannot be displayed on the LCD panel ᕣ. ᕄ twice the MENU switch's up/down control...
... start . t If [NEW] is not displayed when you always check the display before plugging or unplugging the adapter. In this case, erase unnecessary messages to free up direction to change the folder, press the INDEX/FOLDER button ᕢ to move to the position after ID setting ends menu setting and restores the Stop mode. t The recording monitor volume cannot be displayed on the LCD panel ᕣ. ᕄ twice the MENU switch's up/down control...
DS-150 Operation Manual (English)
Page 9
... REC button Pressing REC button Pressing REC button Pressing STOP button once ̄ ̄̄ Message No. 1 Pressing REC button once ̄̄ Message No. 2 ̆ Pressing STOP button once Pressing STOP button once Message No. 2 ̄̄ ̄ Message No. 3 Record Pause 16 17 t If the unit is left in the Standby mode, the Standby mode will be engaged. Each message consists of all voice data recorded from the start of the REC, STOP, play, fast-forward and fast-reverse buttons or the MENU switch...
... REC button Pressing REC button Pressing REC button Pressing STOP button once ̄ ̄̄ Message No. 1 Pressing REC button once ̄̄ Message No. 2 ̆ Pressing STOP button once Pressing STOP button once Message No. 2 ̄̄ ̄ Message No. 3 Record Pause 16 17 t If the unit is left in the Standby mode, the Standby mode will be engaged. Each message consists of all voice data recorded from the start of the REC, STOP, play, fast-forward and fast-reverse buttons or the MENU switch...
DS-150 Operation Manual (English)
Page 10
... the STOP button to end playback and stop at the end of the next message. The recorder will sound if you want to play back. ᕄ Press the Up/Down control (Forward Skip and Reverse Skip) on the MENU switch until the number of the message you have reached the end of the recorded messages in the Playback-Pause mode to resume playback. Volume levels from 0 to 30 are displayed on...
... the STOP button to end playback and stop at the end of the next message. The recorder will sound if you want to play back. ᕄ Press the Up/Down control (Forward Skip and Reverse Skip) on the MENU switch until the number of the message you have reached the end of the recorded messages in the Playback-Pause mode to resume playback. Volume levels from 0 to 30 are displayed on...
DS-150 Operation Manual (English)
Page 11
... initiated in the Stop mode using the Up/Down control on the MENU switch (in the up direction). tReverse skip can also be initiated in the Stop mode using the Up/Down control on the MENU switch (in the down direction). The recorder is reached, normal playback starts automatically. Message No. 2 Message No. 3 Stop mode ̄ Non-recorded section ̇ Reverse skip and stop ̇ Reverse skip and stop Pressing fast reverse button within 2 seconds of...
... initiated in the Stop mode using the Up/Down control on the MENU switch (in the up direction). tReverse skip can also be initiated in the Stop mode using the Up/Down control on the MENU switch (in the down direction). The recorder is reached, normal playback starts automatically. Message No. 2 Message No. 3 Stop mode ̄ Non-recorded section ̇ Reverse skip and stop ̇ Reverse skip and stop Pressing fast reverse button within 2 seconds of...
DS-150 Operation Manual (English)
Page 12
... INDEX/FOLDER button. ᕄ Press the MENU switch once (for more than one second. Erasure of all messages are erased, [OK] is displayed on the LCD panel for more than a second. ERASE 1. The displayed message number will blink. ᕄ Press the ERASE button again within 4 seconds message erasure will be canceled and the normal display will start. ᕆ When all the messages in the Stop, Record-Pause or Playback-Pause mode, the recorder...
... INDEX/FOLDER button. ᕄ Press the MENU switch once (for more than one second. Erasure of all messages are erased, [OK] is displayed on the LCD panel for more than a second. ERASE 1. The displayed message number will blink. ᕄ Press the ERASE button again within 4 seconds message erasure will be canceled and the normal display will start. ᕆ When all the messages in the Stop, Record-Pause or Playback-Pause mode, the recorder...
DS-150 Operation Manual (English)
Page 13
... with a voice activated recording function (called VCVA by Olympus). The LED lights when recording begins and blinks during Record-Pause. ᕅ The recording activation level can be adjusted during VCVA recording with very little loss of voice data at important points during playback, [INDX] lights on the microphone sensitivity setting. 24 RECORDING INDEX SIGNALS You can record index signals at the moment of the microphone. This function helps save memory capacity and extends recording time with the...
... with a voice activated recording function (called VCVA by Olympus). The LED lights when recording begins and blinks during Record-Pause. ᕅ The recording activation level can be adjusted during VCVA recording with very little loss of voice data at important points during playback, [INDX] lights on the microphone sensitivity setting. 24 RECORDING INDEX SIGNALS You can record index signals at the moment of the microphone. This function helps save memory capacity and extends recording time with the...
DS-150 Operation Manual (English)
Page 14
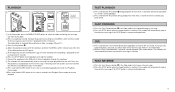
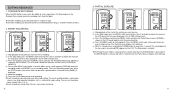
... to stop erasing. (The Partial Erasure display starts blinking.) ᕇ Within 4 seconds, press and hold the ERASE button for less than 2 seconds) to display the menu on the LCD panel (the first menu displayed is the R-TIME setting menu). ᕅ Press the Up/Down control on the MENU switch to end insert recording. PARTIAL ERASURE ᕅ ᕆ ERASE SP DICT MENU ERASE SP DICT MENU ᕇ ERASE SP DICT MENU INDEX/ FOLDER INDEX/ FOLDER INDEX/ FOLDER REC STOP REC STOP REC STOP ᕃ Stop playback...
... to stop erasing. (The Partial Erasure display starts blinking.) ᕇ Within 4 seconds, press and hold the ERASE button for less than 2 seconds) to display the menu on the LCD panel (the first menu displayed is the R-TIME setting menu). ᕅ Press the Up/Down control on the MENU switch to end insert recording. PARTIAL ERASURE ᕅ ᕆ ERASE SP DICT MENU ERASE SP DICT MENU ᕇ ERASE SP DICT MENU INDEX/ FOLDER INDEX/ FOLDER INDEX/ FOLDER REC STOP REC STOP REC STOP ᕃ Stop playback...

DS-150 Operation Manual (English)
Page 15
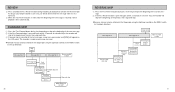
... direction FORMAT I D Time/date Stop mode More than 2 seconds ALARM *Flow in Up direction Time/date I D FORMAT * When the STOP button is plugged in, the built-in speaker does not generate alarms. (Alarm setting change the settings of remaining memory during recording. 3. Alarm setting (ON/OFF)".) Adjusting the Up/Down control and pushing the MENU switch allows you to change procedure) ᕃ In the Stop mode, press and hold the MENU switch for less than 2 seconds to display the alarm setting menu...
... direction FORMAT I D Time/date Stop mode More than 2 seconds ALARM *Flow in Up direction Time/date I D FORMAT * When the STOP button is plugged in, the built-in speaker does not generate alarms. (Alarm setting change the settings of remaining memory during recording. 3. Alarm setting (ON/OFF)".) Adjusting the Up/Down control and pushing the MENU switch allows you to change procedure) ᕃ In the Stop mode, press and hold the MENU switch for less than 2 seconds to display the alarm setting menu...
DS-150 Operation Manual (English)
Page 16
... [LP]). ᕄ Pressing the MENU switch within 4 seconds. Use the remaining time only as well). t Recording time is about 75 minutes in the SP mode and about 160 minutes in flash memory since it is displayed. tWhen the HOLD switch is set when the STOP button is pressed or when no operation is performed for 4 seconds after the Move Message menu is performed for 4 seconds after the formatting display starts blinking.
... [LP]). ᕄ Pressing the MENU switch within 4 seconds. Use the remaining time only as well). t Recording time is about 75 minutes in the SP mode and about 160 minutes in flash memory since it is displayed. tWhen the HOLD switch is set when the STOP button is pressed or when no operation is performed for 4 seconds after the Move Message menu is performed for 4 seconds after the formatting display starts blinking.
DS-150 Operation Manual (English)
Page 17
... reset button with the DS-150 Via Voice kit (if you take a long time to open ? All settings are automatically adjusted to ensure best results. • Recording mode setting: Standard Play (SP) mode • Microphone sensitivity setting: Dictation (DICT) mode • Alarm setting: The alarms are not being recorded? Is the HOLD switch set to an optimum level? Q-5: An alarm sounds during recording. A-7: Have 16 index signals already been recorded? Do not remove the batteries. tPreviously recorded messages...
... reset button with the DS-150 Via Voice kit (if you take a long time to open ? All settings are automatically adjusted to ensure best results. • Recording mode setting: Standard Play (SP) mode • Microphone sensitivity setting: Dictation (DICT) mode • Alarm setting: The alarms are not being recorded? Is the HOLD switch set to an optimum level? Q-5: An alarm sounds during recording. A-7: Have 16 index signals already been recorded? Do not remove the batteries. tPreviously recorded messages...
DS-150 Operation Manual (English)
Page 18
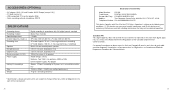
... transfer kit • USB-compatible PC transfer adapter (RA5) • Noise canceling external microphone (ME12) SPECIFICATIONS Recording format Recording medium Specified input level Overall frequency response Recording time Speaker Microphone jack Earphone jack Maximum output (3 V DC) Power supply Battery life (recording) Size Weight Digital recording in accordance with Part 15 of the FCC Rules, Operation is subject to the following two conditions: (1) This device may cause undesired operation. Canadian RFI This digital apparatus does not exceed the Class B limits for radio...
... transfer kit • USB-compatible PC transfer adapter (RA5) • Noise canceling external microphone (ME12) SPECIFICATIONS Recording format Recording medium Specified input level Overall frequency response Recording time Speaker Microphone jack Earphone jack Maximum output (3 V DC) Power supply Battery life (recording) Size Weight Digital recording in accordance with Part 15 of the FCC Rules, Operation is subject to the following two conditions: (1) This device may cause undesired operation. Canadian RFI This digital apparatus does not exceed the Class B limits for radio...


