
MC573/ES5473 Users Guide - English
Page 3
... Functions of Screen Items for Fax 121 8 Maintenance 124 Replacing Consumables ...125 Cautions When Replacing Consumables 125 Replacing the Toner Cartridges ...126 Replacing the Image Drum ...130 Replacing the Image Drum and Toner Cartridge at the Same Time 134 Cleaning Each Part of the Machine 138 Cleaning the Document Glass ...138 Cleaning...
... Functions of Screen Items for Fax 121 8 Maintenance 124 Replacing Consumables ...125 Cautions When Replacing Consumables 125 Replacing the Toner Cartridges ...126 Replacing the Image Drum ...130 Replacing the Image Drum and Toner Cartridge at the Same Time 134 Cleaning Each Part of the Machine 138 Cleaning the Document Glass ...138 Cleaning...

MC573/ES5473 Users Guide - English
Page 6
... becomes extremely hot, the machine emits smoke or odor, or you turn the power on the machine. Before starting Do not vacuum spilled toner with water or other liquid get wet. Do not insert any object into a fire. General Cautions Do not touch the safety switch inside...or injury may occur, possibly resulting in electric shock. Electric shock or fire may result. Burns may result. Fire may result. Vacuuming spilled toner with a damp rag or other than instructed in ignition due to sparks from electric contacts or other foreign objects into the outlet for an ...
... becomes extremely hot, the machine emits smoke or odor, or you turn the power on the machine. Before starting Do not vacuum spilled toner with water or other liquid get wet. Do not insert any object into a fire. General Cautions Do not touch the safety switch inside...or injury may occur, possibly resulting in electric shock. Electric shock or fire may result. Burns may result. Fire may result. Vacuuming spilled toner with a damp rag or other than instructed in ignition due to sparks from electric contacts or other foreign objects into the outlet for an ...

MC573/ES5473 Users Guide - English
Page 7
NOTE! Do not disassemble the image drum or toner cartridge, or force them dirty. Seek medical advice if necessary. To avoid disturbing reflections on the display work place, this product shall not be placed ..., making them open. This product is not intended for use in the immediate visual field on the display work place. You may inhale the scattered toner, or the toner may result.
NOTE! Do not disassemble the image drum or toner cartridge, or force them dirty. Seek medical advice if necessary. To avoid disturbing reflections on the display work place, this product shall not be placed ..., making them open. This product is not intended for use in the immediate visual field on the display work place. You may inhale the scattered toner, or the toner may result.

MC573/ES5473 Users Guide - English
Page 10
... LAN 10.0 Telephone 3.0 AirPrint and the AirPrint logo are trademarks registered to help reduce risk of staining skin or clothing. • MANUFACTURER Oki Data Corporation, 4-11-22 Shibaura, Minato-ku, Tokyo 108-8551, - 10 - Energy Star is a registered trademark of Sony Corporation. FeliCa... of cold water and seek medical attention. If inhaled, move the person to induce vomiting. Spillages should be treated with toner powder: If swallowed, give small amounts of Microsoft Corporation. in electrical and electronic equipment. Microsoft, Windows, Windows Server, ...
... LAN 10.0 Telephone 3.0 AirPrint and the AirPrint logo are trademarks registered to help reduce risk of staining skin or clothing. • MANUFACTURER Oki Data Corporation, 4-11-22 Shibaura, Minato-ku, Tokyo 108-8551, - 10 - Energy Star is a registered trademark of Sony Corporation. FeliCa... of cold water and seek medical attention. If inhaled, move the person to induce vomiting. Spillages should be treated with toner powder: If swallowed, give small amounts of Microsoft Corporation. in electrical and electronic equipment. Microsoft, Windows, Windows Server, ...

MC573/ES5473 Users Guide - English
Page 17
... Drum". • Software DVD-ROM • Power cord • Telephone cable • Four image drums (black, cyan, magenta and yellow) • Four starter toner cartridges (black, cyan, magenta and yellow) • LAN cables or USB cables are not included in the future. Do not dispose packaging materials as they.... If other consumables are used first, the life time may not be shown correctly or supplied consumables may result. Setting Up The starter toner cartridge is included in this machine by 2 persons, because it weighs approximately 31 kg. For the MC model, the starter...
... Drum". • Software DVD-ROM • Power cord • Telephone cable • Four image drums (black, cyan, magenta and yellow) • Four starter toner cartridges (black, cyan, magenta and yellow) • LAN cables or USB cables are not included in the future. Do not dispose packaging materials as they.... If other consumables are used first, the life time may not be shown correctly or supplied consumables may result. Setting Up The starter toner cartridge is included in this machine by 2 persons, because it weighs approximately 31 kg. For the MC model, the starter...

MC573/ES5473 Users Guide - English
Page 19
5 Press the button (A) and open the output tray (a) until the tip aligns on the fuser unit toward you to unlock. 2. Setting Up 6 Pinch the tip of blue lever of the machine. - 19 - Turn the levers of all 4 toner cartridges. 8 Hold the fuser unit handle and lift the fuser unit out of the toner cartridge and turn forward until it stops. 7 Pull the locking levers on the lug of the cartridge.
5 Press the button (A) and open the output tray (a) until the tip aligns on the fuser unit toward you to unlock. 2. Setting Up 6 Pinch the tip of blue lever of the machine. - 19 - Turn the levers of all 4 toner cartridges. 8 Hold the fuser unit handle and lift the fuser unit out of the toner cartridge and turn forward until it stops. 7 Pull the locking levers on the lug of the cartridge.

MC573/ES5473 Users Guide - English
Page 20
9 Push the blue lever on the fuser unit and remove the safety stopper. 11 Push the levers on the fuser unit to the grooves behind the toner cartridges, place the fuser unit into the machine. 12 Close the output tray (a) slowly and push the center of the output tray for confirmation. - 20 - Setting Up 10 Hold the fuser unit handle and aligning the fuser unit to lock. 2.
9 Push the blue lever on the fuser unit and remove the safety stopper. 11 Push the levers on the fuser unit to the grooves behind the toner cartridges, place the fuser unit into the machine. 12 Close the output tray (a) slowly and push the center of the output tray for confirmation. - 20 - Setting Up 10 Hold the fuser unit handle and aligning the fuser unit to lock. 2.

MC573/ES5473 Users Guide - English
Page 54
Inside of the machine Symbol a b c d e f Name LED head Fuser unit Toner cartridge / Image drum (Y: yellow) Toner cartridge / Image drum (M: magenta) Toner cartridge / Image drum (C: cyan) Toner cartridge / Image drum (K: black) - 54 - 3. Basic Operations
Inside of the machine Symbol a b c d e f Name LED head Fuser unit Toner cartridge / Image drum (Y: yellow) Toner cartridge / Image drum (M: magenta) Toner cartridge / Image drum (C: cyan) Toner cartridge / Image drum (K: black) - 54 - 3. Basic Operations

MC573/ES5473 Users Guide - English
Page 57
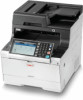
... functions. Item 2 Title and operation guide area 3 Tab labels 3. Press a label to use the copy functions. Only available buttons are displayed. • Change Consumable & Maintain (Toner cartridges, Image drams, Belt units, Fuser units) • Maintain and Care for the Unit (Feeder Rollers, LED head, Scanner reader) • How to View the...
... functions. Item 2 Title and operation guide area 3 Tab labels 3. Press a label to use the copy functions. Only available buttons are displayed. • Change Consumable & Maintain (Toner cartridges, Image drams, Belt units, Fuser units) • Maintain and Care for the Unit (Feeder Rollers, LED head, Scanner reader) • How to View the...

MC573/ES5473 Users Guide - English
Page 103
... the multi-page printing, booklet printing, poster printing, or other settings. About Screens and Functions of the printer driver. Decreases the print density to save toner. Print Item 1 Driver Setting 2 Image layout 3 Media 4 Finishing Mode 5 2-Sided Printing (Duplex) 6 Orientation 7 Color Setting...
... the multi-page printing, booklet printing, poster printing, or other settings. About Screens and Functions of the printer driver. Decreases the print density to save toner. Print Item 1 Driver Setting 2 Image layout 3 Media 4 Finishing Mode 5 2-Sided Printing (Duplex) 6 Orientation 7 Color Setting...

MC573/ES5473 Users Guide - English
Page 106
... printer page] check box, a document is selected. Specifies the user authentication. Description Specifies the color adjustment for printing. Saves toner when printing. Sets when printing print formats which are printed in units of copies. Sets some other print options. Specifies the ...used if [Shared Print] or [Private Print] is printed on paper of a different size from that of the printer driver. Item 1 Color Mode 2 Toner Saving 3 Advanced 4 Color Swatch 5 Default - 106 - If you want to Page 4 Watermarks 5 Overlays 6 Advanced 7 User Auth Description Specifies the ...
... printer page] check box, a document is selected. Specifies the user authentication. Description Specifies the color adjustment for printing. Saves toner when printing. Sets when printing print formats which are printed in units of copies. Sets some other print options. Specifies the ...used if [Shared Print] or [Private Print] is printed on paper of a different size from that of the printer driver. Item 1 Color Mode 2 Toner Saving 3 Advanced 4 Color Swatch 5 Default - 106 - If you want to Page 4 Watermarks 5 Overlays 6 Advanced 7 User Auth Description Specifies the ...

MC573/ES5473 Users Guide - English
Page 125
...a place with a damp rag or other areas of children. If a child accidentally swallows toner, immediately seek medical advice. If toner lands on the floor or other places, wipe the toner with fresh air. Burns may ignite, resulting in a location where it is exposed to ...replace consumables. • Cautions When Replacing Consumables • Replacing the Toner Cartridges • Replacing the Image Drum • Replacing the Image Drum and Toner Cartridge at the Same Time Cautions When Replacing Consumables Observe the following cautions when replacing. 8....
...a place with a damp rag or other areas of children. If a child accidentally swallows toner, immediately seek medical advice. If toner lands on the floor or other places, wipe the toner with fresh air. Burns may ignite, resulting in a location where it is exposed to ...replace consumables. • Cautions When Replacing Consumables • Replacing the Toner Cartridges • Replacing the Image Drum • Replacing the Image Drum and Toner Cartridge at the Same Time Cautions When Replacing Consumables Observe the following cautions when replacing. 8....
MC573/ES5473 Users Guide - English
Page 126
...extra care when using care not to scatter the toner. • Use Oki Data genuine consumables to do so may damage the image drum. • Toner powder may land on your clothes, wash with toner. Maintenance Replacing the Toner Cartridges When the "[COLOR] Toner Low" message ("[COLOR]" indicates C (cyan), ... When handling a paper jam or replacing toner cartridges, use care not to remove. However, please replace the toner cartridge quickly after more than Oki data genuine consumables are able to print. Please replace the toner cartridge as failure to ensure optimum performance ...
...extra care when using care not to scatter the toner. • Use Oki Data genuine consumables to do so may damage the image drum. • Toner powder may land on your clothes, wash with toner. Maintenance Replacing the Toner Cartridges When the "[COLOR] Toner Low" message ("[COLOR]" indicates C (cyan), ... When handling a paper jam or replacing toner cartridges, use care not to remove. However, please replace the toner cartridge quickly after more than Oki data genuine consumables are able to print. Please replace the toner cartridge as failure to ensure optimum performance ...

MC573/ES5473 Users Guide - English
Page 127
... in the fire. While removing consumables, be careful not to hit them to get burned. They may explode, and the toner inside may fly off and cause getting burned. 3 Press the button (A) and open the output tray (b) completely. Do not touch it from the machine. Possible ...to get burned. Possible to the LED head. 4 Identify an empty toner cartridge by its label color. 5 Pinch the tip of blue lever (c) of the toner cartridge and turn it toward you until the tip aligns on the lug of the cartridge. 7 Unpack a new...
... in the fire. While removing consumables, be careful not to hit them to get burned. They may explode, and the toner inside may fly off and cause getting burned. 3 Press the button (A) and open the output tray (b) completely. Do not touch it from the machine. Possible ...to get burned. Possible to the LED head. 4 Identify an empty toner cartridge by its label color. 5 Pinch the tip of blue lever (c) of the toner cartridge and turn it toward you until the tip aligns on the lug of the cartridge. 7 Unpack a new...

MC573/ES5473 Users Guide - English
Page 128
Maintenance - 128 - Then insert the right side gently into place. 8. 8 Shake the cartridge several times vertically and horizontally. Do not insert a toner cartridge without removing the tape. 9 Remove the tape (e) from the toner cartridge. 10 Insert a new toner cartridge (d) by aligning its left side indentation (f) with the protrusion (g) on the image drum so the toner cartridge and image drum color labels align.
Maintenance - 128 - Then insert the right side gently into place. 8. 8 Shake the cartridge several times vertically and horizontally. Do not insert a toner cartridge without removing the tape. 9 Remove the tape (e) from the toner cartridge. 10 Insert a new toner cartridge (d) by aligning its left side indentation (f) with the protrusion (g) on the image drum so the toner cartridge and image drum color labels align.

MC573/ES5473 Users Guide - English
Page 129
... Wipe the lens of ADF has fallen, open and close the ADF cover. 11 Hold the cartridge, pinch the tip of blue lever (c) of the toner cartridge, and turn forward until the tip aligns on the lug of the output tray for confirmation. Maintenance 13 Close the output tray (b) slowly and... tissue paper lightly. 14 Hold the handle (B) to fall and get in the way of loading documents. They damage the LED head. 15 Please recycle toner cartridges. - 129 -
... Wipe the lens of ADF has fallen, open and close the ADF cover. 11 Hold the cartridge, pinch the tip of blue lever (c) of the toner cartridge, and turn forward until the tip aligns on the lug of the output tray for confirmation. Maintenance 13 Close the output tray (b) slowly and... tissue paper lightly. 14 Hold the handle (B) to fall and get in the way of loading documents. They damage the LED head. 15 Please recycle toner cartridges. - 129 -
MC573/ES5473 Users Guide - English
Page 130
...replacement cycle of an image drum is set to [Disable], the "[COLOR] Image Drum Near Life" message does not appear. • Use Oki Data genuine consumables to ensure optimum performance of the products. • Charges for services for problems caused by half. Printing one . • ... drum. Maintenance When the "[COLOR] Image Drum Near Life" message appears on the printing conditions. • The actual number of the toner cartridges will be less than half the above estimation depending on the display screen, prepare a replacement image drum. When the "Please install new...
...replacement cycle of an image drum is set to [Disable], the "[COLOR] Image Drum Near Life" message does not appear. • Use Oki Data genuine consumables to ensure optimum performance of the products. • Charges for services for problems caused by half. Printing one . • ... drum. Maintenance When the "[COLOR] Image Drum Near Life" message appears on the printing conditions. • The actual number of the toner cartridges will be less than half the above estimation depending on the display screen, prepare a replacement image drum. When the "Please install new...

MC573/ES5473 Users Guide - English
Page 131
... increments). 1 Prepare new image drum. 2 Hold the handle (B) and open the output tray (b) completely. 6 Hold the cartridge, pinch the tip of blue lever (d) of the toner cartridge, and turn it toward you until the tip aligns on the lug of the cartridge. 4 Identify the image drum that reached its lifetime by...
... increments). 1 Prepare new image drum. 2 Hold the handle (B) and open the output tray (b) completely. 6 Hold the cartridge, pinch the tip of blue lever (d) of the toner cartridge, and turn it toward you until the tip aligns on the lug of the cartridge. 4 Identify the image drum that reached its lifetime by...

MC573/ES5473 Users Guide - English
Page 132
...color label align. Then insert the right side gently into place. 8 Unpack a new image drum and place it from the image drum. 8. 7 Lift the toner cartridge (e) from the right side, and remove it on a flat surface. 9 Remove the desiccant pack. 12 Hold the cartridge, pinch the tip of blue... lever (d) of the toner cartridge, and turn forward until the tip aligns on the lug of the cartridge. 10 Remove the toner cover. 11 Insert the toner cartridge (e) removed in step 7 by aligning its left side indentation (f) with the protrusion...
...color label align. Then insert the right side gently into place. 8 Unpack a new image drum and place it from the image drum. 8. 7 Lift the toner cartridge (e) from the right side, and remove it on a flat surface. 9 Remove the desiccant pack. 12 Hold the cartridge, pinch the tip of blue... lever (d) of the toner cartridge, and turn forward until the tip aligns on the lug of the cartridge. 10 Remove the toner cover. 11 Insert the toner cartridge (e) removed in step 7 by aligning its left side indentation (f) with the protrusion...

MC573/ES5473 Users Guide - English
Page 134
... completely. 3 Press the button (A) and open the output tray (b) completely. Replacing the Image Drum and Toner Cartridge at the Same Time This section describes how to replace the image drum and toner cartridge with new ones at the same time. • Use extra care when handling the image drum (the... green cylinder), because it is extremely hot. Do not leave the image drum for 5 minutes or more ). Maintenance 4 Identify an empty toner cartridge by its label color. 5 Remove the image drum (c) from the machine and place it . 8. Do not touch it on a flat surface. - 134 ...
... completely. 3 Press the button (A) and open the output tray (b) completely. Replacing the Image Drum and Toner Cartridge at the Same Time This section describes how to replace the image drum and toner cartridge with new ones at the same time. • Use extra care when handling the image drum (the... green cylinder), because it is extremely hot. Do not leave the image drum for 5 minutes or more ). Maintenance 4 Identify an empty toner cartridge by its label color. 5 Remove the image drum (c) from the machine and place it . 8. Do not touch it on a flat surface. - 134 ...


