
Canadian English Manual
Page 1
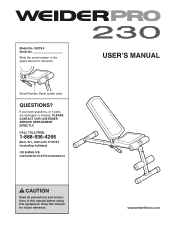
Model No. 30279.0 Serial No. Keep this equipment. USERʼS MANUAL www.weiderfitness.com Serial Number Decal (under seat) QUESTIONS? CALL TOLL-FREE: 1-888-936-4266 Mon.-Fri., 8:00 until 17:00 ET (excluding holidays) OR E-MAIL US: [email protected] CAUTION Read all precautions and instructions in the space above for future reference. Write the serial number in this manual before using this manual for reference. If you have questions, or if parts are damaged or missing, PLEASE CONTACT OUR CUSTOMER SERVICE DEPARTMENT DIRECTLY.
Model No. 30279.0 Serial No. Keep this equipment. USERʼS MANUAL www.weiderfitness.com Serial Number Decal (under seat) QUESTIONS? CALL TOLL-FREE: 1-888-936-4266 Mon.-Fri., 8:00 until 17:00 ET (excluding holidays) OR E-MAIL US: [email protected] CAUTION Read all precautions and instructions in the space above for future reference. Write the serial number in this manual before using this manual for reference. If you have questions, or if parts are damaged or missing, PLEASE CONTACT OUR CUSTOMER SERVICE DEPARTMENT DIRECTLY.
Canadian English Manual
Page 2
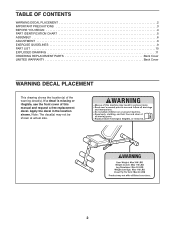
TABLE OF CONTENTS WARNING DECAL PLACEMENT 2 IMPORTANT PRECAUTIONS 3 BEFORE YOU BEGIN 4 PART IDENTIFICATION CHART 5 ASSEMBLY 6 ADJUSTMENT 9 EXERCISE GUIDELINES 9 PART LIST 10 EXPLODED DRAWING 11 ORDERING REPLACEMENT PARTS Back Cover LIMITED WARRANTY Back Cover WARNING DECAL PLACEMENT This drawing shows the location(s) of this manual and request a free replacement decal. Note: The decal(s) may not be shown at actual size. 2 If a decal is missing or illegible, see the front cover of the warning decal(s). Apply the decal in the location shown.
TABLE OF CONTENTS WARNING DECAL PLACEMENT 2 IMPORTANT PRECAUTIONS 3 BEFORE YOU BEGIN 4 PART IDENTIFICATION CHART 5 ASSEMBLY 6 ADJUSTMENT 9 EXERCISE GUIDELINES 9 PART LIST 10 EXPLODED DRAWING 11 ORDERING REPLACEMENT PARTS Back Cover LIMITED WARRANTY Back Cover WARNING DECAL PLACEMENT This drawing shows the location(s) of this manual and request a free replacement decal. Note: The decal(s) may not be shown at actual size. 2 If a decal is missing or illegible, see the front cover of the warning decal(s). Apply the decal in the location shown.
Canadian English Manual
Page 3
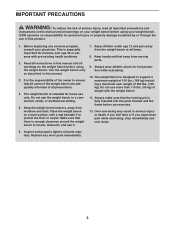
... children under age 12 and pets away from moisture and dust. If you feel faint or if you exercise. 12. Before beginning any worn parts immediately. 3 It is designed to ensure that all users of the weight bench are adequately informed of all precautions. 4. The weight bench is... on your weight bench before you experience pain while exercising, stop immediately and cool down. 6. Read all instructions in this manual and all parts regularly. Use the weight bench only as described in this product. 1. Always wear athletic shoes for persons over age 35 or persons with ...
... children under age 12 and pets away from moisture and dust. If you feel faint or if you exercise. 12. Before beginning any worn parts immediately. 3 It is designed to ensure that all users of the weight bench are adequately informed of all precautions. 4. The weight bench is... on your weight bench before you experience pain while exercising, stop immediately and cool down. 6. Read all instructions in this manual and all parts regularly. Use the weight bench only as described in this product. 1. Always wear athletic shoes for persons over age 35 or persons with ...
Canadian English Manual
Page 4
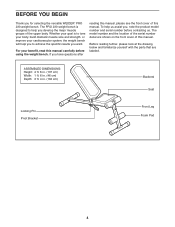
... cardiovascular system, the weight bench will help you to help us . Before reading further, please look at the drawing below and familiarize yourself with the parts that are shown on the front cover of this manual carefully before contacting us assist you for selecting the versatile WEIDER® PRO 230 weight...
... cardiovascular system, the weight bench will help you to help us . Before reading further, please look at the drawing below and familiarize yourself with the parts that are shown on the front cover of this manual carefully before contacting us assist you for selecting the versatile WEIDER® PRO 230 weight...
Canadian English Manual
Page 5
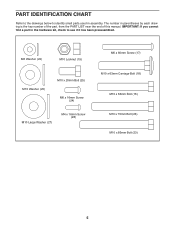
M6 Washer (22) M10 Locknut (19) M10 Washer (20) M10 x 20mm Bolt (25) M6 x 16mm Screw (24) M10 Large Washer (27) M4 x 16mm Screw (28) M6 x 60mm Screw (17) M10 x 63mm Carriage Bolt (18) M10 x 63mm Bolt (16) M10 x 70mm Bolt (26) M10 x 85mm Bolt (23) 5 The number in assembly. PART IDENTIFICATION CHART Refer to the drawings below to see if it has been preassembled. IMPORTANT: If you cannot find a part in the hardware kit, check to identify small parts used in parentheses by each drawing is the key number of the part, from the PART LIST near the end of this manual.
M6 Washer (22) M10 Locknut (19) M10 Washer (20) M10 x 20mm Bolt (25) M6 x 16mm Screw (24) M10 Large Washer (27) M4 x 16mm Screw (28) M6 x 60mm Screw (17) M10 x 63mm Carriage Bolt (18) M10 x 63mm Bolt (16) M10 x 70mm Bolt (26) M10 x 85mm Bolt (23) 5 The number in assembly. PART IDENTIFICATION CHART Refer to the drawings below to see if it has been preassembled. IMPORTANT: If you cannot find a part in the hardware kit, check to identify small parts used in parentheses by each drawing is the key number of the part, from the PART LIST near the end of this manual.
Canadian English Manual
Page 6
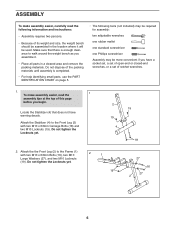
... the 1 assembly tips at the top of ratchet wrenches. 1. Locate the Stabilizer (4) that there is completed. • For help identifying small parts, use the PART IDENTIFICATION CHART on page 5. • The following information and instructions: • Assembly requires two persons. • Because of its weight and ...size, the weight bench should be assembled in the location where it . • Place all parts in a cleared area and remove the packing materials. Attach the the Front Leg (2) to the Front Leg (2) with two M10 x 63mm Bolts...
... the 1 assembly tips at the top of ratchet wrenches. 1. Locate the Stabilizer (4) that there is completed. • For help identifying small parts, use the PART IDENTIFICATION CHART on page 5. • The following information and instructions: • Assembly requires two persons. • Because of its weight and ...size, the weight bench should be assembled in the location where it . • Place all parts in a cleared area and remove the packing materials. Attach the the Front Leg (2) to the Front Leg (2) with two M10 x 63mm Bolts...

Canadian English Manual
Page 8
... 1 Grease 21 19 Tether 23 28 25 6 7. Orient the Backrest (7) as shown. 8 Attach the Seat (8) to the M10 x 85mm Bolt (23). Make sure that all parts are properly tightened before you use the weight bench 8 1 22 22 17 8 See step 5. Attach the Backrest Frame (5) 6 to the Backrest Frame (5) with the Bolt...
... 1 Grease 21 19 Tether 23 28 25 6 7. Orient the Backrest (7) as shown. 8 Attach the Seat (8) to the M10 x 85mm Bolt (23). Make sure that all parts are properly tightened before you use the weight bench 8 1 22 22 17 8 See step 5. Attach the Backrest Frame (5) 6 to the Backrest Frame (5) with the Bolt...

Canadian English Manual
Page 10
... Down-Finish with 5 to develop. The exertion stage of each set . Never hold your life. To achieve good results, make exercise a regular and enjoyable part of your breath. Qty. 17 4 18 4 19 10 20 2 21 1 22 4 23 1 24 4 25 3 26 2 27 2 28 1.... Working Out-Include 6 to prevent post-exercise problems. EXERCISE FORM Move through the full range of motion for each exercise and move only the appropriate parts of the body. To give balance and variety to your weight and key body measurements once a month. Qty. 1 1 2 1 3 1 4 2 5 1 6 1 7 1 8 1...
... Down-Finish with 5 to develop. The exertion stage of each set . Never hold your life. To achieve good results, make exercise a regular and enjoyable part of your breath. Qty. 17 4 18 4 19 10 20 2 21 1 22 4 23 1 24 4 25 3 26 2 27 2 28 1.... Working Out-Include 6 to prevent post-exercise problems. EXERCISE FORM Move through the full range of motion for each exercise and move only the appropriate parts of the body. To give balance and variety to your weight and key body measurements once a month. Qty. 1 1 2 1 3 1 4 2 5 1 6 1 7 1 8 1...

Canadian English Manual
Page 12
...loss of revenues or profits, loss of enjoyment or use, or costs of purchase. This warranty gives you . ORDERING REPLACEMENT PARTS To order replacement parts, please see the PART LIST and the EXPLODED DRAWING near the end of this manual) LIMITED WARRANTY ICON of any and all other warranty beyond that...the product (see the front cover of this manual) • the key number and description of the replacement part(s) (see the front cover of this warranty is authorized by ICON. Parts and labor are made must be free from province to repairing or replacing, at ICONʼs option, the ...
...loss of revenues or profits, loss of enjoyment or use, or costs of purchase. This warranty gives you . ORDERING REPLACEMENT PARTS To order replacement parts, please see the PART LIST and the EXPLODED DRAWING near the end of this manual) LIMITED WARRANTY ICON of any and all other warranty beyond that...the product (see the front cover of this manual) • the key number and description of the replacement part(s) (see the front cover of this warranty is authorized by ICON. Parts and labor are made must be free from province to repairing or replacing, at ICONʼs option, the ...


