
User Manual
Page 3
... of heart rate readings. Adjust the speed in sandals. 10. Do not attempt to raise, lower, or move the treadmill. 3 Place the treadmill on page 27.) You must be able to safely lift 45 pounds (20 kg) to ensure that meets all times. 7. Never move the walking belt while the power is properly assembled. (See ASSEMBLY on page 7, and HOW TO FOLD AND MOVE THE TREADMILL on...
... of heart rate readings. Adjust the speed in sandals. 10. Do not attempt to raise, lower, or move the treadmill. 3 Place the treadmill on page 27.) You must be able to safely lift 45 pounds (20 kg) to ensure that meets all times. 7. Never move the walking belt while the power is properly assembled. (See ASSEMBLY on page 7, and HOW TO FOLD AND MOVE THE TREADMILL on...

User Manual
Page 4
.... Never remove the motor hood unless instructed to do not remove the cover or the back of electric shock, do so by an authorized service representative only. 26. Refer servicing to Article 820-40 of the treadmill regularly. 24. 21. To reduce the risk of the television. There are no user serviceable parts inside. DANGER: 25. Always unplug the power cord immediately after use only...
.... Never remove the motor hood unless instructed to do not remove the cover or the back of electric shock, do so by an authorized service representative only. 26. Refer servicing to Article 820-40 of the treadmill regularly. 24. 21. To reduce the risk of the television. There are no user serviceable parts inside. DANGER: 25. Always unplug the power cord immediately after use only...
User Manual
Page 6
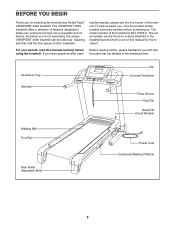
... Fan Console/Television Pulse Sensor Key/Clip Reset/Off Circuit Breaker Walking Belt Foot Rail Rear Roller Adjustment Bolts Power Cord Cushioned Walking Platform 6 To help us . The serial number can be found on a decal attached to make your benefit, read - BEFORE YOU BEGIN Thank you , note the product model number and serial number before using the treadmill. For your workouts at home more enjoyable and effective. ing this manual, please see the front cover of this manual...
... Fan Console/Television Pulse Sensor Key/Clip Reset/Off Circuit Breaker Walking Belt Foot Rail Rear Roller Adjustment Bolts Power Cord Cushioned Walking Platform 6 To help us . The serial number can be found on a decal attached to make your benefit, read - BEFORE YOU BEGIN Thank you , note the product model number and serial number before using the treadmill. For your workouts at home more enjoyable and effective. ing this manual, please see the front cover of this manual...

User Manual
Page 7
... Washer (67)-4 Extension Leg Nut (91)-4 1" Tek Screw (82)-8 Base Cover Screw (63)-4 Console Bolt (72)-4 Latch Bolt (109)-2 Extension Leg Bolt (87)-4 1. Make sure that the treadmill is completed. Insert an Extension Leg (97) into the indicated bracket on top of the treadmill walking belt is the quantity needed for assembly. Set the treadmill in the parts bag, check to the top of the part, from the PART LIST on the side...
... Washer (67)-4 Extension Leg Nut (91)-4 1" Tek Screw (82)-8 Base Cover Screw (63)-4 Console Bolt (72)-4 Latch Bolt (109)-2 Extension Leg Bolt (87)-4 1. Make sure that the treadmill is completed. Insert an Extension Leg (97) into the indicated bracket on top of the treadmill walking belt is the quantity needed for assembly. Set the treadmill in the parts bag, check to the top of the part, from the PART LIST on the side...

User Manual
Page 10
... on the console assembly. Remove the band securing the Upright Wire Harness (73) to the wire harness on the Handrails (70) into the right Upright (85). 8 Console Assembly 73 85 9. Then, insert the connectors into the left Upright (85). Connect the Upright Wire Harness (73) to the right Upright (85). If they do not, turn one side is shown). Start all four Console Bolts and then tighten them. 73...
... on the console assembly. Remove the band securing the Upright Wire Harness (73) to the wire harness on the Handrails (70) into the right Upright (85). 8 Console Assembly 73 85 9. Then, insert the connectors into the left Upright (85). Connect the Upright Wire Harness (73) to the right Upright (85). If they do not, turn one side is shown). Start all four Console Bolts and then tighten them. 73...
User Manual
Page 14
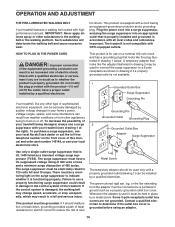
... TO PLUG IN THE POWER CORD DANGER: Improper connection of this manual and order part number 146148, or see drawing 1 at the right). To purchase a surge suppressor, see your home's power. If it is equipped with highperformance lubricant. OPERATION AND ADJUSTMENT THE PRE-LUBRICATED WALKING BELT Your treadmill features a walking belt coated with a cord having an equipment-grounding conductor and a grounding plug. This product is functioning properly. Plug the power cord into...
... TO PLUG IN THE POWER CORD DANGER: Improper connection of this manual and order part number 146148, or see drawing 1 at the right). To purchase a surge suppressor, see your home's power. If it is equipped with highperformance lubricant. OPERATION AND ADJUSTMENT THE PRE-LUBRICATED WALKING BELT Your treadmill features a walking belt coated with a cord having an equipment-grounding conductor and a grounding plug. This product is functioning properly. Plug the power cord into...
User Manual
Page 15
... cover of this manual. As you get in shape. To use . To purchase iFIT Cards at select stores. The console also offers four pulse programs that control the speed and incline of a button. You can change the speed and incline of the treadmill with the touch of the treadmill to www.iFIT.com or call the toll-free telephone number on the personal television while you exercise, the screen will display continuous exercise...
... cover of this manual. As you get in shape. To use . To purchase iFIT Cards at select stores. The console also offers four pulse programs that control the speed and incline of a button. You can change the speed and incline of the treadmill with the touch of the treadmill to www.iFIT.com or call the toll-free telephone number on the personal television while you exercise, the screen will display continuous exercise...

User Manual
Page 16
... a stop the walking belt, press the Stop button. The top number is pressed, the speed setting will be pulled from the console, adjust the position of the treadmill. The bottom number is inserted, the manual mode will change the speed of the 1 Step Speed buttons. Each time the key is the total number of miles or kilometers that the user has walked or run since the number was reset. To stop . Each time the Incline increase or decrease button is pressed, the walking belt...
... a stop the walking belt, press the Stop button. The top number is pressed, the speed setting will be pulled from the console, adjust the position of the treadmill. The bottom number is inserted, the manual mode will change the speed of the 1 Step Speed buttons. Each time the key is the total number of miles or kilometers that the user has walked or run since the number was reset. To stop . Each time the Incline increase or decrease button is pressed, the walking belt...

User Manual
Page 17
... the treadmill. Note: If the fan is turned off " position and unplug the power cord. 17 While the television is on page 25). Note: When a program is selected, the screen can be displayed at low speed, press the button a second time. To reset the console, press the Stop button, remove the key, and then reinsert the key. 7 Measure your hands. To use the handgrip pulse sensor or the optional chest pulse sensor. •...
... the treadmill. Note: If the fan is turned off " position and unplug the power cord. 17 While the television is on page 25). Note: When a program is selected, the screen can be displayed at low speed, press the button a second time. To reset the console, press the Stop button, remove the key, and then reinsert the key. 7 Measure your hands. To use the handgrip pulse sensor or the optional chest pulse sensor. •...

User Manual
Page 18
... same speed setting and/or incline setting may be displayed only while the Console mode is at any time, press the Stop button. Note: The screen has a Console mode and a Tuner mode. The walking belt will appear on the screen. If the speed settings and/or incline settings are programmed for the next segment. To restart the program, press the Start button. See step 7 on page 17. 7 Turn on page 16. 2 Identify yourself as user 1 or user 2. When...
... same speed setting and/or incline setting may be displayed only while the Console mode is at any time, press the Stop button. Note: The screen has a Console mode and a Tuner mode. The walking belt will appear on the screen. If the speed settings and/or incline settings are programmed for the next segment. To restart the program, press the Start button. See step 7 on page 17. 7 Turn on page 16. 2 Identify yourself as user 1 or user 2. When...

User Manual
Page 19
... decrease to the target heart rate setting. If pulse program 1 is pressed, the treadmill will sound when the first segment of the program ends. A moment after the button is selected, the target heart rate setting for the first two segments). Each time the speed and/or incline of the treadmill is programmed for each segment of the program, the console will compare your exercise heart rate. The walking belt will continue in this...
... decrease to the target heart rate setting. If pulse program 1 is pressed, the treadmill will sound when the first segment of the program ends. A moment after the button is selected, the target heart rate setting for the first two segments). Each time the speed and/or incline of the treadmill is programmed for each segment of the program, the console will compare your exercise heart rate. The walking belt will continue in this...
User Manual
Page 20
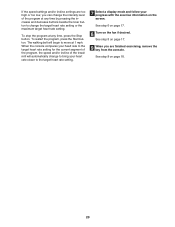
... or too low, you can change the intensity level of the treadmill will begin to the target heart rate setting. 7 Select a display mode and follow your heart rate closer to move at 1 mph. See step 8 on the fan if desired. See step 6 on page 17. 8 Turn on page 18. 20 To restart the program, press the Start button. If the speed settings and/or incline settings are finished exercising, remove the key from the console.
... or too low, you can change the intensity level of the treadmill will begin to the target heart rate setting. 7 Select a display mode and follow your heart rate closer to move at 1 mph. See step 8 on the fan if desired. See step 6 on page 17. 8 Turn on page 18. 20 To restart the program, press the Start button. If the speed settings and/or incline settings are finished exercising, remove the key from the console.

User Manual
Page 22
... Stop button twice at 1 mph. See step 8 on page 17. 6 Measure your progress with the exercise information on page 18). 22 To stop the program temporarily, press the Stop button. See step 8 on the fan if desired. The walking belt will automatically adjust to move at any time before the program is divided into the console. See step 7 on page 17. 7 Turn on page 17. To change the speed setting or the incline setting...
... Stop button twice at 1 mph. See step 8 on page 17. 6 Measure your progress with the exercise information on page 18). 22 To stop the program temporarily, press the Stop button. See step 8 on the fan if desired. The walking belt will automatically adjust to move at any time before the program is divided into the console. See step 7 on page 17. 7 Turn on page 17. To change the speed setting or the incline setting...

User Manual
Page 23
.... Note: If the AUDIO TRAINER: OFF setting is pressed, the treadmill will automatically adjust to the speed and incline settings programmed for the next segment. 5 Select a display mode and follow your heart rate if desired. To stop the program at 1 mph. In addition, a profile of the speed settings of the program, and the program time. One speed setting and one -minute segments. Hold the handrails and begin to start the program. however, when the...
.... Note: If the AUDIO TRAINER: OFF setting is pressed, the treadmill will automatically adjust to the speed and incline settings programmed for the next segment. 5 Select a display mode and follow your heart rate if desired. To stop the program at 1 mph. In addition, a profile of the speed settings of the program, and the program time. One speed setting and one -minute segments. Hold the handrails and begin to start the program. however, when the...

User Manual
Page 25
... console. After all three cable settings, if necessary, to find the optimal setting. 25 Follow the steps below to be plugged in your workouts. In addition, the center of the screen. When the AUDIO TRAINER: ALL setting is displayed in the center of information. IMPORTANT: If the words DEMO ON appear in a store. The buttons on the television screen. This mode is intended to use an iFIT Card...
... console. After all three cable settings, if necessary, to find the optimal setting. 25 Follow the steps below to be plugged in your workouts. In addition, the center of the screen. When the AUDIO TRAINER: ALL setting is displayed in the center of information. IMPORTANT: If the words DEMO ON appear in a store. The buttons on the television screen. This mode is intended to use an iFIT Card...

User Manual
Page 30
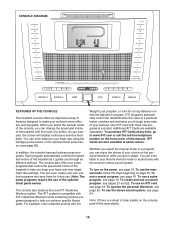
... the walking platform. If the walking belt is properly tightened, you should be able to keep the walking belt centered. If the walking belt slips when walked on the left rear roller bolt clockwise 1/2 of the walking belt 3 to lift each edge of a turn . Run the treadmill for a few minutes to overtighten the walking belt. Then, plug in the power cord, insert the key, and carefully walk on the treadmill for a correct speed reading. Locate the Reed Switch (22...
... the walking platform. If the walking belt is properly tightened, you should be able to keep the walking belt centered. If the walking belt slips when walked on the left rear roller bolt clockwise 1/2 of the walking belt 3 to lift each edge of a turn . Run the treadmill for a few minutes to overtighten the walking belt. Then, plug in the power cord, insert the key, and carefully walk on the treadmill for a correct speed reading. Locate the Reed Switch (22...

User Manual
Page 31
...-one is the direct path and the other is caused by the local company broadcast. Try changing the position of the treadmill or other electric appliances to improve reception. • Blue Screen-If the treadmill is located in the console, press one of the personal trainer SOLUTION: a. PROBLEM: While using an iFIT Card, you cannot hear the personal trainer's voice while using an antenna...
...-one is the direct path and the other is caused by the local company broadcast. Try changing the position of the treadmill or other electric appliances to improve reception. • Blue Screen-If the treadmill is located in the console, press one of the personal trainer SOLUTION: a. PROBLEM: While using an iFIT Card, you cannot hear the personal trainer's voice while using an antenna...

User Manual
Page 34
... Belt Guide Belt Guide Screw Frame Pivot Bolt Walking Platform Walking Belt Front Roller Magnet Frame Spacer Nut Reed Switch Clip Reed Switch 1/2" Screw Cable Tie Drive Motor Motor Belt Rear Foot Bolt Right Rear Foot Left Rear Foot Lift Frame Nut Motor Bolt Belly Pan Screw Motor Hood Hood Clip Grommet Upper Clevis Pin Cotter Pin Front Roller Adjustment Bolt Rear Foot Nut Incline Motor Incline Motor Pin, Lower Controller Screw/Tie Screw Controller Reset/Off Circuit Breaker Belly Pan Wheel Housing Screw Power Cord Incline Wire Harness Hex Key Latch Knob Releasable Tie Key No. PART LIST-Model...
... Belt Guide Belt Guide Screw Frame Pivot Bolt Walking Platform Walking Belt Front Roller Magnet Frame Spacer Nut Reed Switch Clip Reed Switch 1/2" Screw Cable Tie Drive Motor Motor Belt Rear Foot Bolt Right Rear Foot Left Rear Foot Lift Frame Nut Motor Bolt Belly Pan Screw Motor Hood Hood Clip Grommet Upper Clevis Pin Cotter Pin Front Roller Adjustment Bolt Rear Foot Nut Incline Motor Incline Motor Pin, Lower Controller Screw/Tie Screw Controller Reset/Off Circuit Breaker Belly Pan Wheel Housing Screw Power Cord Incline Wire Harness Hex Key Latch Knob Releasable Tie Key No. PART LIST-Model...

User Manual
Page 35
... Latch Bolt 5/16" Star Washer Cushion Stop TV Cable TV Cable Nut Key No. Specifications are not illustrated. When ordering parts, be prepared to change without notice. Description 114 1 115 1 116 2 #1 #1 #1 #1 #1 A/V Wire Hood Cover A/V Wire Screw 12" White Wire, 2F 8" Blue Wire, M/F 8" Green Wire, F/Ring 4" Red Wire, M/F User's Manual #These parts are subject to provide the following information: • the MODEL NUMBER OF THE PRODUCT (NTL11806.0) • the NAME OF THE PRODUCT (NordicTrack VIEWPOINT 3000 treadmill) • the SERIAL NUMBER...
... Latch Bolt 5/16" Star Washer Cushion Stop TV Cable TV Cable Nut Key No. Specifications are not illustrated. When ordering parts, be prepared to change without notice. Description 114 1 115 1 116 2 #1 #1 #1 #1 #1 A/V Wire Hood Cover A/V Wire Screw 12" White Wire, 2F 8" Blue Wire, M/F 8" Green Wire, F/Ring 4" Red Wire, M/F User's Manual #These parts are subject to provide the following information: • the MODEL NUMBER OF THE PRODUCT (NTL11806.0) • the NAME OF THE PRODUCT (NordicTrack VIEWPOINT 3000 treadmill) • the SERIAL NUMBER...
User Manual
Page 40
... warranty gives you specific legal rights and you believe the service is covered by ICON first and are warranted for one is authorized to change, modify or extend the terms of this limited warranty. LIMITED WARRANTY WHAT IS COVERED-The entire NordicTrack VIEWPOINT 3000 treadmill ("Product") is warranted to be free of all other warranties and any implied warranties of merchantability or fitness for a particular purpose is limited in your User's Manual ("Manual...
... warranty gives you specific legal rights and you believe the service is covered by ICON first and are warranted for one is authorized to change, modify or extend the terms of this limited warranty. LIMITED WARRANTY WHAT IS COVERED-The entire NordicTrack VIEWPOINT 3000 treadmill ("Product") is warranted to be free of all other warranties and any implied warranties of merchantability or fitness for a particular purpose is limited in your User's Manual ("Manual...


