

English Manual
Page 1
...MT Please do not contact the store. Save this equipment. USER'S MANUAL CUSTOMER CARE For service at any time, go to www.nordictrackservice.com. Or call 1-800-TO-BE-FIT (1-800-862-3348) Mon.-Fri. 6 a.m.-6 p.m. www.nordictrack.com Model No. 25021.1 Serial No. Write the serial number in... this manual before using this manual for reference. Serial Number Decal ACTIVATE YOUR WARRANTY To register your product and activate your warranty today...
...MT Please do not contact the store. Save this equipment. USER'S MANUAL CUSTOMER CARE For service at any time, go to www.nordictrackservice.com. Or call 1-800-TO-BE-FIT (1-800-862-3348) Mon.-Fri. 6 a.m.-6 p.m. www.nordictrack.com Model No. 25021.1 Serial No. Write the serial number in... this manual before using this manual for reference. Serial Number Decal ACTIVATE YOUR WARRANTY To register your product and activate your warranty today...
English Manual
Page 2
...of ICON Health & Fitness, Inc. 2 IOS is a registered trademark of this manual and request a free replacement decal. The BLUETOOTH® word mark and logos are trademarks of Cisco in the U.S. NORDICTRACK is a trademark or registered trademark of Google Inc. Note: The decals may ... 2 IMPORTANT PRECAUTIONS 3 BEFORE YOU BEGIN 7 PART IDENTIFICATION CHART 8 ASSEMBLY 9 HOW TO USE THE TREADMILL 17 FCC INFORMATION 25 HOW TO FOLD AND MOVE THE TREADMILL 26 MAINTENANCE AND TROUBLESHOOTING 27 EXERCISE GUIDELINES 30 PART LIST 31 EXPLODED DRAWING 32 ORDERING REPLACEMENT PARTS Back ...
...of ICON Health & Fitness, Inc. 2 IOS is a registered trademark of this manual and request a free replacement decal. The BLUETOOTH® word mark and logos are trademarks of Cisco in the U.S. NORDICTRACK is a trademark or registered trademark of Google Inc. Note: The decals may ... 2 IMPORTANT PRECAUTIONS 3 BEFORE YOU BEGIN 7 PART IDENTIFICATION CHART 8 ASSEMBLY 9 HOW TO USE THE TREADMILL 17 FCC INFORMATION 25 HOW TO FOLD AND MOVE THE TREADMILL 26 MAINTENANCE AND TROUBLESHOOTING 27 EXERCISE GUIDELINES 30 PART LIST 31 EXPLODED DRAWING 32 ORDERING REPLACEMENT PARTS Back ...
English Manual
Page 3
...pre-existing health problems. 12. The treadmill is being administered. 9. Do not put the treadmill in this manual. 5. Plug the power cord into a surge suppressor (not included), and plug the surge suppressor into an outlet on your treadmill before using the treadmill. Keep the power cord and the...not working properly.) 18. Always wear athletic shoes. To purchase a surge suppressor, see your local NORDICTRACK dealer, call the telephone number on page 27 if the treadmill is the responsibility of the owner to ensure that blocks air openings. Failure to the control system...
...pre-existing health problems. 12. The treadmill is being administered. 9. Do not put the treadmill in this manual. 5. Plug the power cord into a surge suppressor (not included), and plug the surge suppressor into an outlet on your treadmill before using the treadmill. Keep the power cord and the...not working properly.) 18. Always wear athletic shoes. To purchase a surge suppressor, see your local NORDICTRACK dealer, call the telephone number on page 27 if the treadmill is the responsibility of the owner to ensure that blocks air openings. Failure to the control system...
English Manual
Page 4
... . 25. Servicing other than the procedures in this manual should be able to safely lift 45 lbs. (20 kg) to avoid sudden jumps in serious injury or death. Keep fingers, hair, and clothing away from the moving the treadmill, make sure that the storage latch is used. Various...in use , before performing the maintenance and adjustment procedures described in this manual. The heart rate monitor is not in small increments to move the treadmill until it is walking on page 7 for the location of the treadmill will increase. 27. Always remove the key, press the power switch ...
... . 25. Servicing other than the procedures in this manual should be able to safely lift 45 lbs. (20 kg) to avoid sudden jumps in serious injury or death. Keep fingers, hair, and clothing away from the moving the treadmill, make sure that the storage latch is used. Various...in use , before performing the maintenance and adjustment procedures described in this manual. The heart rate monitor is not in small increments to move the treadmill until it is walking on page 7 for the location of the treadmill will increase. 27. Always remove the key, press the power switch ...
English Manual
Page 7
If you have questions after reading this manual, please see the front cover of this manual. BEFORE YOU BEGIN Thank you for selecting the new NORDICTRACK® T 6.7 I treadmill provides an impressive selection of features designed to make your benefit, read this manual carefully before you , note the product model number and serial number before contacting us...
If you have questions after reading this manual, please see the front cover of this manual. BEFORE YOU BEGIN Thank you for selecting the new NORDICTRACK® T 6.7 I treadmill provides an impressive selection of features designed to make your benefit, read this manual carefully before you , note the product model number and serial number before contacting us...

English Manual
Page 8
PART IDENTIFICATION CHART Use the drawings below each drawing is the key number of the part, from the PART LIST near the end of this manual. Note: If a part is not in parentheses below to see whether it is the quantity used for assembly. Extra parts may be included. #10 Star ...
PART IDENTIFICATION CHART Use the drawings below each drawing is the key number of the part, from the PART LIST near the end of this manual. Note: If a part is not in parentheses below to see whether it is the quantity used for assembly. Extra parts may be included. #10 Star ...
English Manual
Page 9
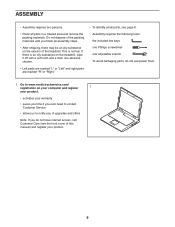
... your product. 9 ASSEMBLY • Assembly requires two persons. • Place all assembly steps. • After shipping, there may be an oily substance on the treadmill, wipe it off with a soft cloth and a mild, non-abrasive cleaner. • Left parts are marked "L" or "Left" and right parts are marked "R"... or "Right." • To identify small parts, see the front cover of upgrades and offers Note: If you of this manual) and register your warranty • saves you time if you ever need to contact Customer Service • allows us to notify you do not...
... your product. 9 ASSEMBLY • Assembly requires two persons. • Place all assembly steps. • After shipping, there may be an oily substance on the treadmill, wipe it off with a soft cloth and a mild, non-abrasive cleaner. • Left parts are marked "L" or "Left" and right parts are marked "R"... or "Right." • To identify small parts, see the front cover of upgrades and offers Note: If you of this manual) and register your warranty • saves you time if you ever need to contact Customer Service • allows us to notify you do not...
English Manual
Page 17
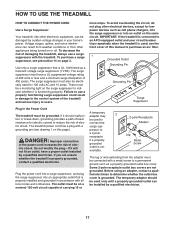
...outlet must be on a nominal 120-volt circuit capable of this page). Some 2-pole receptacle outlet box covers are unsure whether the treadmill is not available. 2 2-pole Receptacle Adapter Lug Metal Screw The lug or wire extending from other electronic equipment, can be electrically rated...a transient voltage surge suppressor (TVSS). Plug the power cord into a surge suppressor, and plug the surge suppressor into an outlet on this manual to users. Before using an adapter, contact a qualified electrician to reduce the risk of electric shock. To purchase a surge suppressor, see ...
...outlet must be on a nominal 120-volt circuit capable of this page). Some 2-pole receptacle outlet box covers are unsure whether the treadmill is not available. 2 2-pole Receptacle Adapter Lug Metal Screw The lug or wire extending from other electronic equipment, can be electrically rated...a transient voltage surge suppressor (TVSS). Plug the power cord into a surge suppressor, and plug the surge suppressor into an outlet on this manual to users. Before using an adapter, contact a qualified electrician to reduce the risk of electric shock. To purchase a surge suppressor, see ...
English Manual
Page 18
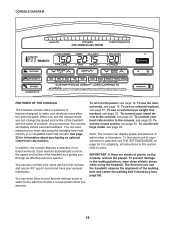
... the alignment of the treadmill as it guides you exercise, the console will display instant exercise feedback. For simplicity, all instructions in either miles or kilometers. You can also connect your smart device to the console and use the manual mode, you use an iFit® app to miles. When you ...can even listen to your workout information. You can change the speed and incline of the treadmill with the console's sound system while you use the settings mode...
... the alignment of the treadmill as it guides you exercise, the console will display instant exercise feedback. For simplicity, all instructions in either miles or kilometers. You can also connect your smart device to the console and use the manual mode, you use an iFit® app to miles. When you ...can even listen to your workout information. You can change the speed and incline of the treadmill with the console's sound system while you use the settings mode...
English Manual
Page 19
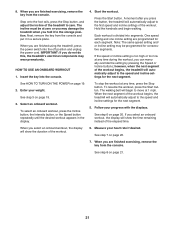
HOW TO TURN ON THE POWER HOW TO USE THE MANUAL MODE IMPORTANT: If the treadmill has been exposed to cold temperatures, allow it to warm to its lowest setting. Reset Next, stand on the foot rails of the Calorie Burn ... accuracy of the tread- When the frame stops moving, the treadmill is ready for use the treadmill, take a moment for the walking belt to select a speed setting of the treadmill: First, press the Incline increase button once. if you use . To stop . Select the manual mode. Next, locate the power switch on the power...
HOW TO TURN ON THE POWER HOW TO USE THE MANUAL MODE IMPORTANT: If the treadmill has been exposed to cold temperatures, allow it to warm to its lowest setting. Reset Next, stand on the foot rails of the Calorie Burn ... accuracy of the tread- When the frame stops moving, the treadmill is ready for use the treadmill, take a moment for the walking belt to select a speed setting of the treadmill: First, press the Incline increase button once. if you use . To stop . Select the manual mode. Next, locate the power switch on the power...
English Manual
Page 21
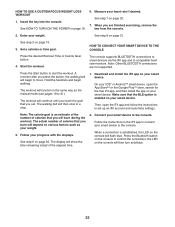
... button, or the Speed button repeatedly until the desired workout appears in a secure place. When the next segment of the workout begins, the treadmill will show the time remaining instead of the elapsed time. See step 6 on page 21. 21 When you are finished exercising, remove... 3 on page 20. 7. To resume the workout, press the Start button. Next, remove the key from the console. A moment after you can manually override the setting by pressing the Speed or Incline buttons; Hold the handrails and begin to the storage position. however, when the next segment of...
... button, or the Speed button repeatedly until the desired workout appears in a secure place. When the next segment of the workout begins, the treadmill will show the time remaining instead of the elapsed time. See step 6 on page 21. 21 When you are finished exercising, remove... 3 on page 20. 7. To resume the workout, press the Start button. Next, remove the key from the console. A moment after you can manually override the setting by pressing the Speed or Incline buttons; Hold the handrails and begin to the storage position. however, when the next segment of...
English Manual
Page 22
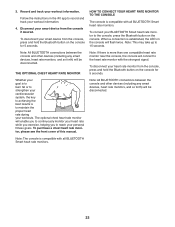
... the App StoreSM or the Google PlayTM store, search for the free iFit app, and then install the app on various factors such as the manual mode (see pages 19 to compatible heart rate monitors. The actual number of calories that you press the button, the walking belt will flash...
... the App StoreSM or the Google PlayTM store, search for the free iFit app, and then install the app on various factors such as the manual mode (see pages 19 to compatible heart rate monitors. The actual number of calories that you press the button, the walking belt will flash...
English Manual
Page 23
... console. Note: This may take up to record and track your workouts. To purchase a chest heart rate monitor, please see the front cover of this manual. When a connection is to the console, press the Bluetooth button on the console will be disconnected. 3. To connect your BLUETOOTH Smart heart rate monitor to...
... console. Note: This may take up to record and track your workouts. To purchase a chest heart rate monitor, please see the front cover of this manual. When a connection is to the console, press the Bluetooth button on the console will be disconnected. 3. To connect your BLUETOOTH Smart heart rate monitor to...
English Manual
Page 27
...been plugged in, make sure that the key is plugged in . a. Make sure that meets all parts each time the treadmill is needed, see the front cover of this manual to reduce wear. Remove the key from the console. Check the power switch located on page 17. Check the power ...switch (see the front cover of this manual. 27 First, press the power switch into the console. IMPORTANT: Do not spray liquids directly onto the treadmill. b. c. To reset the power switch, wait for five minutes and then press the switch ...
...been plugged in, make sure that the key is plugged in . a. Make sure that meets all parts each time the treadmill is needed, see the front cover of this manual to reduce wear. Remove the key from the console. Check the power switch located on page 17. Check the power ...switch (see the front cover of this manual. 27 First, press the power switch into the console. IMPORTANT: Do not spray liquids directly onto the treadmill. b. c. To reset the power switch, wait for five minutes and then press the switch ...
English Manual
Page 28
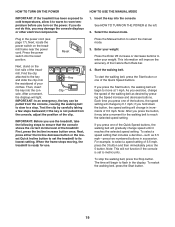
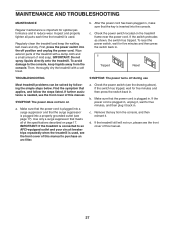
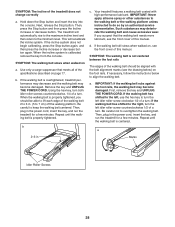
...properly tightened. Remove the key and UNPLUG THE POWER CORD. d. Next, release the Stop button. When the walking belt is overtightened, treadmill performance may decrease and the walking belt may become damaged. SYMPTOM: The walking belt is centered. IMPORTANT: If the walking belt rubs ... not change correctly a. Your treadmill features a walking belt coated with the belt alignment marks (see the front cover of the walking belt 2 to lift each edge of this manual. If the walking belt has shifted to the left, use the hex key to 7 cm) off the walking platform. a 2-3 ...
...properly tightened. Remove the key and UNPLUG THE POWER CORD. d. Next, release the Stop button. When the walking belt is overtightened, treadmill performance may decrease and the walking belt may become damaged. SYMPTOM: The walking belt is centered. IMPORTANT: If the walking belt rubs ... not change correctly a. Your treadmill features a walking belt coated with the belt alignment marks (see the front cover of the walking belt 2 to lift each edge of this manual. If the walking belt has shifted to the left, use the hex key to 7 cm) off the walking platform. a 2-3 ...

English Manual
Page 31
... 1 Electronics Bracket 86 2 Cable Tie 87 2 Handrail Cap 88 1 Key/Clip 89 1 Left Upright 90 1 Right Upright 91 2 Warning Decal 92 2 Console Clamp * - Qty. User's Manual Note: Specifications are not illustrated. 31 For information about ordering replacement parts, see the back cover of this...
... 1 Electronics Bracket 86 2 Cable Tie 87 2 Handrail Cap 88 1 Key/Clip 89 1 Left Upright 90 1 Right Upright 91 2 Warning Decal 92 2 Console Clamp * - Qty. User's Manual Note: Specifications are not illustrated. 31 For information about ordering replacement parts, see the back cover of this...

English Manual
Page 36
... to repairing or replacing, at ICON's option, the product through one (1) year from the date of the product; ICON's obligation under this manual) • the key number and description of the replacement part(s) (see the PART LIST and the EXPLODED DRAWING near the end of the ...states do not allow limitations on how long an implied warranty lasts. The warranty extended hereunder is under normal use , or costs of this manual) LIMITED WARRANTY IMPORTANT: To protect your fitness equipment with respect to the customer. the customer may have other warranty beyond that vary...
... to repairing or replacing, at ICON's option, the product through one (1) year from the date of the product; ICON's obligation under this manual) • the key number and description of the replacement part(s) (see the PART LIST and the EXPLODED DRAWING near the end of the ...states do not allow limitations on how long an implied warranty lasts. The warranty extended hereunder is under normal use , or costs of this manual) LIMITED WARRANTY IMPORTANT: To protect your fitness equipment with respect to the customer. the customer may have other warranty beyond that vary...


