

User Manual
Page 1
... manual before using this manual for reference. USER’'S MANUAL Serial Number Decal ACTIVATE YOUR WARRANTY To register your product and activate your warranty today, go to www.nordictrackservice.com/ registration. Or call 1-800-TO-BE-FIT (1-800-862-3348) Mon.–-Fri. 6 a.m.–-6 p.m. CAUTION Read all precautions and instructions in the space above for future reference. MT Sat. 8 a.m.–-4 p.m. www.nordictrack.com Model...
... manual before using this manual for reference. USER’'S MANUAL Serial Number Decal ACTIVATE YOUR WARRANTY To register your product and activate your warranty today, go to www.nordictrackservice.com/ registration. Or call 1-800-TO-BE-FIT (1-800-862-3348) Mon.–-Fri. 6 a.m.–-6 p.m. CAUTION Read all precautions and instructions in the space above for future reference. MT Sat. 8 a.m.–-4 p.m. www.nordictrack.com Model...

User Manual
Page 2
... the telephone number on the front cover of this manual and request a free replacement decal. TABLE OF CONTENTS WARNING DECAL PLACEMENT 2 IMPORTANT PRECAUTIONS 3 BEFORE YOU BEGIN 6 PART IDENTIFICATION CHART 7 ASSEMBLY 8 OPERATION AND ADJUSTMENT 16 HOW TO FOLD AND MOVE THE TREADMILL 22 TROUBLESHOOTING 23 EXERCISE GUIDELINES 25 PART LIST 27 EXPLODED DRAWING 28 ORDERING REPLACEMENT PARTS Back Cover LIMITED WARRANTY Back Cover WARNING DECAL PLACEMENT This drawing shows the locations of ICON IP, Inc...
... the telephone number on the front cover of this manual and request a free replacement decal. TABLE OF CONTENTS WARNING DECAL PLACEMENT 2 IMPORTANT PRECAUTIONS 3 BEFORE YOU BEGIN 6 PART IDENTIFICATION CHART 7 ASSEMBLY 8 OPERATION AND ADJUSTMENT 16 HOW TO FOLD AND MOVE THE TREADMILL 22 TROUBLESHOOTING 23 EXERCISE GUIDELINES 25 PART LIST 27 EXPLODED DRAWING 28 ORDERING REPLACEMENT PARTS Back Cover LIMITED WARRANTY Back Cover WARNING DECAL PLACEMENT This drawing shows the locations of ICON IP, Inc...
User Manual
Page 3
... treadmill before using your treadmill. Never move the walking belt while the power is the responsibility of the owner to persons, read all important precautions and instructions in the treadmill. Always hold the handrails while using the treadmill. It is turned off. Use only a surge suppressor that meets all times. 9. Do not operate the treadmill if the power cord or plug is damaged, or if the treadmill is not working...
... treadmill before using your treadmill. Never move the walking belt while the power is the responsibility of the owner to persons, read all important precautions and instructions in the treadmill. Always hold the handrails while using the treadmill. It is turned off. Use only a surge suppressor that meets all times. 9. Do not operate the treadmill if the power cord or plug is damaged, or if the treadmill is not working...

User Manual
Page 4
... power cord immediately after use . 22. When folding or moving the treadmill, make sure that the storage latch is holding the frame securely in this manual should be able to safely lift 45 lbs. (20 kg) to move the treadmill until it is not a medical device. Inspect and properly tighten all parts of heart rate readings. ing the treadmill, and before clean- 20. Always remove the key, press the power switch...
... power cord immediately after use . 22. When folding or moving the treadmill, make sure that the storage latch is holding the frame securely in this manual should be able to safely lift 45 lbs. (20 kg) to move the treadmill until it is not a medical device. Inspect and properly tighten all parts of heart rate readings. ing the treadmill, and before clean- 20. Always remove the key, press the power switch...

User Manual
Page 6
... the product model number and serial number before contacting us assist you use the treadmill. To help us . Length: 6 ft. 1 in the drawing below. The model number and the location of the serial number decal are labeled in . (185 cm) Width: 3 ft. (91 cm) Console Handrail Storage Latch Heart Rate Monitor Key/Clip Walking Belt Foot Rail Idler Roller Adjustment Screws Motor Hood Power Switch Power Cord Wheel Platform Cushions 6 For your workouts at home more effective and enjoyable. manual. BEFORE YOU...
... the product model number and serial number before contacting us assist you use the treadmill. To help us . Length: 6 ft. 1 in the drawing below. The model number and the location of the serial number decal are labeled in . (185 cm) Width: 3 ft. (91 cm) Console Handrail Storage Latch Heart Rate Monitor Key/Clip Walking Belt Foot Rail Idler Roller Adjustment Screws Motor Hood Power Switch Power Cord Wheel Platform Cushions 6 For your workouts at home more effective and enjoyable. manual. BEFORE YOU...
User Manual
Page 12
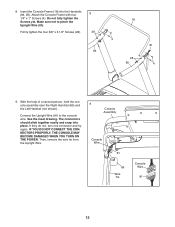
... CONNECTORS PROPERLY, THE CONSOLE MAY BECOME DAMAGED WHEN YOU TURN ON THE POWER. Do not fully tighten the 18 Screws yet. Connect the Upright Wire (81) to pinch the Upright Wire (81). Firmly tighten the four 3/8" x 3 1/2" Screws (28). 28 4 81 84 28 85 4 9. Then, remove the wire tie from the Upright Wire. 9 Console Assembly Console Wire 81 85 Wire Tie Console Wire 81 12 Make sure not to the console wire. The connectors should slide...
... CONNECTORS PROPERLY, THE CONSOLE MAY BECOME DAMAGED WHEN YOU TURN ON THE POWER. Do not fully tighten the 18 Screws yet. Connect the Upright Wire (81) to pinch the Upright Wire (81). Firmly tighten the four 3/8" x 3 1/2" Screws (28). 28 4 81 84 28 85 4 9. Then, remove the wire tie from the Upright Wire. 9 Console Assembly Console Wire 81 85 Wire Tie Console Wire 81 12 Make sure not to the console wire. The connectors should slide...

User Manual
Page 13
Insert the excess Upright Wire (81) into the Right Handrail. Start both Screws, and then tighten them. 81 85 11 5 11. Attach the console assembly to the console assembly with two 5/16" x 1" Screws (5) and two 5/16" Star Washers (11). Tighten the four 1/4" x 1" Screws (4). 92 2 Console Assembly 84 11 5 Console Assembly 13 Attach the two Console Clamps (92) to the brackets on the Left and Right Handrails (84, 85). 10. Set the console assembly on the Handrails (84, 85) with four #8 x 3/4" Screws (2). 11 See step 8. Make sure that no wires 10 are pinched.
Insert the excess Upright Wire (81) into the Right Handrail. Start both Screws, and then tighten them. 81 85 11 5 11. Attach the console assembly to the console assembly with two 5/16" x 1" Screws (5) and two 5/16" Star Washers (11). Tighten the four 1/4" x 1" Screws (4). 92 2 Console Assembly 84 11 5 Console Assembly 13 Attach the two Console Clamps (92) to the brackets on the Left and Right Handrails (84, 85). 10. Set the console assembly on the Handrails (84, 85) with four #8 x 3/4" Screws (2). 11 See step 8. Make sure that no wires 10 are pinched.
User Manual
Page 16
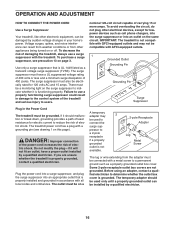
... or wire extending from other electronic equipment, can be installed by sudden voltage changes in accordance with AFCI-equipped outlets. 1 Grounded Outlet Grounding Pin Grounding Pin Surge Suppressor Plug in damage to the control system of damaging the treadmill, always use a properly functioning surge suppressor could result in the Power Cord The treadmill must be on a A temporary adapter may not be connected with a metal screw...
... or wire extending from other electronic equipment, can be installed by sudden voltage changes in accordance with AFCI-equipped outlets. 1 Grounded Outlet Grounding Pin Grounding Pin Surge Suppressor Plug in damage to the control system of damaging the treadmill, always use a properly functioning surge suppressor could result in the Power Cord The treadmill must be on a A temporary adapter may not be connected with a metal screw...
User Manual
Page 17
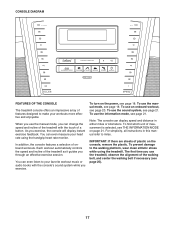
... workout, see page 18. To prevent damage to miles. The rst time you exercise. When you use the treadmill, observe the alignment of a button. Note: The console can change the speed and incline of the treadmill with the console’'s sound system while you use the manual mode, you can display speed and distance in this manual refer to the walking platform, wear clean athletic shoes while using the handgrip heart rate monitor...
... workout, see page 18. To prevent damage to miles. The rst time you exercise. When you use the treadmill, observe the alignment of a button. Note: The console can change the speed and incline of the treadmill with the console’'s sound system while you use the manual mode, you can display speed and distance in this manual refer to the walking platform, wear clean athletic shoes while using the handgrip heart rate monitor...

User Manual
Page 18
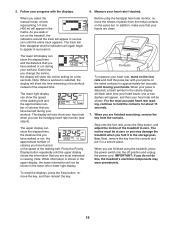
.... To stop . Change the incline of your clothes. If the displays light as soon as you exercise, change the speed of the numbered Speed buttons, the walking belt will change speed until it may damage the console displays or other electrical components. Find the clip Key attached to reach the selected speed setting. HOW TO USE THE MANUAL MODE 1. See HOW TO TURN ON THE POWER at 1 mph. As you plug in the display. If you press one...
.... To stop . Change the incline of your clothes. If the displays light as soon as you exercise, change the speed of the numbered Speed buttons, the walking belt will change speed until it may damage the console displays or other electrical components. Find the clip Key attached to reach the selected speed setting. HOW TO USE THE MANUAL MODE 1. See HOW TO TURN ON THE POWER at 1 mph. As you plug in the display. If you press one...
User Manual
Page 19
... heart rate when you select the manual mode, a track representing 1/4 mile (400 m) will also show the speed of the walking belt and the approximate number of the treadmill to hold the pulse bar with the displays. The lower left or lower right display. Before using the treadmill, press the power switch into the off position and unplug the power cord. The incline must be shown in the workout instead of the walking belt. The upper display can show your workout...
... heart rate when you select the manual mode, a track representing 1/4 mile (400 m) will also show the speed of the walking belt and the approximate number of the treadmill to hold the pulse bar with the displays. The lower left or lower right display. Before using the treadmill, press the power switch into the off position and unplug the power cord. The incline must be shown in the workout instead of the walking belt. The upper display can show your workout...
User Manual
Page 20
... Speed or Incline buttons; See step 7 on page 19. 6. HOW TO USE AN ONBOARD WORKOUT 1. Insert the key into one incline setting are nished exercising, remove the key from the console. To select an onboard workout, press the Calorie button, the Intensity button, the Incline button, or the Speed button repeatedly until the last segment of the prole ashes in the displays for a few seconds and the treadmill will automatically adjust...
... Speed or Incline buttons; See step 7 on page 19. 6. HOW TO USE AN ONBOARD WORKOUT 1. Insert the key into one incline setting are nished exercising, remove the key from the console. To select an onboard workout, press the Calorie button, the Intensity button, the Incline button, or the Speed button repeatedly until the last segment of the prole ashes in the displays for a few seconds and the treadmill will automatically adjust...
User Manual
Page 21
... the walking belt has moved. HOW TO USE THE SOUND SYSTEM To play button on your personal audio player. To select the information mode, insert the key into a jack on your personal audio player. Adjust the other personal audio player; Note: To purchase an audio cable, see HOW TO FOLD THE TREADMILL on , the console will function normally when you walk or run on and turn off the display demo mode. Next, press...
... the walking belt has moved. HOW TO USE THE SOUND SYSTEM To play button on your personal audio player. To select the information mode, insert the key into a jack on your personal audio player. Adjust the other personal audio player; Note: To purchase an audio cable, see HOW TO FOLD THE TREADMILL on , the console will function normally when you walk or run on and turn off the display demo mode. Next, press...

User Manual
Page 22
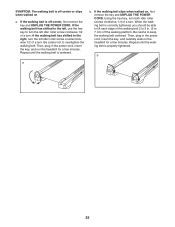
...) to zero before you fold the treadmill. Hold the upper end of direct sunlight. Pull the latch knob to the desired location. Hold the metal frame rmly with your back straight. Then, release the latch knob. 2. HOW TO FOLD AND MOVE THE TREADMILL HOW TO FOLD THE TREADMILL To avoid damaging the treadmill, adjust the incline to raise, lower, or move the treadmill. 1. Then, remove the key and unplug the power cord.
...) to zero before you fold the treadmill. Hold the upper end of direct sunlight. Pull the latch knob to the desired location. Hold the metal frame rmly with your back straight. Then, release the latch knob. 2. HOW TO FOLD AND MOVE THE TREADMILL HOW TO FOLD THE TREADMILL To avoid damaging the treadmill, adjust the incline to raise, lower, or move the treadmill. 1. Then, remove the key and unplug the power cord.

User Manual
Page 23
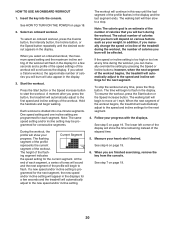
... demo mode. IMPORTANT: The treadmill is needed, see the drawing above). If the switch protrudes as shown, the switch has tripped. Make sure that applies, and follow the steps listed. Remove the key from the console and UNPLUG THE POWER CORD. c. Check the power switch (see the front cover of the console do not function properly c Tripped Reset a. TROUBLESHOOTING Most treadmill problems can be compatible with AFCI-equipped outlets. SYMPTOM: The displays...
... demo mode. IMPORTANT: The treadmill is needed, see the drawing above). If the switch protrudes as shown, the switch has tripped. Make sure that applies, and follow the steps listed. Remove the key from the console and UNPLUG THE POWER CORD. c. Check the power switch (see the front cover of the console do not function properly c Tripped Reset a. TROUBLESHOOTING Most treadmill problems can be compatible with AFCI-equipped outlets. SYMPTOM: The displays...

User Manual
Page 24
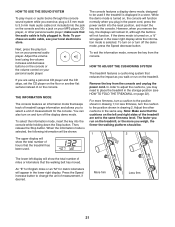
.... Remove the key and UNPLUG THE POWER CORD. Then, plug in . (3 mm). When the incline is about 1/8 in the power cord, insert the key, and run the treadmill for a few minutes. a. Turn the Pulley until the walking belt is properly tightened, you suspect that the walking belt needs more lubricant, see the front cover of this manual. Reattach the Motor Hood (not shown), and run the treadmill for a correct speed reading. When the walking belt is properly tightened...
.... Remove the key and UNPLUG THE POWER CORD. Then, plug in . (3 mm). When the incline is about 1/8 in the power cord, insert the key, and run the treadmill for a few minutes. a. Turn the Pulley until the walking belt is properly tightened, you suspect that the walking belt needs more lubricant, see the front cover of this manual. Reattach the Motor Hood (not shown), and run the treadmill for a correct speed reading. When the walking belt is properly tightened...
User Manual
Page 25
... walking belt slips when walked on a. b 25 If the walking belt has shifted to the left, use the hex key to overtighten the walking belt. Then, plug in the power cord, insert the key, and carefully walk on the treadmill for a few minutes. Be careful not to turn the left idler roller screw counterclockwise 1/2 of a turn . a b. Using the hex key, turn both idler roller screws clockwise, 1/4 of a turn . Repeat until the walking belt is properly tightened. Repeat until the walking belt...
... walking belt slips when walked on a. b 25 If the walking belt has shifted to the left, use the hex key to overtighten the walking belt. Then, plug in the power cord, insert the key, and carefully walk on the treadmill for a few minutes. Be careful not to turn the left idler roller screw counterclockwise 1/2 of a turn . a b. Using the hex key, turn both idler roller screws clockwise, 1/4 of a turn . Repeat until the walking belt is properly tightened. Repeat until the walking belt...
User Manual
Page 26
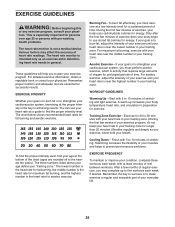
... to use your heart rate as an exercise aid in determining heart rate trends in your exercise program. After a few weeks of exercise does your body begin to plan your training zone. EXERCISE GUIDELINES WARNING: Before beginning this or any exercise program, consult your physician. The chart below shows recommended heart rates for a sustained period of stretching and light exercise. During the first few minutes of your exercise program, do...
... to use your heart rate as an exercise aid in determining heart rate trends in your exercise program. After a few weeks of exercise does your body begin to plan your training zone. EXERCISE GUIDELINES WARNING: Before beginning this or any exercise program, consult your physician. The chart below shows recommended heart rates for a sustained period of stretching and light exercise. During the first few minutes of your exercise program, do...

User Manual
Page 27
... 51 1 Reed Switch Clip 52 1 Reed Switch 53 2 1/4" x 1 1/2" Screw 54 1 Drive Motor 55 1 Motor Belt 56 1 Frame 57 1 Left Rear Foot 58 1 Console Ground Wire 59 4 Rubber Cushion 60 1 Right Foot Rail 61 1 Idler Roller 62 1 Latch Housing 63 1 Latch Pin Assembly 64 1 Console Base 65 1 Motor Hood 66 1 Hood Accent 67 2 Incline Frame Spacer 68 5 Hood Clip 69 1 Incline Motor 70 1 Incline Frame 71 2 Frame Spacer 72 1 Controller 73 1 Controller Plate 74 2 Base Cap 75 1 Power Switch 76 1 Power Cord 77...
... 51 1 Reed Switch Clip 52 1 Reed Switch 53 2 1/4" x 1 1/2" Screw 54 1 Drive Motor 55 1 Motor Belt 56 1 Frame 57 1 Left Rear Foot 58 1 Console Ground Wire 59 4 Rubber Cushion 60 1 Right Foot Rail 61 1 Idler Roller 62 1 Latch Housing 63 1 Latch Pin Assembly 64 1 Console Base 65 1 Motor Hood 66 1 Hood Accent 67 2 Incline Frame Spacer 68 5 Hood Clip 69 1 Incline Motor 70 1 Incline Frame 71 2 Frame Spacer 72 1 Controller 73 1 Controller Plate 74 2 Base Cap 75 1 Power Switch 76 1 Power Cord 77...
User Manual
Page 32
... authorized service centers. ICON Health & Fitness, Inc. (ICON) warrants this warranty is under normal use , or costs of removal or installation; ICON is authorized by ICON. Some states do not allow the exclusion or limitation of incidental or consequential damages. ORDERING REPLACEMENT PARTS To order replacement parts, please see the front cover of this manual) LIMITED WARRANTY IMPORTANT: To protect your tness equipment with an extended service plan, see the PART LIST...
... authorized service centers. ICON Health & Fitness, Inc. (ICON) warrants this warranty is under normal use , or costs of removal or installation; ICON is authorized by ICON. Some states do not allow the exclusion or limitation of incidental or consequential damages. ORDERING REPLACEMENT PARTS To order replacement parts, please see the front cover of this manual) LIMITED WARRANTY IMPORTANT: To protect your tness equipment with an extended service plan, see the PART LIST...


