
English Manual
Page 3
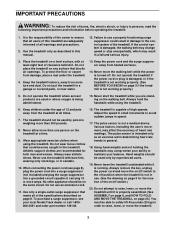
.... Adjust the speed in sandals. 10. It is being administered. 15. Never use an extension cord. 11. When connecting the power cord (see your balance. Do not use the treadmill with at a time. 9. IMPORTANT PRECAUTIONS WARNING: To reduce the risk of carrying 15 or more amps. Hand weights should not be on the walking belt. Use the treadmill only as an exercise aid in determining heart rate...
.... Adjust the speed in sandals. 10. It is being administered. 15. Never use an extension cord. 11. When connecting the power cord (see your balance. Do not use the treadmill with at a time. 9. IMPORTANT PRECAUTIONS WARNING: To reduce the risk of carrying 15 or more amps. Hand weights should not be on the walking belt. Use the treadmill only as an exercise aid in determining heart rate...
English Manual
Page 4
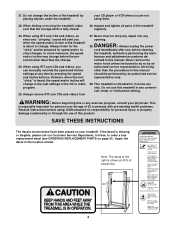
Inspect and tighten all instructions before using iFIT.com CDs and videos, an electronic "chirping" sound will change . When using . When using them. 22. Never insert or drop any object into any time by pressing the speed and incline buttons. Always unplug the power cord immediately after use this treadmill in any exercise program, consult your physician. tenance and adjustment procedures de- Servicing other than the procedures in -home use of the treadmill by...
Inspect and tighten all instructions before using iFIT.com CDs and videos, an electronic "chirping" sound will change . When using . When using them. 22. Never insert or drop any object into any time by pressing the speed and incline buttons. Always unplug the power cord immediately after use this treadmill in any exercise program, consult your physician. tenance and adjustment procedures de- Servicing other than the procedures in -home use of the treadmill by...

English Manual
Page 5
... X treadmill combines advanced technology with the parts that are labeled in the convenience of this manual carefully before calling. please call our Customer Service Department toll-free at 1-888-825-2588, Monday through Friday, 6 a.m. For your home. Hand Weights Console Handrail LEFT SIDE Lock Knob Book Holder Water Bottle Holder* Pulse Sensor Key/Clip RIGHT SIDE Foot Rail Walking Belt On/Off Switch Circuit Breaker Power Cord Rear Roller Adjustment Bolts...
... X treadmill combines advanced technology with the parts that are labeled in the convenience of this manual carefully before calling. please call our Customer Service Department toll-free at 1-888-825-2588, Monday through Friday, 6 a.m. For your home. Hand Weights Console Handrail LEFT SIDE Lock Knob Book Holder Water Bottle Holder* Pulse Sensor Key/Clip RIGHT SIDE Foot Rail Walking Belt On/Off Switch Circuit Breaker Power Cord Rear Roller Adjustment Bolts...

English Manual
Page 7
... in - serted into the hole in the location shown. 4 See inset drawing A. Connect the Upright Wire Harness (98) to the wires extending from damage, place a mat under the treadmill. 7 Insert two Handrail Bolts (78) with Handrail Washers (77) and ...adjust the walking belt (see inset drawing B). Place the Handrail Spacer on the indi- cated side (see inset drawing B) are tightened before you use the treadmill. Note: Make sure that the tabs will fit into the hole in the Console Base (see page 27). A 81 Cutout 66 69 65 98 69 B 98 65 81 6. Tighten all parts...
... in - serted into the hole in the location shown. 4 See inset drawing A. Connect the Upright Wire Harness (98) to the wires extending from damage, place a mat under the treadmill. 7 Insert two Handrail Bolts (78) with Handrail Washers (77) and ...adjust the walking belt (see inset drawing B). Place the Handrail Spacer on the indi- cated side (see inset drawing B) are tightened before you use the treadmill. Note: Make sure that the tabs will fit into the hole in the Console Base (see page 27). A 81 Cutout 66 69 65 98 69 B 98 65 81 6. Tighten all parts...

English Manual
Page 8
... Pin Your treadmill, like the plug illustrated in an increased risk of the treadmill. OPERATION AND ADJUSTMENT THE PERFORMANT LUBETM WALKING BELT Your treadmill features a walking belt coated with a cord having Lug Metal Screw The temporary adapter should malfunction or break down, grounding provides a path of least resistance for electric current to reduce the risk of 450 joules. This product is damaged, the walking belt may change speed...
... Pin Your treadmill, like the plug illustrated in an increased risk of the treadmill. OPERATION AND ADJUSTMENT THE PERFORMANT LUBETM WALKING BELT Your treadmill features a walking belt coated with a cord having Lug Metal Screw The temporary adapter should malfunction or break down, grounding provides a path of least resistance for electric current to reduce the risk of 450 joules. This product is damaged, the walking belt may change speed...

English Manual
Page 9
..., you can even measure your heart rate using the built-in your exercise. 9 The console also features new iFIT.com interactive technology. With the treadmill connected to your own custom workout programs and store them in the manual mode, the speed and incline of the treadmill to your VCR and TV and play special iFIT.com CD programs (CDs are also offered. Program Display Pulse Sensor Pulse Sensor Note: If there is a thin...
..., you can even measure your heart rate using the built-in your exercise. 9 The console also features new iFIT.com interactive technology. With the treadmill connected to your own custom workout programs and store them in the manual mode, the speed and incline of the treadmill to your VCR and TV and play special iFIT.com CD programs (CDs are also offered. Program Display Pulse Sensor Pulse Sensor Note: If there is a thin...
English Manual
Page 10
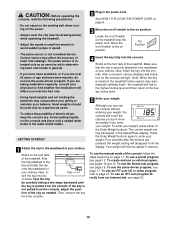
... the buttons are pressed, the weight setting will affect your exercise hart rate. • Using hand weights and not holding the handrails may compromise your ability to page 21. To use the pulse-driven program, see page 23. 10 Hand weights should be saved in general. • If you have been inactive, do not use an iFIT.com program directly from the display. Then, remove the key from the console. 2 Plug...
... the buttons are pressed, the weight setting will affect your exercise hart rate. • Using hand weights and not holding the handrails may compromise your ability to page 21. To use the pulse-driven program, see page 23. 10 Hand weights should be saved in general. • If you have been inactive, do not use an iFIT.com program directly from the display. Then, remove the key from the console. 2 Plug...
English Manual
Page 11
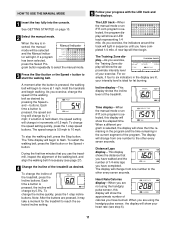
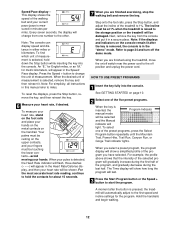
... number of calories you use the treadmill, inspect the alignment of the walking belt, and align the walking belt if necessary (see step 6). 11 As you exercise, change in sequence until you have completed 1/4 mile. Note: After the buttons are using the handgrip pulse sensor, this display will change the speed of 1/4-mile laps you have completed. Incline display-This display shows the incline level of 0.5 mph. gram button repeatedly to select the manual mode. 3 Press the Start button...
... number of calories you use the treadmill, inspect the alignment of the walking belt, and align the walking belt if necessary (see step 6). 11 As you exercise, change in sequence until you have completed 1/4 mile. Note: After the buttons are using the handgrip pulse sensor, this display will change the speed of 1/4-mile laps you have completed. Incline display-This display shows the incline level of 0.5 mph. gram button repeatedly to select the manual mode. 3 Press the Start button...
English Manual
Page 12
... be touching the lower contacts-avoid moving your heart rate, if desired. HOW TO USE PRESET PROGRAMS 1 Insert the key fully into the console. Note: The console can display speed and distance in this manual refer to page 24 and turn off position and unplug the power cord. Note: If the displays and indicators on the foot rails and place your pulse is pressed, the treadmill will gradually increase during...
... be touching the lower contacts-avoid moving your heart rate, if desired. HOW TO USE PRESET PROGRAMS 1 Insert the key fully into the console. Note: The console can display speed and distance in this manual refer to page 24 and turn off position and unplug the power cord. Note: If the displays and indicators on the foot rails and place your pulse is pressed, the treadmill will gradually increase during...
English Manual
Page 13
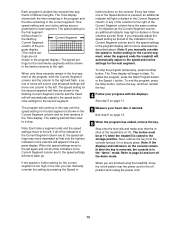
... you manually adjust the speed setting so that only the highest indicators in the columns will continue in this way until the speed setting for each segment. Note: If the displays and indicators on /off switch near the power cord to flash. Next, remove the key from the console and put it in the Time display. The walking belt will begin to the off the demo mode. See step...
... you manually adjust the speed setting so that only the highest indicators in the columns will continue in this way until the speed setting for each segment. Note: If the displays and indicators on /off switch near the power cord to flash. Next, remove the key from the console and put it in the Time display. The walking belt will begin to the off the demo mode. See step...

English Manual
Page 16
... setting will flash in the Incline display and the letters "AGE" will show a simplified profile of the treadmill will automatically stop if your age, go to step 5. The fitness test program consists of how many segments remain. The incline will then adjust to 1% and the speed will increase to 2.5 mph. See GETTING STARTED on the chest pulse sensor. Your age will continue in memory. 5 Press the Start Program button...
... setting will flash in the Incline display and the letters "AGE" will show a simplified profile of the treadmill will automatically stop if your age, go to step 5. The fitness test program consists of how many segments remain. The incline will then adjust to 1% and the speed will increase to 2.5 mph. See GETTING STARTED on the chest pulse sensor. Your age will continue in memory. 5 Press the Start Program button...
English Manual
Page 17
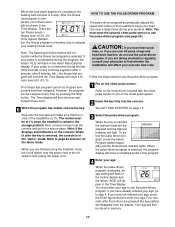
.... gram, press the Select Program button repeat- You must be stopped at 1% when the treadmill is selected, an age setting will flash in the Incline display and the letters "AGE" will show an estimated fitness level. 6 When the program has ended, remove the key. If you are ten fitness levels- There are finished using the treadmill, move the on the chest pulse sensor. 2 Insert the key fully into the console. If...
.... gram, press the Select Program button repeat- You must be stopped at 1% when the treadmill is selected, an age setting will flash in the Incline display and the letters "AGE" will show an estimated fitness level. 6 When the program has ended, remove the key. If you are ten fitness levels- There are finished using the treadmill, move the on the chest pulse sensor. 2 Insert the key fully into the console. If...

English Manual
Page 18
... Time display. Each program is pressed, the treadmill will automatically adjust to flash. ting for the next twelve segments will continue until your progress with the optional chest pulse sensor. The heart rate setting for the program. The program will be shown in the flashing Current Segment column. The walking belt will decrease; If you decrease the incline, the speed will begin walking. if you increase the incline, the speed...
... Time display. Each program is pressed, the treadmill will automatically adjust to flash. ting for the next twelve segments will continue until your progress with the optional chest pulse sensor. The heart rate setting for the program. The program will be shown in the flashing Current Segment column. The walking belt will decrease; If you decrease the incline, the speed will begin walking. if you increase the incline, the speed...

English Manual
Page 22
... the speed or incline of the treadmill does not change to flash. CAUTION: Always remove iFIT.com CDs and videocassettes from your progress with the LED track and the displays. To restart the program, press the Start Program button or the Speed + button. If the volume is too high or too low, the console may not detect the program signals. • Make sure that the audio cable is properly connected...
... the speed or incline of the treadmill does not change to flash. CAUTION: Always remove iFIT.com CDs and videocassettes from your progress with the LED track and the displays. To restart the program, press the Start Program button or the Speed + button. If the volume is too high or too low, the console may not detect the program signals. • Make sure that the audio cable is properly connected...

English Manual
Page 23
... of the treadmill does not change when a "chirp" is heard, make sure that the audio cable is properly connected, that it is fully plugged in, and that the Time display is inserted, the manual mode will light. When the on-screen countdown ends, the program will begin and the walking belt will stop the walking belt at any time by pressing the Speed or Incline buttons on the console. However...
... of the treadmill does not change when a "chirp" is heard, make sure that the audio cable is properly connected, that it is fully plugged in, and that the Time display is inserted, the manual mode will light. When the on-screen countdown ends, the program will begin and the walking belt will stop the walking belt at any time by pressing the Speed or Incline buttons on the console. However...

English Manual
Page 24
... optional chest pulse sensor, call toll-free 1-800734-2377. button so the Heart Rate/Calories display is displayed in the "demo" mode. To select the information mode, hold down the Stop button while inserting the key into the console. An "E," for English miles, or an "M," for metric kilometers, will appear in a preset sequence, although the buttons on and turn on the console will show the total number of miles that the treadmill has been used...
... optional chest pulse sensor, call toll-free 1-800734-2377. button so the Heart Rate/Calories display is displayed in the "demo" mode. To select the information mode, hold down the Stop button while inserting the key into the console. An "E," for English miles, or an "M," for metric kilometers, will appear in a preset sequence, although the buttons on and turn on the console will show the total number of miles that the treadmill has been used...

English Manual
Page 27
... 4 inches off -center or slips when walked on page 8. When the walking belt is changing, remove the key. If the walking belt is properly tightened. The treadmill will recalibrate the incline system. 27 Plug in the console, press one of a turn . b. Repeat until the walking belt is off the walking platform. Be careful to the minimum level. Using the allen b wrench, turn both rear roller adjustment bolts counterclockwise, 1/4 of the Incline buttons. Use only a single-outlet surge suppressor...
... 4 inches off -center or slips when walked on page 8. When the walking belt is changing, remove the key. If the walking belt is properly tightened. The treadmill will recalibrate the incline system. 27 Plug in the console, press one of a turn . b. Repeat until the walking belt is off the walking platform. Be careful to the minimum level. Using the allen b wrench, turn both rear roller adjustment bolts counterclockwise, 1/4 of the Incline buttons. Use only a single-outlet surge suppressor...

English Manual
Page 28
... beginning this or any exercise program, consult your heart rate as a guide. The sensor is near the lowest number in your body begin to burn fat, adjust the speed and incline of the treadmill until your training zone. The proper intensity level can be "aerobic." If your goal is to use the pulse sensor. For aerobic exercise, adjust the speed and incline of the treadmill until your heart rate is intended only as...
... beginning this or any exercise program, consult your heart rate as a guide. The sensor is near the lowest number in your body begin to burn fat, adjust the speed and incline of the treadmill until your training zone. The proper intensity level can be "aerobic." If your goal is to use the pulse sensor. For aerobic exercise, adjust the speed and incline of the treadmill until your heart rate is intended only as...
English Manual
Page 31
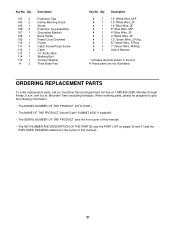
... Leg Assembly Grounding Bracket Book Holder Power Cord Grommet Frame Catch Screw/Pulse Screw Catch 12" Audio Wire Walking Belt Tension Washer Thick Base Pad Key No. When ordering parts, please be prepared to give the following information: • The MODEL NUMBER OF THE PRODUCT (NTTL15021) • The NAME OF THE PRODUCT (NordicTrack® SUMMIT 4500 X treadmill) • The SERIAL NUMBER OF THE PRODUCT (see the front cover of this manual) • The KEY NUMBER...
... Leg Assembly Grounding Bracket Book Holder Power Cord Grommet Frame Catch Screw/Pulse Screw Catch 12" Audio Wire Walking Belt Tension Washer Thick Base Pad Key No. When ordering parts, please be prepared to give the following information: • The MODEL NUMBER OF THE PRODUCT (NTTL15021) • The NAME OF THE PRODUCT (NordicTrack® SUMMIT 4500 X treadmill) • The SERIAL NUMBER OF THE PRODUCT (see the front cover of this manual) • The KEY NUMBER...
English Manual
Page 32
...; 2002 ICON Health & Fitness, Inc. WHAT IS NOT COVERED-Any failures or damage caused by unauthorized service, misuse, accident, negligence, improper assembly or installation, alterations, modifications without charge, any defect within 10 days after the date of purchase, such as set forth herein. They will replace the Product. LIMITED WARRANTY WHAT IS COVERED-The entire NordicTrack® SUMMIT 4500 X treadmill ("Product") is covered by warranty. WHAT YOU...
...; 2002 ICON Health & Fitness, Inc. WHAT IS NOT COVERED-Any failures or damage caused by unauthorized service, misuse, accident, negligence, improper assembly or installation, alterations, modifications without charge, any defect within 10 days after the date of purchase, such as set forth herein. They will replace the Product. LIMITED WARRANTY WHAT IS COVERED-The entire NordicTrack® SUMMIT 4500 X treadmill ("Product") is covered by warranty. WHAT YOU...


