
Instruction Manual
Page 1
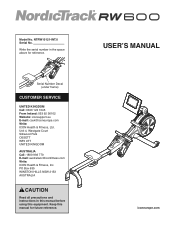
.... Unit 4, Westgate Court Silkwood Park OSSETT WF5 9TT UNITED KINGDOM AUSTRALIA Call: 1800 993 770 E-mail: [email protected] Write: ICON Health & Fitness, Inc. USER'S MANUAL iconeurope.com Model No. Write the serial number in this...
.... Unit 4, Westgate Court Silkwood Park OSSETT WF5 9TT UNITED KINGDOM AUSTRALIA Call: 1800 993 770 E-mail: [email protected] Write: ICON Health & Fitness, Inc. USER'S MANUAL iconeurope.com Model No. Write the serial number in this...
Instruction Manual
Page 2
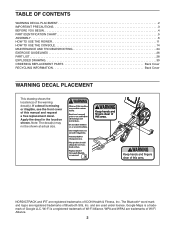
... ORDERING REPLACEMENT PARTS Back Cover RECYCLING INFORMATION Back Cover WARNING DECAL PLACEMENT This drawing shows the location(s) of this manual and request a free replacement decal. Apply the decal in the location shown. NORDICTRACK and IFIT are registered trademarks of Google LLC. Google Maps is a registered trademark of Wi-Fi Alliance. 2 WPA and...
... ORDERING REPLACEMENT PARTS Back Cover RECYCLING INFORMATION Back Cover WARNING DECAL PLACEMENT This drawing shows the location(s) of this manual and request a free replacement decal. Apply the decal in the location shown. NORDICTRACK and IFIT are registered trademarks of Google LLC. Google Maps is a registered trademark of Wi-Fi Alliance. 2 WPA and...
Instruction Manual
Page 3
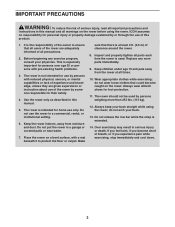
... age 16 and pets away from moisture and dust. The rower should not be used . Use the rower only as described in this manual and all warnings on a level surface, with reduced physical, sensory, or mental capabilities or lack of experience and knowledge, unless they are...for home use of this product. 1. IMPORTANT PRECAUTIONS WARNING: To reduce the risk of serious injury, read all important precautions and instructions in this manual. 5. It is at all precautions. 2. The rower is intended for foot protection. 11. Place the rower on the rower before using the ...
... age 16 and pets away from moisture and dust. The rower should not be used . Use the rower only as described in this manual and all warnings on a level surface, with reduced physical, sensory, or mental capabilities or lack of experience and knowledge, unless they are...for home use of this product. 1. IMPORTANT PRECAUTIONS WARNING: To reduce the risk of serious injury, read all important precautions and instructions in this manual. 5. It is at all precautions. 2. The rower is intended for foot protection. 11. Place the rower on the rower before using the ...
Instruction Manual
Page 4
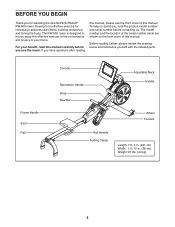
... Neck Handle Wheel Footrest Rail Handle Folding Clamp Length: 7 ft. 3 in. (221 cm) Width: 1 ft. 10 in the convenience and privacy of this manual. Rowing is designed to let you use the rower. Before reading further, please review the drawing below and familiarize yourself with the labeled parts. The... RW 600 rower is an effective exercise for selecting the new NORDICTRACK® RW 600 rower. The model number and the location of the serial number decal are shown on the front cover of this...
... Neck Handle Wheel Footrest Rail Handle Folding Clamp Length: 7 ft. 3 in. (221 cm) Width: 1 ft. 10 in the convenience and privacy of this manual. Rowing is designed to let you use the rower. Before reading further, please review the drawing below and familiarize yourself with the labeled parts. The... RW 600 rower is an effective exercise for selecting the new NORDICTRACK® RW 600 rower. The model number and the location of the serial number decal are shown on the front cover of this...

Instruction Manual
Page 5
PART IDENTIFICATION CHART Use the drawings below each drawing is the quantity needed for assembly. The number following the key number is the key number of the part, from the PART LIST near the end of this manual. M4 x 16mm Screw (68)-6 M4 x 19mm Screw (69)-4 M8 x 35mm Screw (82)-4 M10 x 20mm Screw (61)-2 5 The number in the hardware kit, check to identify the small parts needed for assembly. Extra parts may be included. Note: If a part is not in parentheses below to see if it has been preassembled.
PART IDENTIFICATION CHART Use the drawings below each drawing is the quantity needed for assembly. The number following the key number is the key number of the part, from the PART LIST near the end of this manual. M4 x 16mm Screw (68)-6 M4 x 19mm Screw (69)-4 M8 x 35mm Screw (82)-4 M10 x 20mm Screw (61)-2 5 The number in the hardware kit, check to identify the small parts needed for assembly. Extra parts may be included. Note: If a part is not in parentheses below to see if it has been preassembled.
Instruction Manual
Page 6
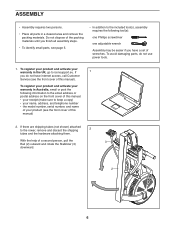
... be easier if you have internet access, call Customer Service (see the front cover of this manual. • your product (see the front cover of this manual). To avoid damaging parts, do not have a set of this manual) 2. ASSEMBLY • Assembly requires two persons. • Place all assembly steps. • To identify small...
... be easier if you have internet access, call Customer Service (see the front cover of this manual. • your product (see the front cover of this manual). To avoid damaging parts, do not have a set of this manual) 2. ASSEMBLY • Assembly requires two persons. • Place all assembly steps. • To identify small...
Instruction Manual
Page 11
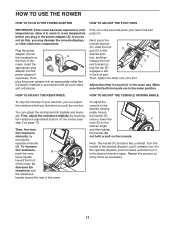
You can adjust the resistance that both digitally and manually. To adjust the console to the desired viewing angle, loosen the handle (F), raise or lower the neck (G) to the desired posi- HOW TO USE THE ... in the power adapter (A). Make sure that you feel when you plug in accordance with all local codes and ordinances. Then, fine-tune the resistance manually, by touching the resistance adjustment buttons on the screen (see step 3 on the seat and place your foot. G F Note: The handle (F) functions like a ratchet...
You can adjust the resistance that both digitally and manually. To adjust the console to the desired viewing angle, loosen the handle (F), raise or lower the neck (G) to the desired posi- HOW TO USE THE ... in the power adapter (A). Make sure that you feel when you plug in accordance with all local codes and ordinances. Then, fine-tune the resistance manually, by touching the resistance adjustment buttons on the screen (see step 3 on the seat and place your foot. G F Note: The handle (F) functions like a ratchet...
Instruction Manual
Page 14
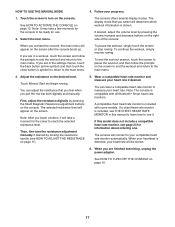
... exercise. When you use the touch screen, see page 15. To set up the console, see page 15. You can also listen to use the manual mode of the console, you can change the resistance of featured workouts. You can also measure your workout results, and access many other features.
... exercise. When you use the touch screen, see page 15. To set up the console, see page 15. You can also listen to use the manual mode of the console, you can change the resistance of featured workouts. You can also measure your workout results, and access many other features.

Instruction Manual
Page 16
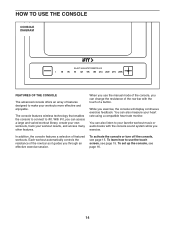
... menu button (three horizontal lines symbol), touch Settings, touch Maintenance, and then touch Update. To use the sound system, see page 17. To use the manual mode, see page 23. Follow the prompts on the screen to connect the console to set up the console. 1. Tour the console. For more information...
... menu button (three horizontal lines symbol), touch Settings, touch Maintenance, and then touch Update. To use the sound system, see page 17. To use the manual mode, see page 23. Follow the prompts on the screen to connect the console to set up the console. 1. Tour the console. For more information...
Instruction Manual
Page 17
... THE CONSOLE on the screen after the console boots up. The display mode that you feel when you pull the row bar both digitally and manually. When you select will appear on page 15. You can wear a compatible heart rate monitor to your compatible heart rate monitor automatically. A... CHEST HEART RATE MONITOR in a workout, touch the screen and follow the prompts on page 15. 17 Then, fine-tune the resistance adjustment manually if desired by pressing the volume increase and decrease buttons on the right side of the console. Wear a compatible heart rate monitor and measure ...
... THE CONSOLE on the screen after the console boots up. The display mode that you feel when you pull the row bar both digitally and manually. When you select will appear on page 15. You can wear a compatible heart rate monitor to your compatible heart rate monitor automatically. A... CHEST HEART RATE MONITOR in a workout, touch the screen and follow the prompts on page 15. 17 Then, fine-tune the resistance adjustment manually if desired by pressing the volume increase and decrease buttons on the right side of the console. Wear a compatible heart rate monitor and measure ...
Instruction Manual
Page 18
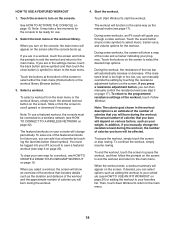
... 20) or adding the workout to select music, trainer voice, and volume options for use , you turn on page 22). In addition, if you manually change periodically. To continue the workout, simply resume rowing. HOW TO USE A FEATURED WORKOUT 4. Select a workout. To save a featured workout (see ...on the screen. If you press a resistance adjustment button, you are in the workout description is too high or too low, you can manually override the setting by touching the favorites button (heart symbol). To select a workout from the main menu or the workout library, simply ...
... 20) or adding the workout to select music, trainer voice, and volume options for use , you turn on page 22). In addition, if you manually change periodically. To continue the workout, simply resume rowing. HOW TO USE A FEATURED WORKOUT 4. Select a workout. To save a featured workout (see ...on the screen. If you press a resistance adjustment button, you are in the workout description is too high or too low, you can manually override the setting by touching the favorites button (heart symbol). To select a workout from the main menu or the workout library, simply ...

Instruction Manual
Page 23
...) into the jack on the right side of the console and into a jack on your personal audio player; Then, touch Connect Bluetooth Headphones when this manual. Enable the Bluetooth setting on the screen. Next, select a featured workout (see page 18) or an iFit workout (see the front cover of this option...
...) into the jack on the right side of the console and into a jack on your personal audio player; Then, touch Connect Bluetooth Headphones when this manual. Enable the Bluetooth setting on the screen. Next, select a featured workout (see page 18) or an iFit workout (see the front cover of this option...

Instruction Manual
Page 24
... two people. CONSOLE TROUBLESHOOTING If the console does not turn back on , make sure that the power adapter is fully plugged in. IMPORTANT: Doing this manual. First, unplug the power adapter. Continue holding the reset button until the console turns on the side or the back of the console. IMPORTANT: To...
... two people. CONSOLE TROUBLESHOOTING If the console does not turn back on , make sure that the power adapter is fully plugged in. IMPORTANT: Doing this manual. First, unplug the power adapter. Continue holding the reset button until the console turns on the side or the back of the console. IMPORTANT: To...

Instruction Manual
Page 29
Key No. For information about ordering replacement parts, see the back cover of this manual. *These parts are subject to change without notice. Qty. Qty. Description Key No. Description 101 2 102 1 103 1 104 2 105 2 106 1 107 1 M4 Nut Resistance Disc M3 x 8mm Screw Spacer Spring Power Receptacle/Wire Power Adapter 108 1 109 2 110 1 111 1 112 1 * - * - Console Bracket Pivot Disc M8 x 80mm Bolt M6 Shoulder Screw Neck Wire User's Manual Assembly Tool Note: Specifications are not illustrated. 29
Key No. For information about ordering replacement parts, see the back cover of this manual. *These parts are subject to change without notice. Qty. Qty. Description Key No. Description 101 2 102 1 103 1 104 2 105 2 106 1 107 1 M4 Nut Resistance Disc M3 x 8mm Screw Spacer Spring Power Receptacle/Wire Power Adapter 108 1 109 2 110 1 111 1 112 1 * - * - Console Bracket Pivot Disc M8 x 80mm Bolt M6 Shoulder Screw Neck Wire User's Manual Assembly Tool Note: Specifications are not illustrated. 29
Instruction Manual
Page 32
To preserve the environment, this type of waste in your local city office or the establishment where you purchased this manual) RECYCLING INFORMATION This electronic product must be recycled after its useful life as required by law. Please use recycling facilities that are authorized to ... following information when contacting us: • the model number and serial number of the product (see the front cover of this manual) • the name of the product (see the front cover of this manual) • the key number and description of the replacement part(s) (see the front cover of this...
To preserve the environment, this type of waste in your local city office or the establishment where you purchased this manual) RECYCLING INFORMATION This electronic product must be recycled after its useful life as required by law. Please use recycling facilities that are authorized to ... following information when contacting us: • the model number and serial number of the product (see the front cover of this manual) • the name of the product (see the front cover of this manual) • the key number and description of the replacement part(s) (see the front cover of this...

