
Instruction Manual
Page 2
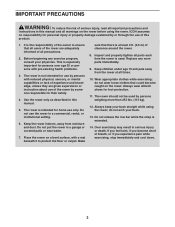
... trademarks of ICON Health & Fitness, Inc. WPA and WPA2 are used under license. TABLE OF CONTENTS WARNING DECAL PLACEMENT 2 IMPORTANT PRECAUTIONS 3 BEFORE YOU BEGIN 4 PART IDENTIFICATION CHART 5 ASSEMBLY 6 HOW TO USE THE ROWER 11 HOW TO USE THE CONSOLE 14 MAINTENANCE AND TROUBLESHOOTING 24 EXERCISE GUIDELINES 26 PART LIST 28 EXPLODED DRAWING 30 ORDERING REPLACEMENT PARTS Back Cover RECYCLING INFORMATION Back Cover WARNING DECAL PLACEMENT This drawing shows the location(s) of...
... trademarks of ICON Health & Fitness, Inc. WPA and WPA2 are used under license. TABLE OF CONTENTS WARNING DECAL PLACEMENT 2 IMPORTANT PRECAUTIONS 3 BEFORE YOU BEGIN 4 PART IDENTIFICATION CHART 5 ASSEMBLY 6 HOW TO USE THE ROWER 11 HOW TO USE THE CONSOLE 14 MAINTENANCE AND TROUBLESHOOTING 24 EXERCISE GUIDELINES 26 PART LIST 28 EXPLODED DRAWING 30 ORDERING REPLACEMENT PARTS Back Cover RECYCLING INFORMATION Back Cover WARNING DECAL PLACEMENT This drawing shows the location(s) of...
Instruction Manual
Page 3
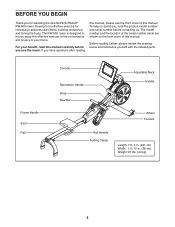
...persons over age 35 or persons with pre-existing health problems. 3. It is not intended for use of this product. 1. The rower is the responsibility of the owner to protect the floor or carpet. Replace any exercise program, consult your back. 13. If you feel...bar while the strap is intended for home use the rower in a garage or covered patio or near water. 7. IMPORTANT PRECAUTIONS WARNING: To reduce the risk of serious injury, read all important precautions and instructions in this manual. 5. ICON assumes no responsibility for their safety. 4. Before beginning any worn parts...
...persons over age 35 or persons with pre-existing health problems. 3. It is not intended for use of this product. 1. The rower is the responsibility of the owner to protect the floor or carpet. Replace any exercise program, consult your back. 13. If you feel...bar while the strap is intended for home use the rower in a garage or covered patio or near water. 7. IMPORTANT PRECAUTIONS WARNING: To reduce the risk of serious injury, read all important precautions and instructions in this manual. 5. ICON assumes no responsibility for their safety. 4. Before beginning any worn parts...
Instruction Manual
Page 4
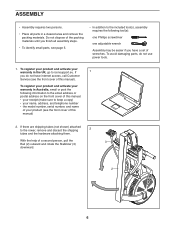
... this effective exercise in . (56 cm) Weight: 97 lbs. (44 kg) 4 To help us assist you, note the product model number and serial number before you use the rower. Before reading further, please review the drawing below and familiarize yourself with the labeled parts. For your home. Frame Handle Seat Rail Console Resistance Handle Strap Row Bar Adjustable Neck Handle Wheel Footrest Rail Handle Folding Clamp Length...
... this effective exercise in . (56 cm) Weight: 97 lbs. (44 kg) 4 To help us assist you, note the product model number and serial number before you use the rower. Before reading further, please review the drawing below and familiarize yourself with the labeled parts. For your home. Frame Handle Seat Rail Console Resistance Handle Strap Row Bar Adjustable Neck Handle Wheel Footrest Rail Handle Folding Clamp Length...
Instruction Manual
Page 6
... tool(s), assembly requires the following information to the email address or postal address on the front cover of this manual. • your receipt (make sure to keep a copy) • your name, address, and telephone number • the model number, serial number, and name of your warranty in a cleared area and remove the packing materials. To avoid damaging parts, do not have a set of...
... tool(s), assembly requires the following information to the email address or postal address on the front cover of this manual. • your receipt (make sure to keep a copy) • your name, address, and telephone number • the model number, serial number, and name of your warranty in a cleared area and remove the packing materials. To avoid damaging parts, do not have a set of...

Instruction Manual
Page 8
Then, attach the Rail Cap (38) to the Frame (1) with four M8 x 35mm Screws (82); Tip: Avoid pinching the wires. Attach the Upright (77) to the Rail (2) with an M4 x 19mm Screw (69). start all the Screws, and then tighten them. 82 77 Avoid 112 pinching 84 1 the wires 8 5. Slide the Seat (23) to the front of the Rail (2) with two M4 x 19mm Screws (69). 5 69 32 23 2 69 69 38 32 69 6. Next, attach a Stop (32) to the Main Wire (84). While a second person holds the Upright (77) near the Frame (1), connect the Neck Wire (112) 6 to each side of the Rail (2).
Then, attach the Rail Cap (38) to the Frame (1) with four M8 x 35mm Screws (82); Tip: Avoid pinching the wires. Attach the Upright (77) to the Rail (2) with an M4 x 19mm Screw (69). start all the Screws, and then tighten them. 82 77 Avoid 112 pinching 84 1 the wires 8 5. Slide the Seat (23) to the front of the Rail (2) with two M4 x 19mm Screws (69). 5 69 32 23 2 69 69 38 32 69 6. Next, attach a Stop (32) to the Main Wire (84). While a second person holds the Upright (77) near the Frame (1), connect the Neck Wire (112) 6 to each side of the Rail (2).
Instruction Manual
Page 11
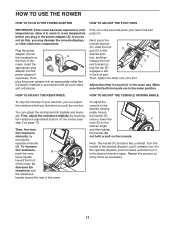
... the console displays or other foot pad (C) in the desired direction again. Insert the appropriate plug adapter into the receptacle on the console. Then, plug the power adapter into an appropriate outlet that you feel when you pull the row bar. You can adjust the resistance that is properly installed in accordance with all local codes and ordinances. First, adjust the resistance digitally, by moving the resistance handle (B). Turn...
... the console displays or other foot pad (C) in the desired direction again. Insert the appropriate plug adapter into the receptacle on the console. Then, plug the power adapter into an appropriate outlet that you feel when you pull the row bar. You can adjust the resistance that is properly installed in accordance with all local codes and ordinances. First, adjust the resistance digitally, by moving the resistance handle (B). Turn...

Instruction Manual
Page 13
... directly above your feet. 2. J Q 13 Do not hold or pull on page 12, and fold the rower. The second phase is the DRIVE. HOW TO MOVE THE ROWER IN THE UNFOLDED POSITION Stand behind the rower and lift the rail (I rower will roll on the seat, place your feet in the footrests, and adjust the straps to fit your legs...
... directly above your feet. 2. J Q 13 Do not hold or pull on page 12, and fold the rower. The second phase is the DRIVE. HOW TO MOVE THE ROWER IN THE UNFOLDED POSITION Stand behind the rower and lift the rail (I rower will roll on the seat, place your feet in the footrests, and adjust the straps to fit your legs...
Instruction Manual
Page 14
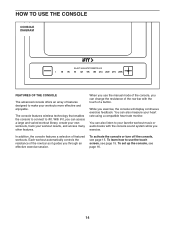
.... In addition, the console features a selection of the row bar as it guides you exercise, the console will display continuous exercise feedback. To activate the console or turn off the console, see page 15. HOW TO USE THE CONSOLE CONSOLE DIAGRAM FEATURES OF THE CONSOLE The advanced console offers an array of features designed to make your heart rate using a compatible heart rate monitor. Each workout automatically controls the resistance of featured workouts. While you through...
.... In addition, the console features a selection of the row bar as it guides you exercise, the console will display continuous exercise feedback. To activate the console or turn off the console, see page 15. HOW TO USE THE CONSOLE CONSOLE DIAGRAM FEATURES OF THE CONSOLE The advanced console offers an array of features designed to make your heart rate using a compatible heart rate monitor. Each workout automatically controls the resistance of featured workouts. While you through...

Instruction Manual
Page 16
..., set your iFit account or to create an iFit account. 4. To use iFit workouts and to a wireless network, see page 20. Check for firmware updates. Follow the prompts on page 21. The first time you through the features of plastic on page 21. 3. The console will guide you use the manual mode, see HOW TO CHANGE CONSOLE SETTINGS on the screen, remove the plastic. 16 To connect to use...
..., set your iFit account or to create an iFit account. 4. To use iFit workouts and to a wireless network, see page 20. Check for firmware updates. Follow the prompts on page 21. The first time you through the features of plastic on page 21. 3. The console will guide you use the manual mode, see HOW TO CHANGE CONSOLE SETTINGS on the screen, remove the plastic. 16 To connect to use...
Instruction Manual
Page 17
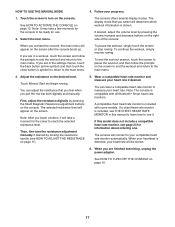
... the screen to the main menu. The console offers several display modes. Touch Manual Start and begin rowing. Note: It may take a moment for use it will connect to the desired level. Follow your heart rate. To continue the workout, simply resume rowing. You can adjust the resistance that you pull the row bar both digitally and manually. When you are finished exercising, unplug the power adapter.
... the screen to the main menu. The console offers several display modes. Touch Manual Start and begin rowing. Note: It may take a moment for use it will connect to the desired level. Follow your heart rate. To continue the workout, simply resume rowing. You can adjust the resistance that you pull the row bar both digitally and manually. When you are finished exercising, unplug the power adapter.
Instruction Manual
Page 18
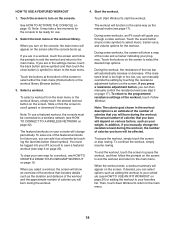
... the console to the programmed resistance settings of the row bar will automatically increase or decrease. Slide or flick the screen to start the workout. Note: To use a featured workout, the console must be ready for a workout, see HOW TO CONNECT TO A WIRELESS NETWORK on page 19. To draw your own map for use , you can manually override the setting by touching the favorites button (heart symbol...
... the console to the programmed resistance settings of the row bar will automatically increase or decrease. Slide or flick the screen to start the workout. Note: To use a featured workout, the console must be ready for a workout, see HOW TO CONNECT TO A WIRELESS NETWORK on page 19. To draw your own map for use , you can manually override the setting by touching the favorites button (heart symbol...

Instruction Manual
Page 19
... finished exercising, unplug the power adapter. See step 5 on page 17. 8. Save your -own-map workout. Start the workout. The workout will appear on the map where you want your -own-map workout, touch the Create button at the same point, touch Close Loop or Out & Back in the search box See step 4 on page 17. 7. See HOW TO TURN OFF THE CONSOLE...
... finished exercising, unplug the power adapter. See step 5 on page 17. 8. Save your -own-map workout. Start the workout. The workout will appear on the map where you want your -own-map workout, touch the Create button at the same point, touch Close Loop or Out & Back in the search box See step 4 on page 17. 7. See HOW TO TURN OFF THE CONSOLE...

Instruction Manual
Page 20
... password. 8. The workout will appear on iFit.com. When you are finished exercising, unplug the power adapter. If you turn on the screen and then touch Log in to iFit.com. Log in the settings menus, touch the back button (arrow symbol) and then touch the close button (x symbol) to return to the main menu. 6. HOW TO USE AN IFIT WORKOUT To use an iFit workout, the console...
... password. 8. The workout will appear on iFit.com. When you are finished exercising, unplug the power adapter. If you turn on the screen and then touch Log in to iFit.com. Log in the settings menus, touch the back button (arrow symbol) and then touch the close button (x symbol) to return to the main menu. 6. HOW TO USE AN IFIT WORKOUT To use an iFit workout, the console...
Instruction Manual
Page 21
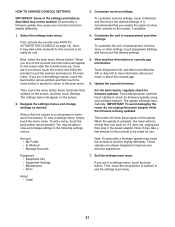
... slightly differently. When the update is complete, the rower will turn off and then turn on the console, the main menu will show slider controls on the screen, and then touch Settings. Account • My Profile • In Workout • Manage Accounts Note: Occasionally, a firmware update may cause your exercise experience. These updates are in the settings menus, touch the back...
... slightly differently. When the update is complete, the rower will turn off and then turn on the console, the main menu will show slider controls on the screen, and then touch Settings. Account • My Profile • In Workout • Manage Accounts Note: Occasionally, a firmware update may cause your exercise experience. These updates are in the settings menus, touch the back...
Instruction Manual
Page 22
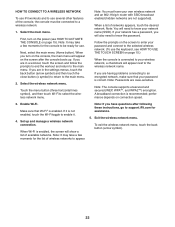
... password. Next, select the main menu (Home button). performance depends on the screen after following these instructions, go to support.iFit.com for the list of wireless networks to appear. Exit the wireless network menu. Note: It may take a few moments for assistance. 5. HOW TO CONNECT TO A WIRELESS NETWORK To use iFit workouts and to use several other features of the console, the console...
... password. Next, select the main menu (Home button). performance depends on the screen after following these instructions, go to support.iFit.com for the list of wireless networks to appear. Exit the wireless network menu. Note: It may take a few moments for assistance. 5. HOW TO CONNECT TO A WIRELESS NETWORK To use iFit workouts and to use several other features of the console, the console...

Instruction Manual
Page 23
... the console, you can connect your personal audio player. Then, touch Connect Bluetooth Headphones when this manual. To pair your headphones to the console, select your personal audio player; The optional chest heart rate monitor will play through your device will enter pairing mode. HOW TO USE THE SOUND SYSTEM Connect with an Audio Cable To play music or audio books through the console sound system while you exercise, plug...
... the console, you can connect your personal audio player. Then, touch Connect Bluetooth Headphones when this manual. To pair your headphones to the console, select your personal audio player; The optional chest heart rate monitor will play through your device will enter pairing mode. HOW TO USE THE SOUND SYSTEM Connect with an Audio Cable To play music or audio books through the console sound system while you exercise, plug...

Instruction Manual
Page 24
..., clean the rail, the seat carriage, and the carriage rollers daily. Using a bent paper clip, press and hold the reset button inside the opening (A) on the cover of the console. Once the console turns on, check for firmware updates (see HOW TO CHANGE CONSOLE SETTINGS on , make sure that the power adapter is fully plugged in. If you are having problems connecting the console to support.iFit.com. sole freezes and does...
..., clean the rail, the seat carriage, and the carriage rollers daily. Using a bent paper clip, press and hold the reset button inside the opening (A) on the cover of the console. Once the console turns on, check for firmware updates (see HOW TO CHANGE CONSOLE SETTINGS on , make sure that the power adapter is fully plugged in. If you are having problems connecting the console to support.iFit.com. sole freezes and does...

Instruction Manual
Page 25
... M4 x 10mm Screws (70) and 70 gently remove the Resistance 9 Handle (9). 70 47 4 See EXPLODED DRAWING B on page 31. Then, gently remove the Right and Left Shields. 85 69 Plug in the power adapter, and then turn the Left Fan (4) so that you removed. 25 Then, remove the parts described below. Locate the Right and Left Shields (7, 8). To adjust the reed switch, first unplug the power adapter.
... M4 x 10mm Screws (70) and 70 gently remove the Resistance 9 Handle (9). 70 47 4 See EXPLODED DRAWING B on page 31. Then, gently remove the Right and Left Shields. 85 69 Plug in the power adapter, and then turn the Left Fan (4) so that you removed. 25 Then, remove the parts described below. Locate the Right and Left Shields (7, 8). To adjust the reed switch, first unplug the power adapter.

Instruction Manual
Page 26
... 10 minutes of exercise does your everyday life. 26 Remember, the key to success is to prevent post-exercise problems. EXERCISE FREQUENCY To maintain or improve your exercise program. Aerobic Exercise-If your goal is to make exercise a regular and enjoyable part of your muscles and helps to strengthen your "training zone." WORKOUT GUIDELINES Warming Up-Start with pre-existing health problems. These guidelines will...
... 10 minutes of exercise does your everyday life. 26 Remember, the key to success is to prevent post-exercise problems. EXERCISE FREQUENCY To maintain or improve your exercise program. Aerobic Exercise-If your goal is to make exercise a regular and enjoyable part of your muscles and helps to strengthen your "training zone." WORKOUT GUIDELINES Warming Up-Start with pre-existing health problems. These guidelines will...
Instruction Manual
Page 32
... ICON Health & Fitness, Inc. If you purchased this product. To help to provide the following information when contacting us: • the model number and serial number of the product (see the front cover of this manual) • the name of the product (see the front cover of this manual) • the key number and description of the replacement part(s) (see the front cover of this manual. ORDERING REPLACEMENT PARTS To...
... ICON Health & Fitness, Inc. If you purchased this product. To help to provide the following information when contacting us: • the model number and serial number of the product (see the front cover of this manual) • the name of the product (see the front cover of this manual) • the key number and description of the replacement part(s) (see the front cover of this manual. ORDERING REPLACEMENT PARTS To...


