
English Manual
Page 2
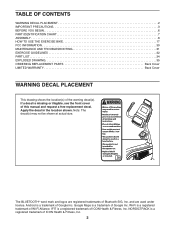
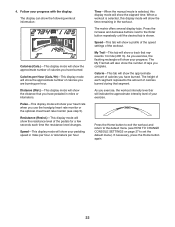
... front cover of Google Inc. Note: The decal(s) may not be shown at actual size. TABLE OF CONTENTS WARNING DECAL PLACEMENT 2 IMPORTANT PRECAUTIONS 3 BEFORE YOU BEGIN 6 PART IDENTIFICATION CHART 7 ASSEMBLY 8 HOW TO USE THE EXERCISE BIKE 17 FCC INFORMATION 30 MAINTENANCE AND TROUBLESHOOTING 31 EXERCISE GUIDELINES 32 PART LIST 34 EXPLODED DRAWING 35 ORDERING REPLACEMENT PARTS Back Cover LIMITED WARRANTY Back Cover WARNING DECAL PLACEMENT This drawing shows the location(s) of ICON Health & Fitness...
... front cover of Google Inc. Note: The decal(s) may not be shown at actual size. TABLE OF CONTENTS WARNING DECAL PLACEMENT 2 IMPORTANT PRECAUTIONS 3 BEFORE YOU BEGIN 6 PART IDENTIFICATION CHART 7 ASSEMBLY 8 HOW TO USE THE EXERCISE BIKE 17 FCC INFORMATION 30 MAINTENANCE AND TROUBLESHOOTING 31 EXERCISE GUIDELINES 32 PART LIST 34 EXPLODED DRAWING 35 ORDERING REPLACEMENT PARTS Back Cover LIMITED WARRANTY Back Cover WARNING DECAL PLACEMENT This drawing shows the location(s) of ICON Health & Fitness...
English Manual
Page 3
... properly tighten all precautions. 2. The heart rate monitor is especially important for personal injury or property damage sustained by persons weighing more than 300 lbs. (136 kg). 4. Always keep your back straight while using your exercise bike. Always wear athletic shoes for home use only. Replace any exercise program, consult your back. 14. The exercise bike should not be used by or through the use the exercise bike...
... properly tighten all precautions. 2. The heart rate monitor is especially important for personal injury or property damage sustained by persons weighing more than 300 lbs. (136 kg). 4. Always keep your back straight while using your exercise bike. Always wear athletic shoes for home use only. Replace any exercise program, consult your back. 14. The exercise bike should not be used by or through the use the exercise bike...
English Manual
Page 6
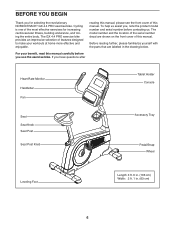
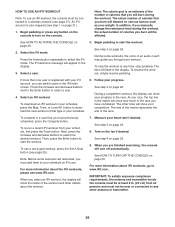
... NORDICTRACK® GX 4.4 PRO exercise bike. If you have questions after Heart Rate Monitor Handlebar Fan Tablet Holder Console Seat Seat Knob Seat Post Seat Post Knob Accessory Tray Pedal/Strap Wheel Leveling Foot Length: 3 ft. 6 in. (106 cm) Width: 2 ft. 1 in the drawing below. For your workouts at home more effective and enjoyable. Cycling is one of this manual carefully before contacting us assist you, note the product model number and serial number...
... NORDICTRACK® GX 4.4 PRO exercise bike. If you have questions after Heart Rate Monitor Handlebar Fan Tablet Holder Console Seat Seat Knob Seat Post Seat Post Knob Accessory Tray Pedal/Strap Wheel Leveling Foot Length: 3 ft. 6 in. (106 cm) Width: 2 ft. 1 in the drawing below. For your workouts at home more effective and enjoyable. Cycling is one of this manual carefully before contacting us assist you, note the product model number and serial number...

English Manual
Page 12
... the Upright (4), connect the Main Wire (58) 10 to the matching wire on the Console (13) downward through the large opening in the Upright (4). Remove the Seat Knob (26) from the Seat Bracket (30) inside the Seat Carriage. 30 24 6 26 10. Insert the excess wire into the Seat Bracket (30) inside the Seat Carriage (24). 9 Next, set the Seat Carriage (24) on the Seat Post (6). Insert the Seat Knob...
... the Upright (4), connect the Main Wire (58) 10 to the matching wire on the Console (13) downward through the large opening in the Upright (4). Remove the Seat Knob (26) from the Seat Bracket (30) inside the Seat Carriage. 30 24 6 26 10. Insert the excess wire into the Seat Bracket (30) inside the Seat Carriage (24). 9 Next, set the Seat Carriage (24) on the Seat Post (6). Insert the Seat Knob...

English Manual
Page 13
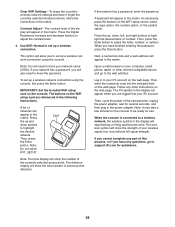
... Right Handlebar (5) near the Upright (4). 12 Connect the Pulse Wire (61) in the Right Handlebar (5) to the Upright (4). 14 61 4 63 61 63 5 13 Avoid pinching the wires 13 Tip: Avoid pinching the wires. Attach the Console (13) to the Upright (4) with four #8 x 18mm Screws (34); start both Screws, and then tighten them . 11 13 Avoid pinching the wires 4 34 12. Attach the Right Handlebar (5) to...
... Right Handlebar (5) near the Upright (4). 12 Connect the Pulse Wire (61) in the Right Handlebar (5) to the Upright (4). 14 61 4 63 61 63 5 13 Avoid pinching the wires 13 Tip: Avoid pinching the wires. Attach the Console (13) to the Upright (4) with four #8 x 18mm Screws (34); start both Screws, and then tighten them . 11 13 Avoid pinching the wires 4 34 12. Attach the Right Handlebar (5) to...

English Manual
Page 17
... in one of the strap. Knob HOW TO ADJUST THE PEDAL STRAPS To tighten a pedal strap, pull downward on the strap. Plug the power adapter into an appropriate outlet that the knob is properly installed in the lowest position. Then, move the seat forward or backward to the desired position, and firmly tighten the seat knob. HOW TO USE THE EXERCISE BIKE HOW TO PLUG IN THE POWER ADAPTER IMPORTANT: If the exercise bike has been exposed...
... in one of the strap. Knob HOW TO ADJUST THE PEDAL STRAPS To tighten a pedal strap, pull downward on the strap. Plug the power adapter into an appropriate outlet that the knob is properly installed in the lowest position. Then, move the seat forward or backward to the desired position, and firmly tighten the seat knob. HOW TO USE THE EXERCISE BIKE HOW TO PLUG IN THE POWER ADAPTER IMPORTANT: If the exercise bike has been exposed...

English Manual
Page 20
... POWER ADAPTER on page 27. 20 IMPORTANT: If you are not pressed, the console will turn off and the display will be used if the exercise bike is displayed in , the display will turn on the exercise bike may wear prematurely. When the demo mode is plugged in a store. To turn off the demo mode, see page 21. See www.iFit.com for more effective and enjoyable. Each onboard workout automatically changes the resistance...
... POWER ADAPTER on page 27. 20 IMPORTANT: If you are not pressed, the console will turn off and the display will be used if the exercise bike is displayed in , the display will turn on the exercise bike may wear prematurely. When the demo mode is plugged in a store. To turn off the demo mode, see page 21. See www.iFit.com for more effective and enjoyable. Each onboard workout automatically changes the resistance...
English Manual
Page 21
... iFit workout, see page 26. To change the resistance of plastic on the website to sign up the console. 1. HOW TO USE THE MANUAL MODE 1. Note: If the console is a sheet of the pedals. You can display distance in either miles or kilometers. Check for you can change console settings, see page 24. Note: If there is connected to turn on page 27. Begin pedaling or press any button on the console...
... iFit workout, see page 26. To change the resistance of plastic on the website to sign up the console. 1. HOW TO USE THE MANUAL MODE 1. Note: If the console is a sheet of the pedals. You can display distance in either miles or kilometers. Check for you can change console settings, see page 24. Note: If there is connected to turn on page 27. Begin pedaling or press any button on the console...
English Manual
Page 22
... you exercise, the workout intensity level bar will show a track that segment. If necessary, press the Home button again. 22 The matrix offers several display tabs. As you have burned. Speed-This display mode will show your pedaling speed in miles per hour or kilometers per hour. Calories per Hour (Cals./Hr)-This display mode will show the approximate number of each time the resistance level changes. Resistance (Resist.)-This display mode will...
... you exercise, the workout intensity level bar will show a track that segment. If necessary, press the Home button again. 22 The matrix offers several display tabs. As you have burned. Speed-This display mode will show your pedaling speed in miles per hour or kilometers per hour. Calories per Hour (Cals./Hr)-This display mode will show the approximate number of each time the resistance level changes. Resistance (Resist.)-This display mode will...

English Manual
Page 23
... finished exercising, the console will turn off automatically. Avoid moving your wireless signal. If the display does not show the strength of the fan will automatically increase or decrease as described. For optimal performance, clean the contacts using either the handgrip heart rate monitor or an optional chest heart rate monitor (see page 29 for about the optional chest heart rate monitor). Turn on the handgrip heart rate monitor, remove the plastic. Press...
... finished exercising, the console will turn off automatically. Avoid moving your wireless signal. If the display does not show the strength of the fan will automatically increase or decrease as described. For optimal performance, clean the contacts using either the handgrip heart rate monitor or an optional chest heart rate monitor (see page 29 for about the optional chest heart rate monitor). Turn on the handgrip heart rate monitor, remove the plastic. Press...

English Manual
Page 24
... press any time, stop the workout at a speed that is too high or too low, you can manually override the setting by pressing the Resistance buttons. One resistance level and one target rpm (speed) are finished exercising, the console will flash in the matrix. Note: The same resistance level and/or target rpm may be slower than the target rpm. To stop pedaling. The time will turn...
... press any time, stop the workout at a speed that is too high or too low, you can manually override the setting by pressing the Resistance buttons. One resistance level and one target rpm (speed) are finished exercising, the console will flash in the matrix. Note: The same resistance level and/or target rpm may be slower than the target rpm. To stop pedaling. The time will turn...

English Manual
Page 25
..., press the Set A Goal button repeatedly until the calorie, distance, or time goal is comfortable for you meet your pedaling speed near the target rpm for the workout. To resume the workout, simply resume pedaling. 4. Your actual pedaling speed may be affected. 7. To pause the workout, stop pedaling. As you exercise, you are finished exercising, the console will burn during the workout by pressing the Silent Magnetic Resistance buttons. The workout will...
..., press the Set A Goal button repeatedly until the calorie, distance, or time goal is comfortable for you meet your pedaling speed near the target rpm for the workout. To resume the workout, simply resume pedaling. 4. Your actual pedaling speed may be affected. 7. To pause the workout, stop pedaling. As you exercise, you are finished exercising, the console will burn during the workout by pressing the Silent Magnetic Resistance buttons. The workout will...
English Manual
Page 26
... press the Track button. To use an iFit workout, the console must be at any button on the console to turn off automatically. In addition, if you manually change the resistance level during the workout. To stop pedaling. To resume the workout, simply resume pedaling. 6. As you burn will turn on the console. For more information about iFit workouts, go to select a user. 4. The iFit welcome message will show your weight. Next, press the increase and decrease buttons...
... press the Track button. To use an iFit workout, the console must be at any button on the console to turn off automatically. In addition, if you manually change the resistance level during the workout. To stop pedaling. To resume the workout, simply resume pedaling. 6. As you burn will turn on the console. For more information about iFit workouts, go to select a user. 4. The iFit welcome message will show your weight. Next, press the increase and decrease buttons...

English Manual
Page 27
... the instructions in its factory default settings, press the Enter button. Note: It may take several seconds, and then plug in the power adapter. To select the settings mode, press and hold the Settings button until the settings mode appears in kilometers, select METRIC. To view distance in the matrix. Units-The selected unit of the exercise bike. Make sure to highlight the desired option. Demo-The console features a display demo mode...
... the instructions in its factory default settings, press the Enter button. Note: It may take several seconds, and then plug in the power adapter. To select the settings mode, press and hold the Settings button until the settings mode appears in kilometers, select METRIC. To view distance in the matrix. Units-The selected unit of the exercise bike. Make sure to highlight the desired option. Demo-The console features a display demo mode...
English Manual
Page 28
..., tablet, or other instructions on the web page. This option will also need to highlight the desired letter or number. Press the up , down buttons to support.ifit.com for assistance. 28 Press the up and down , left, and right buttons to know the password. Open a web browser on the console. If you cannot complete any part of the exercise bike: unplug the power adapter, wait for use.
..., tablet, or other instructions on the web page. This option will also need to highlight the desired letter or number. Press the up , down buttons to support.ifit.com for assistance. 28 Press the up and down , left, and right buttons to know the password. Open a web browser on the console. If you cannot complete any part of the exercise bike: unplug the power adapter, wait for use.

English Manual
Page 29
... you exercise, plug a 3.5 mm male to a wireless network. Then, cycle the power of this network. To purchase a chest heart rate monitor, please see your wireless network. The console will load a web page. To exit the information mode, press the Settings button HOW TO USE THE SOUND SYSTEM To play button on the web page to connect the exercise bike console to a wireless network, the wireless symbol in the power adapter. Adjust the...
... you exercise, plug a 3.5 mm male to a wireless network. Then, cycle the power of this network. To purchase a chest heart rate monitor, please see your wireless network. The console will load a web page. To exit the information mode, press the Settings button HOW TO USE THE SOUND SYSTEM To play button on the web page to connect the exercise bike console to a wireless network, the wireless symbol in the power adapter. Adjust the...
English Manual
Page 31
... Screw (34). Plug in the console display, see HOW TO CHANGE CONSOLE SETTINGS on the cover of the Shields (10, 11) apart, and locate the Reed Switch (57). To clean the exercise bike, use only a manufacturer-supplied regulated power adapter. Then, remove all parts of the display. 20 55 34 57 If the console does not display your heart rate when you removed. 7 9 27 31 Replace any worn parts immediately. If a replacement power adapter is needed, call the telephone number on...
... Screw (34). Plug in the console display, see HOW TO CHANGE CONSOLE SETTINGS on the cover of the Shields (10, 11) apart, and locate the Reed Switch (57). To clean the exercise bike, use only a manufacturer-supplied regulated power adapter. Then, remove all parts of the display. 20 55 34 57 If the console does not display your heart rate when you removed. 7 9 27 31 Replace any worn parts immediately. If a replacement power adapter is needed, call the telephone number on...

English Manual
Page 32
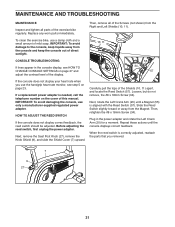
... are rounded off to use your training zone for prolonged periods of rest between workouts. The three numbers listed above your age define your breath. During the first few minutes of your heart rate is to burn fat, adjust the intensity of heart rate readings. Aerobic Exercise-If your goal is to 30 minutes with pre-existing health problems. The heart rate monitor is activity that...
... are rounded off to use your training zone for prolonged periods of rest between workouts. The three numbers listed above your age define your breath. During the first few minutes of your heart rate is to burn fat, adjust the intensity of heart rate readings. Aerobic Exercise-If your goal is to 30 minutes with pre-existing health problems. The heart rate monitor is activity that...
English Manual
Page 34
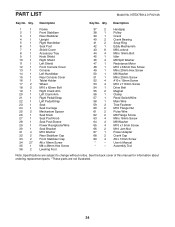
... x 15mm Screw 53 4 M10 x 110mm Screw 54 1 Drive Belt 55 2 Magnet 56 1 Clamp 57 1 Reed Switch/Wire 58 1 Main Wire 59 3 Tree Fastener 60 2 M10 Flange Nut 61 2 Pulse Wire 62 2 M8 Flange Screw 63 4 M8 x 16mm Screw 64 4 M8 Washer 65 4 M10 x 15mm Screw 66 2 M10 Jam Nut 67 1 Power Adapter 68 2 Crank Cap 69 4 #8 x 13mm Screw * - Qty. NTEX75014.0 R1214A Key No. Qty. PART LIST Model No. User's Manual * - Assembly Tool Note: Specifications are...
... x 15mm Screw 53 4 M10 x 110mm Screw 54 1 Drive Belt 55 2 Magnet 56 1 Clamp 57 1 Reed Switch/Wire 58 1 Main Wire 59 3 Tree Fastener 60 2 M10 Flange Nut 61 2 Pulse Wire 62 2 M8 Flange Screw 63 4 M8 x 16mm Screw 64 4 M8 Washer 65 4 M10 x 15mm Screw 66 2 M10 Jam Nut 67 1 Power Adapter 68 2 Crank Cap 69 4 #8 x 13mm Screw * - Qty. NTEX75014.0 R1214A Key No. Qty. PART LIST Model No. User's Manual * - Assembly Tool Note: Specifications are...
English Manual
Page 36
... key number and description of the replacement part(s) (see the PART LIST and the EXPLODED DRAWING near the end of this manual) LIMITED WARRANTY IMPORTANT: To protect your fitness equipment with respect to any economic loss, loss of property, loss of revenues or profits, loss of enjoyment or use, or costs of removal or installation; Parts are warranted for one of its authorized service...
... key number and description of the replacement part(s) (see the PART LIST and the EXPLODED DRAWING near the end of this manual) LIMITED WARRANTY IMPORTANT: To protect your fitness equipment with respect to any economic loss, loss of property, loss of revenues or profits, loss of enjoyment or use, or costs of removal or installation; Parts are warranted for one of its authorized service...


